Showing posts with label HD Media Player. Show all posts

Monday, July 21, 2014

Getting Blu-ray and DVD ISO images for playing back on TV via AC Ryan Player

If you have many Blu-ray/DVD ISO files collections, you may wonder how to play them on TV via AC Ryan Player? Get the solution below to learn how to convert BD/DVD ISO to AC Ryan Player best format here.

Have just bought A.C. Ryan and it is great but I have a fundamental issue which I can't find an answer anywhere. I want to rip my ISO files and stream the converted movie onto the TV for playback via A.C. Ryan player. Don't need to keep the original file size as I have limited storage, but want to get pretty good video quality. Any recommended tool?

AC Ryan Player

A.C. Ryan has been responsible for some of the better networked multimedia players of recent years. It supports every video format in popular use, including not just MOV and MKV but also such rarities as ASF, FLV and RMVB, etc. However, AC Ryan Player will not recognize Blu-ray or DVD ISO files without having to do something.

As far as I know, the best way to get iso images playable on your TV via AC Ryan Player is to convert Blu-ray/DVD ISO to AC Ryan Player friendly MP4 format with a Blu-ray ripping tool. Well, Pavtube BDMagic is such a program with strong capability of rolling off protection and transcoding latest Blu-ray/DVD ISO files to AC Ryan Player supported MP4 format. It's professional but easy to use: 1. load, 2. choose format, 3. convert; it's just as simple as that.

Tutorials: How to transfer Blu-ray/DVD ISO image files to TV for viewing via AC Ryan Player?

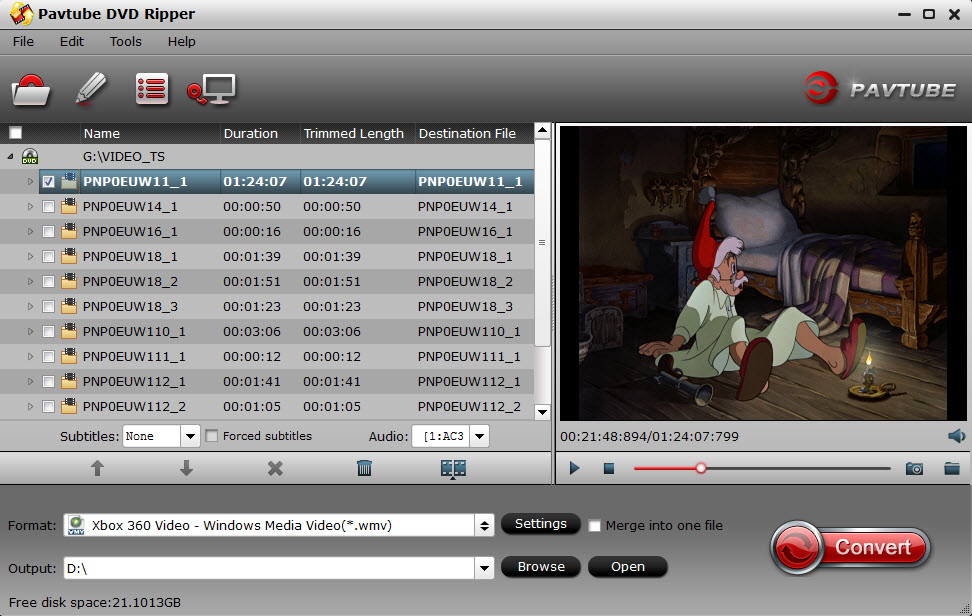
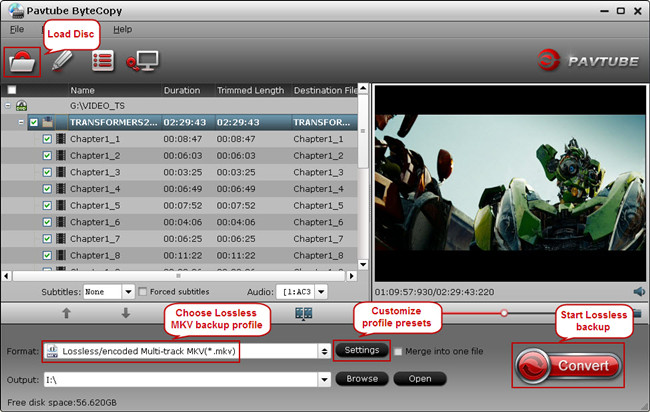
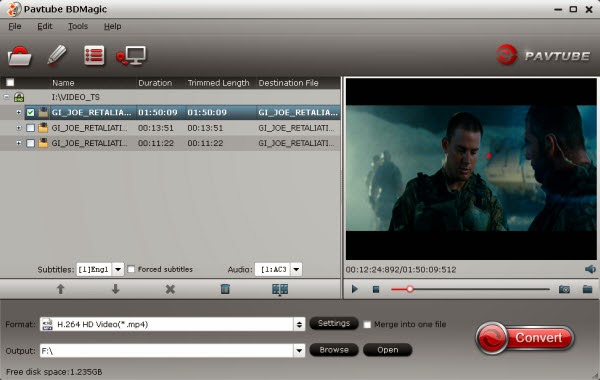
Step 1. Run ISO Converter for AC Ryan Player; load Blu-ray/DVD ISO.

This converter does not only support Blu-ray disc/folder/ISO, but also able to convert DVD disc/folder/ISO/IFO files. click "IFO/ISO" button to browse and import the Blu-ray/DVD ISO file. Your ISO image file would be recognized automatically so there's no need to run virtual drive to mount it any more.


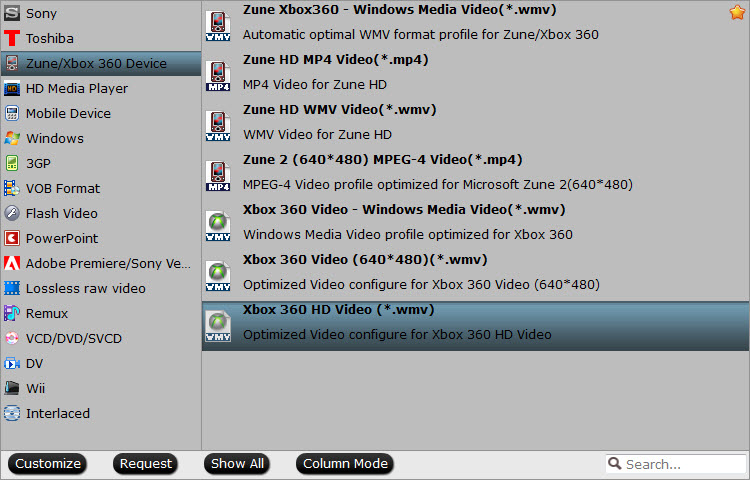
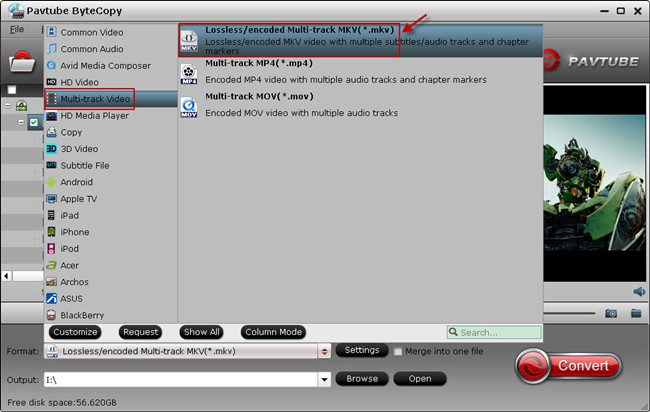
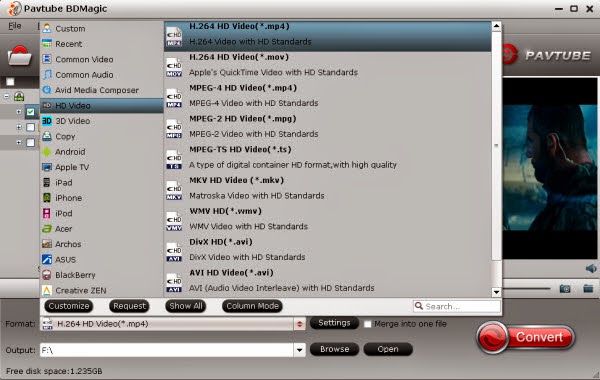
Step 2. Choose format.

Although AC Ryan Player support lots of formats, I still recommend MP4/MKV format as it’s most acceptable by most devices and TV, so that you can watch the converted video on other devices also.

Click “Format” and choose “HD Video > H.264 HD Video(*.mp4)” or "HD Video > MKV HD Video (*.mkv)"as below:


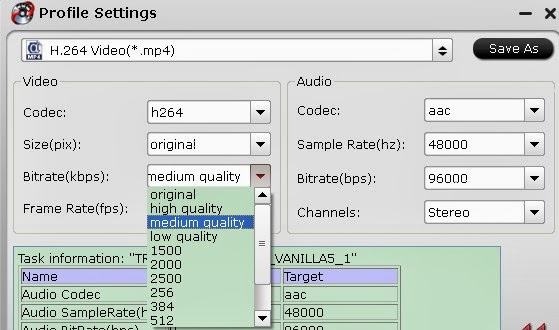
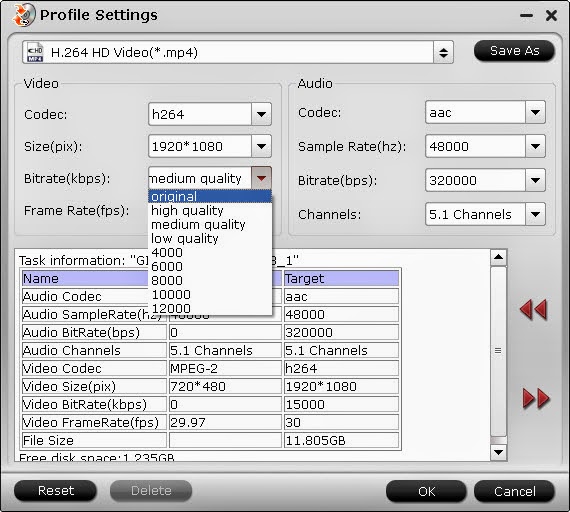
Step 3. Adjust output settings (Optional)

Click “Settings” to change video size, bitrate, frame rate and audio specs. I chose “original” size to playback on TV.


Step 4. Start conversion

Click “Convert” in the main interface to start the BD/DVD ISO to AC Ryan Player conversion (batch conversion supported). After conversion, click “Open” which is below the “Settings” to find the converted video.

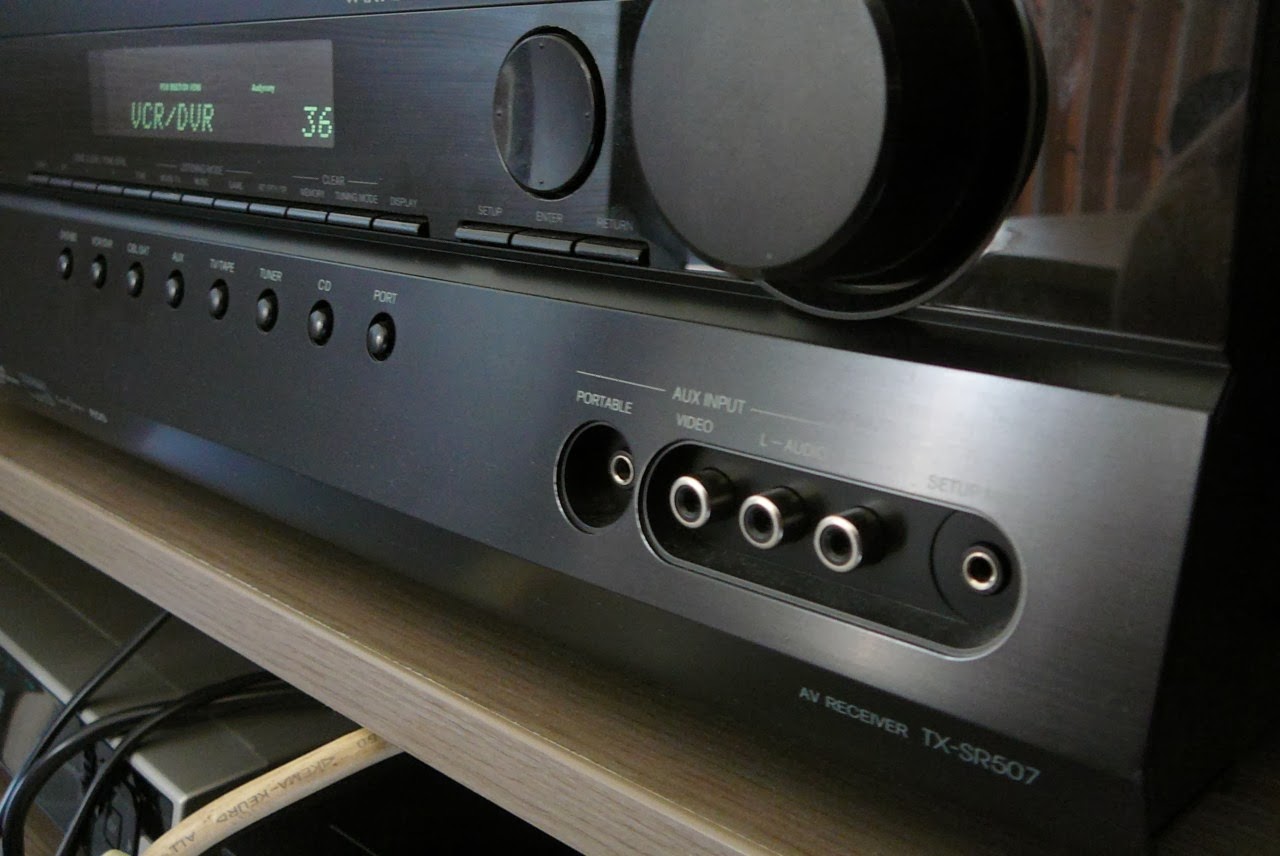
Use a USB drive to transfer the ripped MP4/MKV media file to AC Ryan Player, now just enjoy your Blu-ray/DVD ISO movies on TV! If you are mac users, learn how to backup Blu-ray/DVD to AC Ryan Player on Mac for TV playback here.

Sunday, April 27, 2014

How to Rip DVD to Xbox 360 WMV Fast and Losslessly

Description: This post will give you the easiest solution to rip latest released DVD movies to Xbox 360 for playing without frequently changing your DVD disc.


After reading the latest movie news, I find ‘The Wolf of Wall Street,’ ‘The Great Beauty’ and ‘Ms. 45′ are the Best DVD Releases this Week. But recently I have got a question: Can I watch these new DVD releases on my new Xbox? (As you know, the Xbox 360 is the second Video game console from Microsoft and the first seventh-generation console.) And my friend told me the answer is absolutely yes. And he says that I can use play DVDs on your Xbox 360 console. In fact, every Xbox 360 can play DVD movies right out of the box — with no additional parts necessary. Watching a movie on the Xbox 360 is a straightforward process. The steps are here.

But I find I’m bother to insert the DVD disc every time when planning to watch DVD on Xbox 360. So I need to find an easy way out to save the trouble, that is to rip DVD to Xbox 360 hard drive to enjoy the DVD movies.

After googling, I find Pavtub DVD to Xbox 360 Converter is the best tool for me. Overall, this program can help me extract DVD movies to Xbox 360 playable WMV format fast and losslessly. The Mac version is DVD to Xbox 360 Ripper for Mac. Below is guide for you to learn how to convert DVD to Xbox 360 in an easy way.

P.S.

Now I'm glad to announce that here comes Hailey's 22th birthday, who is a warm and generous girl works for Pavtube Studio.

And Great info! Get a part of Hailey's birthday! You can get DVD Ripper offers~

1. Download our questionnaire and fill the info to get 30% OFF!
2. Share our event to your friends to get 40% OFF~
3. Participate Hailey's Day and get 50% off by sharing your photo with "I Love Pavtube"!

Pls pay attention to Hailey's Birthday special page, and contact customer service to get welfare Only at Apirl 29, 2014! Never miss!!!

Step 1: Run Pavtube DVD Ripper, and load DVD files to it. You can click “DVD ROM” to load movie from DVD drive or “ISO/IFO” DVD ISO file.


Step 2: Select output format for Xbox 360. Click on the drop-down list at the opposite side of “Format”, and then choose “Zune/Xbox 360 Device > “Xbox 360 HD Video(*.wmv)” format. The format is designed for users that wanna get HD videos when streaming DVD rips to Xbox 360.


Tip: This Xbox 360 DVD Ripper let users control/customize output file quality. To improve video quality, simply click “Settings” and set video bitrate up.

Step 3: Start ripping DVD to WMV video for Xbox 360 streaming.

Click “Convert” button to rip DVD to Xbox 360 WMV format for syncing, once the ripping task is finished by Pavtube DVD to Xbox 360 Converter, you can click “Open” button at the bottom of the main interface to get the output WMV file.

Now you can copy this ripped DVD movies to your Xbox 360 hard drive or use the MCE to steam them to Xbox via your home network to watch DVD on Xbox.

More related:

Monday, April 7, 2014

Sync video media (dvd, bluray, other formats) to iTunes for hosting from media server

Summary: Do you want to sync video media (dvd, bluray, other formats) to iTunes for hosting from media server? This article mainly introduces the easy solution to all kinds of contents onto iTunes on Win/Mac.

iTunes proviedes a media library for iOS devices. Before streaming or syncing contents from iTunes, you need to add your music, video, and other items to create your iTunes library. However, iTunes only supports limited video formats. So I want to convert my video media (dvd, bluray, other formats) to be compatible with itunes for hosting from my media server and looking for a video tool to help me.

After searching, I meet this Pavtube Video Converter Ultimate which is recommended by many online web forum reviews. It can help me to rip my Blu-ray/DVD movies and convert my videos to all popular video formats for watching. Besides, the Video editing ability has pushed me, the built-in video editor allows me to trim, crop, rotate video, add watermarks, etc. to get the very part and effect I want. Once I have tried DVDFab, but I have to say i view Pavtube software as a far greater value than DVD Fab.

If you want to convert video files on Mac, try the equivalent Mac version - Pavtube iMedia Converter for Mac.

Now let's go to learn how to convert video media (dvd, bluray, other formats) to iTunes supported videos for hosting from my media server.

Step 1. Run the Pavtube Video Converter Ultimate, drag and drop source video to the program.


Step 2. Click on “Format” bar, and Choose iTunes compatible format for hosting.

Choose the iTunes supported formats in the "Format" dropdown list. You can go to "Common Video" or "HD Video" options to find what you like. I think MP4 format is better for iTunes.


Tips: For some advances users, you can go to adjust video and audio parameters like bitrate, resolution, channels, etc. Click "Settings" button you can go to check and change them as you like.

Step 3. Press on “Convert” to start encoding your media contents to iTunes compatible video.

Step 4. When conversion completes, press on “Open” to locate converted videos. Drag and drop these movies to iTunes.

Now open your iTunes and then sync the converted MP4 to iTunes library for convenient playback via media server.

Transfer videos to your iTunes library:

Drag a file or folder from the desktop to the iTunes window. If you add a folder, all the files it contains are added to your library.

In iTunes, choose File > Add to Library, locate a file or folder, and click Open.


In this way, you can enjoy your favorite video media (dvd, bluray, other formats) via media server with ease.

You may also:

Convert Blu-ray movies to iTunes 1080p video
Solve the problem "Can't Add MP4 to iTunes"
Ripping Blu-Ray on iMac and Stream 1080p on Apple TV 3 with Dolby 5.1 Sound 
Play DVD/Blu-ray on PC With Multiple Audio Tracks/Subtitles 
How to Watch Instructional DVDs on iPhone/iPad/iPod? 

Wednesday, March 26, 2014

Backup your Blu-ray/DVD video to Media Player Classic for watching in full screen

Description: This article will give you the solution to backup your Blu-ray/DVD video to watching on Media Player Classic for watching in full screen with unlocking the aspect ration.

I'm a Blu-ray and DVD fan and collector,now I wanna share my experience here for viewing BD/DVD on MPC Player. As I like watching movies, so I need to backup my precious discs then watch most of my Blu ray films in full screen. Then I'm looking for a way converting my dvd/bluray movies to a file format that unlocks the aspect ration so that I can use Media Player Classic to watch them in full screen glory. And I'm wondering if any converter can do this.


To transfer Blu-ray/DVD to play on my Media Player Classic, I think the first step is to remove commercial Blu-ray discs and DVDs protection from film studio, and then do the conversion. After googling several review sites, I have found this Pavtube BDMagic which does a great job in quick decrypting the protected discs within a few clicks.

Not so much the feature that made me choose over other brand but I read reviews to see which one got better ratings. However, the feature that I stated in number one was paramount. Took some experimenting to find the best format for my needs, I find MKV HD is the best format for outputting. In this way, I can freely watch my favorite on my MPC Player in full screen. Also, I can convert Blu-ray/DVD onto my two iPhone and Samsung Galaxy for watching films with it.


You are free to try free trial version (Pavtube BDMagic for Mac is for Mac users).

Now let me show you how to backup Blu-ray/DVD to Media Player Classic for watching in full screen with unlocking the aspect ration.

Note: A blu-ray drive is needed before Blu-ray conversion.

1. Import Blu-ray/DVD to Pavtube BDMagic.

Click "Load file" icon on the top left to load the Blu-ray/DVD disc.


2. Choose MKV HD format for playing on Media Player Classic.

Under "Format" menu, there are lots of video formats. Go to find "HD Video" option and choose "MKV HD Video (*.mkv)", I find it is the best format for playing in Media Player Classic after severial trials.

Tips: If you want to convert Blu-ray to other video formats or portable devices, just choose the video format you need or select portable devices in the dropdown list.

3. Adjust video specs or change aspect ratio (Optional)

If you are not satisfied with default specs, then click “Settings” to enter Profiles Settings windows; here you can customize video frame rate, bitrate,size and other settings freely.

Note: If you want to trim, crop, editaudio/subtitles or adjust aspect ratio, click the pencil-like icon and switchto “Crop” tab. Choose Advanced mode, lock the “Keep Ratio” and you can free change aspect ratio. Usually it will be set to “Original”, you can change it to 16:9 when playing on TV, or select other options.

4. Start conversion.

Click big "Convert" button to start conversion. It won't take much time for conversion and then you will get MKV HD once completed. Hit "Open" button you will go to location of generated files.

Then go to fully enjoy your favorite Blu-ray/DVD whenever you wanna on Media Player Classic in full screen glory.

Main features in BDMagic:

* Full Disc Copy can 1:1 backup the whole Blu-ray/DVD disc with original structure including chapter markers.

* Directly Copy will backup 100% intact Blu-ray main movie with all the multiple tracks excluding menu.

* Rip and Convert latest Blu-ray/DVD to various video formats for playback or editing, edit the video before conversion including trim, crop, effect, etc, add *sst and *ass subtitle into video part and so on.

Read more:

Ripping my DVDs to MP4s for viewing on my Android
Top Blu-ray Ripper- Convert Blu-ray to MP4 format
Rip my Blu-rays to Plex Media Server for streaming

Friday, March 7, 2014

Stream Blu-ray TrueHD and DTS-HD 7.1 audio from HTPC

The following post is reproduced from Bitstreaming Dolby TrueHD and DTS-HD with the Intel Core i3, Published on Do it Yourself HTPC Blog, written by ddewaele, to whom I would like to say THANK YOU.

“When the Intel Core i3 platform was announced, it was hailed as being the holy grail for HTCP enthusiasts. The reason being that the Core i3 chip (that combines both CPU and GPU onto one physical chip) offers more then the current Atom based platforms have to offer. Not only is the Core i3 platform a lot more powerful compared to the Intel Atom platform, is also maintains a fairly low power consumption. Obviously, it cannot compete with the power consumption of the Atom. However, combine the Atom with an Ion chipset and a blu-ray player, and the difference becomes a lot smaller.

One of the biggest strengths of the Core i3, and the H55 chipset is that it also supports HDMI Audio Pass Through for Native Dolby TrueHD & DTS-HD Master Audiostreaming.

The primary goal off this writing was to get the Dolby TrueHD & DTS-HD Master Audio up & running. And guess what …. it really worked !

I hooked up the Corei3 build to my Onkyo TX SR-507 receiver via HDMI


The receiver has support for HD audio formats such as Dolby TrueHD and DTS-HD Master Audio making it an ideal combo for a high definition audio experience.


Streaming DTS-HD/Dolby TrueHD from HTPC

Most Blu-ray discs contain either a DTS HD Master Audio, or a Dolby True HD soundtrack They’re basically the successors of the DTS 5.1 and Dolby Digital 5.1 coded. Most HTPC boxes support DTS 5.1 and Dolby Digitial 5.1 without much effort. Most Atom/Ion combos for example, when hooked up to a receiver through HDMI, will have no problem sending the DTS / Dolby stream to the receiver. With DTS HD Master Audio, or Dolby True HD, it’s a different story.

If you’re not all that familiar with audio formats, try to think of DTS or Dolby as a compressed format (much like a ZIP file). The audio is encoded or compressed (to consume less space on a Blu-ray disc). That encoded / compressed audio is sent to the receiver, and it’s the receivers responsibility to decode the audio stream. Because the receiver is receiving the encoded / compressed audio from the player (your HTCP), it notices this and turns on the DTS or Dolby symbol on your receiver display.

There are basically 2 types of audio

uncompressed audio = LPCM
lossless compressed = DTS HD / DD TrueHD

So bitstreaming means sending undecoded True HD or DTS HD Bitstream over a digital link (minimum HDMI 1.3) to an external device (receiver / amplifier). The amplifier with True HD and DTS HD decoding capabilities can then decode that stream, rather than the software on the HTPC.

An alternative to bitstreaming is software decoding. Here, a piece is software (ex: ffdshow) is responsible for decoding the True HD / DTS HD bitstream. It then goes on to send multi channel linear PCM to the receiver (MCH PMC). Here, your receiver is unaware that it’s receiving either Dolby True HD or DTS HD, so there will be no indicators on the receiver telling you that it is actually playing Dolby True HD / DTS HD. The receiver just gets the multi channel linear PCM and outputs that.

Cards that support bitstreaming :

Asus Xonar 1.3 HDMI
Auzen X-Fi HomeTheater HD.
ATI 57* graphic card series
The Core i3 HTCP build

Today I got my gigabyte motherboard replacement (the mini-ITX version I had originally ordered), so I could finally start building my first Core i3 based HTCP. The core components of the build are the GigaByte H55N-USB3 motherboard, and the Intel Core i3 530 CPU.


Everything was assembled in my Lian Li PC-Q07 mini-ITX case.


First some general figures on the Core i3 system:

Idle

CPU32/38 degrees

Intel stock cooler1200rpm (audible – but very quiet)

Idle (windows desktop)50W

Load (Prime95

CPU67/70 degrees

Intel stock cooler2500rpm (audible – noisy)

Idle (windows desktop)90W

I installed Windows 7 on it (I’ll write up my experiences with Linux in a future story). After installing all the drivers from the Gigabyte CD (+ updates received via the internet), the system booted and the Intel TV Wizard allowed me to calibrate the screen on my Sony LCD TV.


This allows you to calibrate the screen, as initially, there were black borders around the screen, so it needed to be stretched a little.


After that, it was time to configure my audio settings.

For some reason, the Realtek Digital Output was selected as the default playback device. I had to manually select the Intel(R) Display Audio as the default playback device in order to get sound up & running.

The sound settings in control pannel allow you to configure the playback device by selecting your speaker set (in my case, 5.1 speaker setup).
It also allows you to test the speaker setup by emitting a sound through each individual speaker.

Once this was done, the sound was up & running in both the windows environment, and my other media player software (XBMC, TotalMedia Theatre3,….)


The Intel Display Audio device supports all the major high definition audio formats such as :

DTS Audio
Dolby Digital Plus
DTS-HD
Dolbu TrueHD
Dolby Digital

I supports up to 8 channels.

Obviously, the DTS-HD and Dolby TrueHD is the main interest for this topic.Test setupSoftware required for the tests

As the goal is to bitstream some Dolby TrueHD and DTS-HD Master Audio to the receiver, we’ll be needing some software to do so.

I’ve selected a commercial player (required for Blu-ray disc playback), and an open-source video player for HD media formats (H264 encoded video in a mkv container).

TotalMedia Theatre 3 Platinum. (trial version or full version)

Blu-ray movie player
Homepage : http://www.arcsoft.com/estore/software_title.asp?ProductCode=TMT3P

Media Player Classic – HomeCinema v1.4.2499.0 (latest version at the time of writing)

Free audio and video player for Windows.
Homepage : http://mpc-hc.sourceforge.net/

ffdshow tryouts revision 3556

DirectShow and Video for Windows codec with support for a wide range of audio and video formats, such as Xvid, DivX, and H.264.
Homepage : http://ffdshow-tryout.sourceforge.net/index.php
The latest stable beta is rev3154 (released on 20091209).
For these tests however, you’ll be needing rev3556 (built on 20100902)
Media required for the test

Obviously, if we want to test we also need some files containing high definition audio.Demo World contains a large number of Dolby / DTS trailers, some of them Dolby True HD and DTS-HD Master Audio.

There’s a lot of talk on the internet regarding the playback of these high definition audio codecs. Some say that you can only bit-stream them to your receiver when played from an original Blu-ray disc. We’ll soon find out….

I’ve downloaded 2 media files from Demo World that we’ll be using in the test :

Terminator 2 (Lossless) : DTS-HD MA 5.1
Bit Harvest (Lossless) : Dolby TrueHD 7.1
Inspecting the media files

When dealing with media files, it’s always very interesting to know what kind of video and audio tracks are included. Media Player Classic Home Cinema allows you to view the properties of a media file by either

right-clicking in the video screen and clicking properties
using the File menu – Properties
SHIFT – F10

Terminator 2 (Lossless) : DTS-HD MA 5.1
Video: WVC1 1920×1080 29.97fps [Video - VC-1, 1920x1080, 29.970 fps (1011,fd,00)]
Audio: DTS 48000Hz 6ch 1509kbps [Audio - DTS-HD Master Audio, 48.0 kHz, 6 chn, 1509.8 kbit/s (1100,fd,00)]
Subtitle [No subtitles]

Bit Harvest (Lossless) : Dolby TrueHD 7.1
Video: MPEG4 Video (H264) 1920×1080 23.98fps [Video - AVC (H.264), High Profile, Level 4.1, 1920x1080, 23.976 fps (1011,e0,00)]
Audio: Dolby AC3 48000Hz 6ch 640kbps [Audio - Dolby TrueHD, 48.0 kHz, 6 chn, 640.0 kbit/s (1100,fd,00)]
Subtitle [No subtitles]Test #1 : Playing a Blu-ray disc

The first test I did was playing a Blu-ray disc using TotalMedia Theatre 3 Platinum. As you can see, both the Dolby True HD and DTS-HD Master Audio lights started blinking on my Onkyo Receiver.


Test #2 : Playing a media file using TotalMedia Theatre.

We played the media files (m2ts) using TotalMedia Theatre :


The Dolby TrueHD movie was also bitstreamed correctly to the receiver.


Test #3 : Playing the m2ts media file using Media Player Classic

ArcSoft TotalMedia Theatre is a great product, but it comes at a price. Most HTPC enthousiast use free players like Media Player Classic Home Cinema (MPC-HC), VLC or XBMC. Would it be possible to bitstream the HD Audio using these free players as well ? Lets find out….

When playing media files using Media Player Classic, you’lI get this on the receiver :


Media Player has a DTS / AC3 Decoder. By default, it decodes 16 bit PCM as stereo to the speakers.


Be sure to change this to your 5.1 or 7.1 configuration in order to get surround sound instead of stereo.


We’re going to disable the DTS/AC3 decoder by adding an external filter. We’ll select the ffdshow audio decoder. (Options – Filters – External Filters – Add Filter)


When we now play the media file, the ffdshow audio decoder will be used (instead of the built-in DTS/AC3 Decoder)


During my first attempt with ffdshow, I still wasn’t able to get the DTS-HD or Dolby TrueHD bitstreaming up & running. As you can see from the ffdshow audio decoder configuratio (output section), only AC3 and DTS were mentioned.


I was using the latest stable beta (rev3154).


When using the latest revision (at the time of writing , rev 3556), things started to change.


In the output section, I now had the option of selecting Dolby TrueHD and DTS HD. And from that moment on, Dolby TrueHD and DTS HD was up & running using Media Player Classic HomeCinema.


Related Apps:

More Blu-ray Disc Media Players- PowerDVD, WinDVD, etc

Blu-ray Disc Rippers (for ripping Blu-ray to HTPC with original HD audio) – Pavtube Blu-ray Ripper (for Windows/Mac)

Read more:

Tuesday, December 24, 2013

Easily convert DVD to PS3 with Dolby Digital 5.1 channels audio

This post will give you the easiest solution to rip DVD movies to PS3 for playing on HDTV or Home Theatre, especially for users who want to keep the 5.1 audio track.

To start, just have a look at a question asked by a friend of mine:
I am ripping material off my standard DVDs to an MP4 format to play back on my sony playstation. Is there a way I could save 5.1 audio for playing on my PS3?

Additional Tips:

The following types of files can be played by PS3 under (Video)

  • - MPEG-4 SP (AAC LC)
  • - H.264/MPEG-4 AVC Main Profile (AAC LC)
  • - MPEG-1 (MPEG Audio Layer 2)
  • - MPEG-2 PS (MPEG2 Audio Layer 2, AAC LC, AC3(Dolby Digital), LPCM)
  • - MPEG-2 TS (MPEG2 Audio Layer 2)
  • - AVI
  • - Motion JPEG (Linear PCM)
  • - AVCHD (.m2ts)
To view your DVD movie on your PS3, Pavtube DVDAid (30% off now) is the best tool for you. Overall, this program can help you extract DVD movies to PS3 playable format, and it has PS3 profile preset with remaining AC3 5.1 audio for output. The Mac version is Pavtube DVDAid for Mac. Below is guide for you to learn how to convert DVD to PS3 with 5.1 channel. (Read Review)

Step 1: Run Pavtube DVD to PS3 Converter, and load DVD files to it. You can click "DVD ROM" to load movie from DVD drive or "ISO/IFO" DVD ISO file.

 DVD to PS3

Step 2: Select output format for PS3. Click on the drop-down list at the opposite side of "Format", and then choose "PSP/PS3" > "PS3 Video AC3 5.1 (*.avi)" format. The format is designed for users that wanna get Dolby Digital 5.1 channels audio when streaming DVD rips to PS3.

 DVD to PS3 with mp4

Tip: This PS3 DVDAid let users control/customize output file quality. To improve video quality, simply click "Settings" and set video bitrate up.

 DVD to PS3 settings

Step 3: Start ripping DVD to AVI video for PS3 streaming.

Click "Convert" button to rip DVD to PS3, once the ripping task is finished by Pavtube DVD to PS3 Converter, you can click "Open" button at the bottom of the main interface to get the output AVI file for streaming to PS3.

You can use a PC with PS3 Media Server, TVersity, Windows Media Player 11, Vuse, Nero MediaHome or Mezzmo configured. (Learn how to set up Windows PC as a DLNA Media Server for PS3 streaming.)

More related:

From: http://bestvideosolution.blogspot.com/2013/12/rip-dvd-to-ps3-with-5.1-audio.html  

Monday, December 23, 2013

Enjoy your favorite DVD movies on your TV for a better enjoyment

With a good DVD to TV converter, you can convert DVD to TV and then you can play the DVD videos on your TV for a better enjoyment without restriction.

Suppose that if you have a great DVD video and you want to copy it to watch on your TV, but the DVD videos can not allow you play on TV directly. The following article will help you to solve the problem and give an easy way to watch DVD movies on TV.


“I am a medical device designer and I really don’t have a hobby, other than my movie collection. I enjoy watching DVD movies on my TV without any editing. I originally saw the reviews of Pavtube Video Converter Ultimate on Giveaway of the Day. I have used Aiseesoft Total Video Converter Platinum, but I choose to purchase the converter because of the price, good reviews, especially the conversion speed and ease of using. The only one tiny complaint is about the AMD and CUDA, I am not sure which one I need for my computer to speed up the ripping and conversion process. Anyway, the software does an excellent job of converting and I really like it very much!”

If you want to convert DVD to TV as the customer, the only thing you need to is find a good DVD to TV converter. However, when searching on the Internet for the DVD to TV converter, you can find a lot, but not all of them can really help you copy and convert DVD to TV, you need to polish your eyes to distinguish which one is the best one that you need.

Among so many DVD to TV converter, I think that Pavtube Video Converter Ultimate is you best choice. More than a simply converter, this apps is an all-in-one solution to backup Blu-ray/DVD movies, convert disc content and transcode common videos to any formats you want. (Get Mac version here: Pavtube iMedia Converter for Mac)

See Also:
How To Make your DVD be Compatible with your TV
  
Follow the steps mentioned below:

Step 1: Launch the Pavtube DVD Movie Converter for TV, and click the “Load File” button to load your DVD movies to the program.

dvd to tv converter

Step 2: Click the “Format” bar to choose a suitable output format like MP4 that your TV can support.

convert dvd to h.264 mp4 for tv

Tips:

1. If you have Nvidia CUDA/ATI AMD ready graphics card, you can have GPU encoding. Check the status of the CUDA/AMD button on the main interface and you’ll learn if CUDA/AMD encoding is in use which will help users accelerate conversion speed.

cuda dvd ripper

2. If you want to watch the DVD movies on your TV with high quality, Click “Setting” and adjust the bitrate. Remember, the size of your output file mainly depends on the bitrate, which means the higher bitrate the bigger file size you will get. You can also set other profile like video frame rate, audio channels .etc.


Step 3: Back to the main interface, and hit the big “Convert” button on the bottom right corner to start the conversion. You can do some housework during the conversion, and then you can enjoy your favorite DVD movies on your TV for a better enjoyment.

Articles you may want to read:

Friday, December 20, 2013

Lossless backup/encode BBD 1080i VC-1 Blu-Ray to MKV for NAS

Description: A detailed guide to show how to lossless backup VC-1 BBD or encode them to H.264 MKV, so that you can preserve them on NAS or playback on HD media player/home theatre for sharing with family&friends.

Here is a  

Q: “Usually I backup DVDs with DVDFab. But recently I got some VC-1 format Blu-rays and wish to back up them in H.264 for playback on home theatre. I have a BIG file server(NAS). So the file size is not an issue. So is there any tool well support VC-1 Blu-rays and backup them without quality loss? Thanks!”

It’s a great idea to backup Blu-ray collections to H.264 MKV for a long time saving without scratches. For people who have a large NAS server, video quality should be the most important thing. Follow this guide to learn how to lossless backup/encode VC-1 blu-rays to MKV for playback on computer and home theatre.

What is VC-1?

VC-1 is an evolution of the conventional DCT-based video codec design. Both HD DVD and Blu-ray Disc have adopted VC-1 as a video standard, meaning their video playback devices will be capable of decoding and playing video-content compressed using VC-1. Blu-ray players like XBMC Frodo have problems with VC-1 Blu-rays; so we have to try another way to backup these Blu-rays.

Although there’re many programs supporting Blu-ray ripping, many of them do not support converting VC-1 standard Blu-rays. For people who want to backup VC-1 Blu-rays like me, you are suggested to try this Pavtube ByteCopy(Mac Version).

Pavtube ByteCopy is a professional Lossless Blu-ray backup tool which supports normal commercial Blu-rays including those in VC-1 standard. With this program, we can decrypt Blu-rays and lossless backup Blu-rays to MKV format, or  transcode it to compressed H.264 MKV with desires audio–tracks.

Share this page on Facebook to get 20% off any Pavtube programs.

More Pavtube specials on Christmas can be found here: http://www.pavtube.com/2013-christmas-specials.html

How to lossless backup/encode VC-1 Blu-rays to MKV on PC/Mac?

Part 1. Run this ByteCopy; load discs

Click the top left icon to load Blu-ray/DVD disc, Blu-ray folder/ISO, or DVD folder/IFO/ISO image files.

Pavtube ByteCopy will detect the main title and check it by default.


Part 2. Choose lossless/encode MKV format

Click “Format” drop-down list and choose “Multi-track Video>Lossless/encoded Multi-track MKV(*.mkv)”.


Part 3. Adjust target settings

This preset includes two output formats: lossless and encoded MKV. Let’s click the “Settings” besides “Format” to choose wanted format.

See these screenshots:

1. Switch to “Video” tab; check the “Encode” to output compressed H.264 MKV; otherwise you can get lossless MKV files.

2. Switch to “Audio” tab; select wanted audio tracks.

Moreover, users can see all the source/target video specs including AC-1, AC3(audio codec), kbps(bitrate), etc. in this window. So we can easily check and adjust the input/output video settings immediately before conversion.

Part 4. Start Lossless Conversion

Back to the main interface; hit the big red “Convert” to star converting VC-1 Blu-rays to lossless/encoded MKV files. After the conversion, you can hit “Open” or “Open output folder” to quick locate the converted video; now you can playback them on computer or stream to HD media player to share with family and friends.

Related Guides:

Thursday, December 19, 2013

Quickly Backup/Stream Blu-ray to Plex Media Server for playing on HDTV or portable devices

Summary: This article offers a brief instruction about how to get Blu-ray movie disc free on Plex Media Server to play on HDTV, iPod touch, Samsung Galaxy S4, HTC One X+, etc. portable devices.

Here I would like to introduce Plex Media Server – a solution for your local and online media, which seamlessly connects your Plex clients. Well you can watch movies with the client – Plex Media Center on Windows & Mac, and more importantly, on iPad, iPhone and Android devices with the paid app.

This time, I own a plex mediaserver at home and need content to watch, I have tons of Blu-ray movies and wanted a good program to rip them with. I tried AnyDvD which is supposed to be a faster ripper and it was. 

At last, I found Pavtube Blu-ray to Plex Converter which aims to solve this problem by giving us the ability to store our purchased physical Blu-ray and DVD discs or downloaded media to local computer, hard drive then stream over a home network for Plex Media Server and ipod touch, Samsung Galaxy s2, HTC one X+ playback. It's professional in ripping and converting Blu-ray/DVD discs, Blu-ray/DVD ISO image, Blu-ray/DVD copies and more. It will help you backup your Blu-ray disk and save the time looking for them from the cardboard with ease. The Mac version is Blu-ray to Plex Converter for Mac

I read tests and tons of reviews give this program as No. 1 Blu-Ripper 2013. Well I mostly use it to transcode blu-ray to mkv because it supports good sound options and most devices support the format. As for the device I use is plex media server (PMS) and basicly any device (like my wiiu, htc onex, samsung gs2, 2 computers, xbox 360) that supports DLNA can play converted mkv video from the pms.

Read More: Top 5 Blu-ray Ripper Software Review | Top Blu-ray Ripper for Mac Review 

Hot News! the two programs are 30% off on Christmas Special Offer 2013. Hurry to get them now!

Below is a simple guide about how to convert/ backup your Blu-rays to Plex Media Server.

First of all, you need to download and install the Best Blu-ray Ripper for Plex Media Server. Then, just follow the steps to operate it. 

Step 1: Insert your Blu-ray disc into your BD drive, run the Pavtube Blu-ray Ripper for Mac and click "BD/DVD disc" icon to load movie from DVD and Blu-ray source(Disc, folder, ISO). You can also click "Add Video" to load video files like MTS/M2TS, MKV, VOB, MOV, TOD, TiVo, etc. 

Blu-ray to Plex Media Server

Step 2: Click the "Format" option, and choose HD Video > MKV HD Video(*.mkv) as output format. You can also select H.264 HD Video (*.mp4) for Plex Media Server.

Blu-ray to Plex Media Server

Tip: 

If you like, you can click "Settings" to change the video encoder, resolution, frame rate, etc. as you wish. Keep in mind the file size and video quality is based more on bitrate than resolution which means bitrate higher results in big file size, and lower visible quality loss, and vice versa. 

Step 3: Click the convert button under the preview window, and the Blu-ray ripper will start the conversion from Blu-ray DVD movies to MKV for Plex Media Server on Windows/Mac. 

After conversion, you can stream Blu-ray/DVD movies through Plex Media Server to HDTV or ipod touch, Samsung Galaxy s2, HTC one X+, or other DLNA-compliant devices. Now watching blu-ray movies on portable devices becomes easy and I can really lie back, relax and enjoy my favorite blu-ray movies. 

Related posts:

Monday, August 26, 2013

Can WD TV playback Blu-ray? Rip Blu-ray to MKV with AC3 5.1/DTS 5.1 audio at first

Do you want to play Blu-ray on WD TV HD Media Player? Do you wan to choose multiple audio tracks or channels for output? Convert Blu-ray to lossless MKV with AC3 5.1/DTS 5.1 audio at first. Here you will find an easy to do it.

It is known that WD TV is a customer device produced by Western Digital and it is good at playing high-definition video, standard video and most common video and audio formats. However, the limitation is that it cannot play Blu-ray disc because of lacking Blu-ray drive. If you want to enjoy Blu-ray movies with WD TV HD Media Player, the best way is to backup Blu-ray to digital version. As MKV is an open source container format, which can hold unlimited number of video, audio, picture or subtitle tracks in one file, we can choose to backup/convert Blu-ray to lossless MKV with with AC3 5.1/DTS 5.1 audio, which is supported by WD TV player. 

In this case, a powerful Blu-ray to MKV Ripper is necessary. It can help you to retain all multiple audio and subtitle tracks in MKV files. However, Some WD TV users has difficulty in playing MKV files with DTS audio because some WD TV player can not support DTS sound, like WD TV Mini Media Player. Don’t worry, Pavtube ByteCopy support to select audio codec for every audio tracks in MKV. You can choose to remove unnecessary DTS audio or convert DTS to AC3codec for all WD TV box can decode AC3 5.1.

Free download and install it:
How to convert Blu-ray to lossless MKV with AC3 5.1/DTS 5.1 audio for WD TV Live media player?
  
1. Load Blu-ray source.

First of all, insert your Blu-ray to Blu-ray drive and keep networked. Now it’s time to import Blu-ray into the software after launching it.

Click “Load files” icon to choose Blu-ray source for loading.


2. Choose output Multi-track MKV.

In the dropdown list of “Format” menu, you can find several MKV options for output. Here we recommend “Lossless/encoded Multi-track MKV (* mkv)” under “Multi-track Video” catalogue. Because it will save multiple video, audio and subtitle tracks form original Blu-ray in output MKV and you won’t suffer any quality loss.


3. Select audio codec for output

Click “Settings” button on the main interface; you are brought to Multi-task Settings. Here detailed parameters of multiple audio and subtitle tracks are listed and you can change any of them at will.

In default system setting, every track is checked for lossless MKV output. If you want to remove one of them, just uncheck it from the list. Check “Encode” option, you can change audio parameters like codec, channels according to your needs. In this way, if you don’t like DTS audio, you can choose to remove it or convert to AC3 here.


Note: If you change audio parameters under “Encode” option, you will get a encoded multi-track MKV file, not lossless multi-track MKV. Recoding Blu-ray to MKV will take a little more time for conversion than lossless output.

4. Backup Blu-ray to lossless MKV with AC3 5.1/DTS 5.1 audio.

When everything is ready, you can click “Convert” button to start Blu-ray to MKV conversion. Once finished, go to “Open” the generated multitracks MKV.

Now it is time to enjoy your favorite Blu-ray movies with WD TV player!

Learn more about ByteCopy guides:
Amazing news! We have various Money Saving Software Bundles, which will provide big special sale on much software bundled with ByteCopy, like ByteCopy + Video Converter Ultimate, ByteCopy+DVD Creator, etc.

ByteCopy($42) + Video Converter Ultimate($65) = Only $79.9, Save $27.1 
ByteCopy($42) + DVD Creater($35) = Only $44.9, Save $32.1 
ByteCopy($42) + Vidpie($29) = Only $54.9, Save $16.1 
ByteCopy($42) + MXF MultiMixer($45) = Only $69.9, Save $16.1 
Video Converter Ultimate($65) + Vidpie($29) = Only $74.9, Save $19.1 
Video Converter Ultimate($65) + DVD Creater($35) = Only $64.9, Save $35.1 

If you want to convert your HD videos, movies, music for further editing, playing, sharing, storing, or burning on Windows or Mac, here is right for you. Go to find what you like and you can get special offer with saving up to $35.