Showing posts with label Amazon. Show all posts

Thursday, July 10, 2014

DVD IFO to Fire Phone Converter - Convert/Rip/Play DVD IFO to Amazon Fire Phone

I backed some of my DVD collections to local computer in IFO images already. And I want to move DVD IFO images from my computer to Amazon Fire Phone, which I plan to put into my shopping list. How to get it done?

Well, this article will share you the solution to convert/rip and play DVD IFO to Amazon Fire Phone.

Amazon doesn't just sell smartphones anymore — it makes one. In news that should surprise exactly no one, Jeff Bezos has officially unveiled Amazon's first cellphone, the Fire Phone. It'll be available July 25th with a 4.7-inch, 720p display, aluminum buttons, a Qualcomm processor, Adreno 330 graphics, and 2GB of RAM.

rip dvd ifo to fire phone

Well, here let's have a quick glance of Amazon Fire Phone video format list:

Amazon Fire Phone supported video format:

H.264/MPEG4/AVC, H.263, MPEG4, MPEG4 SP, HDCP2.x, AVI, VP8, PlayReady DRM

As above, I got know Amazon Fire Phone can fully support MP4 video, but not the DVD IFO files. In other words, if I want to play DVD IFO on Amazon Fire Phone, I need to convert them in advance. Now, I’ve a big success converting DVD IFO movies to Amazon Fire Phone optimized MP4 format by using Pavtube DVD to Amazon Fire Phone Converter.

This program is good at dealing with all kinds of DVD movies, like DVD discs, DVD ISO or IFO images files, etc to any common video format like MP4, AVI, WMV, FLV, MKV, VOB, MOV and more as you need. So, with this DVD Convert tool, it will be easy to rip DVD IFO to Amazon Fire Phone compatible formats, and then you can watch DVD IFO movies on Fire Phone as ease.

Easy Steps to rip DVD IFO to Amazon Fire Phone for watching

Free download DVDAid, or DVDAid for Mac

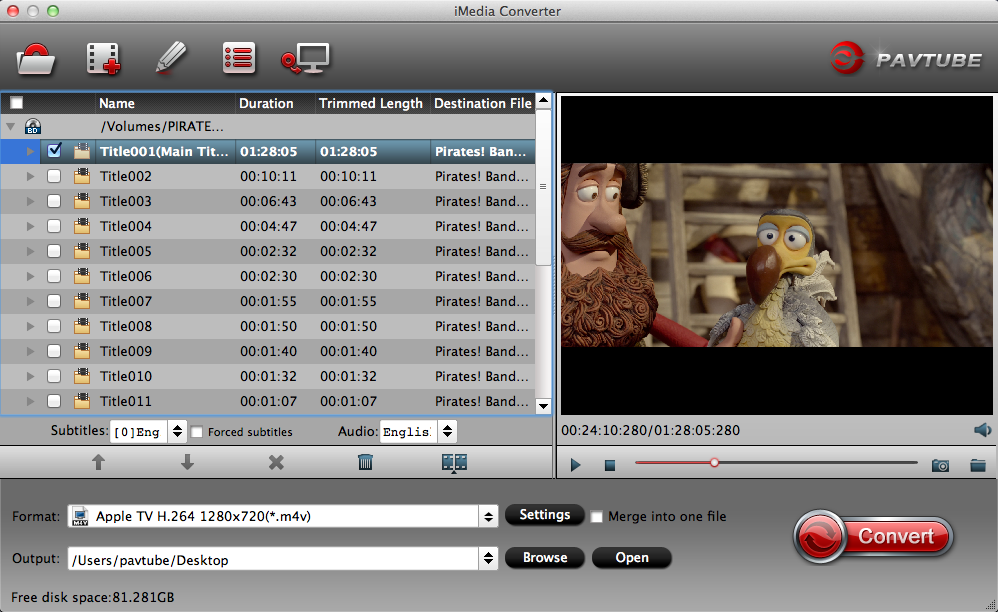
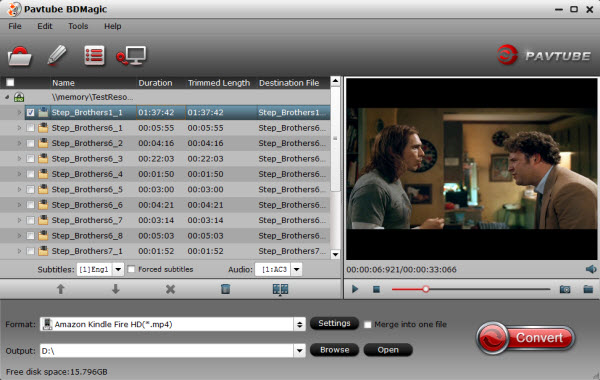
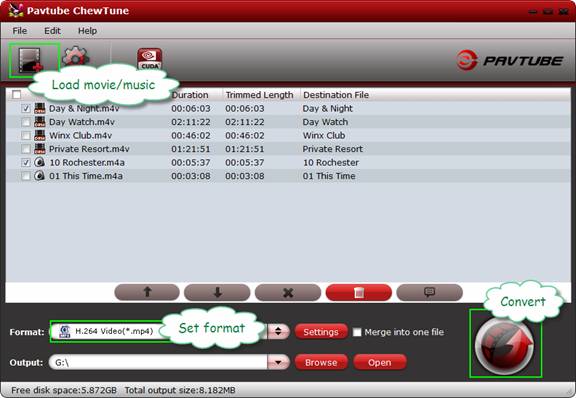
Step 1. Install this DVD IFO converter for Fire Phone on your computer. Run it and load your DVD IFO image file into it.

Rip DVD IFO to Amazon Fire Phone

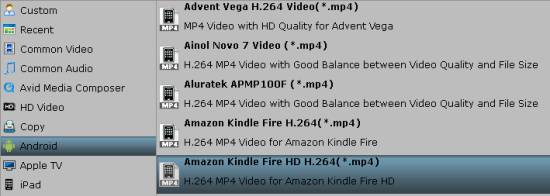
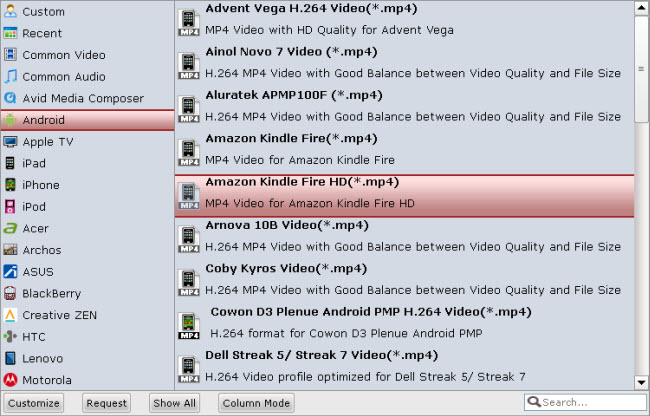
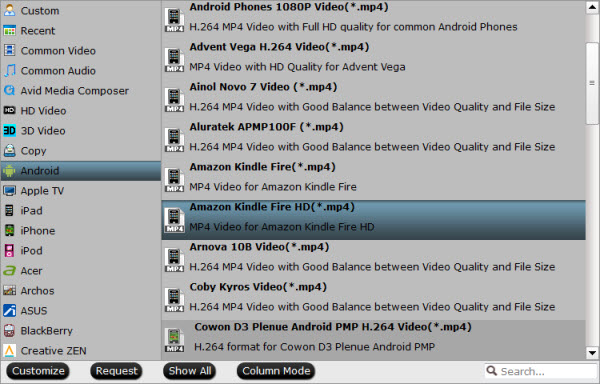
Step 2. Choose output profile for Amazon Fire Phone. Here I recommend you “Common Video > H.264 Video (*.mp4)” which works for playing on Amazon Fire Phone.

Amazon Fire Phone Format

Tips:

1. You may set subtitles and audio language for DVD IFO movies as well.

Select subtitle

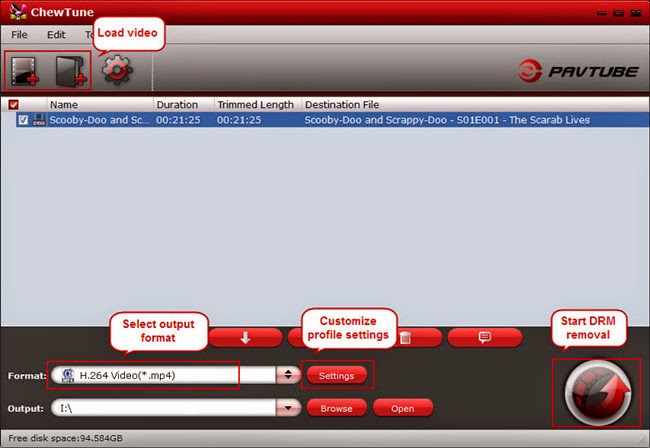
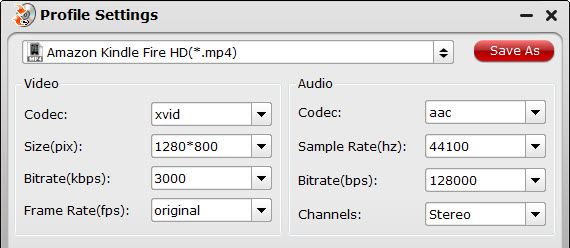
2. Click on Settings you could easily set bitrate, frame rate, codec, channels, sample rate, etc to adjust parameters that affect video quality and file size for the video you prefer. According to the resolution of Amazon Fire Phone, you can set size to 1280 *720.

fire phone format settings

Step 3. Hit Convert button to run this DVD IFO to Amazon Fire Phone conversion.

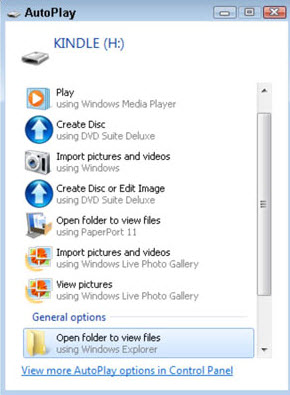
After transferring converted video file to Fire Phone, you can play DVD IFO on Amazon Fire Phone anywhere.

Thursday, June 12, 2014

How to Rip and Put DVD movies to Kindle Fire HDX for playing

Want to put DVD onto Kindle Fire HDX for watching on the go, but don’t know what to do? Get the solution below that teaches you how to import DVD to Kindle Fire HD/HDX for playback smoothly.
Get the Best DVD to Kindle Fire HDX Ripper

Pavtube DVDAid is a helper to address the issue by ripping DVDs (like How to Train Your Dragon (2), Rio 2, The Lego Movie, The Nut Job and so on while getting over Disney X-project DRM, region code, Sony ArccOS, UOPs, CSS, etc.) to Kindle Fire HDX playable videos. It means at least the following two things:

1. A video file will be produced out of the original DVD, in the format acceptable by the tablet;
2. The video file may be compressed in size to feed the device.

How to Copy and Rip DVD to Kindle Fire HDX 7/8.9

The Amazon Kindle Fire HDX comes in two sizes: 7-inch and 8.9-inch, offering a 1920 x 1200 pixel resolution display (323ppi) on the 7-inch and 2560 x 1600 (339ppi) on the 8.9-inch. Both have great size for multimedia experience, including movie entertainment.

If you want to play DVD movie on Kindle Fire HDX 7.7-inch or 8.9-inch display, there is no way but rip the DVD on PC or Mac into Kindle Fire HDX accepted video format first and then transfer the video from computer to the device.

But in view of the fact that Kindle Fire HDX has a special screen size, we should consider about the resolution issue during choosing the conversion tool (the best DVD to Kindle Fire HDX ripper) or during the ripping process.
If you are a Windows user, please download Pavtube DVDAid for PC.

If you are a Mac user, please download Pavtube DVDAid for Mac.

Here we only take ripping & converting DVD to Kindle Fire HDX on Windows PC for example:

After installing it on your Windows OS computer, please run it and insert the DVD with the movie you want to convert and watch. These steps can be considered as pre-rip work.

First: Run this Pavtube DVDAid and the DVD to Kindle Fire HDX Converter; load disc.

Click the top left icon, you can choose to import DVD from ROM, DVD folder or DVD ISO/IFO. It will check the main title by default; moreover, ISO files could also be recognized automatically so that you no longer need to run virtual drive to mount it.


Second: Choose format.

Click "Format" drop-down list and choose "Android > Amazon Kindle Fire HD(*.mp4)" as the compatible MP4 preset with best video quality. Or you can submit “kindle” in search box at the bottom right corner to quick locate this preset.


Thirdly: Customize video specs (Optional).

Your can click “Settings” to free change video size, bitrate, frame rate and others. If you own a 16GB version and do not want to keep videos in large size, you can lower the bitrate settings to get smaller files.


Fourth: Start Conversion.

Click "Start" button on the right corner to start fast and easy DVD to Kindle Fire HDX conversion.

More features of Pavtube Kindle DVD Ripper

1. Self editing enabled: You can control and adjust the resolutions related to Audio Format, customize Audio Quality and Audio Sample Rate to get your desired video quality and file size;

2. Extract DVD audio into MP3 music file: You could play music in the movie on Kindle Fire HDX or other models.

3. Choosing the output folder: During the operation on the UI, you can also define where to place the output converter movie video for your convenience and preference.

4. In order to get customized videos, you can edit the videos before conversion, such as trim, crop, add subtitles, video effect, and add srt, ass, ssa subtitles to your own videos, etc.


5. Backup DVD main movie to VOB format with original quality.

Supplementarily, Pavtube DVDAid is an easy-to-use  and clean DVD ripping and converting software program accepting almost all types of DVDs and outputting in popular video, audio formats for watching on mobile devices like iPhone 5S/5C, iPad Mini with Retina Display, iPad Air, Apple TV, Galaxy S5, Note 3, HTC One, Kindle Fire HDX, PSP and so on.

Tip:

 If you have any requirements of outputting 3D (Anaglyph, T/P, SBS) or keeping multiple audio tracks/subtitles, you are suggested to try Pavtube ByteCopy.

More related:

How to play MKV, AVI, VOB, Tivo, WMV, MPG, FLV, F4V on Kindle Fire HDX 7
Play DVD ISO/IFO on Kindle Fire HDX, Kindle Fire HD
How to convert Tivo files to Kindle Fire HDX for playing on Mac OS X?

Thursday, October 31, 2013

How to convert Tivo files to Kindle Fire HDX for playing on Mac OS X?

Description: A clear, simple and fast solution to transfer Tivo recordings to Kindle Fire HDX for playing on Mac.

Questions:
“Just realize that Kindle Fire HDX does not support playing TiVo recordings of TV shows. Is there a guide mainly show a fast solution to transfer and play TiVo TV shows on my Kindle? I’m running Mac Mountain Lion. Thanks for help!”

With the popularity of Tivo in the world, more and more people use it to record TV shows that match their interests by title, actor, director, category, or keyword. After recording finished, some users may also want to watch TiVo movies on Kindle Fire HDX to kill the boring time in the way of travel. Yeah that’s a great idea. However, Kindle Fire HDX seems not to work with Tivo recordings:

Supported video format:
  • MP4, 3GP, VP8 (video playback at 720p)
Supported audio format:
  • Dolby Digital (AC-3), Dolby Digital Plus (E-AC-3), MP3, Non-DRM AAC (.m4a), MIDI, OGG, WAV, OGG, WAV, MP4, AAC LC/LTP, HE-AACv1, HE-AACv2, AMR-NB, AMR-WB

This format issue really puzzled many Mac users including me. Luckily I just found a working solution of transferring Tivo to Kindle Fire HDX supported video format after several unsuccessful trials.

Come and meet Best Video Converter for Mac from Pavtube, a powerful Mac Tivo to Kindle Fire HDX Converter tool to help you unlock transcode Tivo into MP4 format which is most compatible with your Kindle Fire HDX.

Just checked their home page and found it’s on 20% OFF for Back to School, only $28; don’t miss it!

Let’s see how to start to workflow on Mac: How to convert Tivo to Kindle Fire HDX support format on Mac OS X?

Step 1. Load Tivo files.

Free download the best Tivo to Kindle Fire HDX Converter for Mac, install and run this Mac program and click two icons on the top left corner to import Tivo files or the entire folder.


Tips:

We all know that Tivo recordings require Tivo key to be unlocked when playback on Mac. So does the conversion. The first time you importing Tivo files to this Mac Tivo converter, it will pop up a window as below:

Hit OK and you will see box asking for Tivo Media Access key:


How to find your Tivo key?

Simply head to your TiVo main menu. From there you'll key down to "Messages & Settings". Here you'll find several selections but we're interested in "Account & System Information". Scroll down and press your OK key. On this menu you'll see a selection for "Media Access Key". That's it! 

Step 2. Choose best video format for Kindle Fire HDX.

Click the “Format” drop-down list and select “Android>Amazon Kindle Fire HD(*.MP4)” for Kindle Fire HDX series. Or you can submit “Kindle” in the search box at the bottom right corner.


Step 3. Customize video specs (Optional)

Click “Settings” to enter “Profile Settings” window, you can free set video size, frame rate, bitrate here. If you want to get smaller video file, lower the Bitrate.

Step 4. Start Conversion.

Click the big red “Convert” to start converting Tivo recordings to MP4 for Kindle Fire HDX. After the conversion, click “Open output folder” to quick locate the converted video.

To transfer videos, music and photos to Kindle Fire HDX, refer to this guide: Three Ways to Transfer Media Contents to Your Kindle Fire HDX

Related Articles:

Tuesday, October 29, 2013

How to transfer iTunes M4V videos to Kindle Fire HDX 7?

This article guides you how to legally remove DRM from iTunes videos and download/record iTunes M4V to Kindle Fire HDX for freely playing.

The traditional Halwwloween is coming, have you chosen any present for your children or friends yet? Amazon just announced its latest tablet- Kindle Fire HDX7 is available for pre-order in the UK and Canada, and it should be added to your present list because of its spectacular features such as powerful Quad-Core processor, advanced quality graphics, and Dolby Digital Plus, so that anyone who receives your gift would be thrilled to enjoy movies and music anywhere they like. While iTunes purchased movies would be an exception because of its DRM (Digital Management Rights) protection, and you may need to remove DRM protection from iTunes M4V movies in advance.

With Best DRM removal tool – Pavtube ChewTune you could easily convert and transfer iTunes M4V videos to Amazon Kindle Fire HDX 7 support video. (For Mac users: ChewTune for Mac)

Tips and preparations:

1. Make sure that your computer is authorized by source iTunes videos, that is to say you can play the source iTunes movies in iTunes without trouble.

2. Allow the audio driver installed during the Pavtube ChewTune installation.

3. Close iTunes before running the ChewTune when converting iTunes M4V movies.

Full guide of removing DRM and Recording iTunes M4V movies to Kindle Fire HDX 7

Step 1. Load your iTunes M4V video to Pavtube M4V to Kindle Fire HDX 7 converter. You can either browser to file location or drag and drop source iTunes file to the app.


Step  2. Choose the optimized profile for Kindle Fire HDX 7. If you cannot find the particular profile for your device, don’t worry, Pavtube adds one general profile for Android mobile phones and tablets under Common Video category which are available for almost Android devices.


Step  3. Is necessary, you could set video and audio parameters such as video and audio codec, bitrate, frame rate, etc so that better video and audio quality can be transferred to your Kindle Fire HDX 7 tablet.
  
Step  4. Hit the “Convert” button to start iTunes M4V to Kindle Fire HDX 7 MP4 recording

Since Pavtube ChewTune records source DRM videos in 1:1 video and audio quality, it would take as long as the source movie length for the whole DRM video to Kindle Fire HDX 7 conversion process since Pavtube ChewTune records source DRM videos in 1:1 video and audio quality.

Once it completes, open output folder, locate the created MP4 file and transfer the iTunes M4V movies to Kindle Fire HDX 7 tablet for viewing.

How to Transfer Video, Music, Photo, E-Books from PC to Kindle Fire HDX?
  
Attach the Micro USB end to your Kindle Fire HDX and the USB end to your computer.

Your Kindle Fire HDX should then appear as a drive in Windows Explorer or the Mac Finder. You can now click and drag files from your hard drive to the Kindle Fire HDX or use the copy and paste functions to accomplish the same thing.


Using this process, you can transfer apps, photos, docs, music, e-books, and videos from your computer to your new Kindle Fire HDX tablet. Then, just tap the relevant library (such as Books for e-books and Music for songs) to read or play the content on your Kindle Fire HDX.

You can also upload content to your Amazon Cloud Drive on your computer, and that content will then be available on your Kindle Fire HDX.

Note: It’s easy to purchase or rent content from Amazon, which you can choose to download directly to your Kindle Fire HDX or stream from the Amazon Cloud.

Related Posts:

Thursday, October 17, 2013

Rip Blu-ray and DVD movies to Kindle Fire HD 8.9 for watching with best video quality

Have you ever thought of copying some of your Blu-ray titles onto the 8.9-inch Kindle Fire to make full use of 1920x1200 8.9" HD display? Like many other tablets, Kindle Fire HD 8.9 does not deliver native support for Blu-ray/DVD movies, so if you have the intension to watch Blu-ray or DVD movies on it, you need to convert the Blu-ray movie into a format compatible with your Kindle Fire HD 8.9 in advance.

Q1: How to convert DVD movies to Kindle Fire HD 8.9?

"I am taking a chance that perhaps someone can give me some feedback I am having with. When I convert my favorites Blu-ray and DVD movies to Kindle Fire HD compatible video format, here is my confusion, which one should I save to? Could you give me some advice?"

A1: From Kindle Fire HD official website we know that Kindle Fire HD video format supported are: MP4, 3GP, VP8(.webm), and my suggestion is H.264 MP4 since this is popular video type that you could play on many other portable devices and your local computer. If you have trouble with detailed operation, check this webpage, it tells you exactly how to convert DVD movies to your Kindle Fire HD 8.9.

Q2: How to put Blu Ray Dvds to Kindle Fire HD?

"I'd like to transfer my Blu Ray Dvds to my Kindle Fire HD 8.9. However, while I have had no problems with the original disks, the files play fine on my device, but everything I converted has the same error message: "video cannot be played". What is the problem?"

A2: First of all, check the transferred file location, you need put them to Gallery app directory and your tablet can find them and play well; and remember Android systems compatible Memory cards have a limit of 4GB per file because of the FAT32 file system, including Kindle Fire HD. 720p and 1080p movies today can be up to 10GB, and that's definitely will not transfer to the MircroSd card. So you need re-encode and downsize the file;
or if don't wanna re-encode and lose video quality, use Pavtube Blu-ray Ripper to rip your BD/DVD disks again, but this time, use its Split feature. Don't how-to? 

Don't worry, I find a guide page can help. 

The best way to get over 4GB file size limitation for Android Devices

According my experience, H.264 MP4 format is the best format for Kindle Fire HD 8.9. You'd better get a Top Blu-ray DVD Ripper software. After convert the movies to h.264 mp4, just transfer the generated videos to your Fire HD 8.9. 

Guide: How to Rip Blu-ray and DVD Movies to MP4 for Kindle Fire HD 8.9?

Step 1. Load Blu-ray/DVD movies.

Install and launch the best Blu-ray/DVD to Kindle Fire HD converter.

Note: An external Blu-ray drive is required for ripping Blu-ray/DVD disc.

Load Blu-ray Disc, DVD or ISO image to the Kindle Fire HD 8.9 movie Converter with one click.


Step 2. Select preferred language from drop-down list of "Subtitles" and "Audio" box.

Step 3. Click "Format" bar and select a MP4 format for Kindle Fire HD 8.9 playback. "Android -> Amazon Kindle Fire HD H.264 (*.mp4)" format is recommended for faster conversion and best movie effect.


Step 5. Click "Convert" to start ripping 1080p Blu-ray to Kindle Fire HD 7/8.9 compatible video.

Click the "Open" button to find the converted files when conversion completes and then you can transfer movies to Kindle Fire HD 8.9 easily, and bring your favorite Blu-ray and DVD movies when traveling.

Custom Settings

If you'd like to customize profile settings for better quality or higher resolution, proceed as follows before you start converting Blu-ray to Kindle Fire HD 8.9 video:

Click on "Settings" button. The pop-up Profile Settings window shows you a/v settings you're using.


To take advantage of your screen, set the video size exactly as the display resolution- i.e. 1920 x 1080 for Kindle Fire HD 8.9.

For better quality, set higher bitrate. We find the best balance between 2500kbps to 3000kbps on 8.9-inch screen. To shorten conversion time, set lower quality. Note that when you lower file size, you lower video quality.

Save your preference for future use

One thing good in Pavtube is that you can create new preset for use. For instance, I've decided the best settings work for converting videos to play on the 10.1-inch Kindle Fire HD, and wanna save it for future use, now all I need is save it as a custom preset. This is easy. Just proceed as follows.

1. In the settings window, press "Save As" button.
2. Give the custom preset a name, say "Kindle Fire HD Video 1920 x 1080 (*.mp4)".
3. Click "OK".

The next time you open up the Blu-ray ripper for converting movies to Kindle Fire HD, just press on "Format" bar and find the new preset under "Custom" group.

View Kindle Fire HD column to learn more related articles.

Read More:
  

Tuesday, October 8, 2013

Amazon WMV Nexus 10: Play Amazon Instant Video on Nexus 10

If you have problems about playing Amazon Instant Video on your Nexus 10  tablet, you can check out the tutorial to Remove DRM from Amazon WMV and record Amazon Instant Video(.wmv) to your Nexus 10.
 
Have you purchased lots of WMV videos from Amazon store and want to put these Amazon Instant videos to your Google Nexus 10? As is known to everybody, the WMV videos purchased from Amazon store, including music, videos, movies, and TV show etc. are usually format type unsupported by the Google Nexus 10. The problem is, those WMV videos you downloaded from Amazon are protected (by DRM), and can't be played on any Android/Windows 8 tablet except for the Amazon Kindle Fire (HD). So if you would like to transfer Amazon WMV videos to Nexus 10 for playback, you have to remove DRM from Amazon Instant Video and convert/record it to Nexus 10 compatible formats.

Refer to Google Nexus 10 supported codecs
  • Video codec: H.263, MPEG-4 SP, H.264 AVC
  • Audio codec: AAC LC/LTP, HE-AACv1 (AAC+), HE-AACv2 (enhanced AAC+), AMR-NB, AMR-WB 9, MP3, MIDI SMF, Ogg Vorbis, WAV
 
To do it, Pavtube ChewTune is a great help. It is an all-in-one DRM Removal Program to help you convert/record Amazon WMV videos effortlessly to Nexus 10 supported MP4 format in high quality. After that, you can play your Amazon Instant Video(WMV) on Nexus 10 very smoothly. Now, let's start to convert and transfer Amazon WMV to Nexus 7. (Note: For the common WMV videos, Pavtube Video Converter is recommended to you).

The screen is undoubtedly one of the standout features of the Nexus 10. As the name suggests, it measures 10 inches on the diagonal but more importantly packs an astounding 2,560x1,600-pixel resolution. We were previously blown away by the pin-sharp display of the new iPad with its 2,048x1,536-pixel resolution. The Nexus 10 casually swans past that, to offer an even more refined viewing experience.

Now you want to put some Amazon Instant videos to the Google Nexus 10? Wait a minute. The Amazon Instant videos, though mainly .wmv format, are not supported by Google Nexus 10. The problem is, those WMV videos you downloaded from Amazon are protected (by DRM), and can't be played on any Android tablet except for the Amazon Kindle Fire. To get the Amazon WMV playable on Nexus 10, you'll have to remove the DRM protection first. 

The tools you need to transfer Amazon WMV movies to Nexus 10: A powerful Amazon WMV video DRM remove tool and a WMV to Nexus 10 converter. Pavtube ChewTune combines these two tools together and makes it possible to watch purchased DRM videos on Nexus 10.

Read more: Pavtube ChewTune Review - Free M4V/WMV videos from DRM protection

To convert videos to Google Nexus 10 with best settings, you can download profile patch for the software(Windows only).

Remove DRM protection off Amazon video and convert WMV to the Nexus 10 for playing

Step 1: Load Amazon WMV video files to Pavtube ChewTune.

Install and launch the Pavtube WMV to Nexus 10 Converter, then click the add button to load the WMV video files to the program.


Step 2: Choose H.264 codec format for the Google Nexus 10 playing.

Click "Format" and select an output format for the Google Nexus 10. Here I choose "Android -> Google Nexus 10 H.264 Video (*.mp4)".


Step 3: Optimize the settings for Amazon video to Nexus 10 conversion.

If you find the default settings may not satisfy your need, can click the "Settings" button to change the settings by yourself.

For Mac users, it is necessary to custom profile settings, since there's no profile patch for OS X. Similarly, you can choose Nexus 7 format and custom the profile for Nexus 10 by clicking "Settings" and set the recommended settings as it shows below:


Video
  • Codec: h264
  • Size (pix): 1920*1080
  • Bitrate (kbps): 2000
  • Frame Rate (fps): original

Audio
  • Codec: aac
  • Sample Rate (hz): 44100
  • Bitrate (bps): 128000
  • Channels: Stereo
 
Step 4: Convert Amazon video to Nexus 10 video format.

Having finished the settings? OK, just click the convert button and start to convert Amazon video to Google Nexus 10 format with ease.

When the conversion task is finished, you can click "Open" button to get the final output files for your Google Nexus 10 and transfer the converted videos to Google Nexus 10.

If you have music and videos to watch on the tablet, here's a guide for copying local videos to Google Nexus 10.

Transferring videos and music from PC to Nexus 10?

1. Use the USB cable that came with your 16 GB or 32 GB Nexus 10 to connect the tablet to your PC, and you'll receive a notification that the USB is connected.

2. Open the Notifications panel and touch USB connected. Then touch Turn on USB storage in the screen that opens to confirm that you want to transfer files. The Nexus 10 tablet is connected as USB storage, and the screen will indicate that USB storage is in use and you receive a notification. The Nexus 10 is mounted as a drive on your computer.

3. You can now copy videos from PC to the Google Nexus 10. During this time, you can't access the SD card from your Nexus 10 or share your tablet's data connection with your computer via USB.

4. When the videos are copied to the 16 GB/32 GB Nexus 10, you can disconnect your Nexus tablet from PC.

Like the Nexus 7, it does not include an SD card slot for additional storage, so you may need a Video Converter to compress very big file to smaller file size. (Learn more on Nexus 7 Column)

Tips: MKV, MOV, TS, MPG, Tivo, FLV, F4V and some AVI videos are not accepted formats and you have to convert them to Nexus 10 optimized H.264 .mp4 videos before downloading them to the device.

Good news! Pavtube is offering Money-saving Tips, Up to 35% Off, Saving Up to $35. such as:

Plus, Like Pavtube on Facebook and you would get Free DVD Ripper, DVD Ripper for Mac, Video DVD Converter Ultimate! 

If you have any problem to buy or use Pavtube, pls feel free to contact support@pavtube.com (for windows user), macsupport@pavtube.com (for Mac users).