Sunday, July 31, 2016

Convert YouTube Videos to iMovie 11 for Editing quickly

Importing YouTube video into iMovie but without success? Actually that's because most YouTube videos are normally in FLV format, which are not supported by Apple's iMovie. But that doesn't mean there is no way to import YouTube videos to iMovie to edit. I instantly fizzle out as I only to find that they just gray out. The YouTube FLV files wouldn’t be accepted unless they can be turned to iMovie native formats. Here the following article will introduce you the way to import YouTube videos to iMovie 11 for editing.

Why can’t import YouTube Videos to iMovie 11?

It is important to note that most of these problems can be caused for the most part by the fact that YouTube videos are often in FLV format and hence cannot be edited in iMovie. Apple’s iMovie doesn’t recognize FLV formats. This doesn’t however mean that you cannot edit your YouTube video in iMovie.

Video formats accepted by iMovie include MPEG-2 and AVCHD, DV-Standard and HDV (High Definition Video), QuickTime Movie, MEPG-4.

Convert YouTube FLV Videos to iMovie 11 format

If you want to import and edit the YouTube video with iMovie, you can also refer to Pavtube HD Video Converter for Mac. Hailed as the best-ever YouTube to iMovie Converter, it outshines its rivals also at its capability to faultlessly convert YouTube flv videos to iMovie editable format within barely 3 clicks. Editing the video is another advantage of this YouTube to iMovie converter. You can customize the video as you like without any hassles. In consequence, you can ingest the funny YouTube videos or music videos in iMovie on Mac Mavericks/Yosemite without worrying about format incompatibility issue.

Hot search about YouTube and iMovie related conversion:

iMovie


YouTube

Free download and get the YouTube to iMovie video converter:


Other Download:
How to Convert YouTube video to iMovie friendly format on Mac?

Step 1. Add YouTube videos to the application.

You can click "Add Video" button to load YouTube videos to the program. You can also directly drag the YouTube videos into the program directly.


Step 2. Select output format
From "Format" drop-down option, choose iMovie best video editing codec from "iMovie and Final Cut Ex..." > "Apple Intermediate Codec (AIC)(*.mov) to output.


Tip: You can also adjust video and audio settings, including codec, aspect ratio, bit rate, frame rate, sample rate, and audio channel.

Step 3. Start the conversion

Finally, simply hig the big Convert button to start converting YouTube videos to Apple InterMediate Codec for iMovie. Within several minutes, you can find the converted file on your computer by clicking the "Open" button. And then you can import the converted files to iMovie for editing smoothly.

Read More: 

Thursday, July 28, 2016

Fix YouTube Videos Not Playing Loading issues

According to some forums, we found many people have the problems like “When I click on a posted video, it won't play. Is there something broken?”, "YouTube video loads slowly", "YouTube videos won't play" on Safari, Chrome, or mobile devices like iPhone and iPad, "YouTube video doesn't start", "Youtube loads but video doesn't play", "video gets stuck" and "video player is blank with no video". No worry, next we will tell you why can’t load and play YouTube videos and how to solve YouTube videos not playing loading issue.

Why YouTube Videos Won't load and play?

Why won't YouTube video play or start on mobile (iPhone), Mac or PC? The reasons may be uncontrollable, for example, the problem of the source video. It may also vary from videos themselves to hardware configurations or settings. "When videos blur, buffer, or won't play altogether, YouTube is now pinning the blame on your internet service provider (ISP).", but it might really be the reason. For instance, CenturyLink may be one factor to consider if you fail to play many YouTube videos because it experiences high bandwidth traffic during certain times.

Besides, the "cache" is another possible reason for sluggish YouTube video loading/buffering, dotted circle or some other similar phenomena, because when the memory is full of "temporary internet files'', it will hold you up greatly. It is a general case for the majority of people watching videos or playing games/music frequently. There are many other unpredictable and complicated causes for YouTube errors.

Steps to Solve YouTube Videos Won't Play or Load Problem

  • 1. Let's start with the basic thing that is to check the strength of your internet connection and try again. Normally, part of the "YouTube videos won't load or keep buffering" issues should be fixed. 
  • 2. If the network signal is good and web browsing or gaming is not sluggish at all, then check videos loading on sites besides YouTube, such as Facebook. 
  • 3. Check the version of your Adobe Flash Player for outdated flash player may lead to "YouTube video not playing" problem. Upgrade to the latest up-to-date Adobe Flash Player 16 ActiveX. 
  • 4. Change your Flash Player privacy settings. Reset Firefox or Chrome and enable disabled options. Click to check your Flash player settings here. 
  • 5. Manage add-ons. Check your added plug-ins one by one to make sure that your "YouTube won't play" is not caused by any one of them.

Solve and avoid youtube videos wont play issues: you can try the all-in-one YouTube video converter as the troubleshooting to convert YouTube (HD) videos on PC/Mac. It can also convert YouTube videos to any media player like Windows media player, portable device like iPhone 6s, iPad Pro, Galaxy TabPro S, TV, etc at NO.1 fast converting speed with the aid of hardware accelerated video encoding technology.

Hot search: avchd to YouTubeYouTube video to Samsung TVYouTube video to MP4/MOV,
YouTube to MP3 Converter,, summer recordings to YouTube/Vimeo/Facebook 


If you are using the Mac computer, you can get Mac version to solve the YouTube video playback issues.

Free download the best YouTube Converter for Windows:


Other Download:
- Pavtube old official address: http://www.pavtube.com/video_converter/
- Amazon Download: http://download.cnet.com/Pavtube-Video-Converter/3000-2194_4-75734821.html
- Cnet Download: http://download.cnet.com/Pavtube-Video-Converter/3000-2194_4-75734821.html

How to Use iFastime Video Converter Ultimate to convert YouTube videos to various devices, NLEs, etc?

Step 1. Click "Add video" button to add your YouTube video files to the program. Or directly drag the video you want to convert to the left item bar.


Step 2. Set right output format. Click "Format" bar, and select .mp4, .avi, .mkv, .h.265 etc from "Common video" or "HD video", or choose the output format from "iPhone", "iPad", "Samsung", "TVs", etc


Tips: The default settings may not satisfy you, and you can click the "Settings" button to change the settings by yourself including video resolution, bit rate, audio sample rate, audio channel etc. for full screen playback smoothly. Or keep no changes, which is also a good choice.

Step 3. Click the "Convert" button on the main interface and the software will start to convert YouTube video to any video format. When the conversion done, click "Open" to find the converted video files. Then you can effortless transfer the video files to your devices freely.

More topics:

Sunday, July 24, 2016

Solve Premiere Pro cannot accept Typhoon-H 4K video

Typhoon H offers flight durations of up to 25 minutes while filming with the CGO3+ 4K UHD camera. The Android powered ST16 Ground Station features a 7-inch touchscreen that displays live footage of your flight in HD 720p resolution and enables a wide variety of autonomous flight modes. However, Premiere Pro CS6, CC 7 can handle (usually) 4K files without much problem, but it is extremely hardware intensive.


How to Edit 4K video from Typhoon-H in Adobe Premiere?

It is very common for you to end up with a 4K file from Typhoon-H on you disk, which seems to put your computer to test. Not only will you get error while trying to open the file, the computer will also slow down to its minimum capacity and the screen will most likely hang. Even fast computers with a high end RAM and speedy processor seems to give up when it comes to Typhoon-H 4K files. The problem is with the image editing software and not just a slow computer specs. This is where Adobe Premiere comes in to help you edit Typhoon-H 4K files easily.

Choose a Professional 4K to Premiere Pro video converter

Thankfully you probably don't have to buy a new computer... but you do need to convert 4K video to Premiere Pro using MPEG-2 (1080p) as primary delivery format. The following paragraphs show us how to edit 4K footage with Premiere Pro without bogging down your computer. The process is surprisingly easy and can be done with the help of Pavtube Video Converter for Mac.

With it, you can effortlessly encode/re-encode 4K H.264(MP4), H.265XAVC, XAVC SMOV, MXF, MTS/M2TS etc footage for smoothly importing and editing in various non-linear editing systems (NLE), including Adobe Premiere Pro, Avid Media Composer, Final Cut Pro, iMovie, FCE and more. If you work 4K files in Adobe Premiere Pro on Windows PC, please get Pavtube Video Converter to solve the issues. (read top 5 4k video converter for Mac/Win review)

Hot search: 
If you are using the Windows systerm, you can get Pavtube Video Converter.


Other Download:
- Pavtube old official address: http://www.pavtube.com/video-converter-mac/
- Amazon Store Download: http://www.amazon.com/Pavtube-Video-Converter-Mac-Download/dp/B00QIBK0TQ
- Cnet Download: http://download.cnet.com/Pavtube-Video-Converter/3000-2194_4-76179460.html

Step-by-step guide to Convert Typhoon-H 4K video to Premiere Pro

Step 1. Load Typhoon-H 4K videos

Choose all the Typhoon-H 4K videos in your folder, drag & drop or through File > "Add Video/Audio" button/"Add from folder" button to import source Typhoon-H 4K videos into the converter interface.


Step 2. Choose proper output format Premiere Pro preferred

Click "Format" pull down list to select "Adobe Premiere/Sony Vegas> MPEG-2(*.mpg)" as the best video format for Adobe Premiere Pro CC/CS6/CS5. Another two specialized formats "WMC (VC-1) (*.wmv) and "MOV (AVC) (*.mov)"are the good choice as well.


Tips: Set Advance Settings (Optional)
If you want to customize video and audio encoding settings to get the best quality you want, just click the "Settings" button to customize the output video/audio resolution, frame rate, bit rate, etc.

Step 3. Start converting Typhoon-H 4K videos to Premiere Pro

Click "Convert" button to start transcoding Typhoon-H 4K to MPG/MOV/WMV for Adobe Premiere Pro. When the conversion task is finished, you can get the exported files by click the "Open" button for importing to Adobe Premiere Pro CC/CS6/CS5 to do further editing on Mac.

Read More:

Premiere Pro CC 2015 can't import MPEG2 files
Import Canon XC15 4K footages to Premiere Pro CC
How to edit H.265/HEVC files in Adobe Premiere Pro?
XAVC Premiere Workflow: Import and Edit XAVC with Adobe Premiere Pro CC
Solution for Can't Import GoPro Hero5 4K to Premiere Pro on Mac/Win
Video Solution: Edit XDCAM MXF in Adobe Premiere Pro CC
Transfer same file formats into Premiere Pro CC from FCP
No Audio when Editing MTS files in Adobe Premiere Pro CC?

Wednesday, July 20, 2016

How to Edit Phantom 3 Advanced videos with EDIUS 6/7/8?

Part 1. About Phantom 3 Advanced

In terms of features, the two drones are also twins. They're both flown using the same remote control and smartphone app, which now supports some automated flight features, including waypoint flying and automated return-to-home.

For information on what you can do with the Phantom 3 Advanced, as well as how it handles in flight, the app interface, and automated flight features, head over to our Phantom 3 Professional review. In testing we found that the two aircraft performed identically—the only difference is the maximum video resolution.

Part 2. Phantom 3 Advanced Spec

You can choose between MP4 and MOV file formats in the app, but there's no quality difference between the two. Video quality tops out at 2.7K (1520p), with 24fps, 25fps, and 30fps available. Dropping down to 1080p expands the frame rate options, adding 48fps, 50fps, and 60fps capture, and those capture rates are also available at 720p. It should be noted that you may have to update your firmware to gain access to 2.7K recording—when the Phantom 3 Advanced originally shipped it was limited to 1080p capture.

Part 3. Can I Import Phantom 3 Advanced videos to EDIUS 6/7/8?

Edius is a video editing software package for PC computers running Windows. Edius is a non-linear editor (NLE) that works with most modern video formats. The software is capable of 3D editing.

What codecs are supported by Edius Pro? 

A full list of supported file formats are available on page 145 of the reference manual. Some of the prominent ones are:

Video formats 

H.264
VOB (!)
AVCHD
Flash (!)
AVC-Intra, including 4K XAVC
MPEG-2 Program stream and Transport stream
MPEG-4
R3D
Canon 1DC Motion JPEG
WMV
XDCAM EX
Canon XF

Some wrappers like MOV (Quicktime) or MXF are supported, but not all codecs are supported. Prores and DNxHD are supported, as long as Quicktime is installed.

EDIUS has special importers for various formats which will also bring in any available metadata. Edius supports more formats natively than most programs. This also includes support for native AVCHD as well as the ability to transcode this format into something more usable.

As you see, the EDIUS 6/7/8 does not support the Phantom 3 Advanced video (MOV/MP4). So you’d better convert hantom 3 Advanced videos to EDIUS 6/7/8 friendly formats like MPEG-2, WMV etc. )

Part 4. A smart way of importand editing Phantom 3 Advanced videos in EDIUS 6/7/8

In fact, you do not need to worry about this, you only need to encode MP4 to EDIUS Pro supported MPEG-2, MPEG-4, WMV, etc. Recently many people used a third party - Pavtube Video Converter to change Phantom 3 Advanced video files to Edius Pro playable MPEG-2/MPEG-4 format. It can not only encode Phantom 3 Advanced videos to EDIUS Pro friendly format with ease, but also encode Phantom 3 video to other editing softwares like Windows Movie Maker, Davinci Resolve, After Effects CC, GoPro Studio, FCPiMovie and more. (read how to downscale Phantom 3 4K to 1080p/720p). With the perfect converter, the entire conversion only need 3 clicks, providing the direct right format for any editing softwares, any Apple devices, Android devices, TVs, Projector, Handheld game, etc. (read review)


Other Download:
- Pavtube old official address: http://www.pavtube.com/video_converter/
- Amazon Download: http://download.cnet.com/Pavtube-Video-Converter/3000-2194_4-75734821.html
- Cnet Download: http://download.cnet.com/Pavtube-Video-Converter/3000-2194_4-75734821.html

How to Adjust Phantom 3 Advanced MP4/MOV to Edius Pro friendly format?

Step 1. Click "Add video" button to add your video files to the program. Or directly drag the video you want to convert to the left item bar.


Step 2. Click "Format" bar and choose "Adobe Premiere/Sony Vegas > MPEG-2 (*.mpg)" as output format on the drop-down menu. Of course, you can also choose MPEG-4, WMV from "Common Video" as the output format.


Tips: The default settings may not satisfy you, and you can click the "Settings" button to change the settings by yourself including video resolution, bit rate, audio sample rate, audio channel etc. for full screen playback smoothly. Or keep no changes, which is also a good choice.

Step 3. Click the "Convert" button on the main interface and the software will start to convert to friendly video formats immediately. When the conversion finishes, click "Open" to find the converted video files. Then you can effortless transfer the video files to Edius Pro for editing.

Read More: 

Sunday, July 17, 2016

Does 4K XAVC Can be Edit with Adobe Premiere Elements 12/13 Now?

Filming those special occasions such as, weddings, family events, holidays and the cat is as easy as pointing the camera in the right direction and pressing the Record button. Shooting video is now as simple as taking a photograph, most current digital cameras, mobile phones and tablets have video recording capability. However, the art of producing a memorable professional looking video is in the editing stage. There are several video editing applications available at most price points, some may seem over complicated, whilst others may be too basic. Fortunately Adobe has the software that can simplify the entire editing process with Adobe Premiere Elements 14.

Do you have the “Does XAVC Can be Edit with Adobe Premiere Elements 12/13 Now?” confusion above? After countless tests and searching, I think the problem does not just lie on 4K resolution. Although Adobe Premiere Elements (12/13) with stunning features is a popular video editing software for users, the compatibility between 4K videos and Adobe Premiere Elements is still an unsolved mystery in that some persons can import 4K videos into Elements, while the others can not.

The computer configuration and operation environment should play an important role on this aspect. By passing 4K issue, in fact, there is another problem that users need to pay attention. As far as I know, XAVC , as a newly high compressed video format, is not supported by most NLEs, Premiere Elements 12/13 just included. Below list the the detail supported format with Premiere Elements 12/13:

Video File Formats Supported by Premiere Elements 12/13 – import 

Format and filename extension

3GPP (.3gp, .3g2)

Adobe Shockwave Flash (.swf)

Audio Video Interleave (.avi)

AVCHD (.m2ts, .mts)

DV stream (.dv)

H.264 (.mp4, .m4v)

H.264-encoded QuickTime (.mov, .mp4, .m4v)

MOD (.mod)

MPEG-1 (.m1v, .mpeg, .mpe)

MPEG-2 (.m2v, .mp2, .mpg)

MPEG-2 Transport Stream (.m2t)

QuickTime (.mov)

TOD (.tod)

Video Object (DVD video) (.vob)

Windows Media (.wmv) *

Then to solve the problem, we just need to look for a powerful third party program to convert XAVC videos into MPEG-2, or MOV. Here we highly recommend - Pavtube HD Video Converter for Mac. (read review)

With it, you can do batch conversion from 4K XAVC to Premiere Elements more "edit" friendly codec, MPEG-2 in simple clicks of mouse. New formats are constantly added making the Video Converter Ultimate the most user friendly video converter on the market. Enjoy the latest addition to the VCU in the new 4K video format! With 4K, enjoy the absolute best and finest picture quality! Support converting a standard 2D video to 3D! Support enjoy High Fidelity HEVC/H.265 Video on your devices at half the normal file size! The built-in video editor comes with a set of powerful, easy-to-use editing tools. You can transform your videos into a masterpiece with just a few clicks. So, what does the workflow look like?

Hot search: H.265 to Adobe Premiere Elements 13/12MP4 to Premiere ElementsDJI Phantom 2 Vision+ Video to Premiere Elements 13 

Free Download or Purchase Pavtube HD Video Converter for Mac:


Other Download:
Get 4K XAVC Work in Premiere Elements 14/13/12

Step 1. Load 4K XAVC files to the mac program

Install and launch the Mac XAVC Converter and load the XAVC S recordings to it. If you want to merge several clips, just need to check the "Merge into one" box.


Step 2. Choose the MPEG-2 as output format

At the bottom of the main interface, click the "Format" drop-down button to select "Adobe Premiere/Sony Vegas > MPEG-2 (*.mpg)" as the output format. Besides, you can also choose WMV (VC-1) (*.wmv) if you want to get a relatively smaller output file.


Step 3. Transcode 4K XAVC to Premiere Elements supported format

When you finish the settings, click "Convert" button and begin to transcode 4K XAVC to Premiere Elements supported format. Once the conversion is 100% completed, click the "Open" button to get the converted file and then import the converted 4K XAVC file to Premiere Elements 14/13/12 on Mac.

Read More: 

Wednesday, July 13, 2016

Upload H.265 videos to iCloud storage

H.265/HECV videos becomes more and more popular for their super high definition and smaller size than the same quality H.264 video. But for iCloud users, putting these H.265/HECV videos to iCloud seems not to be easy cause iCloud natively can’t support H.265 videos.

From iCloud.com, iCloud supports to accept 3GP, AVI, MV, MP4, M4V, WMV, VOB, MPEG, etc but not includes H.265 video. So if you want to upload H.265/HEVC video to iCloud, you have to re-encode these H.265 video to H.264 format for iCloud.

To finish the task, you will need to have a reliable H.265 Video Converter to do the job. Among all available H.265 Video Converters in the market,Pavtube Video Converter claims one of the top one to meet the H.265 to H.264 MP4 encoding need. Based on my testing, it works perfectly and now I’d like to share it with all of you.

Now first free download the best H.265 to iCloud converter and learn how to add H.265 movies to Microsoft OneDrive with Pavtube Video Converter. If you are a Mac user, you can get Pavtube Video Converter for Mac.


Other Download:
- Pavtube old official address: http://www.pavtube.com/video_converter/
- Amazon Download: http://download.cnet.com/Pavtube-Video-Converter/3000-2194_4-75734821.html
- Cnet Download: http://download.cnet.com/Pavtube-Video-Converter/3000-2194_4-75734821.html

How to re-encode H.265/HEVC video to H.264 for iCloud?

Step 1. Import H.265/HEVC video

Click the “Add video” button to import H.265/HEVC video into the application.


Step 2. Set output format

Click on “Format” bar to select output format. Here you can choose H.264 MP4, MPEG-4 MP4, WMV, AVI, WMA, etc any one iCloud supported format as target format on Window. Here, we choose H.264 mp4 as the target format for its wide compatibility with all kinds of devices.


Step 3. Start transcoding H.265/HEVC

Click the “Convert” button at the bottom right corner to start transcoding H.265/HEVC video for iCloud. After conversion click “Open” to find the generated videos and upload them to iCloud smoothly.

How to upload H.265 video to iCloud? 

This process is the same as uploading a photo onto the iCloud and is very simple to carry out.

Hold ‘Control’, click the file and compress it to a .zip file
Change the extension of the file from .zip to .txt as before
Go to iCloud on your web browser, log in and go onto iWork. Upload the .txt version of the video file
When this has uploaded, go to iCloud on your other computer and download the .txt file. When it has downloaded, locate it in your downloads folder, rename it by removing the .txt extension and replacing it with .zip (so converting it back to a .zip file) and double click the file to open
You should then have your video!

Read More: 

Sunday, July 10, 2016

Transcode AVI videos to GoPro Studio for editing

Besides editing GoPro Hero Camera footages, GoPro Studio can also edit MOV video files from Canon and Nikon DSLRs but except in Windows 7. In fact, following the guide below you can turn GoPro Studio a universal video editing tool. You can realize to edit MOV video files from Canon and Nikon DSLRs in Windows 8 and Windows 10; and you can import non-GoPro videos like MKV, WMV, AVI, FLV, MXF, MTS to GoPro Studio for editing in Windows/Mac, as well as solve some AVI files fail to import to GoPro Studio issue in Windows/Mac.

GoPro Studio Support Formats

According to GoPro Studio official statement, GoPro Studio supports importing the following files in “Step 1: Import & Convert”:

MP4 video files from the original HD Hero Original, HD Hero 2, HERO3, and HERO3+.

MOV video files from Canon and Nikon DSLRs (except in Windows 8).
JPG files from GoPro HD Hero, Hero 2 and Hero 3 cameras (.jpgs from other sources may work, but have not been tested nor are they officially supported).
And GoPro Studio supports importing the following file formats directly for editing in “Step 2: Edit”: GoPro CineForm AVI or MOV files (MOV only on Mac).

The following guide will guide you step-by-step to convert any video MOV, MKV, WMV, FLV, MP4, MXF, MTS to H.264 MP4 to import to GoPro Studio in “Step 1: Import & Convert”. Due to codec issue, some AVI files fail to import to GoPro Studio, you can also follow the guide to convert your AVI files and other videos to GoPro Studio supported MOV.

How to Convert AVI to H.264 MOV to import to GoPro Studio?

Prepare: Download Pavtube Video Converter - read review

Download Pavtube Video Converter (Pavtube Video Converter for Mac). Install and launch the program.


Other Download:
- Pavtube old official address: http://www.pavtube.com/video_converter/
- Amazon Download: http://download.cnet.com/Pavtube-Video-Converter/3000-2194_4-75734821.html
- Cnet Download: http://download.cnet.com/Pavtube-Video-Converter/3000-2194_4-75734821.html

Step 1: Input AVI video files.

From “File” drop-down menu, select “Add Video/Audio” to import files to the software for conversion.


Step 2: Specify output file format.

Click “Format” bar, from its drop-down selection, define “MOV – QuickTime (*.mov)” as the output profile format.


Step 3: Transcode files to QuickTime MOV format.

Carry out video to QuickTime Conversion process by clicking the right-bottom “Convert” button. When the conversion is over, click “Open” on the main interface to locate the converted files to transfer and import into the GoPro Studio without any problem.

Read More:

Wednesday, July 6, 2016

Sony A6300 XAVC S Files Fail to Convert in GoPro Studio?

What's the issue? 

XAVC S Files are not Importing or Converting properly.

Where does it apply? 

GoPro Studio

How to fix it? 

1. First, make sure that you have the latest version of GoPro Studio installed. You can download the latest version.

2. Next, make sure that there are no non-English characters in the name of the the file being converted, the folder path where the file is saved, or the folder path where you are planning to convert to.

3. If you are experiencing any sort of crashing while converting, check out this article for troubleshooting: How to Resolve GoPro Studio Crashing Issues.

4. If you are planning to export to an external drive, find out what the external drive is formatted to. If it's FAT32, it could limit a single file conversion only up to 4gb. Converted files that are larger than 4gb are not able to move to the external drive for that reason.

5. Prior to adding the clip to the conversion list, change the advance settings to set your image size and frame rate as the SOURCE.

6. Windows only - Make sure you not trying to save the converted file to the root of the hard drive. Instead, create a new folder on the desktop and convert into this new folder.

7. Windows only - Right-click on the GoPro Studio shortcut and select Properties. Click on the Compatibility tab and make sure that “Run this program - Pavtube Video Converter in compatibility mode for:" is UNCHECKED.

Reference this guide article to learn how to add Sony A6300 XAVC S and other MOV, MKV, WMV, FLV, MP4 etc to GoPro Studio with the program quickly.

8. Windows only - If you are converting to a external drive using the default AVI format, please convert it again by changing the file format to MOV.

9. If your computer has multiple graphics cards, you will need to set it up so that GoPro Studio is using the preferred card. For example, if one of your graphics adapters is an Nvidia card, do the following:

Go to the Nvidia Control Panel.
Select Manage 3D Settings.
Click on the Global Settings tab.
Select the High-performance Nvidia processor.

About Best XAVC S to GoPro Studio Video Converter for Windows: 

(top 3 Best GoPro Studio Alternatives on Windows 10 )

Price: 35

Platform: Windows 10/8.1/8/7/Vista/XP

Pavtube Video Converter is a versatile video converter to load and convert videos in XAVC, XAVC S, XAVC L, MP4, MKV, AVI, WMV, MOV, HEVC (H.265), MTS, etc. at SD, 720P/1080P HD, 2160P 4K UHD to ton of popular formats and devices like Apple (iPhone, iPad, iPod, Apple TV), Android (Nexus, Samsung, HTC, Kindle Fire), Microsoft (Windows Phone, Surface, Xbox), Nokia, Blackberry, etc. 200+ Built-in preset device profiles are provided. You can also tweak the video, audio parameters that best suits you need. It is an all-in-one video converter, player and editor. Thanks to its built-in editor, you can also easily trim, crop, set effects, add subtitles to your source video as you want.


Other Download:
- Pavtube old official address: http://www.pavtube.com/video_converter/
- Amazon Download: http://download.cnet.com/Pavtube-Video-Converter/3000-2194_4-75734821.html
- Cnet Download: http://download.cnet.com/Pavtube-Video-Converter/3000-2194_4-75734821.html

Pros 

1. Support wide range of video formats in 4K UHD/HD/SD.
2. Convert any videos to 200+ hot iPhone iPad Android devices.
3. Support convert videos to various editing programs.

Cons 

Lack the ability to download online videos.

Our Verdict 

Pavtube Video Converter stands head and shoulders above the rest of the video converters in our review. Its fast conversion time, high-quality output and extra features make it the perfect choice for video converter software.

If you are a Mac user, you can get Pavtube Video Converter for Mac. This best Mac video converter have many features:

To be frank, many people go all out finding the best free video converters on Mac OS X El Capian provided above but end with disappointment either because of the unsatisfactory video quality, absence of subtitle, the annoying large file size less output formats, heavy quality loss, slow conversion speed and can't meet their needs.

To address this issue, here we list a professional paid video converter for Mac OS X El Capitan- Pavtube Video Converter for Mac which can get rid of limitation with these free video converting programs on Mac. It is totally powerful and effective.

Price: 35

Platform: Mac OS X 10.11 El Capitan, Mac OS X 10.10 Yosemite, 10.9 Mavericks, 10.8 Mountain Lion, 10.7 Lion, 10.6 Snow Leopard, 10.5 Leopard.

Main features: 
  • Support various SD videos, HD videos, 4K videos including H.265 MP4/MKV and converts each other 
  • Export professional encoders for FCP, Premiere, iMovie, FCE, Avid Media Composer & more 
  • Offer 200+ ready presets for iPhone, iPad, Samsung Galaxy Tab and other mobile devices 
  • Provide rich video editing functions(trimming, cropping, adding watermark/effects, inserting subtitles) 
  • Besides, you will be surprised its unmatchable converting speed, stable conversion, high quality video output, batch conversion, humanized feature design, user-friendly interface and simple operation. 


Other Download:
- Pavtube old official address: http://www.pavtube.com/video-converter-mac/
- Amazon Store Download: http://www.amazon.com/Pavtube-Video-Converter-Mac-Download/dp/B00QIBK0TQ
- Cnet Download: http://download.cnet.com/Pavtube-Video-Converter/3000-2194_4-76179460.html


Read Guides: 

Read Hot Reviews: 

Sunday, July 3, 2016

Edit Sony A6300 4K XAVC S with Pinnacle Studio perfectly

Pinnacle Studio, is a video editing program to let you create Video CD, DVD-Video, AVCHD or Blu-ray format, add complementary menus and burn them to disc, at will. The biggest drawback of Pinnacle Studio is it is only compatible with Windows and iOS. That means it doesn't have Mac version. Meet problem while loading Sony A6300 4K XAVC S files to Pinnacle Studio 17/16/15/14? This article talks about how to get Pinnacle Studio work with Sony A6300 4K XAVC S Files beautifully. Follow up.

Here we list the input formats of Pinnacle Studio: 

Import Formats 

Video: MVC, AVCHD, DV, HDV, AVI, MPEG-1/-2/-4, DivX, Flash, 3GP (MPEG-4, H.263), WMV, Non-encrypted DVD titles (incl. DVD-VR/+VR), QuickTime (DV, MJPEG, MPEG-4, H.264), DivX Plus MKV

Audio: MP3, MPA, M4A, WAV, AMR, AC3, AAC, Vorbis, WMA

Solution to Get Pinnacle Studio work with Sony A6300 4K XAVC S nicely

If you want to import the incompatible Sony A6300 4K XAVC S videos into Pinnacle Studio 16/15/14, you have to convert or re-record them into one of Pinnacle Studio supporting formats, like AVI, MPEG-2 or WMV formats first. When doing Pinnacle Studio conversion, you will need a Pinnacle Studio Video Converter.

How to Choose the Best Pinnacle Studio Video Converter?

There are many video converters in the market, what are the standards of judging a qualified one for editing in Pinnacle Studio?

1. Supporting SD/HD/4K videos fully
2. Supporting a wide range of input and output formats
3. Adjusting aspect ratio automatically or manually
4. Don't-Make-Me-Think design with ready-made output profiles
5. No. 1 fast video converting speed

Here Pavtube Video Converter is just the recommeded option for its powerful functions. It can wander freely between all kinds of video formats, and make the converted files be accepted by diverse video editing tools including Pinnacle Studio, Sony Vegas, Windows Movie Maker, PowerDirector, etc. and playing software/applications. If you are a Mac user, you can get Pavtube Video Converter for Mac.

It supports: 

4K or HD Input 

1. Panasonic & Canon HD camcorder Video, JVC HD camcorder Video (*.mod, *.tod), Sony HD camcorder Video (*.mts, *.m2ts);
2. 4K (AVC code, .mp4 file extension) videos from YouTube 4K channel;
3. Video recorded by Apple iPhone 6/6s (Plus)/7, Motorola Nexus 6, Samsung Galaxy Alpha/Note 4/Note 5/S6, Sony Xperia Z4/Z5 (Compact), LG G Pro2/G3, Acer Liquid S2, Oppo Find 7/7a, Lenovo vibe Z2, OnePlus One, etc

Various Output Formats 

1. HD videos: TS HD, MTS, MOV HD, AVC HD, MKV HD, MPEG HD, AVI HD, WMV HD
2. PC/Mac general: MP4, AVC, AVI, WMV, HEVC/H.265, MKV, MPEG1, MPEG2, RM, 3G2, 3GP, ASF, WEBM (VP8), FLV, F4V, SWF, DV, MOV, M4V
3. Devices: All from Apple, Android, Microsoft, Sony, etc.
4. Audio formats: MP3, AAC, AC3, WMA, AIFF, CAF, DTS, OGG, AU, RA, WAV, FLAC, ALAC

What's more, it offers clutter-free design which can meet the requirements of both beginners and experts. You can either choose the ready-made output Adobe Premiere/Sony Veags profile directly for Pinnacle Studio or make advanced and detailed adjustment by yourself, such as, to balance the video quality and the file size.

With the support for NVIDIA CUDA and ATI Stream (AMD APP) acceleration technologies, the conversion speed is maximally improved. Plus, with the built-in video editor, you can also choose to trim, crop, add watermark to your original videos. You are welcome to follow the step-by-step guide to convert Sony A6300 4K XAVC S to formats that are compatible with Pinnacle Studio file on Windows PC.

Hot search: 


Free download the best 4K XAVC S to Pinnacle Studio video converter:


Other Download:
- Pavtube old official address: http://www.pavtube.com/video_converter/
- Amazon Download: http://download.cnet.com/Pavtube-Video-Converter/3000-2194_4-75734821.html
- Cnet Download: http://download.cnet.com/Pavtube-Video-Converter/3000-2194_4-75734821.html

Simple Guide to Convert incompatible videos to MPEG-2 for Pinnacle Studio 
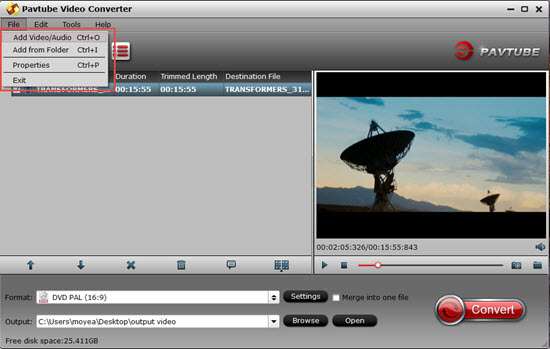
Step 1: Add Files

Click "Add video" button to browse for and select the file you want to convert for Pinnacle Studio . Alternatively, drag & drop source videos to the project area. If you want to combine several files into one for better enjoyment, you can choose "Merge into one file" option.


Step 2: Edit or Create (Optional)

It's an optional step that allows you to edit source vidos. You are allowed to customize your videos or even create your own videos as you desire by clicking "Edit selected task". The converter comes with all regular video editing tools like Trim, Crop, Effect, Subtitle, Watermark. For basic video editing tasks, you can even replace your Pinnacle Studio with it.

Step 3: Set Pinnacle Studio -friendly video format

Click "Format" drop-down box, and then choose "MPEG-2 (*.mpg)" from "Adobe Premiere/Sony Vegas" category. Or Choose the AVI format which is also suitable for Pinnacle Studio.


Step 3. Start conversion

After all the necessary settings, hit the "Convert" button at the bottom right corner. Now your 4K XAVC S video files will be converted into AVI which are ready to be imported into Pinnacle Studio smoothly without hassle. After conversion, you can get the generated files under "Open" panel to get the generated files for loading in Pinnacle Studio 17/16/15/14 perfectly.

Read More: