Monday, March 30, 2015

2015 Easter Gift! Mac Video Converter Has 50% Discount in Pavtube !

Just come and take a look! Pavtube Studio is going to offer us a big 50% discount of Video Converter for Mac, which is a professional converting tool for all users! What are you waiting for? Let’s just enjoy this Easter surprise in the following guide!


Follow the customs to celebrate the 2015 Easter Sunday!
According to the long history from west, Many churches hold special services on Easter Sunday, which celebrate the Jesus Christ's resurrection after his crucifixion. Many people also decorate eggs. These can be hard boiled eggs that can be eaten later, but may also be model eggs made of plastic, chocolate, candy or other materials. It is also common to organize Easter egg hunts. 

Big Surprise During 2015 Easter Days---50% OFF of Pavtube Video Converter for Mac
Are you still interested in the old celebration activities during Easter days? Why not shoot some personal Easter videos with your friends? It is hot to share the personal movies online (YouTube, etc) after editing in NLEs like FCP,iMovie, etc. In this way, in order to remove the formats limitation, Pavtube Video Converter for Mac can handle all the video conversion work well. Especially from 2015 March 30 to April 5, we can enjoy the big 50% discount there! Is that cool?

Main attractive features you can learn more here:
1.Convert all popular media formats
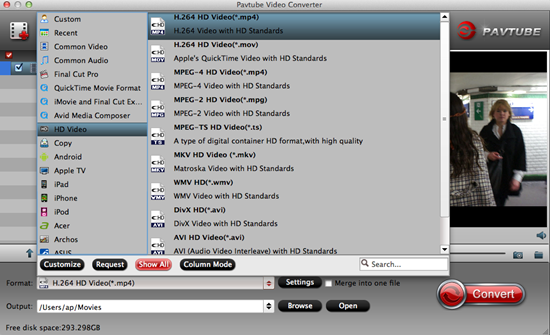
Convert between the most popular media formats with Pavtube Video Converter for Mac: DVD, AVI, MP4 (including H.264 codec), FLV, SWF, MPEG-1,2, MPEG-TS, WebM, OGV, RM, 3GP, MKV, WMV, and QuickTime video (MOV). Process 4K Ultra HD video. Upscale SD to HD. Convert audio files in AAC, FLAC, MP3, Monkey’s Audio, OGG, WAV, M4A, and WMA. 

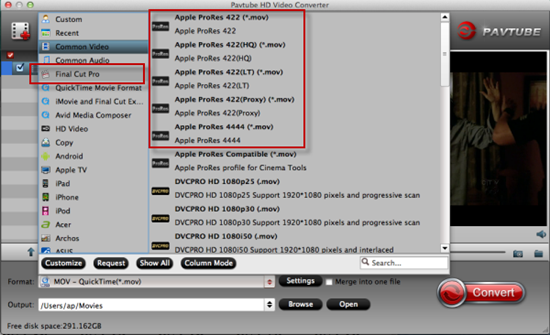
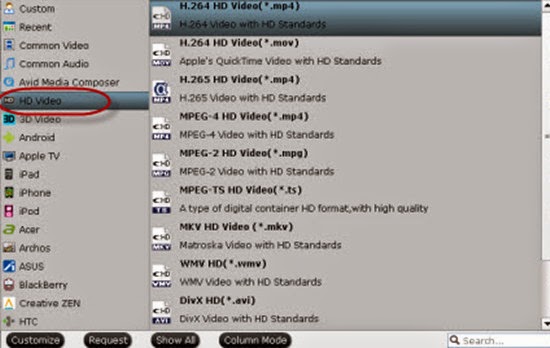
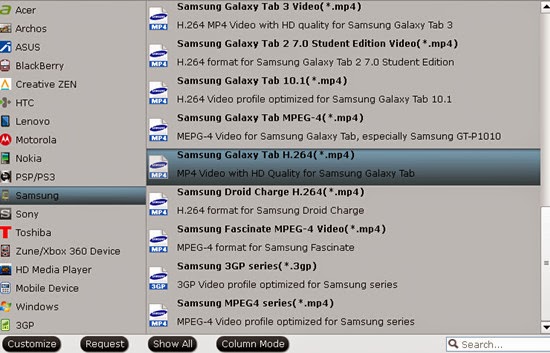
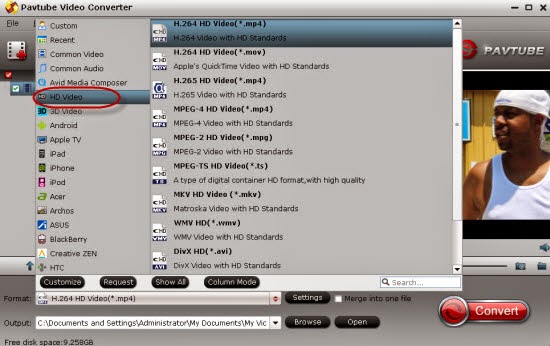
2. So many output formats for NLEs and media devices
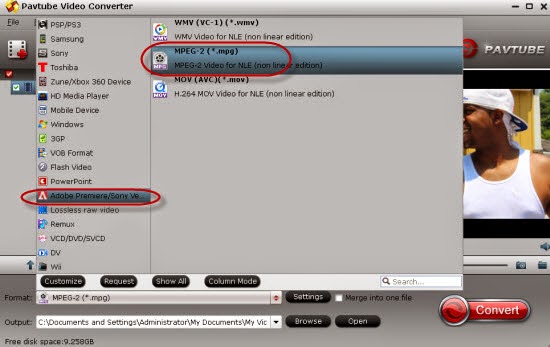
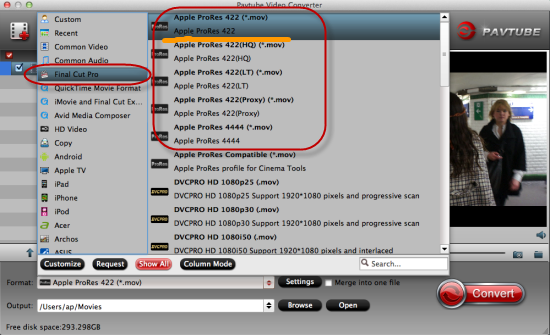
There are various media devices and smart phones or different editing tools offered on the output list for us to choose if we need. Such as the Apple devices, Android devices or other NLEs like FCP, iMovie, FCE, Avid MC, Premiere Pro, etc. So you won’t worry the output ones there.

3. Edit and enhance your video before converting
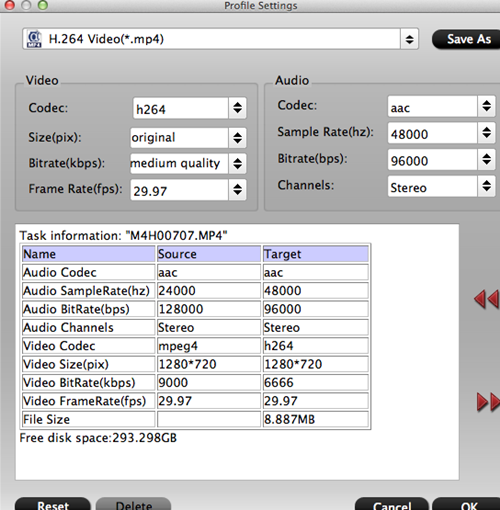
Take advantage of the handy editing tools that let you adjust your video however you want. Cut or trim media files and convert any selected section of your movie. Merge multiple video or audio files. Crop, flip, and rotate your footage. Fine-tune video parameters: brightness, contrast, and more. Improve the quality of your video with the help of auto filters. Add captions and overlay watermarks to complete your video.

4. Easy operation and faster conversion speed
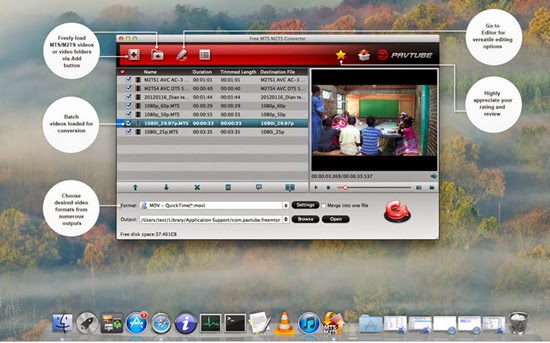
Due to the size of your original files and the output video formats you choose, you won’t wait the conversion results for a long time! Moreover, we would like to mention that it has the concise interface and simple items we can learn well.

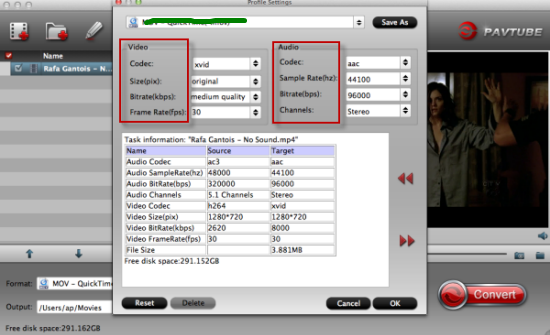
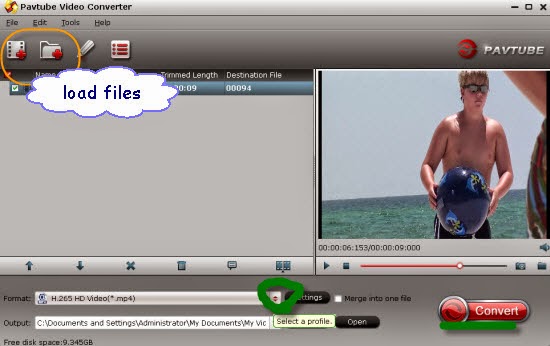
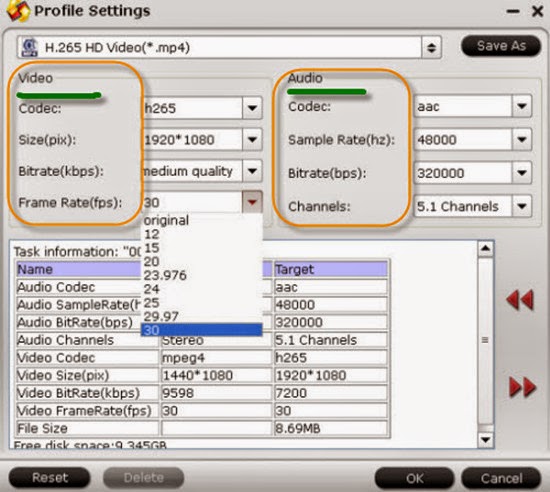
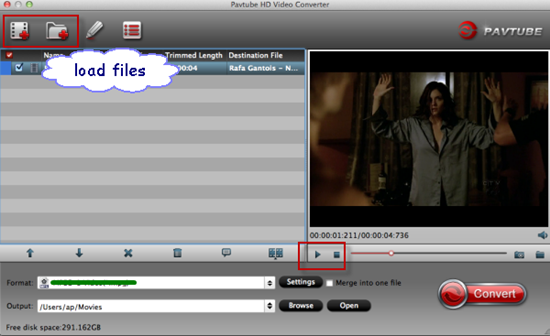
In a word, just open the main interface, with ‘Add files’ we can easily load them in. Then on the output list, drop down the list to find the suitable one as output. Next, if you are advanced users, you may need the ‘Settings’ or ‘Edit’ buttons to adjust more video and audio parameters there. Finally, click the ‘Convert’ button, we can easily get the conversion started! 


No matter for sharing the Easter videos on websites or editing the celebration movies with NLEs, this professional Mac Video Converter won’t make you disappointed! Just come to have a look! 50% discount in Pavtube Studio during Easter celebration days!

Edit Olympus Stylus SH-2 1080 60p MOV Videos in FCP X

What’s the purpose of this guide? To remove the troubles of editing Olympus Stylus SH-2 1080 60p MOV Videos in FCP X, we are here writing this article to help you easily convert the 1080 60P MOV to ProRes MOV, which can be suitable one for FCP X as we all know.  It introduces a way of converting Stylus SH-2 H.264 MOV files to ProRes .mov for editing in FCP X with optimum performance.


‘You know, it is cool that Olympus Stylus SH-2 is equipped with Advanced Movie Modes for powerful video recording functions, including Full HD 1080p captured at up to 60 frames per second for smooth motion playback of fast action footage. I always use it to record some exciting moments in order to share them online with many net friends. Unfortunately, it would be a little hard for us to edit them in FCP X due to the limited video codec you know.’

I have met the similar questions before, I shot the recordings also encoded by MOV from my Nikon D5500, while for editing D5500 MOV in FCP X, something wrong happened as usual. In this case, we need a professional FCP X video encoder to work this job well. The Stylus SH-2 records video files in H.264 codec, which is a codec suitable for capture and delivery, but not quite proper for editing. Seeking for a faster and easier way to remove the troubles? Pavtube HD Video Converter for Mac could be such a nice one for us to convert the Olympus Stylus SH-2 1080 60p MOV to ProRes MOV for FCP X. Let’s enjoy more details below:

Guide on how to transcode Stylus SH-2 1080 60p MOV files for editing in FCP X:
Step 1: Open up HD Video Converter for Mac as a Stylus SH-2 Video Converter for Mac. When its main interface comes up, click ‘Add File’ to load your source media. 


Step 2. Select output format for your editing program. When you come to the output list here, we suggest you to drop down the list and find the ‘Final Cut Pro’>>’Apple ProRes Codec 422 (*.mov)’ as the best one for FCP X. For others? You can find them on the list or just tap them in the searching box.


Step 3: Custom video and audio settings (optional)
If necessary, you can click ‘Settings’ button and go to ‘Profiles Settings’ panel to modify video and audio settings like video encoder, resolution, video bit rate, frame rate, aspect ratio, audio encoder, sample rate, audio bit rate, and audio channels. 


Finally, just go back to the main interface and hit the ‘Convert’ to start Olympus Stylus SH-2 movies to MOV Conversion on Mac. Then without waiting for a long time, we can transfer the files into FCP X for further editing. So just enjoy shooting videos with your Olympus Stylus SH-2.

You may also like:

Thursday, March 26, 2015

Compress MTS to MP4 with Handbrake/Free MTS/M2TS Converter

Hi guys, If you need to compress your .mts files to a smaller size more suitable for a slower internet connection upload you can use a free program called Handbrake to convert these .mts files into compressed .mp4 files. Moreover, to convert the MTS to MP4 freely, another free MTS/M2TS converter for Mac is also introduced in this following article. 

Part 1.Handbrake---a normal tool to convert your MTS/M2TS videos
As a free Mac Converter, Handbrake enables you to convert your MTS or M2TS camcorder videos to MP4 or MKV (only two output options provided.) It’s a piece of cake to convert MTS or M2TS with Handbrake, of course. But it’s a bit complicated to set the video settings. And Handbrake has already preset some output video formats for iPhone, iPod, Apple TV and more which you can choose when it’s needed. More, as usual as others, with several steps, you can easily finish the MTS/M2TS transcoding. 


1.Download Handbrake to convert your MTS/M2TS video
2.Add your MTS/M2TS files to the Mac app
3.Set the output format to be suitable
4. Start to convert MTS, M2TS with Handbrake

Part 2.Free MTS/M2TS Converter for Mac---No paid for converting MTS to MP4!
This is a Mac AVCHD Converter from Pavtube Studio that works for Canon, Sony, Panasonic and JVC cameras. It's specific on converting AVCHD/MTS/M2TS files to various video formats in sync and encoding them with preferred video codec for NLE programs on Mac, such as Final Cut ProiMovieAvid Media Composer, etc. It's also a smart assistant to well sync your footage to portable devices for playing back on Apple iOS devices like iPad Air, iPad Mini 2, iPhone. To compress MTS to MP4 as the common ones, there are enough output items for your choices. 

Easier steps you could learn to convert MTS to MP4 freely:

Install and launch this free MTS to MP4 converter on Mac, open the main interface and you could click the ‘Add files’ to load your files in. Directly drag the files in is also available.


Then go to the output list after hitting the ‘Format’ bar, here if you wanna MP4 to be the output one, just select the ‘H.264 HD Video(*.mp4)’ on the ‘HD Video’ column. Or for others, we just need to drop down the list and find it easily. Tap the formats in the searching box is also a good idea.


Custom video and audio settings (optional)?
Generally speaking, the default settings will ensure you a good balance between file size and image quality. But you can still click ‘Settings’ button to modify video and audio settings like codec, resolution, bit rate, frame rate, sample rate, and audio channels in your own way.

Go back to the main interface, the big red icon ‘Convert’ is waiting for your choice! With this easy to use MTS to MP4 converter for Mac, are you still confused with the questions of MTS workflow? Freely compress your MTS files, freely enjoy your MTS videos!

Notes: Since this is a free MTS/M2TS converter for our users, it still cannot support some other latest high definition video codec. In this way, we highly recommend you the updated version Pavtube MTS/M2TS converter for Mac. With this new version, even for the latest H.265/HEVC codec, it can also support for encoding and decoding, is that cool? Just update is for a nice try!

More?

Thursday, March 19, 2015

Play MKV, VOB, AVI, FLV, Tivo Files on Galaxy Tab 4

Larger screen, higher definition, Samsung Galaxy Tab 3 has brought users a greater and newer experience with the faster processor. And it would be a wonderful experience to watch your favorite videos and movies on it since it can handle Full HD 1080P videos. However, if you are trapped in watching compatible videos like MKV, VOB, AVI, FLV, Tivo on Samsung Galaxy Tab 3, in this page, we are glad to tell you how to easily watch different videos on Samsung Galaxy Tab 3.


Frankly speaking, with the Android OS operation, it would be better for us to convert these MKV, VOB, AVI, FLV, Tivo files to MP4, which we all think the best one of the Android supported video formats for smoothly viewing. According to this case, we are glad to tell you Pavtube Video Converter could help you a lot in converting MKV, VOB, AVI, FLV, Tivo, etc to MP4 workflow for Galaxy Tab 3. In this way, you can play videos in virtually any video formats on your Samsung Galaxy Tab 3(10.1/8.0/7.0) without any troubles.

Notes: For Mac users, you can download it for your iTunes with the Mac version. You won’t be disappointed with it! 

For other download sites?
http://download.cnet.com/Pavtube-Video-Converter/3000-2194_4-75734821.html

How to convert MKV, VOB, AVI, FLV, Tivo videos to Samsung Galaxy Tab 3?
Step 1.Launch the program and add videos in the following two ways: 1> Click Add button to choose video files from your hard drive for converting. 2> Directly drag the movies you want to convert to the left item bar. To save your time, you can add multiple files for converting at a time since batch conversion is well supported


Step 2. Click on the pull down menu of Format and choose Samsung > Samsung Galaxy Tab 3 Video (*.mp4) as the target format. It ensures the best video quality on Galaxy Tab 3.


Step 3. Before the conversion, you can edit your videos by trimming, cropping, adding watermarks, inserting subtitles and more to get the exact effect and feel you want. (Click the Edit button to open the video editing window, where you can perform the operations.)


Finally, click the Convert button to start MKV/AVI/VOB/Tivo files to Galaxy Tab 3 conversion. When the conversion completes, click Open bar to locate the converted MP4 files. And now you're ready to transfer the videos to your Galaxy Tab 3: connect your device to computer via a USB cable and transfer the movies to it. Afterwards, simply enjoy kinds of the movies .mov, .avi, .vob, .mpg, .mts, .mkv on Galaxy Tab 3 on the go.

Any More?

Monday, March 16, 2015

Guide on Roku Best Supported Video Formats

Got a hobby of streaming your purchased, downloaded movies to Roku for nice watching? I have to admit that it’s indeed a wonderful idea for all video lovers, right? However the following page is talking on the Roku best supported videos and how to stream those incompatible ones to Roku for another way. 


What can Roku media player do?
Roku extends the capabilities of your TV and helps you to stream channels directly to your TV. In addition to these external channels, now you can enjoy the movies and photos from your smartphone to big TV screen with Roku media box. Many users want to use Roku as a streamer to cast local video contents to HDTV for playing, but they don’t know which format is supported for streaming, that’s why we are here to learn how to stream any Supported/Unsupported Video and Audio format from your mobile to Roku.

Best Video/Audio formats for Roku Media Player:
  • Video — MKV (H.264), MP4 (H.264), MOV (H.264), WMV (VC-1, firmware 3.1 only)
  • Audio — AAC, MP3, WMA, FLAC (firmware 5.3 and later), WAV (firmware 5.3 and later)
  • Photo — JPG, PNG, GIF (non-animated)

List of Roku unsupported format below:
Video format: DRM-protected content, common videos like 3GP, VOB, MTS, AVI, M4V, WMV, XviD, DV, MP4-XviD, DIVX, H.264, H.265 (HEVC), MP4-MC, OGV, ASF, MPEG-1 NTSC, MPEG-1 PAL, MPEG-1 SECAM, MPEG-2 NTSC, MPEG-2 PAL, MPEG-2 SECAM, DVD-Video NTSC, DVD-Video PAL, DVD-Video SECAM, FLV, F4V, SWF, 3GP, 3G2, etc.
Audio format: AC3, M4A, OGG, AIFF, AU, MKA, APE, M4B, M4R, etc.

Question: How to watch those unsupported videos on Roku Media Player?
If you have the video formats that Roku accepts, you can only cast them from phones to your TV via Roku, as long as you have an Apple device with iOS 4.3 or later, or Android phones or tablets. On the other hand, if you got some video formats that cannot be accepted by Roku Media Player well. Why not ask Pavtube Video Converter for Windows/Mac for a help? of converting your media to Roku supported formats like MKV, MP4, MOV, WMV for streaming with no quality loss. And what I’ve learned is that MP4 would be one best target format for it is fully compatible with nearly all media devices including iPad, iPhone, PS3, Apple TV, etc. If you are running on Mac OS X, etc.

How to make unsupported video formats accepted by Roku?
1.Run this Roku Movie Coverter; click the ‘Add’ button to load movie files to the program from your computer. You can also directly drag the video files into the program.


2.Hit the format bar on the main interface, here we can choose the desired format. Especially for Roku, we would like to introduce you the ‘HD Video’>>’H.264 HD Video (*.mp4) to you. You can have a try!


3. Tip: If you like, you can click “Settings” to change the video encoder, resolution, frame rate, etc. as you wish. Keep in mind the file size and video quality is based more on bitrate than resolution which means bitrate higher results in big file size, and lower visible quality loss, and vice versa.


Back to the main interface and click the ‘Convert’ icon there, we can easily start our work. Within several minutes, you can find the converted file on your computer by clicking the “Open” button. Afterwards, it’s free to stream your media files from Roku. Make sure the wireless network connection is accessible among the Roku and other devices. 

See Also:

Friday, March 13, 2015

Nikon D5500 to FCP X: Could D5500 MOV Be Available with FCP X?

From Nikon D5500 MOV recordings to Final Cut Pro X for editing? If you still have no ideas of handling this job well, why not read the following guide to learn how to easily convert Nikon MOV to ProRes MOV for a further dispose. Let’s find the solutions in this thread.

The D5500 supports a broad range of standard sensitivities, from ISO 100 to 25600, for superior image quality that is stable and reliable, even with shooting in dimly lit situations. You can record 1080 video at a high speed frame rate of 60p - perfect for capturing fast-moving subjects or creating. Usually, recordings from Nikon D5500 may encoded by H.264/MPEG-4, what a pity it seems not suitable for FCP best supported video formats


If you're looking for ways to convert Nikon D5500 video to Mac compatible video, you must have come across similar problems, either to play D5500 files on any Apple devices or even to iTunes, edit MOV movies in Mac video editors likeiMovie/FCE or share D5500 videos to online video sites. Actually, you're lucky since there are many tools that can convert Nikon footage on Mac OS X (including Lion and Mountain Lion).

Fortunately, there is an easy way to fix the issues---Pavtube HD Video Converter for Mac, which is a powerful video converter, editor and player. It offers an optimized preset Apple ProRes Codec 422 that would be so nicely for FCP X. Besides transcoding NIKON D5500 MOV video to FCP supported videos with optimized settings while keeping the video quality, the all-in-one and easy-to-use toolkit can convert all other popular video formats like AVI, MXF, etc. Brief steps are allowed below:

How to Convert Nikon D5500 MOV files for Editing in FCP X?

Step 1. Load .Nikon D5500 MOV files
Drag & drop Nikon D5500 MOV files to the program directly. Or click "Add File" to locate the Nikon D5500 MOV files you want to add. You can add several files to do batch conversion.


Step 2. Step 2. Select the output format
On the output list you can choose Final Cut Pro –> Apple ProRes 422 (*.mov) as the output format. The output video can be imported to FCP X/FCP 7/FCP 6 directly.


Tip: Furthermore, you are provided some useful edit functions cropping, trimming, adding watermark, attaching subtitles for pre-editing your video files so that you can simplify your iMovie editing.

Step 3. Start Nikon D5500 MOV to FCP conversion on Mac
Click the "Convert" button to start the NIKON D5500 MOV to Apple ProRes conversion. Just in a few minutes, you make it.

Finally, after the conversion, click "Open" to locate the result videos and then launch FCP X. as soon as you transfer the files into FCP X, you will find that it's just a piece of cake to edit Nikon D5500 MOV files in FCP X.

More?

Wednesday, March 11, 2015

Convert Cyberlink YouCam WMV for Sony Vegas Pro 13/12/11 in MPEG


It seems that Sony Vegas Pro 13/12/11 cannot directly accept the WMV files which come from Cyberlink YouCam. As we all know that MPEG-2 MPG is best formats for editing in Sony Vegas, should we need to convert Cyberlink YouCam WMV files to MPEG foe smoothly editing in Song Vegas? Any good methods there for us to natively import Cyberlink YouCam WMV to Sony Vegas Pro 13/12/11?

Cyberlink YouCam is an application to truly enable Windows system to be used as smart cameras to capture personal photos and videos. For Windows users, it is convenient to record some favorite and necessary photos and videos and then for further editing, right? In this case, Sony Vegas Pro could be the best editing program for us. If you have collected some vivid WMV videos from YouCam, why not import your YouCam WMV files to Sony Vegas Pro for further dispose? 


‘I’d like to show you guys the problems when I adding YouCam WMV videos to Sony Vegas here. Something like video preview lag, render slow or even won’t work always appeared there on the screen.’ Due to the Sony Vegas Pro limited formats, not all videos can be directly added in, such as H.265(latest codec), MTS, or MXF files etc. Actually, it’s an easy trick. What you need to do is to convert YouCam .wmv to MPEG (MPEG-2) for use in Sony Vegas NLE as it does not handle .wmv well. Pavtube Video Converter for Windows/Mac can no doubt be the professional WMV to MPEG converter for Sony Vegas Pro. No matter what version of the NLE apps you are applying, and what Windows system you are working on, this video converter will assist you to import FLV, MOV, MKV, AVI, MP4 and even Nikon, Canon, JVC, Panasonic camcorders files to Sony Vegas Pro, Adobe Premiere Pro, Pinnacle Studio, Windows Movie Maker, etc. Let’s learn more details on conversion steps.

Step 1.  Download, install and run the WMV to Sony Vegas Pro Converter to load your source .WMV videos with ‘Add videos’ or ‘Add from folder’.  It supports batch conversion, so you are allowed to add multiple files to convert at a time.


Step 2. Click on the dropdown menu of “Format”, and then follow Adobe Premiere/Sony Vegas” and select “MPEG-2(*.mpg)” as the output format. 


Step 3. Tip: Customize the video Settings. You can click “Settings” button to adjust output parameters, including the Bitrate of Video and Audio, the Codec of Video and Audio, Video Size, Sample Rate, Frame Rate, Audio Channels, etc. 

Finally, hit the ‘Convert’ button on the main interface to get the work started. Once the conversion completes, you can click “Open” button to get the generated MPEG-2 files for Sony Vegas Pro easily. Then, it would be easy to import and edit WMV with Vegas Pro 9/10/11/12/13. 

More:

Monday, March 9, 2015

Edit 4K XAVC Footage with No Rendering in NLEs

Editing or playing with 4K videos is no longer a pie in the sky. With the output recordings encoded by 4K XAVC for Sony FDR-AX1, we are glad to enjoy the 4K videos after edited in NLEs without rendering. In this article, we can get some XAVC tips on editing our 4K XAVC footage nicely.

The FDR-AX1 records 150Mb/s and for 1920x1080 at 60p you'll get 50Mb/s. But the editing workflow on Mac with AX1 4K XAVC S files is not so fluent. You may encounter problems when you want to import Sony AX1 XAVC S files to some hot editing tools or transcode XAVC to common formats on Windows/Mac, such as AVI, MOV, MP4, WMV, etc. or due to the high definition we can enjoy, someone would like to watch 4K XAVC on HDTV, right? Frankly speaking, that’s the main point we are talking in the following article.


How to edit our 4K XAVC recordings in NLEs with no rendering?
In order to edit Sony AX1 or other output 4K XAVC S clips in NLEs without crashing problem and avoid rendering, we here strongly introduce you the Pavtube Video Converter for Windows/Mac, which we also called a professional XAVC video converter to solving some XAVC incompatible issues. The reason why it has a good reputation among our users is it has the various output items for NLEs such as FCP, Avid MC, Premiere Pro, iMovie, etc. Do you wanna a try?

Show you how to transcod 4K XAVC files without rendering here:
Step 1. Free download and install 4K video converter Mac version, you can run this program on Mac OS operation systems. Open the main interface and tap the ‘Add videos’ and ‘Add from folder’ to let them in.


Step 2.  After you imported the 4K files, please click format column to choose output video format you need, such as MP4, MOV, AVI, MKV, etc. just choose according to your need. Especially for those hot NLEs, we suggest you to drop down the output list to find the individual ones. For example: ‘Final Cut Pro”>>’Apple ProRes codec 422 (*.mov)’.(FCP supported video formats) Others you can easily find them there.


Step 3. To preserve the high quality after conversion? After you selected the video format, you can click settings button to adjust the output parameters, such as adjust the resolution to 1920*1080, or choose original 4K resolution for output; adjust the bitrates can control the output video’s quality, you can adjust it to 2000-5000 kbps.


Conclusion: When your 4K files are converted, you can open the output folder and get the videos that you need. After transferring files into NLEs, such as FCP, it’s your time to edit the files with your own style. Just enjoy it! 

Related:

Friday, March 6, 2015

Play Sony AX100 4K XAVC Movies on HDTV

‘I purchased the Sony AX100 4K camcorder and shot some 4K recordings there several days ago. In order to check the high definition of the recordings, my friends suggested me to add them into HDTV as a try. However, errors like ‘unsupported’ always appeared there on the screen. Now I am finding some efficient ways to watch the 4K XAVC movies on HDTV smoothly’


In recent years, more and more video loves would like to enjoy the 4K high definition movies as it is becoming hotter and hotter in our daily life. Do you have some 4K videos recorded by camcorders or downloaded from online websites? Maybe you have, after got the 4K videos, you may want to watch 4K videos on HDTVs right? While with the HDTV best video formats limited, we cannot add 4K XAVC to HDTV so easily. Such problems may also happen when editing 4K XAVC in NLES, like FCP or playing on media players like VLC, etc. How could we solve the issues when enjoying 4K XAVC movies on HDTV?

Best 4X XAVC to HDTV converter to solve the issues well
To make the 4K XAVC videos more suitable with HDTV, we here would like to introduce you the professional 4K XAVC to HDTV converter---Pavtube Video Converter, which we can take to work with smoothly. We can look it as the professional HDTV assistant to help us a lot in watching 4K XAVC files, such as Samsung 4K TV, Sony 4K TV, Panasonic 4K TV, LG 4K TV, etc.

How to work this 4K XAVC to HDTV convert on Windows well?
1. Free download and install 4K video converter Windows version, you can run this program on Windows 10/8.1/7/XP, etc Open the main interface and tap the ‘Add videos’ and ‘Add from folder’ to let them in.


2. After you imported the 4K files, please click format column to choose output video format you need, such as MP4, MOV, AVI, MKV, etc. just choose according to your need. If you want to play videos on 4K TV, we recommend you to choose HD Video -> HD MP4 (*.mp4), this format is well supported by most HDTVs.


3. After you selected the video format, you can click settings button to adjust the output parameters, such as adjust the resolution to 1920*1080, or choose original 4K resolution for output; adjust the bitrates can control the output video’s quality, you can adjust it to 2000-5000 kbps.


Conclusion: When your 4K files are converted, you can open the output folder and get the videos that you need, now you can copy the files to USB Flash Drive, and then you can play 4K files on 4K HD TV with compatible format, and you can copy videos to other playable devices for watching as you want.

More related:

Wednesday, March 4, 2015

Can't Add MP4/MPEG Files to iTunes? Solved!

Can't add mp4 to iTunes or import MP4 files to iTunes successfully? I think most people who use iTunes encounter the following similar issues if they wanna enjoy movies on iPhone, iPad or other Apple devices. MP4, as a container format, differs in video codec. If your MP4 files are rejected by iTunes, it's most likely the codecs in MP4 files are unaccepted by iTunes. Thus we may need a professional MP4 to iTunes video converter.


Explanation on why MP4/MPEG files refused by iTunes sometimes:
Due to the iTunes best supported video formats, we can surely import those suitable videos to iTunes for transferring to Apple devices. While for MP4 media container format, it is encoded by many different video and audio codecs like DivX, Xvid, H.264, H.263, MPEG-4, AC3, WMA, AAC, etc. If the MP4 video is encode with iTunes unsupported video or audio codec, iTunes will not add and play it.

Pavtube Video Converter for Mac/Windows---Best MP4 to iTunes converter for adding files.
In order to solve the issue of "can't add MP4 to iTunes" or "can't transfer MP4 to iPhone, iPod, etc via iTunes", we strongly recommend converting MP4 to iTunes supported formats. To do this, you need a powerful yet easy-to-use MP4 to iTunes Converter. It has the feature of converting various kinds of MP4 files to iTunes recognized MP4 format, no matter the MP4 files are encoded with video codecs like DivX, Xvid, H.264, H.263, MPEG-4, etc or audio codecs like AC3, WMA, AAC, etc.

How to convert MP4/MPEG to iTunes with simple steps?
Step 1 Add MP4 to the program
Just drag and drop your MP4 file to the main interface of Pavtube MP4 to iTunes Converter to load file soon. Or click "Add File" button of the program to open your source MP4 file.


Step 2. Set MP4 as output format
Click the drop-down button if you have come to the output list. Here we should choose the right formats for iTunes. ‘HD Video’>>’H.264 HD Video(*.mp4)’ as the most typical suitable output for iTunes.


Step 3. Custom your MP4 videos to make them fit your player better
You can adjust your Bit rate and Frame rate in this "Settings" UI by clicking the "Settings" bottom beside the format bar. Take the following screen as a reference.


Conclusion: Hit the ‘Convert’ icon and if all seems to have gone well, open iTunes and transfer the converted movies to your iTunes library and then sync them to your iPhone/iPad/iPod. Just enjoying them by yourselves!

Read More: