Saturday, September 27, 2014

Released!!! An amazing update of Pavtube HD Video Converter for Mac 3.6.1

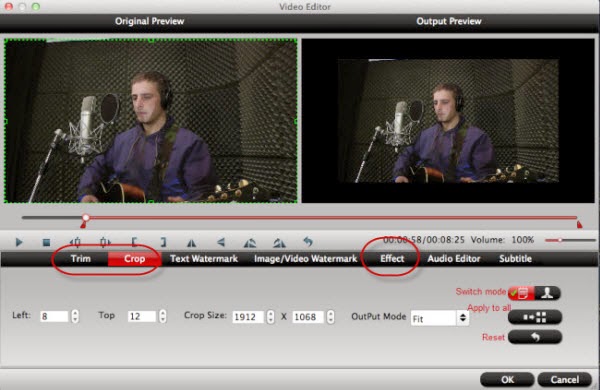
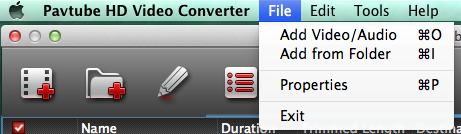
Good News! We are so proud to announce that Pavtube has an amazing updated version of its all multimedia tools. Acted on customers requests and Pavtube adds some amazing new features at the latest release. 

What's new?

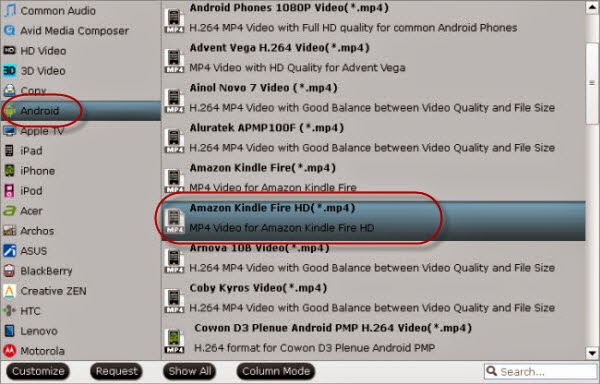
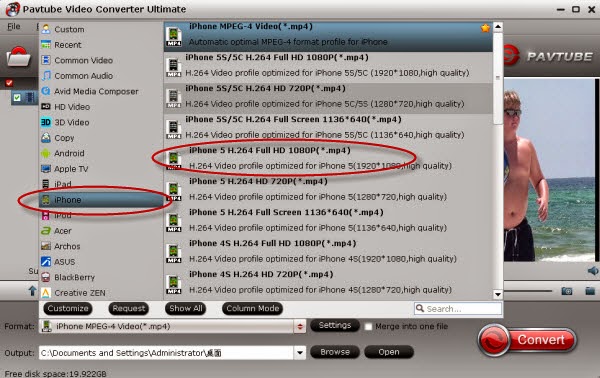
1. Add profiles for iPhone 6, iPhone 6 Plus and Samsung Galaxy Note 4
2. fix some bugs

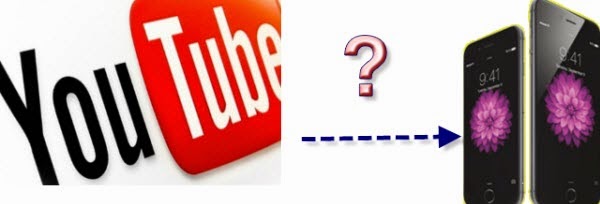
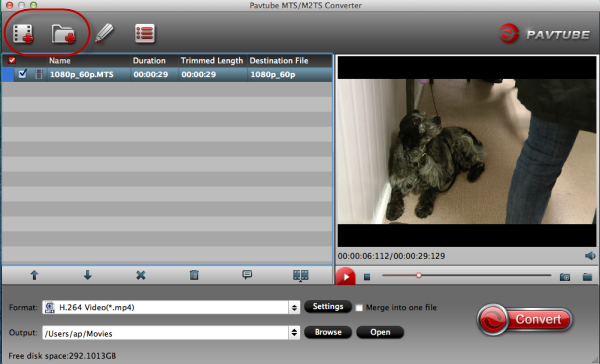
The new version of Pavtube HD Video Converter for Mac 3.6.1 is specially designed for converting your recored MTS/MXF/MOV/MP4/Tivo videos to iPhone 6, iPhone 6 Plus and Galaxy Note 4 for watching!

new version of Pavtube HD Video Converter for Mac

Version: 3.6.1

Supported OS: Windows 2003/XP/Vista/Windows 7/Windows 8/Windows 8.1

Download the lateast version of Pavtube HD Video Converter for Mac here.
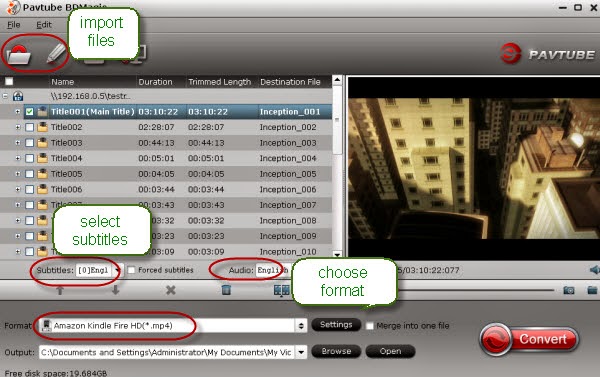
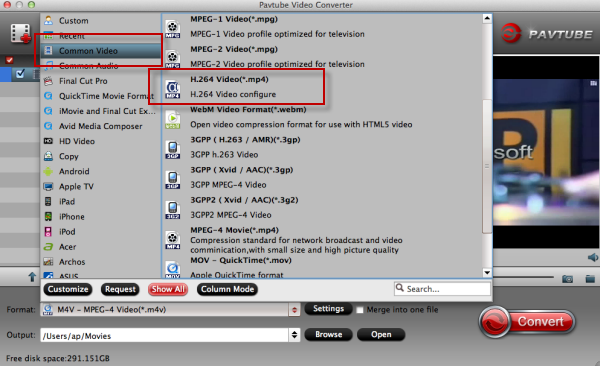
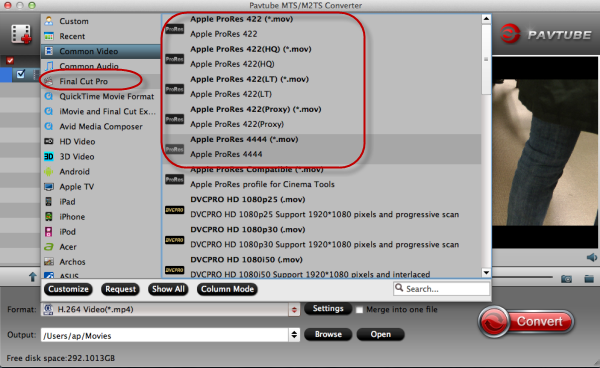
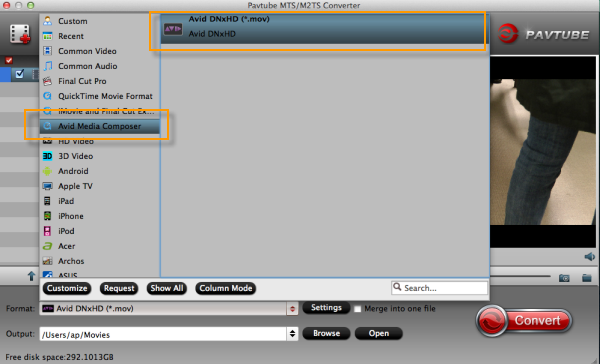
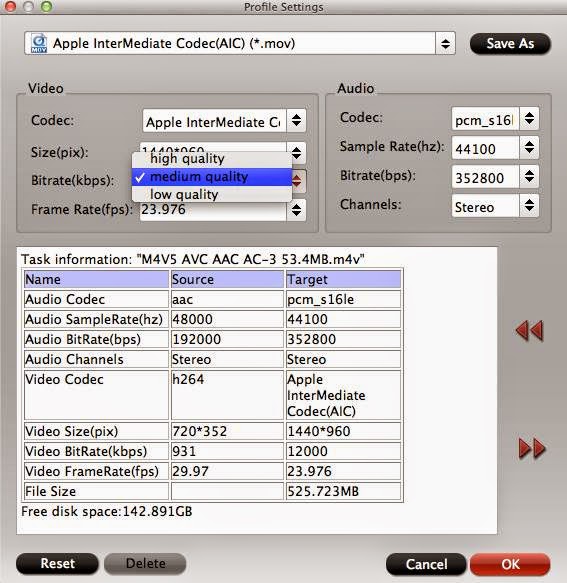
Three new profiles:

iPhone 6 Plus Video Format

iPhone 6 Video Format

Galaxy Note 4 Video Format

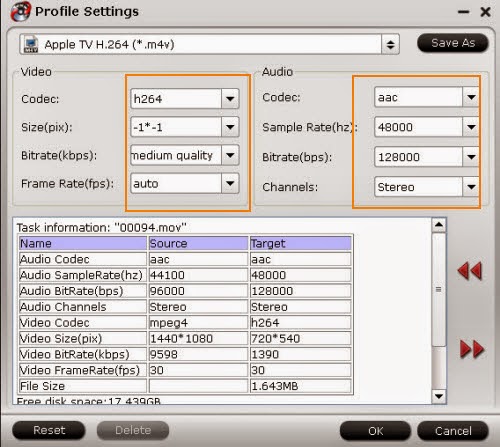
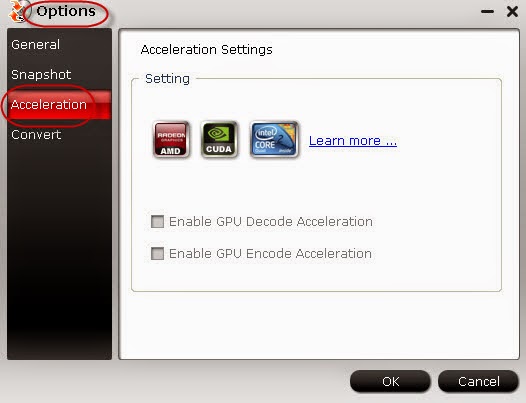
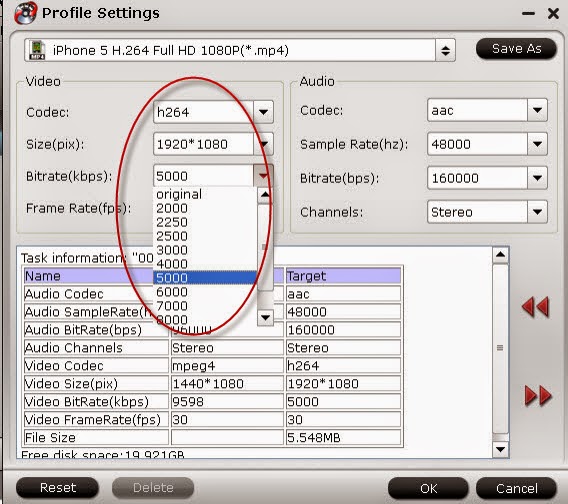
Best Profile Settings:
iPhone 6 Plus Video Settings

iPhone 6 Video Settings

Galaxy Note 4 Video Settings

Friday, September 26, 2014

Transfer Video and Music files to 6-inch Kindle Fire HD from PC

This guide specially told for those Android users on how to transfer videos and music files to 6-inch Kindle Fire HD from PC.


Equipped with a most impressive looking 6-inch tablet screen, Amazon Kindle Fire HD has attracted a lot of fans since it was announced on tablet market. Kindle Fire HD is perfect for browsing, playing, reading, and shopping on-the-go. What’s more, it comes with some special feature like Exclusive Dolby audio and dual-driver stereo speakers. But how to transfer contents to this tablet is always a problem for those new customers. Here we have figured out the easiest solutions to transfer videos and music to Kindle Fire HD from PC.

Solution No.1Drag or drop files---USB Wired Transfer
1.Connect Kindle Fire HD to your PC via USB. 2.Once you've connected your Kindle Fire HD to a computer with a USB cable (sold separately), your Kindle Fire HD will appear in the same location as external USB drives usually appear. For Windows users, this is typically in the "Computer" or "My Computer" menu. 3.Open the Kindle drive, you will see several folders inside, drag and drop them into the applicable content folder, Videos and Music are included.


Solution No.2 Download your favorite contents from Cloud
Do you know the wireless cloud service? From the Amazon Cloud, you can download such like Apps, videos, music or books that you want. Just connect your Kindle Fire HD with via Wi-Fi and choose to access your content through the Cloud.

Specific Step-by-steps

1.Download content from the Cloud to your device and confirm that your tablet is connected to Wi-Fi.
2.Tap the Cloud tab within Apps, music and videos, etc
3.Tap an item in the Cloud and download to your device.

Solution No.3 A third-party friend---DoubleTwist
DoubleTwist---a friendly tool that can manage and sync your contents to your device well. Not only for your media but also for your playlists and track ratings. You can downloadhere and install it on PC with installation instructions.

Other Tips for synchronizing incompatible videos to Kindle Fire HD

For those senior Kindle Fire users, you must know that not all videos can be accepted by this tablet except for MP4,3GP and VP8(.webm). So for other video formats such like MKV, WMV, AVI, FLV, MTS, M2TS, MOV, MPEG, MPG, MOD, TiVo, VOB, etc, we have recommend Kindle Fire HD Video Converter for you to convert various videos formats to native that you want. Download tips you can allow here.

To those DVD lovers, maybe DVD to Kindle Fire HD Converter is a good choice for you. With 6X faster conversion speed, it can export playable videos for Android and Apple Tablets. Download this way.

While for our Blu-ray fans, Pavtube BDMagic is no doubt a true friend that deserved to make. With professional Blu-ray/DVD to any video solution and customize with built-in video editor, it has popular among BD market. Why not have a try here?

What’s more, if you have the intention to transfer Blu-ray, DVD movies as well as your personal HD video files to Kindle Fire HD, you’d better get the best all-in-one video convert tool Pavtube Video Converter Ultimate to have fastest and most effective conversion. Download the program and get into the interface , you’ll find more useful items.

More guides?

Thursday, September 25, 2014

Work Panasonic HD MTS Files with iPad or Apple TV Well

Today we are here to have a hot topic on how to work Panasonic HD MTS files with iPad and Apple TV well in an efficient way.
If you got a hobby of taking home videos with some portable cameras, it’s a nice enjoyment when you watch your recordings on tablets or devices, such as iPad and Apple TV. Two guys which can play indoor or outside. Let me show you an example:

‘Hello, everybody! When we have family meetings or outdoor activities, I’m used to recording HD home videos with a Panasonic HD camera and use a NAS for storage. Cause the recordings are MTS files so as you know, they can’t work well with my iPad or Appple TV. I will be appreciate if there are any solutions to convert MTS to M4V files with original HD effects too.’

For searching online with the key words’ MTS Converter’, surely there are a few professional converting tools. But do you observe that HD MTS Video Converter is the best one which has been estimated well. Just with the simplicity of the UI and over more versatile videos offered, it is popular among videographers.

Before we introduce some main steps of how to convert MTS files to M4V videos with HD retained, here are two additional items you deserve to know.

Tip 1. For Windows users, we can save much time for waiting your conversion, Why? Get into the ‘Options’ and you will see the ‘Acceleration’ choice. Click it if you are in a hurry.


Tip2.Extra ‘Editor’ for those advanced users. Open the pencil icon to walk into another interface. ‘Trim’ to make the suitable length of you output video. ‘Crop’ to cut off unwanted clips. You can also add some ‘Subtitles’ to explain something to the audience.


Main steps of converting the Panasonic MTS files to HD M4V are showed here. For a first step, add your MTS files with ‘Add video’ or ‘Add from folder’. Then come to the most important point, choose the best format, click ‘Format’ list to find the item’ Apple TV’>>’Apple TV H.264 M4V(*.m4v). For iPad, ‘iPad’>>’iPad Video H.264 (*.mp4). Don’t know clear how to transfer videos from iTunes to iPad? Open here to get the answer.

Oh, almost forget to mention the ‘Settings’ button for you! For more video size, frame rate, bitrates or even audio channels. You can have a try here. Like the picture below:


For all iPad or Apple TV fans, if this guide helps you a lot, please leave us some comments below. Thanks a lot.

More:

Tuesday, September 23, 2014

Rip Blu-ray to MP4 for Playing on Kindle Fire HDX

For those Android fans, this paper can tell you something about how to rip Blu-ray to MP4 for playing on Kindle Fire HDX.

For those Android tablets fans, they must have a familiar sense with Kindle Fire HDX, which has equipped with 2.2 GHz quad-core Snapdragon 800 processor, it provides 3x more processing power than Kindle Fire HD. Furthermore, it also provides faster app launches, faster speed operation and better voice effect. It has been popular in our Android fans’ hearts. However, to those Blu-ray makers, it has still been a tough task to rip Blu-ray on Kindle Fire HDX because the supported video and audio formats for this tablet are listed below:

Amazon Kindle Fire HDX supported Video/Audio Formats:
Video Format: MP4, M4V, MKV, 3GP, VP8(WEBM)
Audio Format: Dolby Digital(AC-3), Dolby Digital Plus (E-AC-3),non-DRM AAC, MP3, MIDI, WAV

Due to the reasons listed above, if you want to make full use of this display to watch Ble-ray rips, we can’t figure out a proper method to do so. So here you have come to the right place. A Blu-ray to Kindle Fire HDX Converter to make it possible to offer you a reliable solution on ripping Blu-ray movies to MP4, which you can easily play back with your Kindle Fire HDX Tablet.

See alsoHow to transfer videos to Kindle Fire HD?

How to transfer Blu-ray to Kindle Fire HDX?


Load your source Blu-ray media
DownloadPavtube BDMagic and get into the interface, can you see the button ‘Load files’ ? Click it and load your Blu-ray movie contents from your BD drive. Also, you can select wanted subtitles and audio track, as the picture below:


Choose the best output format specially for Kindle Fire HDX.
This program has a high-light that it provides the special items for Android series, click the format bar to ‘Amazon Kindle Fire HD (*.mp4), as the target video format.


Additionally, it never mind if you are in a hurry with conversion, for Windows version, it has the personal design, ‘Acceleration’ from ‘Options’ button.


When all the work done above, just click the ‘Convert’ item to finish the conversion, frankly speaking, more items are waiting for your exploration here.

More guides:

Friday, September 19, 2014

Best Top 5 Video players for iPhone 6/6s or iPhone 6 Plus/6s Plus

With the appearance of Sixth- generation iPhone series on smart phone market, so many iFans would like to play videos with the 4.7 inches display or 5.5 inches display. However it might still perplex you a lot on the issues of playing videos on iPhone 6/6s or iPhone 6 Plus/6s Plus. Fortunately , today we’ll have the topic on how to choose a best video player for iPhone 6/6s or iPhone 6 Plus/6s Plus. 

Hot SearchBest iPad Video Players Best Galaxy S7 Video Player Best Windows 10 Media Players Best Torrent Players

Several top video players we have searched on Internet below:

Introduction of Top 5 Best Video Player for iPhone 6/6s or iPhone 6 Plus/6s Plus

Top 1. Player Xtreme HD
Player Xtreme is the app designed for both iPhone and iPad. iFans can watch your movies on the go from anywhere even if they’re in any format even if they don’t normally play or even sync with your iPhone! You can watching your favorite videos without conversion on iPhone 6 Plus and iPhone 6.

Top 2. VLC player for iOS
VLC for iOS can play all your movies and shows in most formats directly without conversion. You can synchronize media to your device using WiFi Upload, iTunes, Dropbox, or direct downloads from the web. VLC for iOS requires iOS 6.1 or later. It runs on any iPhone, iPad, or iPod touch. For iOS 5.1, an older version is still available.

Top 3. Air Playit HD
Air Playit is a video streaming software designed to stream videos audios to Apple devices, including iPhone 6 Plus and iPhone 6. Air Playit is capable of streaming 320 different video & audio formats to your mobile devices via WiFi and 3G/4G network. It acts as your personal audio video cloud server and lets you watch videos on the go.

Top 4. Oplayer HD Lite
OPlayer is used to boost your iPhone/iPod's media abilities, you can also use it to streaming audio and video over the internet. This app can be use to stream audio and video over HTTP, it can be use to play almost popular video formats like WMV, AVI, MKV, RM, RMVB, XVID, mp4, 3GP and MPG. Overall, OPlayer HD Lite is a must have application on your iPad to fully optimize the use of media using your phone.

Top 5. Versatile video player for iPhone 6/6s or iPhone 6 Plus/6s Plus

Even with a powerful video player, you may still get trouble during video playback on your the version trouble, operation problem, we here got another choice, Pavtube iMedia Converter for iPhone 6/6s or iPhone 6 Plus/6s Plus absolutely solve the problem during video playback on your iPhone 6/6s or iPhone 6 Plus/6s Plus by converting various video formats to MP4, MOV and M4V, which are three best formats supported by iPhone 6/6s or iPhone 6 Plus/6s Plus. As the picture showed below:


Another Highlight :

Except for common videos, this program can make Blu-ray and DVD sources playable on your iPhone 6(Plus). Is that cool? Also you can click here to get how to transfer videos to iPhone 6/6s or iPhone 6 Plus/6s Plus.


Pavtube has released iPhone 6 topic which covers everything you need when having fun with your iPhone 6/6s or iPhone 6 Plus/6s Plus?

Other Guides:

Thursday, September 18, 2014

Convert Torrent to iTunes on Windows/Mac with No Trouble

The following article can allow you the best method of converting different kinds of torrent to iTunes on Windows or Mac.

To those Apple fans, iTunes is so similar to them. They all know that due to the limitation format of the Apple devices, we can’t import all torrents to iTunes on Windows or Mac. iTunes only support MOV, MP4, and M4V video format, while Torrent movies are usually in AVI, MKV, or WMV format, not natively supported by iTunes. That’s why we can’t get it work well.

So what does Torrent exactly mean? Torrent clients, like Bit Torrent, uTorrent, Vuze, are great for downloading movies, videos and TV shows for free. Once you've downloaded torrent movies onto your computer, rather than watch them on your computer you may want to get them onto iTunes and playback on iPhone, iPad, iPod. In this case, you will have to convert Torrent movies to iTunes readable formats, such as MP4, MOV and M4V. Due to this case, we wanna get yourself a professional Torrent to iTunes Video Converter for Mac/Win from torrent to MP4, which is the best video format supported by iTunes, including Apple devices.

The next step-by-step guide can walk you through the process on how to easily convert or put Torrent videos onto iTunes. Read on

How to successfully convert torrent on iTunes on Mac or Windows?

1 .Free download the Torrent to iTunes Video Converter with Mac version or Windows version.


2. Launch the program and add your torrent with ‘Add videos’ or ‘Add from folder’, click the former for single video and click the latter for a group of videos clips. Select which you like better. 


3. Best iTunes supported video format for you, just click’ Common Video’ you’ll see a list with many outputs, just select ‘MP4’ as your best choice.


4. Edit your Torrent videos as you need. For further editing in output videos, the pencil icon ‘Editor’ must be a good assistant. Such as ‘Trim’ to decide your torrent length, ‘Crop’ to cut off your video edges or ‘Effect’ to make it perfect, etc. More items are waiting for your exploration.


When you start your conversion in Torrent to iTunes Video Converter For Mac/Windows, for those users who don’t know how to sync videos from itunes to  Apple device, such as iPhone or iPad, you can take a reference.

More you would like:

Add Blu-ray/DVD to iTunes 11  for Apple Devices
Play Torrent Video on Android, iPad and iPhone Freely
Play Internet torrents movies on Apple TV

Wednesday, September 17, 2014

Canon 7D Mark II Arrives with Amazing Autofocus System

The new Canon 7D Mark II is here, and at long last, as many Canon users would likely agree. Five years after the original flagship APS-C camera was released, Canon's made some significant strides in image quality and performance for both stills and video in a variety of areas. They've taken a lot of the technology and processing performance of the 5D Mark III and 1D X cameras, as well as innovations from the 70D and combined them into a new rugged, high-performance APS-C flagship HD-DSLR. 

At the heart of the camera is a newly designed 20.2-megapixel APS-C CMOS sensor. While that may sound familiar, given the 70D's identical resolution, according to Canon, the 7D Mark II's sensor is in fact an all-new design, with improved clarity over the 70D's sensor. However, like the Canon 70D, the new 7D Mark II brings over Canon's Dual Pixel CMOS AF live view focusing system, with some notable improvements with speed and sensitivity adjustments. 


Coupled with this new sensor is some serious processing horsepower. The new 7D Mark II features dual DIGIC 6 image processors, giving this camera more processing performance that any other EOS camera, including the 1D X and its dual DIGIC 5+ configuration! Thanks to the new sensor and the new dual image processors, the default ISO range is now 100-16,000 and expandable up to 25,600 and 51,200, which is a big jump from the maximum expandable ISO of 12,800 with the 7D. And the continuous burst shooting gets a bump up to 10fps with a 31 RAW/1090 JPEG buffer capacity. 

Alongside Dual Pixel AF, the phase-detect AF system has undergone a big improvement. For still photographers, and especially those who shooting sports, wildlife and other fast-moving action, the 7D Mark II is equipped with an all-new 65-point, all cross-type phase-detect autofocus system (5D Mark III and 1D X only had a 61-point, 41-cross-type AF system). The 7D Mark II utilizes the 1D X's AI Servo AF III for excellent subject tracking and face detection. 


For all the details about Canon's big upgrade to their flagship APS-C DSLR, head over to read our comprehensive, hands-on Canon 7D Mark II preview, or to see all the big changes from the original 7D, check out our in-depth comparison of the 7D Mark II vs. 7D

The new Canon 7D Mark II is set to be available this November and will be sold in both a body-only model with a retail price of $1,799 or with the EF-S 18-135mm f/3.5-5.6 IS STM lens for $2,149. Also scheduled to be available are the new BG-E16 Battery Grip and optional Wireless File Transmitter WFT-E7A Version 2, though shipping dates and estimated retail pricing have yet to be announced. Both the Canon 7D Mark II camera and Battery Grip are backwards-compatible to the current LP-E6 batteries. 

Tuesday, September 16, 2014

Download YouTube videos to iPhone 6 Plus and iPhone 6

Are you interested in watching some videos you like on iPhone 6 Plus oriPhone 6 from YouTube? Okay, let’s talk about this with other iFans!


Firstly, before we would like to play YouTube videos on iPhone 6 Plus or iPhone 6, maybe we should make it clear that why and how to share this idea, right? Let’s know more about YouTube and iPhone 6 Plus and iPhone 6.

How much do you know about YouTube?
YouTube is a video-sharing website on which users can upload, share, and view videos. It is a great resource. Since March 2008, YouTube HD Videos have been available in a range of quality levels, with the higher quality levels offering improved picture definition. In November 2008, 720p HD support was added. And in November 2009, 1080p HD support was added. Thus users are allowed to upload and enjoy the HD video on YouTube. So many video formats that can be supported by YouTube: MOV, AVI, MPEG, MPA, FLV, etc.

What's New in iPhone 6 and iPhone 6 Plus?
iPhone 6, beyond sporting the faster next-gen A8 CPU and the new iOS 8 operating system, also comes to us with a bigger yet clearer display with a 4.7 inch iPhone 6 with 1334 x 750 (348 ppi) and a 5.5 inch iPhone 6 Plus with 1920 x 1080 (401 ppi). And supported with a 1810mAh capacity and a 2915mAh capacity battery, iPhone 6 and iPhone 6 Plus are able to sustain 14/24 hours for 3G talk and 250/384 hours for standby, only support the format like MP4, MOV and M4V.

An idea of watching YouTube video on iPhone 6 Plus and iPhone 6?
From above we all know, except the three video formats that can be friendly with iPhone 6 Plus, for other videos, we need a YouTube to iPhone 6(Plus) Converter to make it possible to play videos on iPhone 6 Plus or iPhone 6 with no difficulties. Get more about it? Follow my steps here:

As same as other video converters, after you download the YouTube Video Converter, add your files from YouTube and click the ‘Format’ bar for output video format. The different point to others is this program has the special item s for smart phones, such as iPhone, Samsung, or HTC, etc. just click’iPhone’>>’H.264 Full HD 1080P(*.mp4)’


In order to make the output videos more suitable to iPhone 6 Plus and iPhone, you can so some ‘Settings’ with your YouTube Videos before you start ‘Convert’. Size 1920*1080, Bitrates 5000(kbps), etc.


Additional advice:
To those new iFans, how to sync your videos from PC to iPhone 6 Plus and iPhone 6 here may do you a great favor.

Click “File > Add Files to Library” at the upper left corner of the window. Then select the video files on your computer, then click Open to add the media files to the iTunes library.


Open My Computer, go to your movies folder and choose the movies you want to copy to your iPhone. Right click then choose Copy.


Related Giudes:
Best Video Formats For iPhone 6 Plus & iPhone 6
Any Ideas on 1080p or 720p SD/HD Videos to iPhone 6 Plus?

Friday, September 12, 2014

Play Blu-ray on iPhone 6 Plus with Multiple Audio Tracks

If you are fond of watching Blu-ray videos and have some ideas of playing clips on iPhone 6 Plus, may be here we can offer you some good suggestions.


How much do you know about iPhone 6 Plus?

Apple officially announced two new larger phones on Tuesday, the iPhone 6 with 4.7-inch display and iPhone 6 Plus with 5.5-inch display, both of which come in gold, silver, and space gray. The iPhone 6 Plus appears to have the same 16:9 aspect ratio as the iPhone 5S and 5C from last year, meaning older apps designed for the 4-inch screen found on those models, and the even older iPhone 5, won't be distorted running on the larger screen. Just like a little television, larger screen of iPhone 6 Plus has attracted a lot of fans, especially for some Blu-ray users.

Blu-ray on iPhone 6 Plus with multiple audio tracks? Is that possible?

Blu-ray, it is capable of storing high-definition video resolution (1080p).However, we can’t take BD movies to watch at anytime or anywhere. Somebody may ask, can we load BD movies on our smart phones for watching? Such as iPhone 6 Plus? Absolutely not if you have not read the paper below. Here we got a Blu-ray to MP4 Converter for Mac which also with multiple audio tracks and subtitles preserved.

To make it possible that play Blu-ray videos on iPhone 6 Plus with multiple audio tracks and subtitles.

Let’s begin! First, click ‘File’ to choose one that import your files correctly. ’Load from disc’ ‘Load from folder’ or ‘Load from ISO/IFO’


We have the specific item for multi-track conversion, ‘Multi-track Video’>>’Multi-track MP4 (*.mp4), which can be smoothly played on iPhone 6 Plus.


Don’t forget to change your multiple audio tracks. Can you see the ‘Settings’ button? Open it and choose the ‘Audio’ item. If there are some tracks you don’t like, you can click Settings button and go to Multi-task Settings window to uncheck and remove them under Audio tab, as the picture showed below:


What’s more, when you start conversion by ’Convert’ icon, list the Blu-ray clips on the left and tick the ‘Merge into a file’. You can find a big surprise!

Good Tip: Sync videos from computer to iPhone 6 Plus.

Plug iPhone 6 into computer via the USB cable. iTunes will launch automatically, if not, manually start it on your computer.  Click “File > Add Files to Library” at the upper left corner of the window. Then select the video files on your computer, then click Open to ‘add the media files to the iTunes library.’


Open My Computer, go to your movies folder and choose the movies you want to copy to your iPhone. Right click then choose Copy.


More guides:
Play Blu-ray on PC With Multiple Audio Tracks/Subtitles
How Do I Watch Blu-ray/DVD Movies on PS3?
How to Import Blu-ray to iMovie on Mac?

Thursday, September 11, 2014

Import Canon XF305/XF300 MXF to Apple Aperture 3 with multi-track

You may know canon xf305 or xf 300 serious camera, but do you know how to import this footage to Apple Aperture with multi-track for editing?


MXF---exists around ourselves!For all to know that MXF format footage has been widely used in some popular camera serious, for example:
Panasonic: AG-HVX200, HVX-203, HPX170/171, HPX2000, HPX-2100, etc.
Canon: XF100, XF105, XF300, XF305, C300, C500
Sony: PMW-350, PMW-320, PMW-100, PDW510, PDW-700, PDW-F800, PMW-500, PMW-200, PMW-160, etc.
To learn more about MXF, you can open here.

Do you know Multi-track?
is a method of sound recording that allows for the separate recording of multiple sound sources to create a cohesive whole. Multi-track became possible with the idea of simultaneously recording different audio channels to separate discrete "tracks" on the same tape.

Apple Aperture 3---works with a wide varity of videos formats, but not all QuickTime-compatible video formats are supported. It gives your photography the professional treatment it deserves, with more sophisticated tools to perfect your images and powerful ways to browse and choose your best shots. And now that Aperture is optimized for the Mac Book Pro with Retina display, it’s a whole new way to see everything.

Can we combine three guys together with MXF multi-track converter?
I don’t know if there are any MXF plug-ins that can change MXF videos into multi-track footage for editing in Apple Aperture 3. But I have actually found an efficient MXF Multi-track to Apple Aperture Converter for Mac to make our dreams come true.  It provides your requirements for preserving and mixing MXF multi-tracks/channels, converting MXF video files to popular formats for professional editing in editing programs.

Let’s start using MXF multi-track video converter!

Like the other common video converters, we need to load our Canon MXF files in iMixMXF with two buttons, ‘Add videos’ or ‘ Add from folder’. Then the most important point is choose the multi-track item for converting MXF to multi-track MOV, which is best supported by Apple Aperture 3.’Muti-track Video’>>’Multi-track MOV(*.mov). See the photo below:


Before you start your conversion, we can also click the ‘Settings’ for some other choices. Like the Video Size, Bitrates, Frame Rate, etc.


Additional Tip: What you unexpected for this MXF Multi-track Converter is that it also has the ‘3D Video’ function. It can Convert 2D MXF to 3D video formats in MKV/MP4/MOV/WMV/AVI with Side-by-Side, Top-Bottom, or Anaglyph 3D effect. To enjoy your 3D MXF video files at home cinema. Just change the step like this below.


Actually, I didn’t show all the features MXF multi-track converter has, just waiting for you to explore here.

More for you:
Edit Canon XF305 MXF in FCP X with Multi-track Audio
Handle Panasonic GH4 4K videos in Apple Aperture 3
Load Canon XF100/XF105 MXF files to FCP X 

Friday, September 5, 2014

Thought on A Workflow for AVCHD in FCPX and DaVinciResolve 9

When you have a thought on a workflow for AVCHD in FCPX and Resolve 9, why not take the following paper for a reference? 
Do U know here?

FCPX---(pronounced "Final Cut Pro Ten") is a video editing app for OS X from Apple Inc. and the successor to Final Cut Pro. FCP X was announced in April 2011 simultaneously at the Los Angeles Final Cut Pro Users Group held at Bally's Las Vegas and at the NAB Show in the Las Vegas Convention Center and released in June 2011.

Resolve 9As one of the earliest pioneers in post production products, Davinci Systems introduced several innovative products and was considered a significant player in the post production industry during its 25 years of operation.


With Blackmagic DesignDaVinci Resolve 9 Lite being free and a really powerful grading tool, many users are trying it out. It makes a great companion to Apple Final Cut Pro X and is really easy to move files between both applications via XML.

However, we have found that it performs really badly with AVCHD files. When you import AVCHD files, like those from the Sony NEX-FS100 / 700, FCPX creates ProRes Proxy files in the background. FCPX then uses those files in the timeline, so you are not actually editing with the AVCHD file but rather the proxy.

Here is a simple workflow for you to get a smooth working process in Resolve from FCPX with AVCHD. Let’s have a look.

In FCPX: Select your Event containing your clips. Select “File/Transcode Media…” and then select “Create optimized media”. Let FCPX do its thing. FCPX is now transcoding the AVCHD files to ProRes 422. Now export your project XML file.

In Resolve: Launch and browse your Final Cut Events Folder in Media panel. Find the Event folder for your project, inside it you’ll see a folder called “Transcoded Media” in there you’ll find 3 folders, open “High Quality Media”. Select all the files, right click and select “Add to Media Pool”.

Now move to the Conform tab and import the FCPX XML file and uncheck “Automatically import source clips into media pool”.Resolve will use the files already in the Media Pool, which are high quality ProRes 422 files, rather than the original AVCHD files. Things should run a lot smoother.

Question: How to make it easier for editing AVCHD MTS files both in FCPX or Resolve9?
Answer: An AVCHD MTS Video Converter for you!

If you wanna know more about the specific process of converting AVCHD MTS to Apple Prores mov for FCP and DNxHD mov for Resolve, here we can go.

Step1. Import AVCHD MTS files from ‘Add videos’ or ‘Add from folder’


Step 2. Make it easier to choose output formats.(1).’Final Cut Pro>>Apple ProRes 422 codec mov.’  (2).’Avid Media Compose’ >> “Avid DNxHD (*.mov)


Step 3.More ‘Settings’ for you! Set something about your video and audio.  Including Video size, bitrates and fame rate and more. Usually 1920*1080 video size and 30fps video frame rate are recommended for FCP editing. Well, if you prefer to work with 4K video, you can adjust video size to get 4K ProRes for FCP.


Tip: More small functions are waiting for you. ’Edit’>>’Crop, Trim, Subtitles, etc.’


Start conversion with ‘Convert’ button.

Not only for FCP or Resolve, but also for other editing system like iMovie or Premiere. MTS Video Cnverter for Mac will help you import the file correctly and saving the rendering time.

More:
Import Panasonic GH4 4K Videos to DaVinci Resolve 9
Make Avid DNxHD MXF Load to Resolve

Thursday, September 4, 2014

Talking about the Best 4K Ultra HD Video Converter for Mac/Windows

Along with the popular 4k video comes in our life and attract our attention, Do you know the specific details about 4k Ultra HD videos?


From standard 720p and 1080p, now the latest standard called 4k has come to our life. Don’t you know what does 4K means? You’re out! As we all known, video quality is one of the most factors that many people concern. So the 4K video is more and more popular with many people. If you've got some 4K Ultra HD videos, but have no idea how to work with them, you are in the right place. This article will give you some tips and tricks how to play, edit 4K videos in a simple way.


Definition and Development of 4K:

4K is a new resolution standard designed for digital cinema and computer graphics. It has following advantages: higher image definition quality, more detailed picture, better fast-action and larger projection surface visibility.

4K format was named because it has 4000 pixels horizontal resolution approximately. Meanwhile, standard 1080p and 720p resolutions were named because of its vertical resolution. The new standard renders more than four times higher image definition than 1080p resolutions for example.

Source of 4K video:

With the number of 4K-capable cinemas already high and growing fast, more and more new films are either being converted into 4K Ultra HD digital masters from 35mm celluloid, or filmed directly in the 4K digital format using a new generation of 4K-capable digital cameras or camcorders. Here we’ll introduce you some main camcorders which can produce’4K videos’

Sony serious: FS700, CineAlta F5, CineAlta F55, CineAlta F65
Canon serious: EOS C500, EOS-1D C DSLR
Panasonic Lumix GH4 serious.
Blackmagicserious.

Though 4K Ultra HD Video is so popular in digital area, including televisions and camcorders, the format 4K supported is not accepted by usual devices or editors. So is there any tool to convert or compress 4K Ultra HD Videos? Of course Yes! Here we got a professional 4K Ultra HD Video Converter for Mac/Windows which can provides so many usual formats like Apple ProRes 422(HQ/LT/Proxy) for FCP, AIC MOV for FCE and iMovie, MP4 for any mobile or PC video players, etc. In addition, this 4K Video Converter can also so some simple editing for you. For more, we can openhereto take a further reference.
Some main steps for converting your 4K videos are allowed here(More details

Step 1. Load your files in three ways: 

Click “File” menu, and select "Add Video/Audio" or "Add from folder" to import source video, audio and image files.


Click “Add Video” button or “Add from folder" button to import source files.


Open the folder that contains source files, and drag and drop video, audio and image files to the program.

TIP:If you are loading TiVo shows to 4K Video Converter for Mac, please enter your Media Access Key as the program asks, and then click "OK" button to confirm.


Step 2. Choose the best formats you want with’ Format Button’ on the format list.

Step 3. All formats here are set with optimized video/audio codec, bitrates, frame rates, etc. But you can still specify as you like by clicking ‘Settings’ button.


Start your conversion with ‘Convert’ button and convert your 4K video formats.

Are you all be satisfied with the suggestions above? Please leave some comments if necessary.

What’s more:
Possible to Convert 2K/4K XAVC Videos to MP4/FLV/SWF/MOV/AVI/WMV/M4V/MPG?
Methods to Convert 2K/4K Videos to ASF/SWF
Work with Sony F55/F5 XAVC in FCP/iMovie/Premiere/Avid MC