Showing posts with label Apple. Show all posts

Friday, September 5, 2014

Thought on A Workflow for AVCHD in FCPX and DaVinciResolve 9

When you have a thought on a workflow for AVCHD in FCPX and Resolve 9, why not take the following paper for a reference? 
Do U know here?

FCPX---(pronounced "Final Cut Pro Ten") is a video editing app for OS X from Apple Inc. and the successor to Final Cut Pro. FCP X was announced in April 2011 simultaneously at the Los Angeles Final Cut Pro Users Group held at Bally's Las Vegas and at the NAB Show in the Las Vegas Convention Center and released in June 2011.

Resolve 9As one of the earliest pioneers in post production products, Davinci Systems introduced several innovative products and was considered a significant player in the post production industry during its 25 years of operation.
 

With Blackmagic DesignDaVinci Resolve 9 Lite being free and a really powerful grading tool, many users are trying it out. It makes a great companion to Apple Final Cut Pro X and is really easy to move files between both applications via XML.

However, we have found that it performs really badly with AVCHD files. When you import AVCHD files, like those from the Sony NEX-FS100 / 700, FCPX creates ProRes Proxy files in the background. FCPX then uses those files in the timeline, so you are not actually editing with the AVCHD file but rather the proxy.

Here is a simple workflow for you to get a smooth working process in Resolve from FCPX with AVCHD. Let’s have a look.

In FCPX: Select your Event containing your clips. Select “File/Transcode Media…” and then select “Create optimized media”. Let FCPX do its thing. FCPX is now transcoding the AVCHD files to ProRes 422. Now export your project XML file.

In Resolve: Launch and browse your Final Cut Events Folder in Media panel. Find the Event folder for your project, inside it you’ll see a folder called “Transcoded Media” in there you’ll find 3 folders, open “High Quality Media”. Select all the files, right click and select “Add to Media Pool”.

Now move to the Conform tab and import the FCPX XML file and uncheck “Automatically import source clips into media pool”.Resolve will use the files already in the Media Pool, which are high quality ProRes 422 files, rather than the original AVCHD files. Things should run a lot smoother.

Question: How to make it easier for editing AVCHD MTS files both in FCPX or Resolve9?
Answer: An AVCHD MTS Video Converter for you!

If you wanna know more about the specific process of converting AVCHD MTS to Apple Prores mov for FCP and DNxHD mov for Resolve, here we can go.

Step1. Import AVCHD MTS files from ‘Add videos’ or ‘Add from folder’


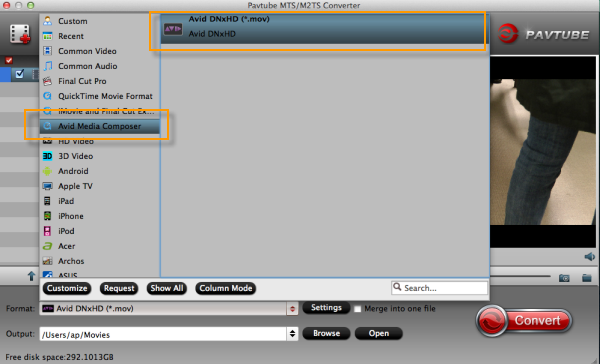
Step 2. Make it easier to choose output formats.(1).’Final Cut Pro>>Apple ProRes 422 codec mov.’  (2).’Avid Media Compose’ >> “Avid DNxHD (*.mov)
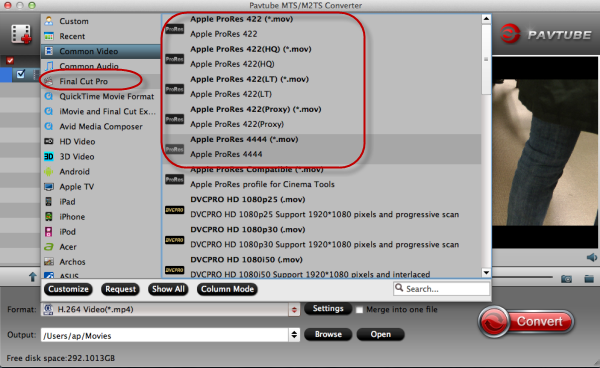


Step 3.More ‘Settings’ for you! Set something about your video and audio.  Including Video size, bitrates and fame rate and more. Usually 1920*1080 video size and 30fps video frame rate are recommended for FCP editing. Well, if you prefer to work with 4K video, you can adjust video size to get 4K ProRes for FCP.
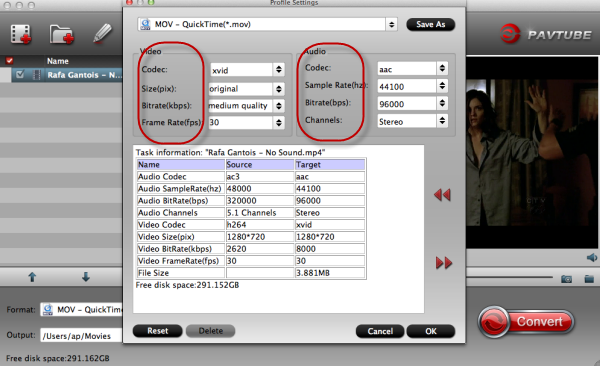
 

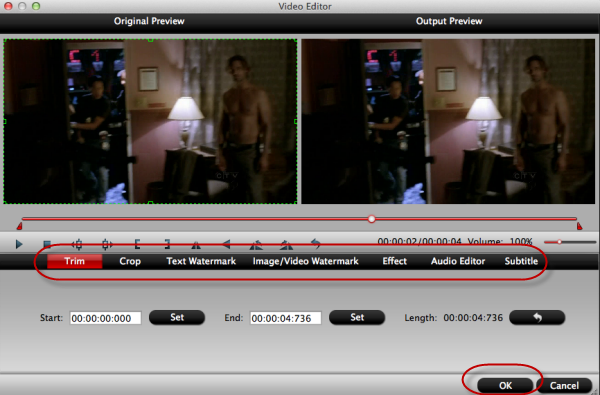
Tip: More small functions are waiting for you. ’Edit’>>’Crop, Trim, Subtitles, etc.’
 

Start conversion with ‘Convert’ button.

Not only for FCP or Resolve, but also for other editing system like iMovie or Premiere. MTS Video Cnverter for Mac will help you import the file correctly and saving the rendering time.

More:
Import Panasonic GH4 4K Videos to DaVinci Resolve 9
Make Avid DNxHD MXF Load to Resolve

Thursday, May 29, 2014

How to Download and Watch 2014 FIFA World Cup Video on iPhone

Are you a football fan of 2014 FIFA World Cup ? Take a look at this article which aims at telling you the best way for transferring 2014 FIFA World Cup Video to iPhone for freely playing.

With 2014 Brazil FIFA World Cup is sneaking in, the hot topic "what are the best ways to watch 2014 FIFA World Cup?" causes a headed discuss online. Unbelievable, circa 2.57 million tickets of 2014 FIFA World Cup Brazil have already been allocated to fans. And for these football fans, they may choose to a couch potato to watch 2014 FIFA World Cup video via TV set indoor, but it will be another great choice is to watch 2014 World Cup video on iPhone so that you are divorced from being glued to TV set for every second of action.

It is true that it is awesome to collect 2014 FIFA World Cup Video for putting and playing on upcoming iPhone 6, iPhone 5s, iPhone 5c, iPhone 4 or other portable devices if you have not time to watch the live telecast. However, as we konw, iPhone is picky of video formats and it just supports limited video formats like mp4 or mov fomrat.

In a bit to hassle-free watch 2014 Brazil World Cup video on iPhone without any limitation, a professional yet easy-to-use video converter is dispensable.

Must-have Helper to Aid You Download and Convert 2014 World Cup Video to iPhone 

Here a popular iPhone Video Converter Ultimate (iMedia Converter for Mac is available for Mac users) to convert them to iPhone supported format. In this way, iPhone will work well with your recorded World Cup video. Even Tivo show can be played well on iPhone by importing Media Access Key to the software.

Having lots of unsupported World Cup video files in hand but couldn't watch on iPhone? Wondering what we can do to make it working? Download and install the best World Cup video  converter, then follow below detailed guide:

Full Guide on How to Download and Convert 2014 World Cup Video to iPhone

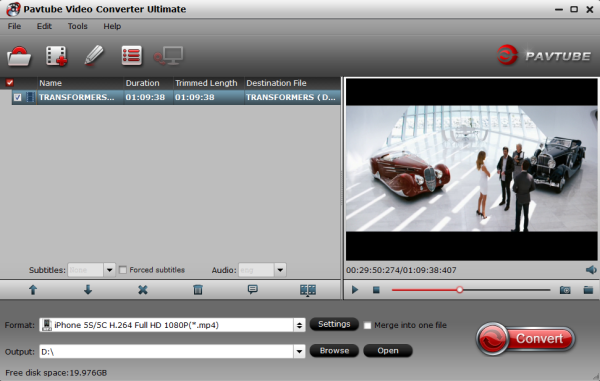
Step 1. Run this Pavtube Video Converter Ultimate as the iPhone 6 Ultimate Converter; import videos.

Click "Add video" to import source videos.


Step 2. Choose video format.

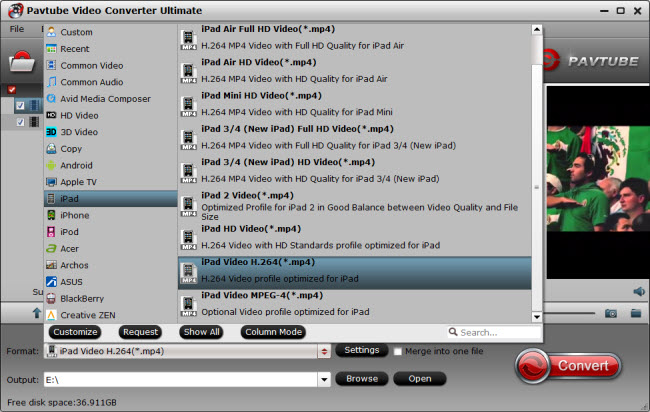
Click the drop-down list besides "Format", select the best profile for your iPhone from "iPhone" option according to the model of your iPhone.


Note: Keep in mind, to get the iPhone 5S/5C preset, you should also install the Patch in advance, but now only windows version have the patch file.

Step 3. Edit video before conversion. (Optional)

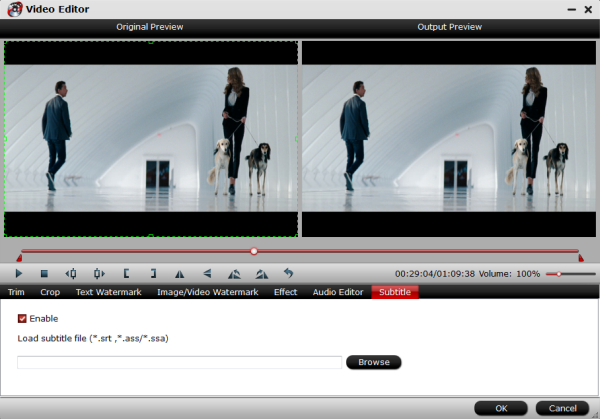
Click the pencil-like icon on top to enter Video Editor interface. You can choose to trim, crop, watermark, effect, audio or subtitles before conversion.


Back to main interface, click "Settings" to customize video size, frame rate, bitrate and other settings.

Step 4. Start conversion.

Click "Convert" to start converting your World Cup Video to MP4 for iPhone. Wait for a few moments, and click "Open" or "Open output folder" to quick locate the converted video.Or you can check "shut down computer after conversion" and just leave it running.

Don't know how to transfer converted video to iPhone? Read this:


More articles:

Monday, April 7, 2014

Sync video media (dvd, bluray, other formats) to iTunes for hosting from media server

Summary: Do you want to sync video media (dvd, bluray, other formats) to iTunes for hosting from media server? This article mainly introduces the easy solution to all kinds of contents onto iTunes on Win/Mac.

iTunes proviedes a media library for iOS devices. Before streaming or syncing contents from iTunes, you need to add your music, video, and other items to create your iTunes library. However, iTunes only supports limited video formats. So I want to convert my video media (dvd, bluray, other formats) to be compatible with itunes for hosting from my media server and looking for a video tool to help me.

After searching, I meet this Pavtube Video Converter Ultimate which is recommended by many online web forum reviews. It can help me to rip my Blu-ray/DVD movies and convert my videos to all popular video formats for watching. Besides, the Video editing ability has pushed me, the built-in video editor allows me to trim, crop, rotate video, add watermarks, etc. to get the very part and effect I want. Once I have tried DVDFab, but I have to say i view Pavtube software as a far greater value than DVD Fab.

If you want to convert video files on Mac, try the equivalent Mac version - Pavtube iMedia Converter for Mac.

Now let's go to learn how to convert video media (dvd, bluray, other formats) to iTunes supported videos for hosting from my media server.

Step 1. Run the Pavtube Video Converter Ultimate, drag and drop source video to the program.


Step 2. Click on “Format” bar, and Choose iTunes compatible format for hosting.

Choose the iTunes supported formats in the "Format" dropdown list. You can go to "Common Video" or "HD Video" options to find what you like. I think MP4 format is better for iTunes.


Tips: For some advances users, you can go to adjust video and audio parameters like bitrate, resolution, channels, etc. Click "Settings" button you can go to check and change them as you like.

Step 3. Press on “Convert” to start encoding your media contents to iTunes compatible video.

Step 4. When conversion completes, press on “Open” to locate converted videos. Drag and drop these movies to iTunes.

Now open your iTunes and then sync the converted MP4 to iTunes library for convenient playback via media server.

Transfer videos to your iTunes library:

Drag a file or folder from the desktop to the iTunes window. If you add a folder, all the files it contains are added to your library.

In iTunes, choose File > Add to Library, locate a file or folder, and click Open.


In this way, you can enjoy your favorite video media (dvd, bluray, other formats) via media server with ease.

You may also:

Convert Blu-ray movies to iTunes 1080p video
Solve the problem "Can't Add MP4 to iTunes"
Ripping Blu-Ray on iMac and Stream 1080p on Apple TV 3 with Dolby 5.1 Sound 
Play DVD/Blu-ray on PC With Multiple Audio Tracks/Subtitles 
How to Watch Instructional DVDs on iPhone/iPad/iPod? 

Thursday, April 3, 2014

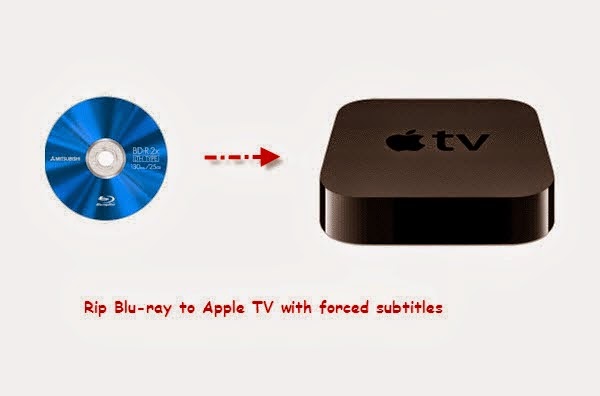
Rip your Blu-ray collection for Apple TV with forced subtitles

Want to make Blu-ray portable on Apple devices with preserving forced subtitles? This article mainly introduces the way to put Blu-ray on Apple TV with forced subtitles.


We like surfing, email, ebay, remote work, reading, watching movies on our IOS devices iPad2, iPad3, iPad mini, and also on Apple TV. Now I have Blu-Ray which I wanted to view via my AppleTV and store on my media drives. I hope to be able to set Forced subtitles, and write directly out to Apple TV format. Is there any way? 


Indeed, you can not play Blu-rays directly on your Apple devices like Apple TV. To make Blu-ray portable with Apple TV, the answer is to rip Blu-ray to Apple TV compatible videos so you can transfer them for smoothly playback.

What's more, some Blu-ray contains the unknown language like Avatar and you cannot understand it without subtitles. So how to keep the subtitles for full Blu-ray enjoyment on Apple TV?

In this case, Pavtube BDMagic is the ideal software to you. It will help to rip and convert Blu-ray to Apple TV friendly MP4 format with fast speed and high video quality. Moreover, you can choose the desired subtitle for output and select forced subtitles for some unknown languages. Now let's go to learn how to do it.


How to convert Blu-ray to for Apple TV with forced subtitles?

Get your Blu-ray drive ready and insert Blu-ray you need to the drive. And keep networked when ripping Blu-ray.

Tips: If you are running on Mac, please try BDMagic for Mac.

Step 1. Load Blu-ray to Blu-ray to Apple TV Converter.

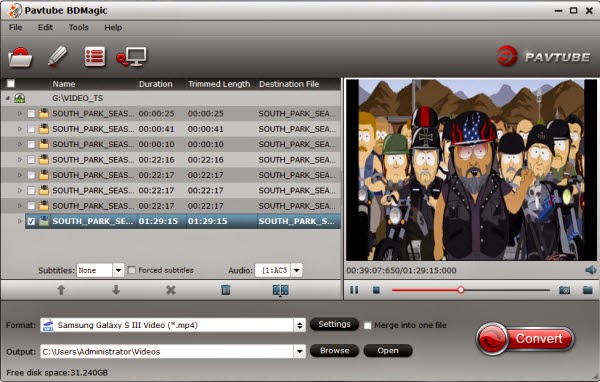
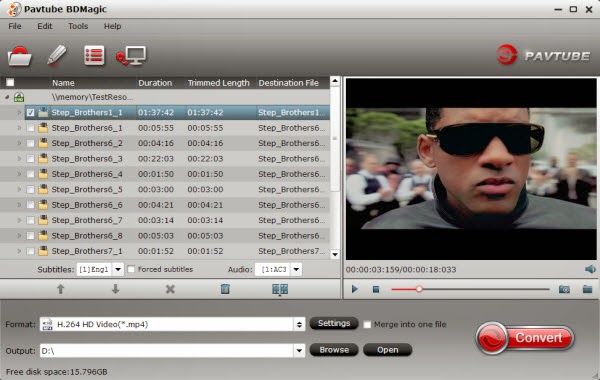
Run the best Blu-ray to Apple TV Converter, click "Load file" button to select the inserted Blu-ray and import it for transferring to iTunes. It will take only few seconds to rip Blu-ray. Then the software will recognize the actual main title of Blu-ray and pick it automatically. You do not need to look for the main title manually.

Press the selected main title you can preview the whole Blu-ray movies on the preview window on the right, which works like a media player.


Step 2. Check forced subtitles for output.

Because Blu-ray always contains multiple subtitle and audio tracks, you can go to choose the desired subtitle and audio on the interface for output.

Beside subtitles option, "Forced subtitle" is optional and uncheck by default. Go to check "Forced subtitles" for output. Take note that it will output forced subtitles only if it is checked.

Step 3. Choose Apple TV compatible format.

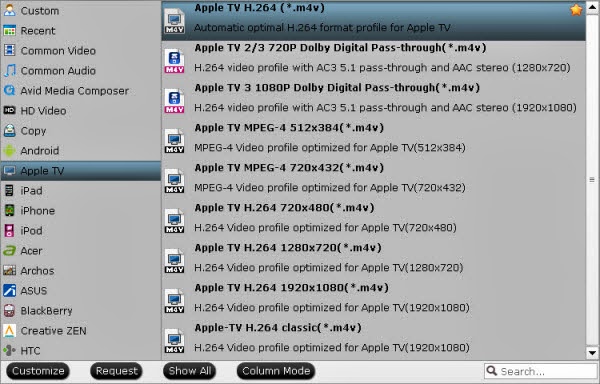
Choose "Format" dropdown list and go to "Apple TV" options to find "Apple TV H.264 (*.m4v)". This format is best for playing on Apple TV.


Tips: For some advances users, you can go to adjust video and audio parameters like bitrate, resolution, channels, etc. Click "Settings" button you can go to check and change them as you like.

Step 4. Convert Blu-ray to Apple TV.

Before conversion you can go to "Browse" your computer to find the folder for output files. Then click "Convert" button to get Blu-ray to Apple TV conversion started. After a while, you can find the generated file for Apple TV quickly via "Open" button. In this way, you can enjoy your favorite Blu-ray with forced subtitles on your Apple TV wherever you are.

Related articles:

Mac Tivo to ATV solutions- Play commercial-free Tivo recording on Apple TV
Get Blu-ray movies to Apple TV 3 for watching on Mac
Sync DVD ISO/IFO images to Apple TV 3, Apple TV 2 and Apple TV

Wednesday, April 2, 2014

Mac Tivo to ATV solutions- Play commercial-free Tivo recording on Apple TV

Description: Best Tivo to ATV solutions on Mac, this guide show you how to trim out commercials in your EyeTV Tivo recordings, and convert to best M4V file for your Apple TV on Mac.

"I just got EyeTV and recorded some *.tivo recordings when I'm out of town. It works great but I'm wondering how can I remove all the commercials inside? Can I get a pure video file to be streamed to Apple TV at home? If yes, how can I do that?"

Elgato's EyeTV is Mac OS X software that provides a user interface to the various TV Tuners from Elgato and some licensees. It is bundled with TV Tuner products sold by Elgato and is offered separately as well. Its main function as a PVR is to show the Tuner's received TV programs on the computer screen. It can show live programs and also offers Time shifting. It can record programs permanently to disk, by pre-programming.

However, the recorded TiVo files usually are not compatible with most media players, TVs we adopt. Thus, if you want to get a pure tivo recording to ATV, it's advisable to trim out ads firstly, and then convert TiVo files to H.264 M4V format for better preservation or sharing with family and friends.

Solution 1. Comskip

Comskip is a free mpeg commercial detector. It is a windows console application that reads a mpeg file and analyses the content based on a large amount of configurable parameters. After analysis it generates a file in various possible formats containing the location of the commercials inside the mpeg file.

Here is a thorough thread of how to use Comskip to remove commercials in your Tivo recordings, then stream it to ATV via iTunes after it's done. Although this software is free and open source, you will need to donate $10 via PayPal or more to pay for the Comskip site

Shortcoming:

Comskip is a console window program. This means it does not have a nice windows user interface. As it's not completely compatible with your OS, you may need to run Comskip manually which can be confusing for many users.

Solution 2. Pavtube iMedia Converter for Mac

It's not a free software but not overpriced. Comparatively it has a better (simple and straight) interface which allows users trim out commercials freely on their own.

This makes tv viewing a lot more pleasurable and efficient, and is especially helpful controlling advertiser access to children.

Download a free trial here.


Step 1. Enter Tivo key and import Tivo files.

Launch Pavtube iMedia Converter for Mac, click "Option" icon and switch to Tivo tab, submit your tivo key firstly.


Now drag and drop your tivo recordings to it directly. Or you can click the top left two icons to load single Tivo file or the entire folder from local path.

Step 2. Trim out commercials.

Click this edit icon on top:


Then you enter the Video Editor.

Check the "Trim" tab, enter the start and edit time manually, or you can drag the small point on progress bar.

There're are two small icons to let you adjust frame by frame.


Don't forget to click "Ok" to confirm the change.

Step 3. Choose format and star conversion.

Click the "Format" list and choose preset according to your ATV model. As I'm using Apple TV 2 also want surround sound, I chose Apple TV 2/3 720P Dolby Digital Pass-through(*.m4v).

Back to main UI, click the big red "Convert" to start converting commercial-free Tivo recording to Apple TV format.

After conversion, click "Open output folder" and you can find the converted video easily.

Related articles:

Mac solution: Get Blu-ray movies to Apple TV 3 for wathing
Sync DVD ISO/IFO images to Apple TV 3, Apple TV 2 and Apple TV
Ripping Blu-Ray on iMac and Stream 1080p on Apple TV 3 with Dolby 5.1 Sound 

Tuesday, April 1, 2014

DVD to iPad Air : Copy/Transfer DVD Movies For Playback on iPad Air

This simple tutorial mainly shows you how to convert and rip DVDs to iPad Air supported video formats so that you can play DVD movies on Apple iPad Air anytime, anywhere. 

Apple finally released the fifth-generation tablet iPad Air alongside the iPad Mini 2 with Retian Display on October 22, 2013, just weeks after the sensational iPhone 5S and iPhone 5C launch event. This time iPad Air is slimmer and narrower than its brothers, while remaining the existing 9.7-inch screen size. With that in mind, it is tempting to get this glamorous gadget for watching DVD movies and videos on its HD retina display.


However, iPad Air doesn't have a built-in DVD-ROM or DVD player. If you have some DVD movie collections and want to enjoy DVD movies on the iPad Air, you need to convert DVD to iPad Air accepted videos on computer as your first move along with some help from third-party softwares. To help those who wanna get DVD movies off of DVDs and onto iPad Air for playback, below, I would throw a quick tutorial up.

As mentioned above, in order to download and put DVD movies to iPad Air, we need use a 3rd-party tool to rip DVD movies to iPad Air compatible video formats such as MP4, AVI etc. DVD Ripping software varies. You may confused about choosing a suitable tool. If so, I recommend you try Pavtube DVD to iPad Air Converter (Alternative Mac version of DVD to iPad Air Converter). It is easy to use for editing and conversion and makes great quality copies of my DVDs.

To be honest, Pavtube DVD Ripper can help you rip and convert all the DVD discs even DVD ISO/IFO image files. Besides, the audio/video synchronization is very good, the size of the subtitles too. If you have any requirements of outputting 3D (Anaglyph, T/P, SBS) or keeping multiple audio tracks/subtitles, you are suggested to try this Blu-ray/DVD to iPad Air Converter Pro. Below is how.

A Simple guide: How to convert DVD movies to iPad Air compatible video formats

Note: The quick start guide below uses DVD Ripper Windows screenshots. The way to rip DVD movies to iPad Air on Mac is almost the same. Just make sure you get the right version according to your computer operating system.

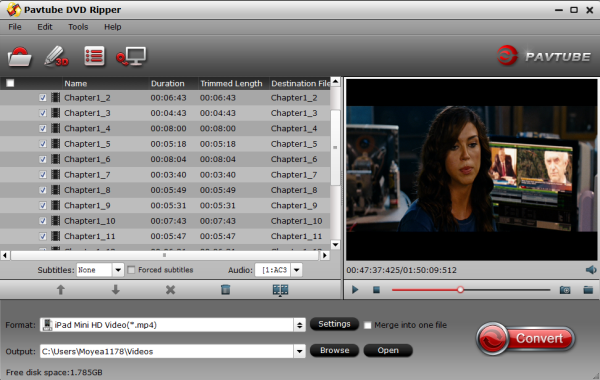
1. Run this Pavtube DVD Ripper as the best DVD to iPad Air Converter; load disc.

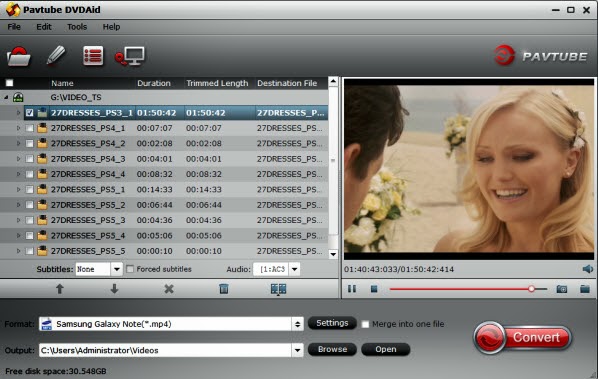
Click the top left icon, you can choose to import DVD from ROM, DVD folder or DVD ISO/IFO. It will check the main title by default; moreover, ISO files could also be recognized automatically so that you no longer need to run virtual drive to mount it.


2. Choose format.

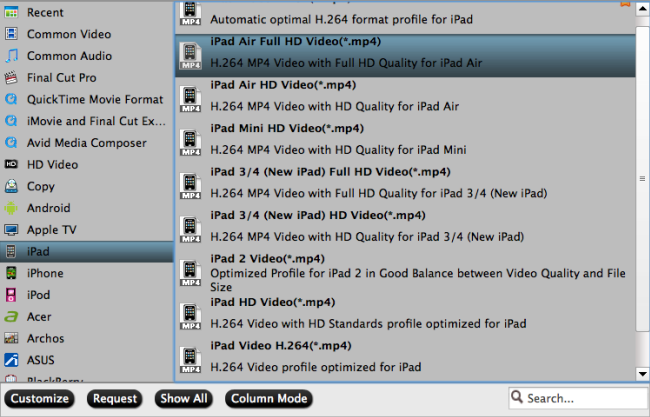
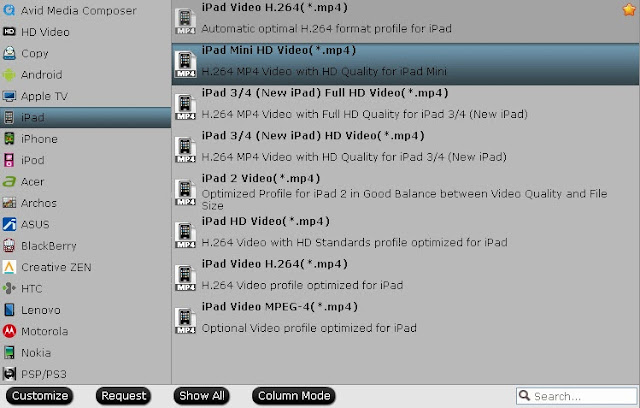
Click "Format" drop-down list and choose "iPad>iPad Air Full HD Video(*.mp4)" as the compatible MP4 preset with best video quality. Or you can choose other presets if you don't need full size videos. To get the customized profile, you'll need to download a patch here;


3. Start Conversion.

You can hit the big red "Convert" to start converting DVD to iPad Air MP4 with best video settings. After the conversion, click "Open output folder" in the conversion window, or "Open" in main interface to quick locate the converted video.

After getting the converted movies files, you can transfer them to new iPad Air via iTunes. If you don't know how to put and play movie onto new iPad Air , just follow the steps to realize it:

1) Make sure you have install iTunes. If not, you can free download iTunes here at first. And launch the iTunes.

2) Connect iPad Air to Mac/PC.

3) Choose "File –> Add File to Library…"

4) Drag the .mp4 file you want to the iPad Air icon

So there you have it. Prette simple. Now, you can enjoy and view DVD movies on iPad Air anytime everywhere for great digital fun.

Additonal Tips:

If your movie isn't already in one of the iPad Air supported formats or it's still on a DVD or a Blu-ray, you can get the Video Converter Ultimate or the iMedia Converter Mac) which can help you convert Blu-ray/DVD/ISO/IFO and various formats of 720p/1080p HD videos in MKV, AVI, TiVo, VOB, MPG, MTS, etc. to your iPad Air, iPhone 5C, iPhone 5S, iPad 3, iPod 5, Apple TV 3 and other iOS/Android/Windows 8 tablets/phones for smoothly playing. (

Read More:

Monday, January 27, 2014

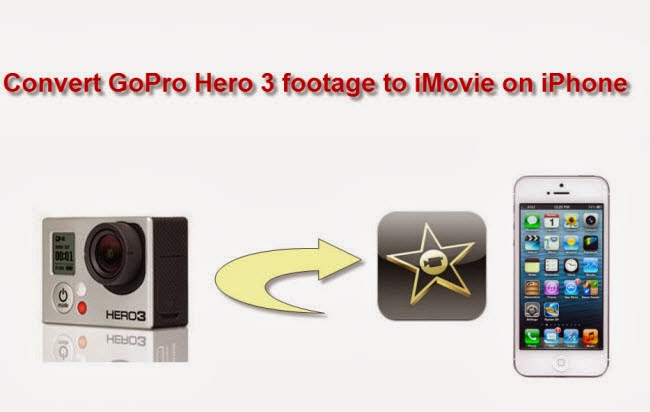
Edit your GoPro Hero 3 footage in iMovie and share on Instagram with friends

This is a brief guide of how to convert your GoPro Hero 3 footage to iPhone, so that you can edit it in iMovie and share it to friends on Instagram. 
GoPro's lineup of mount-anywhere cameras have been dazzling extreme sports enthusiasts for years. With the GoPro 3, you can easily shoot footages with your hands free – that's pretty convenient yet safe when you are surfing, skating, snowboarding or traveling.

I'm rather fond of taking this little magic box out on vacation with great fun. However, unlike professional cameras, I always need to edit some of them. As I just got a new iPhone 5S, iMovie should be a good choice which is free to IOS 7 users.


With the help of Pavtube iMedia Converter for Mac, I am able to import GoPro Hero 3 footage to iMovie on iPhone and post it on Instagram.

Pavtube iMedia Converter for Mac is a professional Mac GoPro to iMovie converter; it's very easy-to-use and totally painless during the whole conversion from GoPro MP4 to Apple Intermediate Codec.

Good News! Pavtube Release a New Site - multipelife.com with Product Migration and Name Change.

To thanks for your continued support all along our previous site and the new www.multipelife.com, we are holding a 'New Site Special' with fantastic discounts up to 40% off. You can get 20% off BDMagic, 30% off ByteCopy, 40% off DVDAid and 20% off Video Converter Ultimate on Windows/Mac platform:

https://www.facebook.com/pavtubefans/app_209569249055691

Read more: http://mediaconverting.blogspot.com/2014/05/pavtube-new-official-website.html

How to convert GoPro Hero 3 MP4 video to iMovie on iPhone?

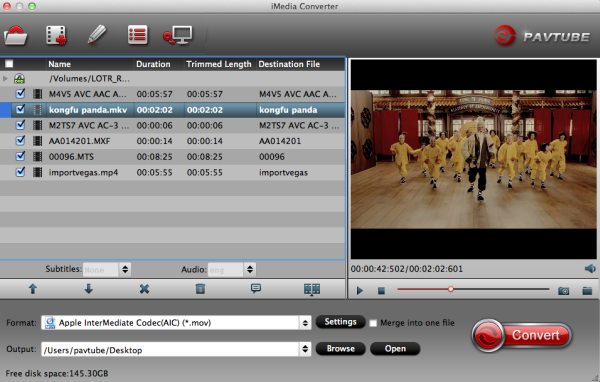
Step 1. Load files to the GoPro to iMovie Converter for Mac.

Launch the GoPro MP4 to iMovie Converter for Mac and add footage files to it. Keep your GoPro Hero 3 on and connect it to Mac; click "Add video" to load video clips or "Add from folder" to load the entire folder. Then you can preview the whole videos in the preview window on the right area.


Step 2. Choose AIC MOV format for iMovie.

Click "Format" drop-down list and choose "iMovie and Final Cut Express > Apple InterMediate Codec (AIC) (*.mov)" as the most compatible format for iMovie.


Notes: If the default settings do not fit your needs, you can click "Settings" button to customize output video bitrate, channels, frame rate, etc. In general, the higher video bit rate you choose, the larger output file size will it be; and vice versa.

Step 3. start conversion.

Now hit the big "Convert" button to start converting GoPro Hero 3 MP4 to AIC MOV for iMovie on iPhone. After it completed, hit "Open" button to find the generated.

Now transfer the converted video to iPhone via iTunes and open it in iMovie for iPhone app. Edit it and upload to Instagram; just have a try.

Read More:

Source: http://device-camcorder-tips.blogspot.ca/2014/01/convert-gopro-hero-3-footage-to-imovie-on-iphone.html

Tuesday, January 14, 2014

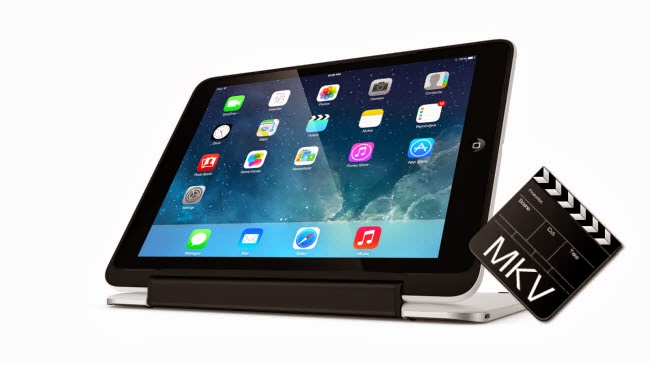
iPad Air MKV Playback- Make 1080p/720p MKV playable iPad Air with subtitles on Mac

How to play 1080p/720p mkv movies on iPad Air? Please follow below simple steps to easily & quickly convert MKV to  iPad Air support video formats for smoothly playback on Mac. 
The new iPad Air is a new model tablet released by Apple Inc. in 2013. It is only 0.29 in depth and about 1 pound in weight, very thin and light. Especially, it comes with Retina Display and 2048-by-1536 resolution at 264 ppi. What an amazing experence to carry with iPad Air for a commute and travel to watch 1080p/720p videos and movies!


According to Apple, however, iPad Air supported video formats are limited to .mp4, mov and m4v, which means there will be many videos in different file format can’t be played with this device. Then many movie fans may have the question: How can we watch MKV files on iPad Air with subtitles when we are out?

To accomplish this goal, the most effective way is to convert MKV to MP4 with best video settings for iPad Air. Now follow this article; you will learn how to change MKV to iPad Air with subtitles easily within a few clicks on Mac OS X system. For Windows users, the workflow is almost the same.

Preparation:

Here I'd like to introduce Pavtube iPad Air Video Converter for Mac, a very easy-to-use video to iPad Air converting program which comes with flawless video quality and quick conversion speed on Mac.  Reach the Windows version here: iPad Air Video Converter.

(Both are 20% off now at Pavtube Christmas & New Year Huge Discount).

Tip 1:

If you have any requirements of outputting 3D (Side-by-Side, Top-Bottom, Anaglyph) in MKV/MP4/AVI/MOV/WMV formats, you are suggested to try this 20% off Video Converter Ultimate (Mac Verison: iMedia Converter for Mac)

Tutorials: Converting MKV to iPad Air friendly format on Mac

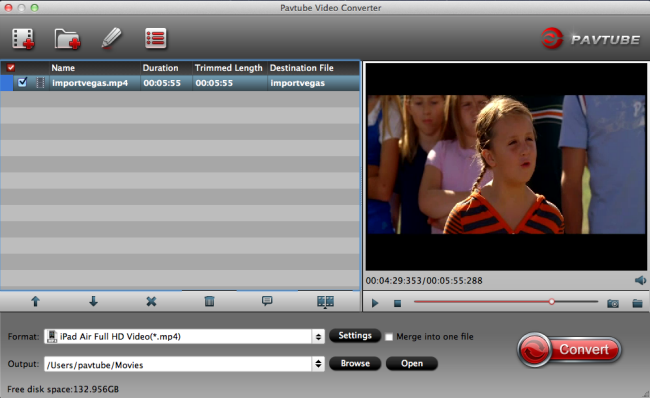
Step 1: Load video files to this Mac Video to iPad Air Converter

Download the Pavtube Video Converter for Mac on your computer, install and run the program, add videos. You can choose to import videos or the entire folder by clicking the top left two icons.


Tip 2:

From the drop-down list of Subtitles tab, choose the desired language you want to show in converted movie. You are allowed to choose audio track as well. (Read more: Subtitle FAQs)


Step 2. Choose a proper format for iPad Air.

Click the "Format" drop-down list and select "iPad >iPad Air Full HD Video(*.MP4)" for iPad Air. Or you can choose other presets if you don't need full size videos. You can submit "iPad Air" in the search box at the bottom right corner. 


Step 3. Customize video specs for iPad Air (Optional).

You could also click the "Settings" to adjust the video and audio parameters of output files.

In the Video Settings, you can select Encoder, Frame Rate, Resolution (you could define it yourself according to your iPad Air tablet) and Bitrate for your movie.

In the Audio Settings, you can select Encoder, Channels, Bitrate and Sample Rate for your movie.

Step 4. Start 1080p/720p MKV Videos to iPad Air Conversion.

You can hit the big red "Convert" to start converting MKV to MP4 with best video settings for iPad Air on Mac. After the conversion, click "Open output folder" in the conversion window, or "Open" in main interface to quick locate the converted video. Now, you can transfer these MKV to iPad Air on Mac for smooth playback without any problem. Enjoy your digital life!
Related Articles:

Put Blu-ray movies to iPad Air
Play DVD movies on iPad Air
Transfer Blu-ray ISO files on iPad Air
Rip DVD IFO Files to iPad Air for watching
  • Watch DVD Movies on New iPad 2017
  • Play 4K UHD Movies on Videos on New iPad 2017
  • Watch Blu-ray Movies on New iPad 2017
  • Monday, December 30, 2013

    Add Blu-ray/DVD to iTunes 11 with multi-tracks for Apple TV, iPad, iPhone, iPod on Mac

    Want to add your Blu-ray/DVD contents in iTunes Library 11? Or want to put your Blu-ray/DVD contents to your Apple devices through iTunes 11? In this article, you can find the easy way to do this.

    iTunes, a name closely contact with Apple devices like iPhone, iPad, iPod, etc. When first use Apple device, most people may not familiar with how to put music and videos to the device. The key is iTunes. So, first let’s know something about it.

    What is iTunes?

    iTunes is not only a media player app to play audios and videos, but also a media library to download and manage digital music and videos on PC, as well as on iPhone, iPad and iPod touch. It is a bridge to transfer sources between PC and Apple devices. The latest version of iTunes is iTunes 11 which has “dramatically simplified new interface” and better “iCloud features”

    The OS that supported iTunes
    • Mac OS: Mac OS X 10.9 Mavericks, 10.8 Mountain Lion, 10.7 Lion, Snow Leopard10.6, Leopard 10.5
    • Windows OS: (Windows 32 bit or Windows 64 bit) Windows XP Service Pack 2 or later, Windows Vista, Windows 7, Windows 8 and Windows 8.1

    Then, let’s know how to enable iTunes play the role of transmitter. Most of you are not about to pay iTunes’ ridiculous prices to watch movies and TV shows you already own on Blu-ray. As we know, videos upon Blu-ray disc have been in high definition format, many are usually in .m2ts file extension that is not based on apple iTunes, while iTunes could only recognize video files in MP4, MOV, M4V that you can’t play Blu-ray on iTunes directly and even not to speak of keeping multi-tracks. Good news now what you need is only a professional Blu-ray ripper that can help you convert Blu-ray movies to iTunes supported MP4 format with multi-track.

    To transfer Blu-ray contents to iTunes 11 library, the best program I can recommend is Pavtube ByteCopy for Mac(Windows version: ByteCopy), which you can use to remove the strict Blu-ray protection and region restrictions and Blu-ray/DVD contents to iTunes video very quickly with great video quality. It’s an ideal app for you to copy Blu-ray/DVD to iTunes 11 library and any Apple devices.

    How to rip Blu-ray/DVD contents to iTunes 11 library with multi-track?

    Step1: Load Blu-ray/DVD movies.

    Launch the best Blu-ray/DVD to iTunes with multi-track converter; import Blu-ray/DVD movies into the program. Loaded Blu-ray/DVD can be previewed in the right preview window.


    Step 2: Choose output format

    To rip Blu-ray/DVD to iTunes 11 library with multiple tracks, click the drop down box of “Format”, and choose the “Multi-track MP4 (*.mp4)” profile under “Multi-track Video”. This profile is designed to output videos with multiple audio tracks.


    You can check the audios you want to keep and uncheck the audios you don’t need. It all depends on your own choices.

    If you want to add the Blu-ray/DVD contents to iTunes 11 library for play on iPhone, iPad, iPod, etc, you can also directly select iPhone, iPad, iPod as the output format to get videos with optimized settings for your Apple devices. Read How to rip Blu-ray to iTunes for iPad, iPhone4, iPod and Apple TV? to get the detail information.

    If you need, you can also click “Settings” to modify parameters of your output profile to meet your professional needs: bitrate, frame rate, aspect ratio, etc. Just remember the file size and video quality is mainly depends on bitrate than resolution which means higher bitrate results in big file size, lower visible quality loss and vice versa.

    Step 3: The last step you need to do is hit the “Convert” button to start the conversion of Blu-ray/DVD content to iTunes 11 library supported format.

    When the conversion is over, just find the folder of your output videos and add to your iTunes 11 library. Then you can play organize your Blu-ray/DVD contents on iTunes and put them on your Apple devices.

    Related articles:
      
    Ripping Blu-Ray on iMac and Stream 1080p on Apple TV 3 with Dolby 5.1 Sound 
    How to Watch Instructional DVDs on iPhone/iPad/iPod? 
    Is It Possible to Add FLV Videos to iTunes? 
    How to Sync Local Contents to iTunes on PC/Mac?
  • Watch DVD Movies on New iPad 2017
  • Play 4K UHD Movies on Videos on New iPad 2017

  • Thursday, December 19, 2013

    Quickly Backup/Stream Blu-ray to Plex Media Server for playing on HDTV or portable devices

    Summary: This article offers a brief instruction about how to get Blu-ray movie disc free on Plex Media Server to play on HDTV, iPod touch, Samsung Galaxy S4, HTC One X+, etc. portable devices.

    Here I would like to introduce Plex Media Server – a solution for your local and online media, which seamlessly connects your Plex clients. Well you can watch movies with the client – Plex Media Center on Windows & Mac, and more importantly, on iPad, iPhone and Android devices with the paid app.

    This time, I own a plex mediaserver at home and need content to watch, I have tons of Blu-ray movies and wanted a good program to rip them with. I tried AnyDvD which is supposed to be a faster ripper and it was. 

    At last, I found Pavtube Blu-ray to Plex Converter which aims to solve this problem by giving us the ability to store our purchased physical Blu-ray and DVD discs or downloaded media to local computer, hard drive then stream over a home network for Plex Media Server and ipod touch, Samsung Galaxy s2, HTC one X+ playback. It's professional in ripping and converting Blu-ray/DVD discs, Blu-ray/DVD ISO image, Blu-ray/DVD copies and more. It will help you backup your Blu-ray disk and save the time looking for them from the cardboard with ease. The Mac version is Blu-ray to Plex Converter for Mac
    I read tests and tons of reviews give this program as No. 1 Blu-Ripper 2013. Well I mostly use it to transcode blu-ray to mkv because it supports good sound options and most devices support the format. As for the device I use is plex media server (PMS) and basicly any device (like my wiiu, htc onex, samsung gs2, 2 computers, xbox 360) that supports DLNA can play converted mkv video from the pms.

    Read More: Top 5 Blu-ray Ripper Software Review | Top Blu-ray Ripper for Mac Review 

    Hot News! the two programs are 30% off on Christmas Special Offer 2013. Hurry to get them now!

    Below is a simple guide about how to convert/ backup your Blu-rays to Plex Media Server.

    First of all, you need to download and install the Best Blu-ray Ripper for Plex Media Server. Then, just follow the steps to operate it. 

    Step 1: Insert your Blu-ray disc into your BD drive, run the Pavtube Blu-ray Ripper for Mac and click "BD/DVD disc" icon to load movie from DVD and Blu-ray source(Disc, folder, ISO). You can also click "Add Video" to load video files like MTS/M2TS, MKV, VOB, MOV, TOD, TiVo, etc. 

    Blu-ray to Plex Media Server

    Step 2: Click the "Format" option, and choose HD Video > MKV HD Video(*.mkv) as output format. You can also select H.264 HD Video (*.mp4) for Plex Media Server.

    Blu-ray to Plex Media Server

    Tip: 

    If you like, you can click "Settings" to change the video encoder, resolution, frame rate, etc. as you wish. Keep in mind the file size and video quality is based more on bitrate than resolution which means bitrate higher results in big file size, and lower visible quality loss, and vice versa. 

    Step 3: Click the convert button under the preview window, and the Blu-ray ripper will start the conversion from Blu-ray DVD movies to MKV for Plex Media Server on Windows/Mac. 

    After conversion, you can stream Blu-ray/DVD movies through Plex Media Server to HDTV or ipod touch, Samsung Galaxy s2, HTC one X+, or other DLNA-compliant devices. Now watching blu-ray movies on portable devices becomes easy and I can really lie back, relax and enjoy my favorite blu-ray movies. 

    Related posts:

    Friday, November 29, 2013

    To Get DVD on iPad Mini 2, Convert DVD to iPad Mini 2 with Retina display on PC/Mac

    Apple has released the second-generation iPad mini with Retina display in these days, It is a mini Tablet PC device with small body and higher resolution, It is now convenient and easy to carry out for watching movie or playing game. It is a great idea to put DVD movies to iPad Mini 2 so that you can enjoy the HD movies anywhere. However, the iPad Mini retina can't play DVD movies directly. To watch DVD movies on iPad Mini 2, you need to convert DVD to iPad Mini 2 retina compatible format, to get this target, a professional DVD to iPad Mini 2 ripper is necessary.

    dvd to ipad mini 2

    There are varies of DVD Ripper softwarePavtube DVDAid is regarded as the best DVD to iPad Mini 2 converter software on the market, which is a most effective program to rip DVD to iPad Mini 2 with retina display supported format like MP4 with fast ripping speed and high output video quality. The most important is that this iPad Mini 2 DVD Ripper can handle any new protected DVDs, such as CSS, region code, RCE, Sony ArccOS, UOPs and even the latest as well as most sophisticated Disney X-project DRM. The audio/video synchronization is very good, the size of the subtitles too.

    Besides ripping DVD to iPad Mini retina, this DVD Ripper can also output a wide range video format including MKV, VOB, AVI, MOV, MPG, MP4, SWF, FLV, WMV, MP3, AAC, etc. for iPhone 5S/5C, iPad Air, Nexus 5, Kindle Fire HDX, Surface 2, Surface Pro 2, new Nexus 7, Sony Xperia Z1, HTC One Mini, Moto X, Apple TV 3, iPod 5, PSP/PS3 and many other devices. It is easy to use for editing and conversion and makes great quality copies of your DVDs. If you're not already installed this great utility, download it from Pavtube DVD Ripper.

    Follow the steps below to download and put DVD movies to iPad Mini 2 for smoothly playing!


    Note that the trial version will create videos with Partube logo standing in the center of the outputting image, to bypass the watermark; you should purchase the full version.

    How to rip DVD to iPad Mini 2 with Retina Display supported video format?

    Step 1. Load DVD file to the DVD to iPad Mini 2 converter.

    Insert DVD diso into your DVD-rom and then the software will detect it automatically, click the DVD diso icon to add DVD file, You can also add DVD folder or ISO file directly.

    dvd to ipad mini 2 converter

    Step 2. Set output format for iPad Mini 2.

    Select the output format for iPad Mini with Retina Display, Click the Format option and you will find the iPad group. Choose the iPad mini HD video (.mp4), meanwhile don't forget select the destination folder to saved the converted video.

    ipad-mini-2-video-converter

    Tip: How to rip DVD to iPad Mini 2 with wanted subtitle and audio track?
      
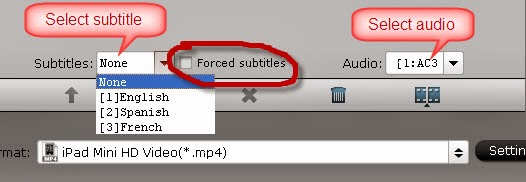
    Click the dropdown triangle button near subtitle list and audio list to select you wanted subs and audio tracks to be preserved in the resulted mp4 file for watch on iPad Mini 2.

    In addition partube DVD ripper also offers an option called "forced subtitle", which enable you to see subtitle only when actors are speaking a different language, for instance if you specify English (your mother tongue) as your subtitle, and meanwhile tick off "forced subtitle" option, then when actor are speaking English, no subtitle will show up, but when they are speaking in French, the subtitle will appear accompanying with the French.

    rip dvd with subtitles

    Step 3. Start converting DVD to iPad Mini 2.

    Click "Convert" button to start the conversion. You can view the conversion progress and are able to cancel the converting process anytime. As soon as the convertion is done, you can click open button to get the generated mp4 file and transfer it to your iPad Mini 2 for playing back. If you don't clear about how to transfer the files, see (how to sync movies from itunes to the iPad).

    There, now you know how to get DVD movies onto your iPad Mini 2 so you can watch them on that gorgeous screen! Keep in mind that some of the settings can be tweaked to improve the video quality but it's a balance between quality and size.

    For watch Blu-ray on iPad Mini 2, you need download Blu-ray to iPad Mini 2 Converter to rip Blu-ray to iPad Mini 2 support format.

    See also:

    Tuesday, November 26, 2013

    How to convert and sync AVI to iPad Air with subtitles?

    Summary: A details guide to show how to transfer SD/HD AVI videos to MP4 for iPad Air, you can also add srt/ass/ssa subtitles to AVI video for playback.

    Q1: "I have a very long bus trip coming up and a lot of good .avi format movies (mostly xvid) is there any way i can get them to play on my iPad Air. Anything that can help me out?"

    Q2: "I am on a bit of a time limit so I am hoping to get this done soon. I am shipping a parcel out to my brother later this afternoon and I would like to include the movie. I have researched online and keep running into dead ends. 
    So, I have the Movie Deathnote L-Change the world, and I downloaded with it a .srt file for the subs, they are in the same folder but I do not have the option it seems to add the .srt file permanently?"

    iPad Air has just been shipped about a week and it's so light comparing with other full size tablets. Most of you may much prefer taking it out than any other iPad before. It's really an enjoyment to watch movies videos everywhere with such a super light full size tablet with Retina display.

    However, iPad Air is still a tablet and it could not deal with all video formats as a real computer. MOV and MP4 are still the most compatible formats with iPad. So what if we have many videos in other formats like AVI? (Yes, the native player does play AVI files, but note that AVI is just a container format which can contain different video codecs; only a small subset of these codecs can be recognized by iPad Air.)

    How to play videos on iPad Air without format limitation?

    iPad Air supported format:
    • Video Format: .m4v, .mp4, .mov, MPEG-4, H.264, M-JPEG
    • Audio Format: AAC, Protected AAC, HE-AAC, MP3, AAX, AAX+m, Apple Lossless AIFF, WAV
    With iPad Air Video Converter Ultimate, you can easily encode HD/SD AVI including some Blu-ray and DVD discs to iPad Air supported format with best settings that give you best effect when watching all kinds of movies on iPad Air. How to play AVI movies on iPad Air? How to hard-burn subtitles to AVI for playback on iPad Air? Follow below simple steps and you can do it within a few clicks.

    Required tool: 
    Pavtube AVI to iPad Air Converter
    , an easy-to-use Windows/Mac tool to help you transfer AVI to most compatible MP4 for iPad Air.
    Mac version here: AVI to iPad Air Converter for Mac.

    Tutorials: how to transgfer AVI to MP4 for playback on iPad Air?

    Step 1: Run this Pavtube Video Converter as AVI to iPad Air Converter; add videos.

    You can choose to import videos or the entire folder by clicking the top left two icons. Or you can try drag and drop directly. 

    watch world cup matches on ipad iphone.jpg

    Step 2. Choose format.

    Click "Format" drop-down list and choose "iPad>iPad Air Full HD Video(*.mp4)" as the compatible MP4 preset with best video quality. Or you can choose other presets if you don't need full size videos.(Note: You need to download a patch file for getting best video format for iPad Air)

    watch world cup matches on ipad iphone profile chosen.jpg

    Step 3. Customize video specs (Optional).

    Click "Settings" to free change video resolution, bitrate(quality), frame rate and other settings. Note that if you need to get videos in smaller size (especially when you own a 16GB model), you are suggested to turn down bitrate settings; the generated video size could also be found in this window. 

    For those who want to burn subtitles to it permanently, click "Edit" on top to enter video editor windows; switch to "Subtitles" tab and you can browse to load your *.srt/*.ass/*.ssa subtitles manually.

    Step 4. Start Conversion.

    You can hit the big red "Convert" to start converting HD AVI to MP4 with best video settings for iPad Air. After the conversion, click "Open output folder" in the conversion window, or "Open" in main interface to quick locate the converted video.

    If you don't know how to put and play movie onto new iPad Air , just follow the steps to realize it:
      
    Here I take movie files transfer as an example. Similar operation for streaming music, photos, and iBook to iPad Air using iTunes.

    Note: Make sure you have install iTunes. If not, you can free download iTunes here at first. And launch the iTunes.

    Step 1. Open iTunes, and connect your iPad Air to your Windows computer. 

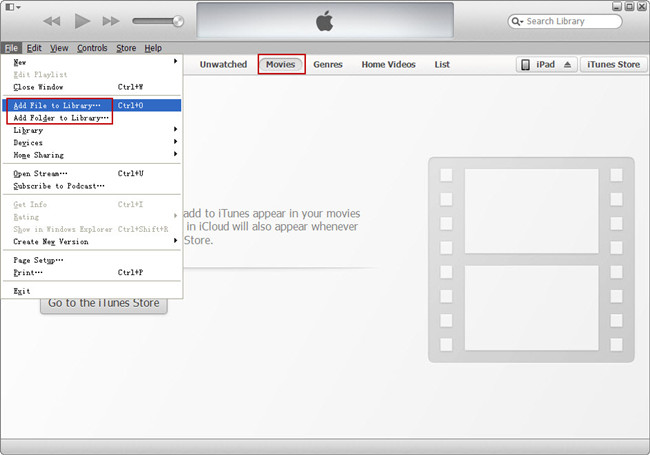
    Step 2. Switch to "Movie" category, click "File" tab in the left navigation bar, and add local file or folder to iTunes library.


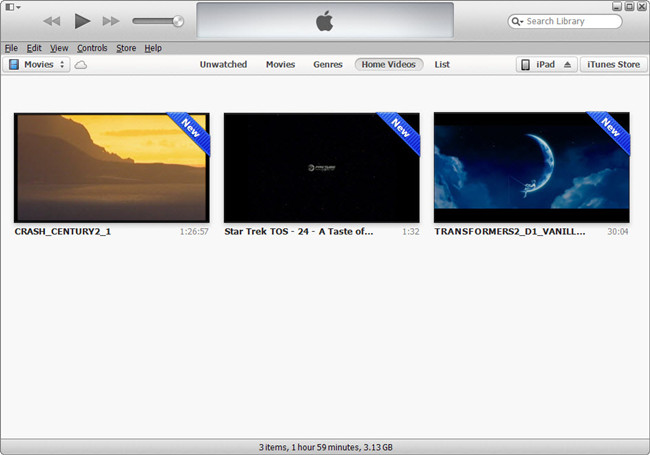
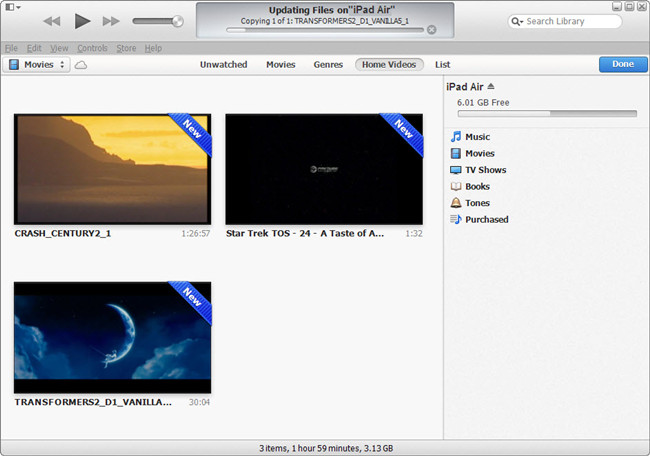
    When the files are added, you would see "New" tab at the top right corner.


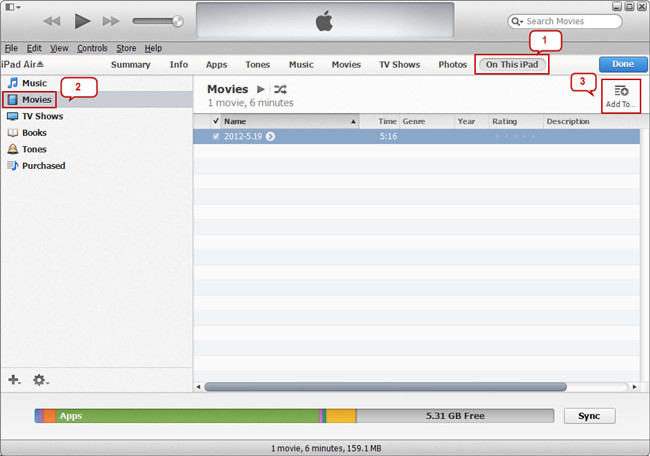
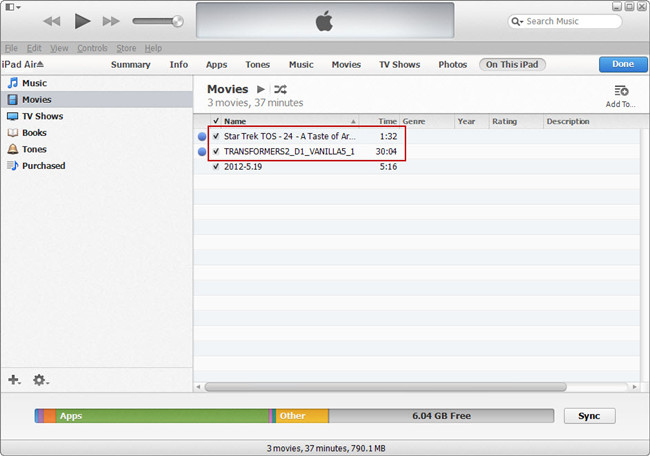
    Step 3. Click on iPad Air in the right navigation bar, then follow the path "On This iPad > Movies > Add To" to stream videos from local computer to iPad Air.


    Wait for the uploading file process complete and all files would be successfully transferred to your iPad Air.


    Read this article to get more detailed steps: How to sync video, music, photo files to iPad Air with iTunes on Windows/Mac?

    Related Articles: