Summary: In this page, we’ll study the Sony HDR-CX440 to Avid MC workflow to deal with the XAVC S footage in an effective way. Learn how to convert CX440 XAVC S to DNxHD MOV for Avid MC smooth editing.

The Sony HDR-CX440 HD Handycam, with 8GB Internal Memory features an Exmor R CMOS sensor and a wide-angle Carl Zeiss zoom lens with 30x optical zoom. The Sony HDR-CX440 captures Full HD 1920*1080 video at 60p and 9.2MP still images to its 8GB of internal memory or to optional media cards. The Sony CX440 records using XAVC S codec (up to 50 Mb/s) and features dual recording, which lets you simultaneously capture both high-quality AVCHD and web-optimized MP4 files.
You may have got the Sony HDR-CX440 camera, recorded some full-HD footages in XAVC S format, and wanted to import the XAVC S recordings to Avid MC for editing. But you will encountered problems when importing Sony CX440 XAVC S files to Avid MC. Why the problems occur? Sony XAVC S is the latest high definition format introduced by Sony–is not supported by Avid Media Composer so far. To import Sony HDR-CX440 XAVC S videos to Avid MC for editing without issues, the best solution is to convert Sony CX440 XAVC S to Avid MC supported format.
Main Supported Video Formats for Avid Media Composer:
DNxHD: This is Avid’s baby. All kinds of DNxHD are supported natively via either of the import methods mentioned above.
H.264: H.264 is the ubiquitous codec, and it looks like it will stay for quite some time. Avid Media Composer supports H.264 natively, via AMA as mentioned above.
MPEG-4: Like H.264, Avid Media Composer supports MPEG-4 natively, via AMA as mentioned above. The Quicktime plug-ins are installed by default.
Since, DNxHD MOV is the most compatible codec for Avid MC, so if we want to edit Sony HDR-CX440 XAVC S in Avid MC, it is necessary to convert those already shot XAVC S files to DNxHD .mov using third-party software. Here, you can depend on Pavtube HD Video Converter for Mac (review). With this best program, besides Avid MC, it can also export MPEG-2 for Adobe Premiere Pro, AIC for iMovie and more for native editing.


Other Download:
- Pavtube old official address: http://www.pavtube.com/hd-video-converter-mac/
- Amazon Store Download: http://www.amazon.com/Pavtube-Video-Converter-Mac-Download/dp/B00QI9GNZS
- AppStore Download: https://itunes.apple.com/de/app/pavtube-hd-video-converter/id502792488?mt=12
- Cnet Download: http://download.cnet.com/Pavtube-HD-Video-Converter/3000-2194_4-76177786.html
How to work with Sony HDR-CX440 XAVC S videos in Avid MC?
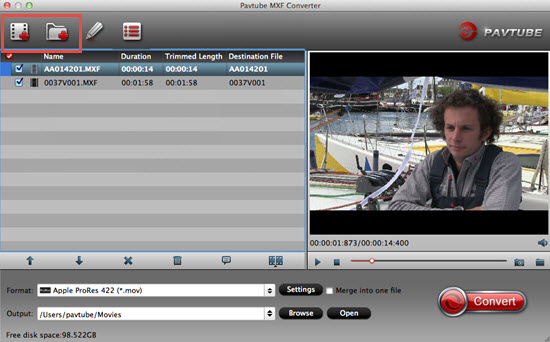
Step 1: Launch the HD Video Converter on your Mac, and then click the “Add video” button to import your XAVC S videos from Sony HDR-CX440 directly. In order to import several files at one time, you can click “Add from folder” button.

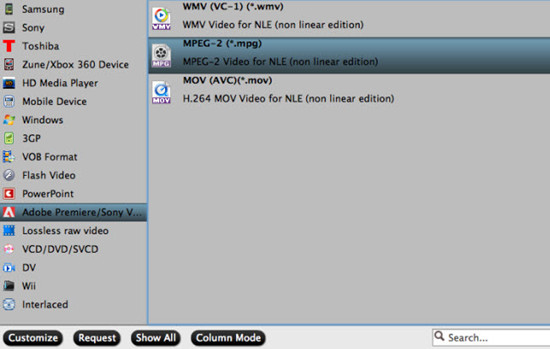
Step 2: Click the “Format” bar to get the drop-down menu and you can get “Avid Media Composer>>Avid DNxHD (*.mov)” as output format.

Step 3: Click “Settings” button to customize the output video and audio settings by yourself. But if you are not good at it, you’d better use the default parameters, they will ensure you a good balance between file size and image quality basically. You can change the resolution, bit rate, frame rate as you need.
Conclusion: Once the conversion process shows in 100%, click “Open” to get the output videos. Create a project and start Sony HDR-CX440 editing XAVC S videos in Avid MC with light speed.
Further Reading:
- Make Canon C300 MXF Footage Editable in Final Cut Pro 7
- Make Panasonic V130 MTS Compatible with Premiere Pro
- MXF to DaVinci Resolve- Import Ikegami MXF to DaVinci Resolve for Editing
- Import Canon T6s/760D MP4 to VLC, QuickTime for Playing on Mac OS X Yosemite
- Sony Alpha a7II Workflow with Premiere Pro CC/After Effects CC
- Load Sony HDR-PJ670/B MTS Files to Avid MC for Editing
- Playing Captured AVI Files from Bushnell Trail Camera on QuickTime Player