Tuesday, August 29, 2017

The LUMIX GH5 records silky smooth 4K 60p/50p (QFHD 4K: 3840 x 2160 / MOV or MP4) video. For Mac users, after shooting many beautiful videos, you may wish to load the Panasonic GH5 4K video into FCP X, the professional NLE editing software on Mac platform for some post editing workflow. The problem is that a lot of people they have encounter incompatible issue when working LUMIX GH5 4K video with FCP X. The following article will show you how to get a smooth workflow of Lumix GH5 4K video with FCP X.

Best editing codec for FCP X

To get a smooth workflow of Panasonic GH5 4K with FCP X, we highly recommend you to use the Apple Prores codec, which is specially designed by Apple for high quality and high performance editing workflow of 4K video in FCP X.

Transcode Panasonic GH5 4K to Prores codec for FCP X

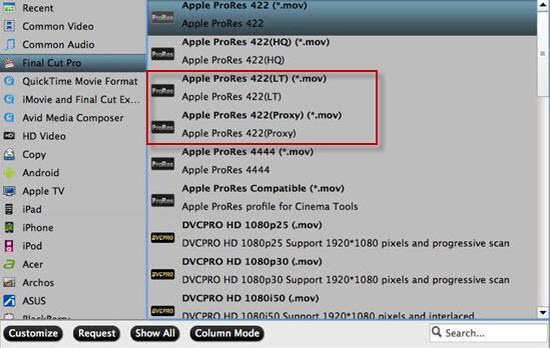
To generate Apple Prores coded, you can download our best Mac Prores Converter - Pavtube Video Converter for Mac, which Which has perfect support for both the 4K H.264 MP4 and MOV container file format recorded by Panasonic GH5. The program can facilitate you to directly output FCP 7/X most favorable Apple Prores codec in various different file types including Apple Prores 422, Apple Prores 422 HQ, Apple Prores 422 Proxy and Apple Prores 422 LT. If your computer are powerful enough to handle multicam and high-resolution video and you are going to do many effects editing work with FCP X, you'd better choose to output "Apple Prores 422(*.mov)"or "Apple Prores 422(HQ)(*.mov)"for better performance. If your computer are not fast enough, just choose Apple Prores 422 Proxy and Apple Prores 422 LT format, which helps to create small file resolution video for smooth post editing workflow.

How to Transcode Panasonic GH5 4K to Prores Codec for FCP X Best Editing Workflow?

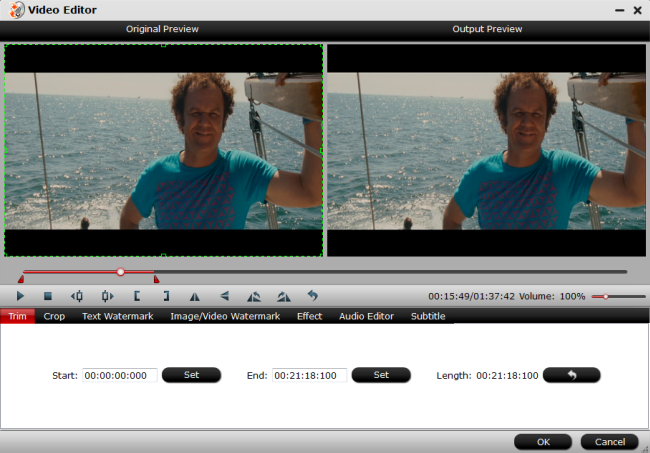
Step 1:Load Panasonic GH5 4K video.

Open the program, click "File" menu, from its drop-down option, select "Add Video/Audio" to load GH5 4K video to the program.

Load Panasonic GH5 4K video

Step 2: Define the output format.

Clicking the Format bar, from its drop-down list, you can choose one of Final Cut Pro X best compatible Apple Prores editing format. If your computer is powerful enough to handle 4K video, it would be much ideal for you to choose "Apple Prores 422(*.mov)" or ""Apple Prores 422(HQ)(*.mov)" for high quality performance on Final Cut Pro X.

Output Apple Prores 422 or 422 HQ format

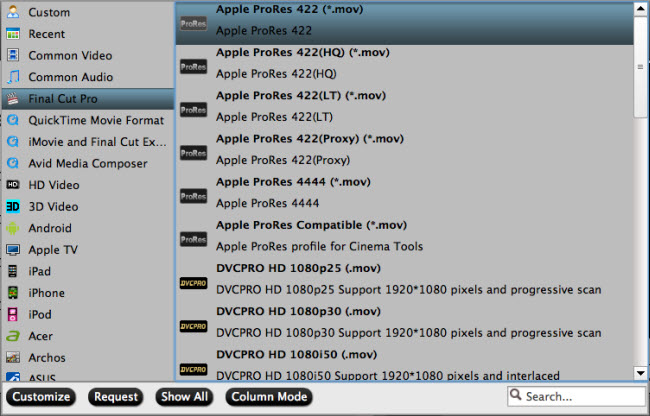
If you have a underpowered computer, it is ideal for you to output "Apple Prores 422(Proxy)(*.mov)" or "Apple Prores 422(LT)(*.mov)" format.

Output Apple Prores LT or Proxy format

Step 3: Start the conversion process.

Go back to the main interface, hit right-bottom "Convert" button to start to convert and compress GH5 4K video to Final Cut Pro X best favorable Apple Prores format with compatible file resolution.

When the conversion is completed, feel free to import video to Final Cut Pro X for professional post-production workflow on either powerful or slow computer.

Tuesday, August 22, 2017

Import Canon 5D Mark IV 4K to FCP X

Canon 5D Mark IV 4K Video issues in FCP X

"Hi guys. I have Canon 5D mark 4 and it can shoot 4K videos in MJPEG format. When i tried to edit this videos in FCPX video seems laggy and not smooth. I think it's about for MJPEG format because it's normal in the camera screen. And 1080P ALL-I & IPB videos are seems normal and ok too. Do you have any suggestions to solve for this issue?"

Can FCP X handle Canon 5D Mark IV 4K video?

The Canon 5D Mark IV shots DCI 4K (4096 x2160) resolution recording in MJPEG format, which is unfortunately excluded from FCP X supported file formats. To successfully load Canon 5D Mark IV 4K to FCP X, you will need to perform a format transcoding process.

Best workflow of Canon 5D Mark IV 4K with FCP X

You can easily convert Canon 5D Mark IV 4K MJPEG to one of FCP X editable file formats with any of the Mac video conversion tool on the market , however, if you are looking for a high quality and high performance workflow, we highly recommend you to use the Apple Prores codec, which retains higher quality during editing while requiring much less expensive disk systems.

To generate Apple Prores codec, you can download this professional program - Pavtube Video Converter for Mac, which can swiftly transcode Canon 5D Mark IV 4K MJPEG to Apple Prores codec in various types, you can choose a proper codec according to your computer hardware system condition.

If you computer is old or slow, or you just want to do some rough editing, you can select to output "Apple Prores Proxy)(*.mov)"or "Apple Prores (LT)(*.mov)"format to save more space and bandwidth. However, if your computer are powerful enough to handle multicam and high-resolution video and you are going to do many effects editing work with FCP X, you'd better choose to output "Apple Prores 422(*.mov)"or "Apple Prores 422(HQ)(*.mov)" for better performance.

Notes:
1.When converting video to Final Cut Pro oriented format templates(e.g. Apple Prores), please ensure that your computer has Final Cut Pro installed, otherwise the converted files will have audio only without image.
2.If you are using FCP X, please make sure you have installed ProApps QuickTime Codecs, or you may get files with sound only without video.

Step by Step to Convert Canon 5D Mark IV 4K to Apple Prores for FCP X

Step 1: Load Canon 5D Mark IV 4K footage.

After transferring the footage from the camera to your Mac local drive, launch the program on your Mac computer, from "File" drop-down option, select "add Video/Audio" to add Canon 5D Mark IV 4K files to the program.

Load Canon 5D Mark IV 4K video

Step 2: Select output file format.

Click "Format"bar, from its drop-down list, select "Final Cut Pro"> "Apple Prores 422(*.mov)"as your desired output file formats for working with high performance computer, for slow computer, just choose "Apple Prores Proxy)(*.mov)"or "Apple Prores (LT)(*.mov)"format.

Output Apple Prores format

Step 3: Begin the conversion process.

Go back to the main interface and press the "Convert" icon on the right-bottom to start Canon 5D Mark IV 4K to Final Cut Pro X Apple Prores codec encoding process.

When the conversion is done, you can easily import converted video to FCP X for furthering professional editing.

Tuesday, August 15, 2017

Upload 4K Video to Instagram

Have some personal 4K video shot with your camera, camcorder, smartphone, tablets or downloaded from online sites and wish to upload and share the 4K video on Instagram, but have no ideal how to get the best uploading settings such as file format, video length, file size, etc. The following article will give you the full answer for all those questions.

Best video settings for Instagram uploading

Size: maximum width 1080 pixels (any height)
Frame Rate: 29.96 frames per second
Codec: H.264 codec / MP4
Bit rate: 3,500 kbps video bitrate
Audio: AAC audio codec at 44.1 kHz mono

From above lists, we can see that the maximum uploading resolution for Instagram is 1080p, therefore, it is essential for you to compress 4K to 1080p to get a fast and smooth uploading process. In addition, the video format should be MP4 file format compressed with H.264 video codec and AAC audio codec. If the 4K video that you try to post to Instagram are wrapped in other incompatible container file formats such as AVI/WMV/MOV/MKV/FLV/TS/XAVC/XAVC S/MXF or unsupported codec like H.265, Prores, etc. You will need to perform a format and codec transcoding process. What's more, the best video frame rate should be 29.96, therefore, make sure that the video are encoded with that compatible frame rate.

Best tool for converting and compressing 4K video for Instagram

To get above listed best uploading settings for Instagram, you can easily achieve that with our best Instagram video converter program called Pavtube Video Converter, the program not only assists you to encode 4K video to Instagram compatible H.264 codec with MP4 container, but also allows you to output Instagram best compatible uploading settings listed above in the program's profile parameters window.

Trim video for Instagram uploading

Since Instagram only allows you to post video from 3 to 60 seconds, therefore, if your 4K video is longer than 60 seconds, you can take good advantage of the program's built-in video trimming function to cut off video to remove unwanted parts or segments to shorten the video length to less than 60 seconds.

For Mac users, please download Pavtube Video Converter for Mac to produce Instagram best compatible uploading settings.

Step by Step to Convert and Compress DJI 4K for Instagram Uploading

Step 1: Load DJI 4K video into the program.

Start the program on your computer, click "File" menu and select "Add Video/Audio" or "Add from folder" to import DJI 4K video.

Load DJI 4K video

Step 2: Choose output file format.

To downscale DJI 4K to 1080p, you can output Instagram compatible "H.264 HD Video(*.mp4)" under "HD Video" main category.

Output Instagram compatible HD H.264 format

Step 3: Output Instagram best uploading profile settings.

Click "Settings" icon on the main interface to open the "Profile Settings" window, under video section, set the output resolution as"1920*1080 or"1080*720, frame rate as 29.96fps, bit rate as 3500Kbps, audio codec as aac, sample rate as 44100, channels as mono.

Output Instagram compatible uploading profile settings

Step 3: Trim or cut DJI 4K video to less than 60 seconds.

Open "Video Editor" window and switch to the "Trim" tab, you can drag the slider bars to include the segment you want to remain, click the left square bracket to set start point, and click the right square bracket to set end point when previewing the video or directly input specific values to "Start" and "End" box.

Trim DJI 4K video

Step 4: Start the conversion process.

After all settings are done, click right-bottom "Convert" button to begin to convert and compress DJI 4K video to the best formats and settings for Instagram.

When the conversion is completed, you can smoothly upload and share DJI 4K video on Instagram.

Tuesday, August 8, 2017

Canon EOS 6D Mark II to Premiere Pro

The Canon EOS 6D Mark II features a 26.2 Megapixel full-frame CMOS sensor designed to create high-resolution and detailed images. With the camera, you can record up to a maximum frame rate of 60p in MOV or MP4 container with MPEG-4 AVC/H.264 compression codec. Want to move the footage into Premiere Pro for some professional editing workflow. The following article will show you how to get a smooth workflow of Canon 6D Mark II with Premiere Pro.

Canon Premiere Pro native import Canon EOS 6D Mark II video?

After searching for Premiere Pro supported file formats, we get the information that the H.264 MP4 files shot with Canon EOS 6D Mark II is officially included in Premiere Pro CC workable file formats. However, it is well known H.264 is a good delivery file format but not a good editing format, to get a smooth workflow of Canon EOS 6D Mark II video with Premiere Pro, we highly recommend you to transcode EOS 6D Mark II H.264 to Premiere Pro native compatible editing format.

Transcode EOS 6D Mark II H.264 for Premiere Pro CC

Here, you can get the job easily completed with a simple to use application called Pavtube Video Converter. The program supports batch conversion mode, so that you can load multiple Canon EOS 6D Mark II footage for conversion at one time. Different from other application, you can easily get Premiere Pro CC specially optimized MPEG-2 video with best editing profile parameters.

Pavtube Video Converter is available on Windows 10/8.1/8/7, it is also accompanied with an update to date Mac version - Pavtube Video Converter for Mac. The program is quite simple to use, anyone can learn to use it in minutes. In addition, it produces high quality conversion results with better video/audio quality.

Step by Step to Convert Canon EOS 6D Mark II for Premiere Pro Editing

Step 1: Load Canon EOS 6D Mark II files.

Here you can directly drag & drop the Canon EOS 6D Mark II to the converter, or click "Add Video" or "Add from folder" button on the top menu to browse and choose the camera video files.

 Load Canon EOS 6D Mark II file

Step 2: Choose the preset output format.

Here, you can directly use the program to output Premiere Pro CC specially optimized editing format "MPEG-2(*.mpg)" under "Adobe Premiere/Sony Vegas..." main category.

Output Premiere Pro specially optimized forma

Tips: Click "Settings" to open "Profile Settings" window to to flexibly adjust output video codec, resolution, bit rate, frame rate, audio codec, bit rate, sample rate, channels, etc as you like to get better output video and audio quality.

Step 3. Start converting Canon EOS 6D Mark II files.

Click the big "Convert" button in the main UI to begin the Canon EOS 6D Mark II to MPEG-2 conversion. You can see your converted videos by clicking "Open" button.

When the conversion is finished, click "Open Output Folder" icon on the main interface to open the folder with generated files, feel free to import video to Premiere Pro CC for professional post editing workflow.

Tuesday, August 1, 2017

Edit Canon EOS 6D Mark II with FCP X

The Canon EOS 6D Mark II comes equipped with powerful Full HD video recording options, you can record up to a maximum frame rate of 60p in MOV or MP4 container with MPEG-4 AVC/H.264 compression codec. For Mac users, you may wish to load the Canon EOS 6D Mark II to FCP X for some professional post editing workflow, the following will show you how to get the smooth workflow of Canon EOS 6D Mark II with FCP X.

Can FCP X native support Canon EOS 6D Mark II HD video?

From FCP X supported file formats, we can see that you can native import Canon EOS 6D Mark II MOV or MP4 H.264 file into FCP X. However, it is well known that H.264 is a good delivery file format, but not a good editing format. If you try to directly edit H.264 in FCP X, you will start to lose image quality as you do color correction or composite gradients to create greenscreen keys. If you wish to achieve a high quality and high performance workflow of Canon EOS 6D Mark II video with FCP X, we highly recommend you to transcode H.264 to Apple Prores codec, which render faster and have more room, so you can create great looking effects without losing any quality.

Transcode Canon EOS 6D Mark II H.264 to Prores for FCP X

To produce Apple Prores codec from Canon EOS 6D Mark II, we highly recommend our best Mac Prores Converter - Pavtube Video Converter for Mac to you. The program can assist you to effectively encode Canon EOS 6D Mark II H.264 to FCP X best compatible Apple Prores in various different file types including Apple Prores 422, Apple Prores 422 (HQ), Apple Prores 422 (LT), Apple Prores 422 (Proxy) and Apple Prores 4444. You can flexibly make your own selection according to your own needs.

If you computer is old or slow, or you just want to do some rough editing, you can select to output "Apple Prores Proxy)(*.mov)"or "Apple Prores (LT)(*.mov)"format to save more space and bandwidth. However, if your computer are powerful enough to handle multicam and high-resolution video and you are going to do many effects editing work with FCP X, you'd better choose to output "Apple Prores 422(*.mov)" for better performance.

Step by Step to Convert Canon EOS 6D Mark II to Prores for FCP X Editing

Step 1: Load Canon EOS 6D Mark II H.264 video.

Download the free trial version of the program. Launch it on your computer. Click "File" menu and select "Add Video/Audio" or click the "Add Video" button on the top tool bar to import Canon EOS 6D Mark II H.264 video files into the program.

Load Canon EOS 6D Mark II video

Step 2: Select output file format.

Click "Format" bar, from its drop-down list, select your desired Prores format such as "Final Cut Pro" > "Apple Prores 422(*.mov)", you can also choose other Prores format on your own needs.

Output Apple Prores format

Step 3: Begin the final conversion process.

Go back to the main interface and press the "Convert" icon on the right-bottom to start Canon EOS 6D Mark II H.264 video to Final Cut Pro X Apple Prores MOV conversion process.

When the conversion is done, feel free to import converted video to FCP X for furthering professional editing.