Monday, February 29, 2016

MXF & After Effects CS6 Workflow: Can After Effects CS6 Support MXF Files?

Can After Effects CS6 Support MXF Files?

Since After Effects CS4, MXF is supported by AE. However, MXF is a container format, After Effects can only import some kinds of data contained within MXF files. Many users still have troubles when importing MXF to After Effects (including After Effects CS6). What’s available workaround to successfully edit MXF files in After Effects without any issue?


MXF (Material Exchange Format) is a container format for professional digital video and audio media defined by a set of SMPTE standards. As MXF container is not so widely accepted as MP4, AVI, and WMV format, it is unacceptable to many editing software. HD digital camcorders’ video like Canon C300, Canon XF100, Canon XF105, Sony XDCAM series and Panasonic P2 series still can not natively or directly imported to Adobe After Effects CS6.

How to Make After Effects CS6 Support MXF Files?

In that case, MXF is not a proper format for editing. You can definitely convert MXF files to Adobe After Effects CS6 codec with the native quality before importing. And video formats supported by After Effects CS6 include MPEG-2, WMV (VC-1), etc.

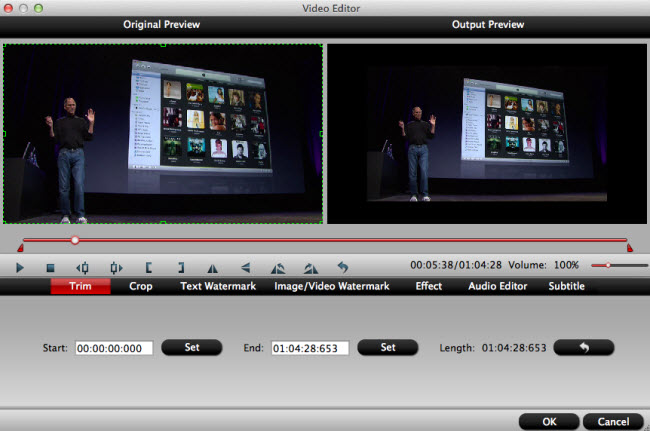
Here I highly recommend Pavtube MXF Converter. It is the most professional and easy-to-use MXF to FCP X Converter, which can convert your MXF files to FCP X compatible formats with the 6X faster conversion speed and best output quality on Mac. Also it offers you other functions like convert MXF to 3D video, define video/audio parameters, add video watermark, etc. 

Below is a detailed guide on how to convert MXF to After Effects CS6 more compatible video format like convert MXF to MPEG-2.

The trail-before-purchase is supported, just feel free to try it, it is 100% clean and safe:


Key Feature of Pavtube MXF Converter:

1. Convert MXF to other videos

Powerful video converting software can help you convert MXF to MP4, AVI, MOV, WMV, HD videos, MP3.

2. Support professional video editing software

Transcode MXF files to Sony Vegas, Adobe Premiere, Windows Movie Maker, Avid, etc.

3. Merge source MXF files

Join different source MXF videos together and output a single video. Then you can enjoy a long output movie.

4. Adjust output video effect

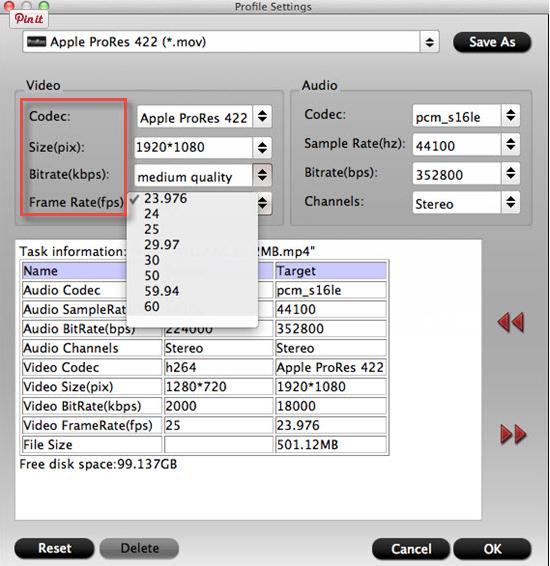
To customize the output profile, users can adjust the output Resolution, Bitrate, Frame Rate, Encoder, Channels, and Sample Rate.

Tips: The conversion speed is very fast because it supports batch conversion and NVIDIA CUDA & ATI Stream (AMD APP) acceleration technologies. It converts multiple video clips at the same time, moreover it can shut down computer after the process is complete, so run the app overnight and you could enjoy the created videos next morning when you are up.

If you are a Mac user, and in need of edit the MXF videos in Final Cut Pro 7 / XiMovie,Avid Media Composer, etc. Please turn to Pavtube MXF Converter for Mac

How to Convert MXF Files to MPEG-2 for After Effects CS6

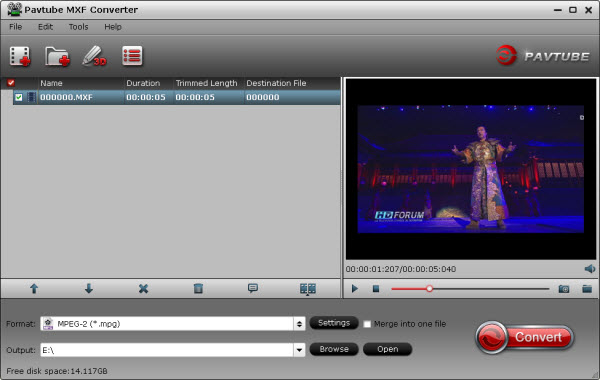
Download and install Pavtube MXF Converter on your PC (compatible with Windows 10, Windows 8, Windows 7, Windows XP, Windows Vista, and Windows 2000). Run this program, you will find the interface is very brief, this program is very easy to use.

Step 1: Now please click add files button to import the MXF video files from your camera or from a folder stored on your HDD that you want to convert, you can add batch files at one time.


Note: MXF systems produce split A/V which means the video and audio are stored in separate files. Some careless editors may only import the video files into an MXF converter. The result is that there will be no audio in the output video. Make sure that the whole MXF file structure is transferred before converting.

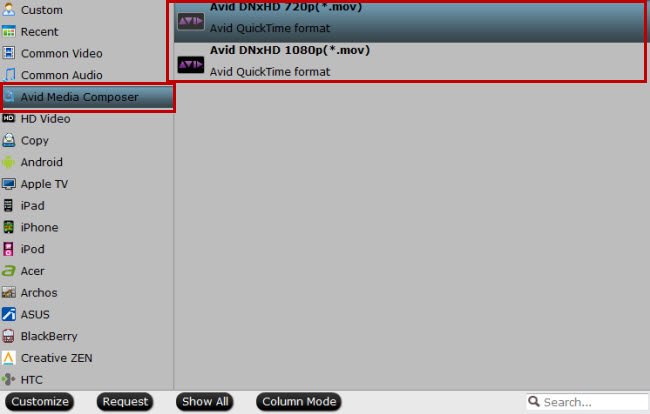
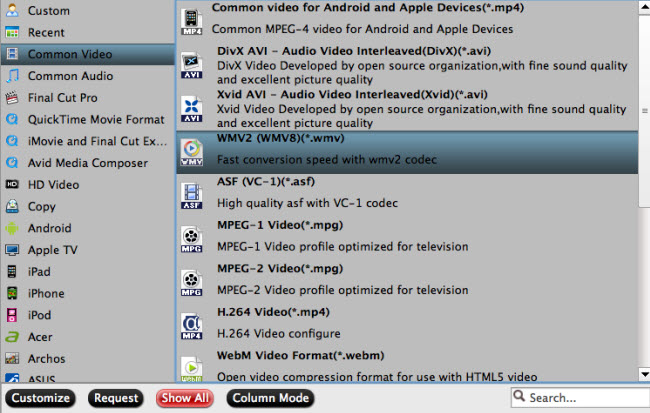
Step 2: Go to the format list and pick “MPEG-2 (*.mpg)” under “Adobe Premiere/Sony Ve…” option.


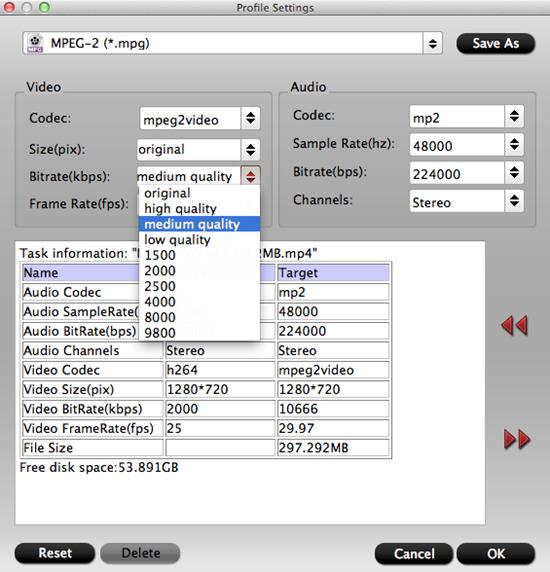
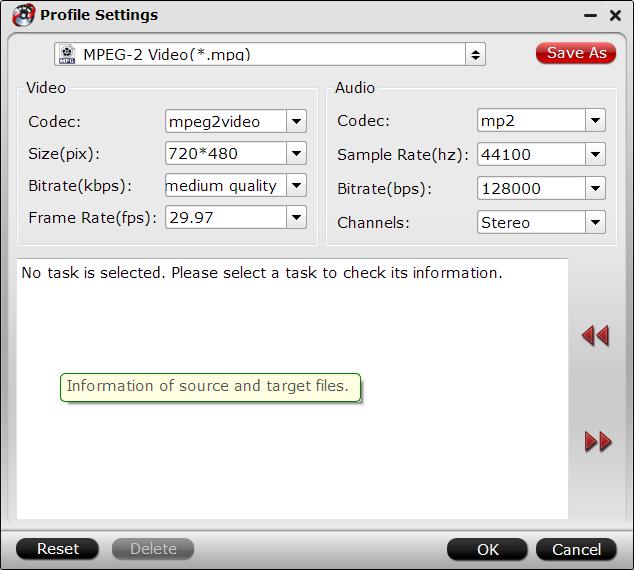
Step 3: If you would like to customize the video and audio parameters, you can click "Settings", adjust the parameters as you want, like Video Codec, aspect ratio, bit rate, frame rate, Audio codec, sampling rate, bit rate, channels.


Step 4: Click "Convert" to start to convert MXF to After Effects CS6 MPEG-2 for native editing.

Once the conversion completes, simply click “Open” button to get the converted MPEG-2 files. And now you can bring the output MPEG-2 files into After Effects CS6 to create your own masterpieces.

Related program:

If you have multiple-track videos requirements,  Pavtube MXF MultiMixer / Pavtube iMixMXF would be your best-choice: It is able to import and export MXF video files with multiple audio tracks/channels as well as mixing the multiple audio tracks/channels into one. Convert MXF video files from popular devices such as Apple, Samsung, Sony, Canon, JVC, Panasonic, etc. to various video format supported by any media player and NLEs.

Read More:

Friday, February 26, 2016

Support for XAVC-S in FCPX

“I recently got myself a Sony A7s (great little camera!) that shoots in XAVC-S.
However, most of the time the XAVC-S files don't show up when choosing Import in FCP X.
Any way to make the XAVC-S files show up in the import window?”

Based around the XAVC S codec, a more highly compressed (Long GOP) version of pro-friendly XAVC/H.264 Level 5.2, videos are encoded in an MP4 wrapper, which means they should be relatively widely supported.

Although Final Cut Pro X with stunning features is a popular video editing software for users, the compatibility between 4K videos and Final Cut Pro X is still an unsolved mystery in that some XAVC-S videos can be imported into FCP X, while the some XAVC-S videos can not. 

To import and edit XAVC S files in FCP X, you will need to do some preparation before editing. The easy workaround I’ve worked out is to find a way to transcode Sony XAVC S to FCP X editable Prores codec in 1080p. Such as ProRes 422, ProRes 422 HQ, ProRes Proxy, ProRes 422 LT, ProRes 4444 video.>> Types of Apple ProRes Codecs 

Therefore, the easy workaround is, get Pavtube Video Converter for Mac (Best XAVC/XAVC S Video Converter for Mac Review) to convert XAVC S to ProRes, which will save you both time and trouble, and all you need is to drag the result videos for prompt editing.

Plus, you may also encode XAVC S to Avid Media Composer, Adobe Premiere Pro, iMovie and more NLE programs highly compatible formats for smooth editing. Besides, it might help you change XAVC to other frequent formats like MOV, MKV, MP4, AVI, etc for playback on media devices. 

The trail-before-purchase is supported, just feel free to try it:


Key Feature of Pavtube Video Converter:
  • Support nearly all HD/SD video and audio formats to various video and audio format;
  • Make videos & movies & audios compatible with Android tablets/Phones, Apple devices, Mac OS X El Capitan, video game console, websites and more;
  • Edit videos with trim, crop, split, merge and special effects;
  • Process videos and movies in batch even faster and easier;
  • Attach external *.srt, *.ass, or *.ssa subtitles into source media for entertainment;
  • Support perfect audio and video synchronization.
Install and run it, you will see the interface. The following is a simple instruction of how to use this Pavtube Video Converter for Mac:

Notes: 
1.When converting video to Final Cut Pro oriented format templates(e.g. Apple Prores), please ensure that your computer has Final Cut Pro 7 installed, otherwise the converted files will have audio only without image.

2.If you are using FCP X, please make sure you have installed ProApps QuickTime Codecs, or you may get files with sound only without video.

How to Get XAVC S Support in Final Cut Pro X

Step 1: Add XAVC S footage to the program.

Launch the software on your Mac computer, click "File" menu, select "Add Video/Audio" or "Add from folder" to import XAVC footage to the program.


Step 2: Choose output format.

Click "Format" bar, from its drop-down options, move your mouse to "Final Cut Pro > Apple ProRes 422 (*.mov)" to select it as the output file format.


Read the difference of ProRes. 

• Apple ProRes 422 – Higher quality than Apple ProRes 422 (LT); 
• Apple ProRes 422 (HQ) – Keep original video quality for editing in FCP; 
• Apple ProRes 422 (LT) – Get a smaller file sizes than Apple ProRes 422; 
• Apple ProRes 422 (Proxy) – SD levels – 480i/p and 576i/p. Used in offline workflows. 
• Apple ProRes 4444 – Edit and finish 4:4:4 material. 

Actually, different Apple ProRes codec corresponds to different needs. Here you can refer to this article "Differences among Apple ProRes codec". 

Step 3: Customize output ProRes parameters.

Open "Profile Settings" window to adjust the output video codec, size, bit rate, frame rate, audio codec, sample rate, bit rate and channels.


Step 4: Convert XAVC S Video to FCP X.

Hit the convert button under the preview windows, the program will start XAVC footage to Apple ProRes MOV conversion for Final Cut Pro X.

When the conversion is completed, run FCP X and import the ProRes codec footage for post production workflow.

If you are running on Windows,for other windows NLEs please get Pavtube Video Converter.

Read More:

Wednesday, February 24, 2016

M2TS in Resolve 9/10/11/12 - Convert M2TS Files to Davinci Resolve

DaVinci Resolve can handle much more native video formats and camera files than any other real time editing system. However, it cannot handle the M2TS footage from Sony, Panasonic or Canon cameras. That's why you found it's a painful experience to import M2TS files to DaVinci Resolve 9/10/11/12 for editing. 


On many HD video editing forums, there are many users complained about the issue to import M2TS to DaVinci Resolve for editing, the DaVinci Resolve video editing software can’t support M2TS video files recorded by Sony, Canon, JVC, Panasonic, etc. so users can’t load the M2TS footages to DaVinci Resolve for editing smoothly. How to solve this M2TS to DaVinci Resolve importing and editing issue easily?

Read through some posts online, I have found some similar (but not identical) problems like no audio, import slowly… After looking into this more, I know that DaVinci Resolve has not offered support for M2TS video.

To make M2TS files compatible with DaVinci Resolve, the easy and reliable workaround is to transcode M2TS to DaVinci Resolve 9/10/11/12 supported video formats such as QuickTime, ProRes, DNxHD first.

To convert M2TS to DaVinci Resolve 9/10/11/12 easily and quickly, Pavtube MTS/M2TS Converter for Mac (Best MTS/M2TS Converter for Mac Review) is highly recommended. This program features high efficiency and seamless conversion. With it, you can transcode M2TS to DaVinci Resolve 9/10/11/12 compatible video(QuickTime, ProRes, Avid DNxHD is well supported by this powerful editing system) with original quality. Besides, this software can also transcode M2TS files for editing in Final Cut Pro 7/XiMovieFinal Cut Express, etc NLEs. 

If you are running on Windows, please get Pavtube MTS/M2TS Converter.

The trail-before-purchase is supported, just feel free to try it:


Key Features:
  • Three simple clicks to convert M2TS videos to DaVinci Resolve 9/10/11/12 compatible formats.
  • Aside from DaVinci Resolve, you can directly convert M2TS to iMovie, QuickTime, Windows Movie Maker and more video editors supported formats without additional settings.
  • Edit your M2TS videos before converting them. With the built-in editor, you can trim or crop your videos. And you are able to add subtitles and watermarks to the videos as well.
  • Perfectly compatible with Mac OS X 10.11 El Capitan, 10.10 Yosemite, 10.9 Mavericks, 10.8 Mountain Lion, 10.7 Lion and 10.6 Snow Leopard.
Install and run it, you will see the interface. The following is a simple instruction of how to use this Pavtube Mac MTS/M2TS Converter:

How to Convert and Import M2TS Files to DaVinci Resolve 9/10/11/12

Step 1. Add M2TS files

Click "Add Video" button to load .M2TS files to the program. You can also directly drag the video files into the program directly.


Step 2. Select output format

As is mentioned above, Avid DNxHD is well supported by DaVinci Resolve 9/10/11/12. So just click the format bar to follow “Avid Media Compose” > “Avid DNxHD 720p (*.mov)” or “Avid DNxHD 1080p (*.mov).”


Tip: If you like, adjust video and audio parameters, including the Bitrate of Video and Audio, the Codec of Video and Audio, Video Size, Sample Rate, Frame Rate, Audio Channels, etc., by clicking the Settings button on the main interface for getting the best quality.


Step 3. Start the conversion

Finally, simply hig the big Convert button to start converting M2TS to DaVinci Resolve 9/10/11/12 friendly video formats. 

Within several minutes, you can find the converted file on your computer by clicking the "Open" button. And then you can import the converted files to DaVinci Resolve 9/10/11/12 easily.

Read More:

Sunday, February 21, 2016

iMovie MTS: How to Convert MTS to iMovie (iMovie 11 Included)

Why an MTS Video File Cannot Be Imported to iMovie?

To answer this question, we have to first understand the VCHD, which is short for Advanced Video, Codec High Definition which was developed by Panasonic and Sony for camcorders. It is basically a form on video compression, which allows larger data created using the HD video recording to be saved in the internal hard disk and expandable memory. 

MTS, short for MPEG -2 Transport Stream is a part of the avchd and is used for multiplexing audio and video. This is not an editable file, but a container file lacking the necessary information needed by iMovie and other editing tools. While you may have luck playing the files using some players, you will not be able to import it into iMovie and other editing software.


How to Import MTS to iMovie on Mac

With the editing program iMovie, you can import a variety of media files including audios, videos, photos and graphics files to it for professional and further editing. These media files may come from a hard disk of your computer, an external storage device connected to your computer, a memory card inserted in your computer’s card slot or a card reader, or an existing hard disk on your home or other computer network.

When following the iMovie instructions you decide to import the MTS video files to the iMovie, you may be told by iMovie that it cannot recognize the MTS file format. Coming across the dilemma of importing MTS video files to iMovie, you should make clear the best compatible format for iMovie first. The basic solution is transcoding MTS to iMovie best video editing codec - Apple Intermediate Codec (AIC), which is a high-quality and less processor intensive intermediate codec for using with HD workflows in iMovie

If you are looking for an easy way to convert your MTS to iMovie, following are a few steps to help you achieve your goal with Pavtube MTS/M2TS Converter for Mac (Best MTS/M2TS Converter for Mac Review) which is designed to convert MTS to any other popular video or audio format at high fast conversion speed and excellent output quality. No matter you are an expert or novice, you could easily use it for its intuitive interface.

See AlsoiMovie Tips | AVCHD MP4 to iMovie

Free download, it is 100% clean and safe:


Key Features:
  • Three simple clicks to convert MTS videos to Final Cut Pro compatible formats.
  • Aside from FCP, you can directly convert MTS to iMovie, QuickTime, Windows Movie Maker and more video editors supported formats without additional settings.
  • Edit your MTS videos before converting them. With the built-in editor, you can trim or crop your videos. And you are able to add subtitles and watermarks to the videos as well.
  • Perfectly compatible with Mac OS X 10.11 El Capitan, 10.10 Yosemite, 10.9 Mavericks, 10.8 Mountain Lion, 10.7 Lion and 10.6 Snow Leopard.
Now you can free download this MTS to iMovie Apple Intermediate Codec (AIC) Converter, install and run it, you will see the interface.

The following is a simple instruction of how to use this Pavtube Mac MTS/M2TS Converter:

Step 1: Add MTS files to the program

Click the “Add File” button to select the MTS videos from your hard drive to this program. To save your time, this program supports batch conversion so you can add multiple files at a time.


Step 2: Choose output format and specify output folder

Choose output format for your specific usage. For example in this case, from "Format" drop-down option, choose iMovie best editing codec by selecting "iMovie and Final Cut Ex..." > "Apple Intermediate Codec (AIC)(*.mov). If you select all files and click Merge, you can join all imported mts files to one output video.


Step 3. Edit MTS files (Optional)

The “Video Editor” can be reached by clicking the “Edit” button. You can edit your MTS files by using editing functions like trimming, cropping, adding watermark to video file, change video effects, etc.


Step 4: Start the Conversion.

Click “Convert” button to start conversion immediately. Few minutes later, you will get output video in your destination folder.

After converting MTS to iMovie. workable formats you can easily import them to your Final Cut Express for editing. Hope you have a good editing experience.

If you are looking for AVCHD MTS/M2TS Converter for Windows, please click HERE.

Read More:

Friday, February 19, 2016

XAVC-L & Vegas Pro- Load Sony XAVC-L to Sony Vegas

Does anyone have any suggestions on how to ingest XAVC-L into Sony Vegas Pro 13? As of now I have not been able to edit this format. I know Sony recently released an update to Vegas Pro 13 but unfortunately a XAVC-L plugin was not included. I did not have paid for vegas to convert all my files before use it in Vegas.
So maybe somebody can help me here.
I trow my last bottle in the ocean.
Thank you for the time you spend.


Many guys included you guys above have been complaining about the lack of XAVC-L support in Sony Vegas Pro even the latest version Vegas Pro 13. Although Sony offers some trial software to convert/transcode, we have tried and find it’s still hard to import these professional XAVC L files or even read.

Although there are several third-party software that promise to transcode professional XAVC L files, most of them I have tried either crash upon opening or don’t read. The only piece of transcoding software I currently have tried that has been able to read and transcode professional XAVC L files so far is Pavtube Video Converter for Mac (Best Three XAVC Video Converter for Mac Review), which can easily transcode XAVC L to Sony Vegas Pro friendly format-MPEG-2 without quality loss. If you are a Mac user, please turn to Windows Version here.

Free download, it is 100% clean and safe:


Download and install Pavtube Video Converter on Mac (compatible with Mac OS X 10.11 El Capitan, 10.10 Yosemite, 10.9 Mavericks, 10.8 Mountain Lion, 10.7 Lion, 10.6 Snow Leopard, 10.5 Leopard and lower versions). Run this program immediately. We choose the Mac version as the guide, Windows version as the same in the steps.

XAVC-L & Vegas Pro- Convert XAVC-L to Mpeg-2 for Sony Vegas

Step 1.Click "Add File" button to locate the XAVC L file(s) you want to add. Or you can drag & drop the files into software window list directly.


Step 2. Click "Format" pull down list to select Adobe Premiere/Sony Vegas> MPEG-2(*.mpg) as the best video format for Sony Vegas Pro. WMV, MOV formats are the good choice as well.


Step 3. Click "Settings" to fix the frame rate, bitrate, video size, etc to your needs. To have a smooth editing with Sony Vegas Pro, you need create the files with the appropriate resolution and frame rate that matches your source footage.  


Step 4. Click the big "Convert" button at the bottom right corner to finish encoding XAVC L to MPG, MOV for Sony Vegas Pro. When the conversion is done, you can find the output files by clicking "Open" button on the main interface, then you can transfer the encoded XAVC L files to your Sony Vegas Pro 13 to play and edit without any problem. Just enjoy it!

Read More:

Wednesday, February 10, 2016

KMPlayer VS VLC: Which Media Player Be Better in File Formats Compatibility?

Recently the famous software related website Winmatrix has been posted a hot poll on the best media player among VLC, KMPlayer, BS player, GOM player and more. Based on the investigation result, KMPlayer and VLC stand out from the crowd. Why these two media players can tower above their rivals? Which one is the best video music player for you? Here I compare KMPlayer with VLC in all significant directions with a desire to shed some light on these two most popular video players.

KMP VS VLC Media Player: What Are the Trumps of KMP and VLC?

KMPlayer

After getting the common features of KMPlayer and VLC, perhaps you can't wait to know what the unique features KMPlayer and VLC have. Maybe that's the key to decide which media player is your cup of tea. Primarily, KMPlayer outshines VLC concerning its rare 3D format playback function, which allows you to experience the amazing 3D home cinema world with a low CPU Memory share and an optimized, stable playback supported by GPU. More thoughtfully, you can enjoy the wonderful 3D contents without downloading any 3D Movie Plus Apps.

In addition, KMPlayer also has an ace in the hole coming soon. That's Cloud KMP designed for you to easily and conveniently manage the media library files that were edited in the album art. Currently this new feature is being developed on an urgent basis. It's convincible that it's coming around the corner and will make your edited files be synchronized at anytime anywhere.

VLC

Speaking of VL video player highlights, it's mentionable that VLC beats others hands down in its powerful knack to play the video content of incomplete, unfinished, or damaged video downloads before the files have been fully downloaded. And even confronted with some damaged video, it can hassle-free skip the error part and continue to smoothly play back the video with clear image provided.

Another shining point rests with VLC interior advanced tech supports which is superior to KMPlayer with no doubt. Take the system resource they needs for instance, it's tested that generally VLC for Android can save up to 80% system resource compared with KMP when they are playing the same video file. In such case, VLC is seemingly much more effective and energy-efficent.

Comparison Between KMPlayer and VLC

Both KMPlayer and Video Lan player are the widely used free video players available. They have many sides on common and also host certain unique features. Now let's get close to them and learn more about KMP and VLC.


Media Player


Developer


Operating Systems


Mobile OS


Features


Additional Features


KMP


Pandora TV


Windows 7
Windows Vista
Windows XP


Windows OS


Remote Controllable
Equalizer
Media Library
Pitch Shifting
Streaming
Time Stretching
Visualizer


Altering of playback speed
highly customizable configuration


VLC


The VideoLan Organization


Linux
Mac OS X
Windows 7
Windows Vista
Windows XP


Android


Equalizer
Media Library
Pitch Shifting
Streaming
Time Stretching
Visualizer


Support for DVDs of all regions A/V sync adjustments

KMPlayer VS VLC: Which Media Player Be Better in File Formats Compatibility?

Compatible with a glut of file formats is what makes these two multimedia players inconceivably acclaimed. First off, KMPlayer, (also known as KMP or K-multimedia player), is an open source media player capable to play back a myriad of video and audio formats, including DVDs, VCDs, MP4, MPEG, MOV, FLV, AVI, 3GP, MKV,WAV, MP3, WMA, OGG and RA on Windows without worrying about any codec thanks to its own internal codec aids.

Having said that, compared with VLC, it's seemingly that VLC has the edge here. You see, VLC, full name of VLC media player, is also a 100% free media player for Mac OS X, Windows and Linux users to play back even more video and audio formats. Beyond friendly with the above mentioned file formats K-multimedia player supports, VLC also allows the users to play back M4V, MTS, OGM, M2P, XVID, 3G2, MOD, AAC, M3U, MID file formats, as well as playback 8K, 4K UHD, 3D, Blu Ray videos. Hence, in terms of this aspect, the Android media player alternative to KMplayer is seemingly more compatible than KMP.

Tips:  Supposing you have a yen for playing back the camcorder video like AVCHD, TS, M2TS, TOD or other common video, H.264, VOB, RM, WebM, to name a few with KMP or VLC media player, then you need to convert these videos to KMP and VLC acceptable file formats with the top all-in-one video converter-Pavtube Video Converter, which empowers you to convert any video to MP4, MOV, FLV, AVI, MKV, etc. KMP and VLC recognizable formats.

          
Key Feature of Pavtube Video Converter:
  • Support nearly all HD/SD video and audio formats to various video and audio format;
  • Make videos & movies & audios compatible with Android tablets/Phones, Apple devices, Windows 10, Mac OS X El Capitan, video game console, websites and more;
  • Edit videos with trim, crop, split, merge and special effects;
  • Process videos and movies in batch even faster and easier;
  • Attach external *.srt, *.ass, or *.ssa subtitles into source media for entertainment;
  • Support perfect audio and video synchronization.
The conversion speed is very fast because it supports batch conversion and NVIDIA CUDA & ATI Stream (AMD APP) acceleration technologies. It converts multiple video clips at the same time, moreover it can shut down computer after the process is complete, so run the app overnight and you could enjoy the created videos next morning when you are up.

Read More:

Saturday, February 6, 2016

Windows Media Player AVI: Play .AVI with/without WMP 12 in Win 10

As the default media player in Windows operating system, Windows Media Player (abbreviated WMP), makes it easy to play audio, video and view images for Windows users. 

AVI stands for Audio Video Interleave, which is a multimedia container format created by Microsoft, that ordinarily, Windows Media Player has no problems opening and playing. 

However, many AVI files contain video streams that are encoded using codecs that Windows Media Player cannot normally interpret, like like Xvid, DivX, DX50, MP4V, – and when you attempt to playback such a file, you will likely just hear the audio stream. Other people may encounter other problems when trying to playing AVI in Windows Media Player.

Windows Media Player AVI Playback Problems
  • Only audio but no video while playing an AVI file in Windows Media Player 12 in Windows 10/8/7.
  • Windows Media Player 12 won’t play any of my .avi files.
  • Certain avi file won’t play in Windows Media Player with error message says: “Windows Media Player cannot play the file. The Player might not support the file type or might not support the codec that was used to compress the file.”
  • Some AVI files can be opened with Windows Media Player 12 but won’t play. Divx Player can play the files fine.
  • Windows media player cannot play Fraps AVI videos. Certain videos in .AVI that recorded with FRAPS won’t play, they’ll play the beginning of the video, but near the end I’ll get this error message “Windows Media Player cannot play the file. The Player might not support the file type or might not support the codec that was used to compress the file.”
Why Windows Media Player 12 Won’t Play AVI files in Windows 10/8/7?

Reason 1: Codec issue

AVI is the container that may contain various audio and video codec. Windows Media Player used to support all video codecs that compressed in AVI file in the days that AVI format comes into being. However, more video codecs like Xvid, DivX, DX50, MP4V, MPEG-4 were invented and began to be used in AVI files and Windows Media Player does not update to support such files. Hence fails to play such AVI files in WMP. In such situation, refer to How to Play AVI in Windows Media Player in Windows 10/8/7 or How to Play AVI without Windows Media Player in Windows 10/8/7?

Reason 2: AVI files are corrupted or broken

If an AVI file is corrupted or broken, Windows Media Player may fail to play in various situations:
  • Picture freezes but sound continues, this is possible due to broken/corrupted frames in the video stream;
  • Picture gets pixilated and blocky, this is possibly due to corrupted frames;
  • Cannot seek/skip through video, this is often due to a bad AVI Index, or a lack of an Index entirely.
To successfully play corrupted or broken AVI files in Windows Media Player, you can download AVI repair tool to repair AVI files. Then your AVI files can play fine in Windows Media Player.

How to Play AVI in Windows Media Player 12 in Windows 10/8/7?

To fix AVI won’t play in Windows Media Player, one solution is to install missing codec so that Windows Media Player can interpret, the other solution is to convert the unsupported AVI to Windows Media Player supported WMV.

Solution 1: Install missing codecs
Most of AVI files are encoded with Xvid, DivX codec, a few are encoded with DX50, MP4V. Installing missing codecs will help Windows Media Player interpret video codec for successful playback.
  • Free Download and install XVID codec. Then restart your computer and open up your AVI files with Windows Media Player. WMP should now play your AVI files with both audio and video.
  • If installing XVID codec can’t solve your problem, you will need to download DivX Codec.
  • If installing XVID codec and DivX Codec still can’t solve your problem, you can download the all-in-one codec pack K-Lite Codec Pack. With K-Lite Codec Pack installed, you can play almost all the movie and the AVI files should be able to play in Windows Media Player.
Solution 2: Convert AVI to Windows Media Player 12 WMV

Installing additional codecs may mess up your computer especially if you install the all-in-one codec pack. If you are not a computer wizard, it is better to convert the unsupported AVI to Windows Media Player supported WMV.

How to Convert AVI to Windows Media Player WMV?

PrePare: Download Pavtube Video Converter

Download Pavtube Video Converter. Install and launch the program.


Step 1: Add AVI files

Directly drag and drop your AVI files to Pavtube Video Converter. You can load multiple files at one time.


Step 2: Set output format

Click on “Profile” drop-down and select the “WMV Windows Media Video (*.wmv)” category as the profile from “General Video”.


Step 3: Convert AVI to Windows Media Player WMV

Press on “Convert” button to convert AVI to Windows Media Player WMV. Then you can open and play the converted AVI in Windows Media Player easily.

Read More:

Tuesday, February 2, 2016

How to View QuickTime Contents on Android

QuickTime is one of the most popular and versatile video players out there. Many websites use QuickTime to embed video, and with the rise of smartphones, you can take your web browsing experience anywhere! That includes websites with video and other multimedia content provided by QuickTime, and in this guide, you’ll find out some of the best options for viewing QuickTime video and multimedia content, regardless of whether you have an iPad, iPhone, or Android smartphone.

QuickTime is owned by Apple, who are the makers of the iPod, iPhone, iPad, and Apple Mac. These devices come with a greater level of QuickTime compatibility, but that doesn’t mean that if you’re an Android user, you have to miss out! QuickTime is so popular that a number of apps have been developed for Android, as well as for the iPad and iPhone, specifically to play QuickTime multimedia content.

QuickTime for Android

Whether you’ve got the Samsung Galaxy S5, the HTC One, or any of the other brilliant Android smartphones currently on the market, you can now enjoy great QuickTime content wherever you are! There are many simple applications for Android which can play QuickTime content. Check out our top suggestions:

• Mobo Player

One of the most popular video applications on Android, MoboPlayer supports QuickTime and many other formats. It has great reviews from hundreds of users, and an average rating on the Play Store of over four stars! Mobo Player can be your one-stop shop on Android for all multimedia content, including QuickTime, so check it out at Mobo Player official site or search MoboPlayer in the Play Store. Even better news: there’s a free version which won’t cost you a cent. If you want more features, though, check out Mobo Player Pro, the paid version. It’s only $3.99, and doesn’t have any ads.

• BSPlayer

BSPlayer has been downloaded onto over 70 million PCs worldwide, and now the phenomenally popular media player is available on Android devices too! Like Mobo Player, BS can play a wide range of multimedia content, including QuickTime. It also has a free version, available in the Play Store. There’s a paid version, too, if you need more than the basic set of features, called BSPlayer Full Version. It costs $4.99, and features no ads.      

• MX Player

MX Player has millions of android users already, and an average rating in the Play Store of over four stars. Like BSPlayer and Mobo Player, it can play many different multimedia formats, including QuickTime’s .mov format. It has a special “kid-lock” feature, which lets your kids watch the QuickTime movies that they want to without being able to make calls or use other applications. Perfect for busy parents! MX Player Pro is the paid version, it’s ad-free and has some features not included in the free version. It costs $4.99 in the Play Store.

• VPlayer

With an average rating of four stars in the Play Store, VPlayer is another solid bet for watching your favourite QuickTime content on your Android device. It supports multiple file formats, and is supported across the HTC and Samsung product ranges. It’s free to download.

• VLC for Android

Though still in its Beta stage, VLC for Android has already racked up a quarter of a million downloads, and has the highest average Play Store rating of any of the media players currently available at four and a half stars. Just like the others, it’s free, and it plays multiple file formats, including QuickTime.

What’s more, simple video conversion applications are available which change your QuickTime videos into other file formats, like .mp4 or .avi, which have built-in support on Android and Apple devices. If you don’t want to download a new media player because you’re happy with the one you already use (even if it doesn’t support QuickTime!) then a video converter is the way to go. Keep in mind, though, that if you plan on converting a lot of video files, you’re going to need space on your device to store them.

If fact, it is very easy to put QuickTime contents to Android phone so long as you own the professional video to Android converter. Let's take a look at the world-class Android video converter Pavtube Video Converter / Mac Version (read the review) which is an easy-to-use software right away. 

Key Feature of Pavtube Video Converter:
  • Convert almost all QuickTime contents HD/SD audio/video formats: All types of QuickTime contents to almost any audio and video formats for Android.
  • All popular Android devices: Android products (e.g. Google Nexus series, Samsung Galaxy series, Sony, HTC, etc).
  • hange default settings: You can change the parameters such as video size, bitrate, frame rate, and channels for your video file according to your need to get the best output effect.
  • Batch conversion: Handle multiple videos and realize batch conversion to save your time and energy.
  • Merging & splitting: Merge several video clips into one bigger file and splitting one video file into several clips according to the clip quantity, duration time and file size.
  • Create new output format: Adjust profile parameters, rename and save it for future use.
  • Supported OS: Windows XP/2003/Vista/Windows 7/Windows 8/Windows 8.1/Windows 10
  • Supported OS: Mac OS X 10.11 El Capitan, Mac OS X 10.10 Yosemite, 10.9 Mavericks, 10.8 Mountain Lion, 10.7 Lion, 10.6 Snow Leopard, 10.5 Leopard
How to Convert QuickTime Contents to Android Phone

The simple instructions below show you how to convert video for Android phone in just a few easy steps. Just click the appropriate button to download the Windows or Mac version.


Step 1: Install the Program

Download the Pavtube Video Converter. Run the downloaded file and install the program following the onscreen instructions

Step 2: Add QuickTime contents for Conversion

Click the Add Video button. In the Open File dialogue window, find the movies or clips you want to convert to watch on your phone, and click Open to add them to the program


Step 3: Choose the Output Preset

Here you can choose the target format you want. Click “Android” on the left column and find the target format with your phone brand, or you can just select "HD video" > "H.264 MP4" cause H.264 MP4 is the most compatible format of Android phones.


Step 4: Start Converting QuickTime contents for Android Mobile

The final step is to click Convert on the right. Once the encoding process is complete, the output folder will open automatically.

Step 5 (Optional): Transfer Output Video to Your Android Mobile Phone

In the destination folder on your computer, select the files you want to store on your device, right-click them, and select Copy. Connect your device to your computer via USB cable and open the phone’s flash drive. Select the folder where you store your media files, right-click the empty space, and choose Paste to copy the files to your device. See more on transfer video to Android phones.

Additional Tips

Android tablets only recognize SD cards formatted in FAT 32, this limits a single file size less than 4GB. If you worry about getting a big video file larger than 4GB, you can use split feature in Pavtube software to split a large file into multiple chunks under 4GB. Learn to split a large video file into several small files under 4GB for Android device.

Read More: