Showing posts with label Backup. Show all posts

Friday, July 11, 2014

Carry Around Your Entire DVD Movie Collection In Your Pocket with Wi-Drive 64GB/32GB

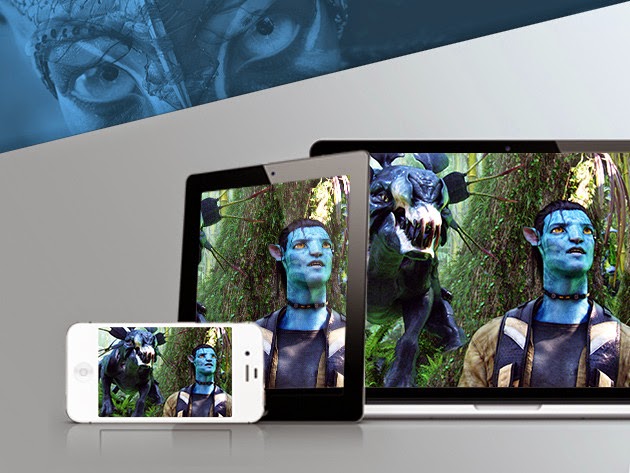
If you’re like me and have trunk filled with DVDs, you should consider ripping them for storage on Wi-Drive. Not only does this create DVD backups just in case the discs become damaged, but you can also move them onto your favorite devices iPad, iPhone with ease.

For example, lately I’ve been feeling very nostalgic for older episodes of The Simpsons. Over the weekend I set out to pack my Kingston Wi-Drive with Simpsons episodes of my DVD discs so that I could stream them to iPad for watching on vacation without sacrificing my internal storage.
ipad on vacation

Wi-Drive 32GB or 64GB is the best ultra-portable hard drive where you can store all your movies, then stream them to your iPhone or iPad using a simple Wi-Fi network the drive creates.

Why choose Wi-Drive?

First, They're easy to set-up, and all you need on your device is an app to access all your content.

Plus, most of these drives are small enough to fit in your pocket.

Also, with most of these Wi-Fi hard drives, a few people can watch movies streaming from them simultaneously. This means that you can have three kids in the backseat, each with an iPhone, watching the same movie on different screens (if you're so lucky).

Lastly, these gadgets have built in rechargeable batteries so even if you don't have a power outlet nearby, you'll have enough juice for a plane ride or car trip.

Have a ton of DVD movies? Here's how to bring them with you on Wi-Drive.

simpsons

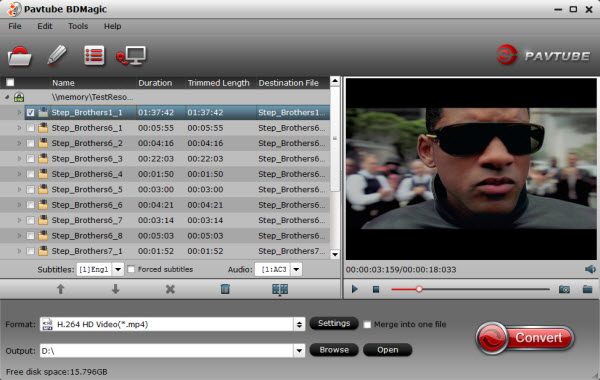
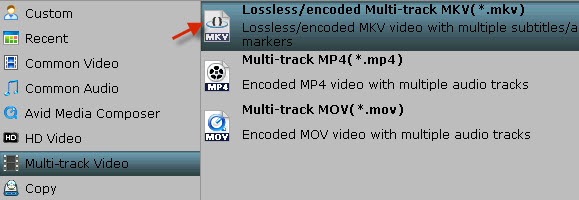
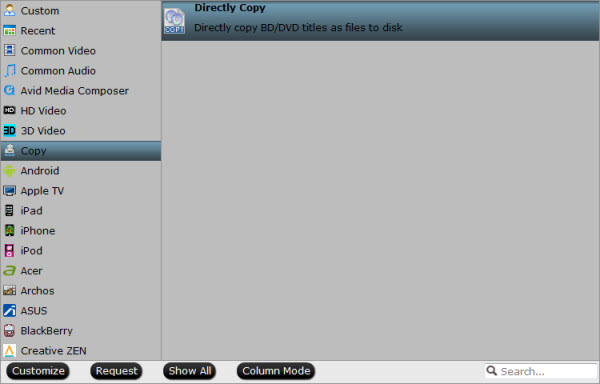
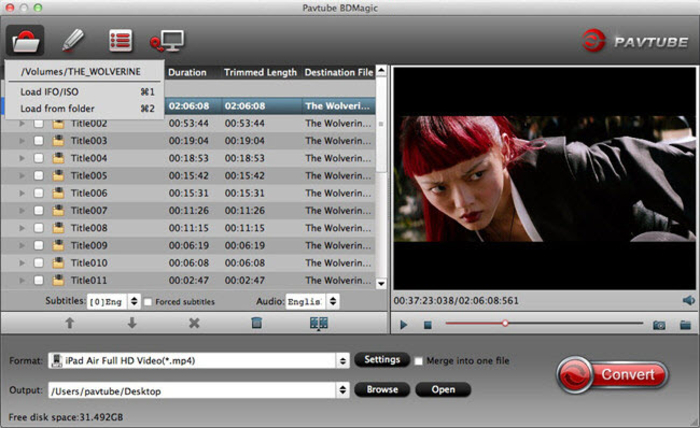
To bring your DVDs on the go, you'll need a piece of free software called Pavtube Free DVDAid to iPad/iPhone/Wi-Drive supported mov format.

Here's how to use the super simple freeware.
Which Is the Best Free DVD Ripper for Mac to rip DVD movies free

Once you've converted your movies to about 1-2 GB per movie, you can either import them into iTunes and sync them to your device, or drag them onto a Wi-Fi hard drive like the ones we mentioned.

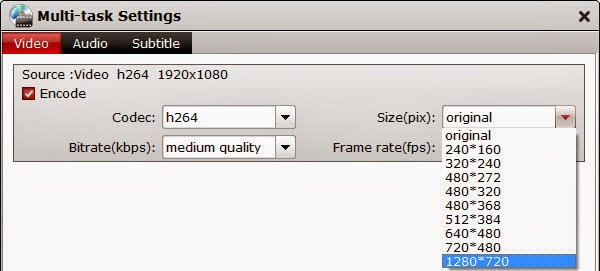
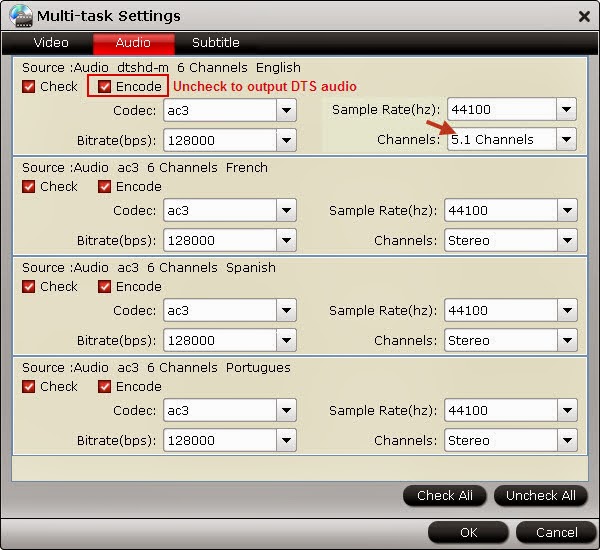
Depending on how many movies you have and whether you're using an iPhone (small screen) or iPad (large screen), you can alter compression settings in Handbrake to fit your needs and how many movies you want to bring around.

For example, if you plan to only watch on an iPhone, the quality of a movie compressed to 500 MB could be quite good, but it might look pixelated on an iPad.
In that case, carrying a whole stack of DVDs with Wi-Drive on vacation is as easy as a pie, and it's pretty nice to lug your entire collection with your iPad on the road.  

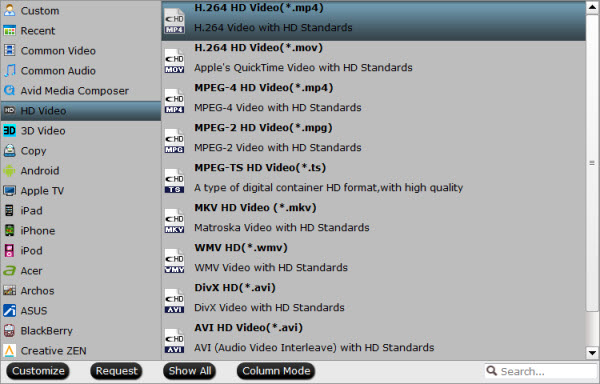
Note: If you want to transfer your DVD videos to other portable devices and media players for freely watching, you'd better get the updated DVDAid to rip DVD into MP4 format.

How to Use AirVideo to stream movies to your iPhone or iPad

use airvideo to stream movies 

Use AirVideo for iPhone and iPad to stream movies from your home computer over Wi-Fi or over your cell network.

AirVideo won't play videos you've purchased on iTunes, but it will play everything else (it converts incompatible videos on the fly).

Price: $2.99

The comparison of Wi-Drive and its alternatives

1. The AirStash is wallet-friendly and fully featured

the airstash

The AirStash is ultra-light, only has one button, and lets you decide how much you want to spend on memory.

Th AirStash lets you slip in SD cards up to 32GB in size, which is killer, because you can pick how much memory you want to spend money on. If you have a bunch of SD cards lying around, you can bring tons of media with you.

AirStash has a companion app for accessing your media from an iPhone or iPad, and has great battery life too. Up to 8 people can view documents at the same time using the AirStash, and fewer for movies or music.

Also, since the AirStash has a SD card slot, traveling photographers can pop in their SD cards and view all their photos on the go.

Price: $99.99 (SD card not included)

2. The SeaGate GoFlex Satellite has the most storage, but isn't tiny

the seagate goflex satellite

Seagate

The GoFlex Satellite isn't small, but it holds tons more storage than some of the other portable solutions.

At 500GB, you can bring along hundreds of movies, but you'll sacrifice size and portability. The GoFlex Satellite has a good 5 hours of battery life, but apparently the software to use the device isn't as good.

Even if the software isn't great and directories are hard to navigate, the GoFlex uses the super fast USB 3.0 to transfer movies and other media.

Unlike the Wi-Drive, the GoFlex doesn't allow you to browse the internet over Wi-Fi while you're connect to the device.

Price: $199.99 (500GB)

3. The Kingston Wi-Drive is as big as an iPhone, but thinner.

the kingston

The Kingston Wi-Drive is another flash drive to hold all your media. It comes in 16GB and 32GB varieties, with no expandable memory slots.

The Wi-Drive isn't as small as the AirStash, and you have to charge it with a bundled in USB cable (which means you're bringing one more thing around). Up to three people can use the Wi-Drive simultaneously.

Kingston built a decent app for the Wi-Drive which lets you access all your media, and one killer feature is that you can connect to the Wi-Drive via Wi-Fi, but also use the internet via Wi-Fi simultaneously because it has a pass-through data feature.

Price: 16GB ($149.99), 32GB ($199.99)

4. The Panasonic DY-PS10 has superb battery life
the panasonic dy ps10


The Panasonic Pocket Server is kind of like the AirStash, because it reads SD cards, and is kind of like the Wi-Drive, because it's palm-sized.

The device takes SD cards up to 64GB (the AirStash's max is 32GB) and has about 10 hours of battery life, but we don't know much more than that since it was just announced today.

Price: $191.00 (launching in Japan September 15th)

You'll also need...


adapter

Never have to worry about battery life again using a cigarette lighter adapter that will let you charge your Wi-Drive, AirStash, or GoFlex Satellite on the go.

Get an adapter with extra ports or a USB port (like this one) to also conserve battery life on your iPhone or iPad.

Price: $19.99

Thursday, June 26, 2014

Copy Blu-ray disc to digital format and Burn to DVD for watching on Honda Pilot

This article mainly discusses about how to Copy Blu-ray to digital format for burning and watching on Honda Pilot. In this page, you will find the reason and tool you need to backup Blu-ray for burning, as well as how to do this.

With a new baby, the only time I can watch the movies is on my husband's Honda Pilot to work! The wonderful experience is that I would like rip the original Cars movie from Blu Ray to computer and burn them into DVD for playing. I'm looking for the way now.


Part I: Convert Blu-ray disc to digital format

In case Blu-ray discs get damaged or destroyed, it is a good choice to copy/rip Blu-ray in digital format. But how to convert Blu-ray to digital copy? To get the answer, just read on to learn how to make a digital copy of Blu-ray.

At first, Pavtube BDMagic is the tool you need  which can rip Blu-ray into a most common format which could be accepted by most of your devices with best quality. After many trials, I prefer to save them into MP4 format as it’s widely supported by my iPhone, iPad, Android tablet and Samsung Smart TV.  It is easy of use and after converting,you can freely enjoy your favourite Blu-rays without loading BD disc, isn’t it fantastic? Just have a try!

The Mac version is BDMagic for Mac.

How to convert Blu-ray to digital videos with Pavtube BDMagic

Step 1. Launch Pavtube BDMagic; import disc

Run the best Blu-ray Rippe and click this “Load Disc” icon to import your inserted Blu-ray Disc. Note that you shall keep Internet connected during this period.


Step 2. Choose format


Hit “Format” drop-down list and choose “HD Video> H.264 HD Video(*.mp4)” as the most widely used format for playback on smartphones, tablets and HDTV, or choose the optimized preset for your device. If you want to play DVD with Windows Media Player, you can choose WMV as the output format.


Step 3. Adjust output settings (Optional)


You can click “Settings” (besides “Format”) to change target video size, bitrate, frame rate and other specs. Change the size to “Original” to get full size picture that can be playback on TV clearly. And the higher bitrate you choose, the better video quality will be.

Step 4. Star conversion

Back to the main interface and hit the “Convert” to start converting Blu-ray to HD MP4; this converter will start all the tasks in batch. Wait for a while till the conversion completed; click “Open output folder” to quick locate the converted files. Now start trasferring your Blu-ray movies for playback and sharing.

Part 2: Burn converted mp4 Videos to playable DVD video

Software Required:

Here I recommend using Pavtube DVD Creator which can help you to easily and fastly burn mp4 videos to DVD ISO/Disc for backup or DVD Player.

Breaking news: With Pavtube new site releasing, now we are offering some new money saving bundles. With either bundle package, not only can you save more money, you will get the most powerful combination from Pavtube to handle Blu-rays, DVDs, regular videos as well as DRM protected videos files at this Special Offer Page.

BDMagic($49) + DVD Creator($35) = Only $49.9, Save $28.1
BDMagic for Mac ($49) + DVD Creator for Mac ($35) = Only $49.9, Save $28.1

Now you can copy Blu-ray disc to digital format and burn to DVD for watching on Honda Pilot with this bundled software. Just try it!

Monday, March 24, 2014

No way to Rip Schwarzenegger Blu-ray Collection? ByteCopy Help you!

Description: Look no further when coping or ripping Schwarzenegger Blu-ray Collection? Here is a brief guide to help you to freely watch Schwarzenegger Blu-ray movies with perfect video/audio sync and best quality.

Arnold Schwarzenegger is an Austrian/American actor, politician and businessman who started his career out as a weight-lifter. Born July 30, 1947 in Thal, Styria, Austria, Schwarzenegger with a keen interest in physical fitness and seemingly indomitable drive, parlayed his notoriety as a five-time Mr. Universe and seven-time Mr. Olympia champion to turn himself into a Hollywood movie star and public personality.

Arnold Schwarzenegger is known for:


The Terminator (1984): A human-looking indestructible cyborg is sent from 2029 to 1984 to assassinate a waitress, whose unborn son will lead humanity in a war against the machines, while a soldier from that war is sent to protect her at all costs.

Predator (1987): A team of commandos, on a mission in a Central American jungle, find themselves hunted by an extra-terrestrial warrior.

Total Recall (1990): When a man goes for virtual vacation memories of the planet Mars, an unexpected and harrowing series of events forces him to go to the planet for real, or does he?

True Lies (1994): Harry Tasker is a secret agent for the United States Government. For years, he has kept his job from his wife, but is forced to reveal his identity and try to stop nuclear terrorists when he and his wife are kidnapped by the terrorists.

If you are keen to collect the hot Schwarzenegger Blu-ray Collection, but it’s not easy to get these Blu-ray movies playback on your PC or portable devices without external Blu-ray drive and Blu-ray player. Also frequent watching Schwarzenegger Blu-rays will make your discs easy to be scratched.

So how can we watch Schwarzenegger Blu-ray movies without limitation? What’s the best format to convert to? Can we finish all the tasks with one go?

Here Pavtube ByteCopy is recommended. It will help you to remove the copyright protection of the disc and convert to whatever videos you want. With it, you can enjoy your favorite Blu-ray movies at any time and safe the original discs from being ruined at the same time. And it will provide you various ways to backup of the Schwarzenegger Blu-ray discs, just choose the one you like most.

First of all, free download Windows version (Bytecopy for Mac is for Mac users) and run the software to learn how to copy Schwarzenegger Blu-ray disc in three ways.

Step 1. Import Blu-ray discs to Pavtube ByteCopy.

Run the best Blu-ray backup software, click "Load files" icon to load the Blu-ray discs. After successful 100% load, click the select main title you are able to preview the whole movie in the preview window, which works just like a media player.

Note: When loading discs, please make sure your computer is networked and Blu-ray disc drive is installed properly.


Step 2. Different ways for copying Schwarzenegger Blu-ray disc to avoid scratched by children.

Here I will show you three different ways of lossless backup Schwarzenegger Blu-ray disc:

Method 1. Full disc copy: 1:1 backup the entire disc with original structure and chapter marks

If you want to copy a Schwarzenegger Blu-ray discs for further playback with keep the original structure of disc, that is what exactly "Full disc copy" can do for you.

Click "Copy the entire disc" icon on the interface and you are brought to conversion progress immediately. After conversion, go to "Open output folder" you will get a generated folder combined with two folders: "BDMV" and "CERTIFICATE". All the M2TS files are located in BDMV folder.


Method 2. Directly Copy: 100% backup the intact main movie of Schwarzenegger Blu-ray discs

If you just want to copy the main movie for playback without the menu and promotional clips etc, "Directly Copy", which will takes less time for conversion and occupies less space than Full disc copy, is right for you.

Click "Format" menu and go to "Copy" option, choose "Directly Copy" for output format.

Then click "Convert" button to start conversion. Once finished, you will get a converted file in M2TS format for Schwarzenegger Blu-ray disc.

Read more detailed steps: Lossless backup Blu-ray main movie in original format

Method 3. Lossless Multi-track MKV: lossless backup Schwarzenegger Blu-ray to MKV with multitracks preservation.

If you want to convert to MKV files without quality loss and preserve all multiple audio and subtitle tracks from original Schwarzenegger Blu-ray disc, or want to select some audio and subtitle tracks you need for output, Lossless Multi-track MKV is perfect. And chapter mark is preserved in MKV files. In this way, you can select any audio and subtitle track and chapter mark you want when playing it in media player.

Go to find "Multi-track Video" option under "Format" dropdown list, then choose "Lossless/encoded Multi-track MKV (*.mkv)" for output.

Then click "Convert" button to start and definitely you will get a MKV file with multiple tracks.

Read more detailed steps: Keep multiple audio and subtitle streams when backing up Blu-ray Disc to MKV/MP4/MOV

Note 1: If you want to remove the unnecessary audio or subtitle track to shrink the output MKV files, you can go to click "Settings" button to uncheck what you do not need. What’s more, do not check "Encode" for the output MKV if you wanna a lossless file.


Note 2: Not all media player can support to play multi-track videos, so you can try powerful VLCPlayer to play output multi-track MKV files with chapter mark. And the generated folder made by "Full disc copy" also can be played with them.

Every time when the conversion is finished, "Open" button on the main interface will help you to locate the generated files. If you try to copy one Schwarzenegger Blu-ray disc in different ways, you do not need to worry about that the previous one will be covered because of the same file name. In this case, the software will automatically add number 1, 2, 3… in the end of file name because of built-in setting of renamed the same file name.

Above all, you can choose any way of them to copy your Schwarzenegger Blu-ray disc without quality loss and then share them with your family or friends.

More features:

However, what ByteCopy can do for you is more than it. It can support adding srt, ass, ssa subtitles and converting Blu-ray disc to various formats for many popular devices, like MP4/MOV with multi-track audios, M4V, AVI, WMV, MPG, M2TS, etc for playback on iOS/Android/Windows Tablets/Phones, HD Media Players (WDTV), editing software including Avid Media Composer, Adobe Premiere, etc, and more. So it is also a good helper for you to easily enjoy Schwarzenegger Blu-ray disc when out of home or edit it.

View Pavtube Special Offer page to get more Money-saving Tips:

ByteCopy($42) + Video Converter Ultimate($65) = Only $79.9, Save $27.1 
ByteCopy($42) + DVD Creater($35) = Only $44.9, Save $32.1 
ByteCopy($42) + Vidpie($29) = Only $54.9, Save $16.1 
ByteCopy($42) + MXF MultiMixer($45) = Only $69.9, Save $16.1 

Related articles:
Backup Arnold Schwarzenegger Blu-ray Movies to PC/Mac
Copy Arnold Schwarzenegger DVD Collections to hard drive for watching in future
Rip/Copy Stallone Blu-ray Collection to Mac/Tablet/Phone/HD Media Players for playing

Friday, January 24, 2014

Lossless backup Blu-ray/DVD for playing on Plasma TV with keeping 10:9 widescreen and 5.1 DTS video

Description: Just follow the step-to-step guide to learn how to lossless backup DVD to QNAP NAS via DLNA or TwookyMedia Server with 10:9 widescreen and 5.1 DTS video preserving, and then stream to Samsung plasma TV for playback.

Question:

I'm seriously considering to buy a DVD ripping tool. As I ripped Toy Story 2 from a 16:9 standard DVD and there are so many choices of different files & codecs, I was pretty confused. All I'm really after is the "highest quality" 16:9 Video/5.1 DTS file available to stream from my QNAP NAS via DLNA or TwookyMedia Server to my Samsung plasma (which has Smart Hub).

What setting would I use for standard DVD's, Blu-rays, & 3D Blu-ray's to achieve this? I assume I wouldn't use the same setting for a blu-ray as I would a standard DVD? Please keep in mind that I'm after the closest representation of the DVD/Blu-ray (video & 5.1 sound) as possible.


What we need?
If you want to enjoy the Blu-ray/DVD movie on your Samsung plasma TV streaming from QNAP NAS and TwookyMedia Server, you need to first lossless backup your Blu-ray/DVD disc to media server.

To achieve it, I did many free trials, and then I choose to 
use is Pavtube ByteCopywhich runs as the the top of the list of the best Blu-ray rippers. I was able to copy both my Blu-rays and DVDs with keeping 16:9 widescrenn with fast speed. It can keep the original V/A settings without quality loss, the chapter markers so I can skip viewing easily, and the most important original DTS audio. Mac version is available here:Pavtube ByteCopy for Mac; well support Mac Mavericks! Now I will show you how to lossless backup your Blu-ray to QNAP NAS and TwookyMedia Server on Win and Mac. 

Download a trial before purchase; or you can get 20% OFF any Pavtube programs by sharing to your FB.

How to backup Blu-ray to QNAP NAS and TwookyMedia Server keeping 16:9 widescreen and DTS audio

Step 1. Launch Pavtube ByteCopy, click “Load files(s)” to import Blu-ray disc, ISO/IFO files, and BD/DVD folder.


Step 2. Choose “Multi-track Video >Lossless/encoded Multi-track MKV(*.mkv)" in “Format” drop-down list as the lossless preset for QNAP NAS and TwookyMedia Server.


Step 3. Adjust video/Audio settings. Click “Settings” in the main interface, you will find three tabs for Video, Audio and Subtitles. In the Video tab, uncheck “Encode” to output MKV file without quality loss.

If you check the “Encode”, it will output MKV files compressed with H.264 or Xvid uses the original aspect ratio. If you are using Blu-ray as input, you needn’t change anything here, because this ratio is proper for full HD Blu-ray movies, and you can get a 16 x 9 file in 1080p. But if your source media is standard DVD, we suggest you set the size down to 1280*720 to produce a 720p video in widescreen (16x9).


Then switch to Audio tab, choose wanted audio tracks and uncheck “Encode” and can set up channels to 5.1 for output to get 5.1 DTS audio.


Step 4. Start Conversion.

Start backing up Blu-ray/DVD movie to lossless MKV, all the chapter markers will be save and Pavtube ByteCopy will take the rest. After the conversion, click “Open” to quick find converted videos.

Simply copy the output MKV file to your QNAP NAS and TwookyMedia Server and stream them via DLNA to Samsung plasma TV for freely playback.

Money saving bundles:

ByteCopy($42) + Video Converter Ultimate($65) = Only $79.9, Save $27.1 
ByteCopy($42) + DVD Creater($35) = Only $44.9, Save $32.1 
ByteCopy($42) + Vidpie($29) = Only $54.9, Save $16.1 
ByteCopy($42) + MXF MultiMixer($45) = Only $69.9, Save $16.1 
BDMagic($49) + Vidpie($29) = Only $49.9, Save $28.1 

Related articles:

Tuesday, January 21, 2014

Best way to Copy/Store DVD disc on a Sonology Diskstation

More and more people keep an eye on how to protect your favorite DVD disc from scratched. This article mainly tells you how to backup/copy DVD discs on a sonology diskstation for wathing or syncing.

I wanted to store my DVD collection on a sonology diskstation, then I can watch the videos from any mobile device or on my tv when I connect my laptop. How to make it?

DVDs, as with all kind of optical media, is that they are pretty easy to damage. DVD players need the DVD to be in a specific format. To can easily play DVD content from sonology disk station with no restrictions and without needing the DVDs every time. You need to use a DVD ripping software to rip and transfer the DVDs to sonology disk station for watching.

So I'm looking for the best software to copy dvd digitally without sacrificing the picture quality on the internet for quite a while until I met this Best Blu-ray Ripper- BDMagic. I like that it’s simple to use as I’m not a computer technician. The ripped video works well on my galaxy s4, iPad 2, and a laptop.

Overall, BDMagic is a professional Blu-ray/DVD converting program which works with 1:1 backup solution and convert Blu-ray/DVD to MKV/MP4/MOV/M4V/MPG/FLV/AVI/WMV, etc. Well I haven’t got the chance to try every profile, but it’s really the best Blu-ray/DVD backup tool I’ve met ever; I mean it’s ease of use, not fuss and simple to follow. This best Blu-ray Ripper can rolls off Blu-ray/DVD disc protection, supports loseless 1:1 Blu-ray backup and keeps all the disc titles and chapter structure perfectly.

Don’t you like to have a try?

They provide free trial (no time limitation) before purchase; and you can reach the Mac version here. Here is a guide for Mac users: How do I Back up and Burn a Blu-ray with Mac?

How to backup DVD disc on a sonology disk station with best video quality

Step 1. Import DVD discs to Pavtube BDMagic.

Run the best DVD backup software, click "Load files" icon to load the DVD discs. After successful 100% load, click the select main title you are able to preview the whole movie in the preview window, which works just like a media player.

I also noticed if you have a ISO file to import, it will recognize the ISO file automatically with no need to run virtual driver and mount ISO files firstly. Good design.


Step 2. Different ways for copying DVDs to sonology disk station.

Here I will show you two different ways of lossless backup DVD disc:

Method 1. Full disc copy: 1:1 backup the entire disc with original structure and chapter marks

If you want to copy a 3D/2D DVD discs and remain 3D/2D in output files for further playback, or keep the original structure of disc for further creating ISO files or DVD discs, that is what exactly "Full disc copy" can do for you.

Click "Copy the entire disc" icon on the interface and you are brought to conversion progress immediately.

After conversion, go to "Open output folder" you will get a generated folder combined with two folders: "BDMV" and "CERTIFICATE". All the M2TS files are located in BDMV folder.

Method 2. Directly Copy: 100% backup the intact main movie of DVD discs

If you just want to copy the main movie for playback without the menu and promotional clips etc, "Directly Copy", which will takes less time for conversion and occupies less space than Full disc copy, is right for you.

Click "Format" menu and go to "Copy" option, choose "Directly Copy" for output format.


Then click "Convert" button to start coping. Once finished, you will get a converted file in M2TS format for DVD disc.

Every time when the conversion is finished, "Open" button on the main interface will help you to locate the generated files. If you try to copy one DVD disc in different ways, you do not need to worry about that the previous one will be covered because of the same file name. In this case, the software will automatically add number 1, 2, 3… in the end of file name because of built-in setting of renamed the same file name.

You can choose any way of them to copy your DVD disc without quality loss. Now connect your sonology diskstation to computer and transfer them into it, then share them with your family or friends.

Read More:

Monday, January 20, 2014

Backup BD contents (mostly additional contents) with subtitles to Tablet for watching on the subway

This is a thorough hands-on review on the best Blu-ray Ripper for Mac of how to backup BD contents to external hard drive, or watch on tablets on the subway with subtitles.
Q: I needed a sw to backup mu BR collection and to transfer some contents on my tablet, mostly BR additional contents that i transfer to my tablet to watch it on the subway while i'm going to work. I was wondering whether there is a program could allow me do this? I'd prefer to convert these BRDs to h.264 for ipad or Xvid for Kindle Fire (HD) for enjoying. Any insights?"

I'd love to share my experience with you guys. After googling to search the word: transfer video from blu ray, convert blu ray to ipad, extract video with subtitles (Subtitle was in my search because was one of my first needs), I met this BDMagic for Mac.

I downloaded a trial version some months ago and liked it, after some time of tryouts to see if it was right for my needs i purchased it. i am able to transfer contents with subtitles, which was a features i did not found in anther sw, or i did not find simply in other software UI, it is simple to use.

This best Blu-ray Ripper for Mac can rolls off Blu-ray/DVD disc protection, supports loseless 1:1 Blu-ray backup and keeps all the disc titles and chapter structure perfectly.

Don't you like to have a try?

They provide free trial (no time limitation) before purchase; and you can reach the Windows version here (Also 30% off now).

Here is a guide for Mac users: How do I Back up and Burn a Blu-ray with Mac?

How to BD contents (mostly additional contents) with subtitles to Tablet for watching on the subway

At first, keep your Mac networked to insure the software will handle Blu-ray copy-protections.

Step 1. Run Best Blu-ray Ripper for Mac and import disc.

Click this icon to load disc from ROM, IFO/ISO or folder. I also noticed if you have a ISO file to import, it will recognize the ISO file automatically with no need to run virtual driver and mount ISO files firstly. Good design.


Notes:
  • Select the movie title you want to convert, and preview the file you just selected from the BD movie in the preview window if you want.
  • Select wanted subtitles and audio track if necessary. 

Step 2.
Choose format.

Click "Format" drop-down list and choose proper format for different using.

For instance, if you simply want to back up Blu-ray to external hard drive, here are two solutions:

1. Click the "computer" icon on the top to output 1:1 Blu-ray file exactly the same as original.

2. Select "Copy>Directly Copy" in format list to output an intact m2ts file of the main title.

directly copy

For people who want to watch Blu-ray movies on Tablet, you can choose "Common Video> H.264 Video(*.mp4)", it's well compatible with most Apple/Android/Windows devices.

Step 3. Change video specs. (Optional)

If you are not satisfied with default specs, then click "Settings" to enter Profiles Settings windows. You can customize video frame rate, bitrate, size and other settings freely.

(It does not work for directly copy)

Step 4. Add External Subtitles (srt/ass/ssa) 

If you want to trim, crop, edit audio/subtitles of the source video, just click the pencil-like icon on the top to enter video editor.

Click "Edit" button on the interface to find "Subtitle" option, check "Enable" then go to "Browse" to find your download subtitles in srt format. Click "OK" button to load the subtitles. Please note that subtitle in SRT/ASS/SSA format can be supported.


Step 5.  Start conversion.

Click the big red "Convert" to start backing up or converting your Blu-rays. Usually backup will be quicker because it does not need to do trancoding.

After the conversion, click "Open output folder" to quick locate converted files. Connect your tablet to computer and transfer them into it. Now the subtitle has become a part of converted mp4 movies, you can totally enjoy the movies on your tablet with subtitles on the subway. Just download the program to have a try. You will love it.


See also:

Ripping Blu-Ray on iMac and Stream 1080p on Apple TV 3 with Dolby 5.1 Sound 
Watch Blu-ray/DVD on Mac Mini HTPC via XBMC With Lossless Quality & All Audio Tracks 
Make DVD Movies Stored in External Hard Drive/Thumb Drive on Mac 
Edit Recorded ALS Ice Bucket Challenge Videos on Mac