Thursday, July 31, 2014

Solution for converting VC-1 to WMV with high video quality


Have some movies that use VC-1 codec can't playback? Here offers an easy solution to convert VC-1 video files to WMV format for editing or playing.

VC-1, which was initially developed as a proprietary video format by Microsoft. It is today a supported standard found in Blu-ray Discs, Windows Media, Microsoft's Silverlight framework, Slingbox, and the now-discontinued HD DVD.

convert vc-1 to wmv

If you have some m2ts files or Blu-ray movies with VC-1 codec saved on PC and want to convert VC-1 (WMV 9 encoded files) to WMV (with WMV8 and earlier WMV codec) for editing and playing with original HD quality, you need a powerful and useful vc1 to wmv converter to help you. The following guide includes full conversion of VC-1 to WMV with Pavtube Video Converter Ultimate. Hope this helps you out.

At first Pavtube Video Converter Ultimate probably would be the best choice to finish the conversion. It is simple to use and features fast conversion speed. The advanced encoding technology accelerates its conversion speed to great extent. With this VC-1 to WMV Converter, you can convert videos (including DVDs, Blu-rays) with VC-1 stream much faster than other similar tools. The Mac version is Pavtube iMedia Converter for Mac.

Step 1. Load VC-1 files

Have the Pavtube Video Converter installed on your computer. Run the app and click “Add Video” button to load source VC-1 video files. The converter works with WMV files encoded with WMV9 and supports batch conversion.

convert VC-1 to WMV

Step 2. Select output format

Click on the “Format” bar and find “HD Video” group. For VC-1 to WMV conversion, you may select “WMV HD(*.wmv)". The format creates WMV3 ideos in high quality and perfect sync.

WMV Format

Step 3. Convert VC-1 to WMV.


Click “Convert” to start converting. When the VC-1 to WMV conversion completes, click “completed”, back to the Pavtube Video Converter interface, and click “Open” to find converted WMV videos for streaming to your media players or importing to your editing programs.

Tips and Tricks:
a. Click “Settings” button, the “Profile Settings” windows pops up, on which you are allowed to reset video resolution, video bit rate, frame rate, audio bit rate and sample rate.

In order to avoid quality loss, you may set a higher bitrate before conversion. Find “Bitrate” in Video column, and set it to “high quality”. Or you may type in a bitrate the same with original video.


b. To maintain 5.1 surround sound, you may click “Settings” and select “5.1 channels” in the drop-down list of Audio Channels.

c. The trial of Pavtube Video Converter produces video with a Pavtube logo on the screen and you can purchase a license to get rid of the watermark.

d. You can also convert Blu-ray and DVD collections with WMV format using Pavtube VC1 to WMV Converter.

Monday, July 28, 2014

Transcode MXF film from Canon XF200 to FCP X (with multi-track)

How to edit Canon XF200 multi-track MXF video in FCP X? This guide will show you the easy way to achieve it by transcoding MXF to multi-track Prores 422 for editing.

Convert Canon XF200 to FCP X

The Canon XF200 (XF-200,XF 200) is a compact, high-performance Professional Camcorder which is ideally suited to newsgathering, documentary and independent filmmakers as well as videographers across a wide range of disciplines. The camcorder features a wide-angle 20x optical zoom lens with three control rings, full image stabilization, infrared capabilities, flexible MXF/MP4 dual recording at various data rates, two/four-channel audio recording, a network interface and dual-band Wi-Fi.

Workflow for Canon XF200 multi-track MXF and FCP X

Suppose that you are a professional musician and want to built a music video project in FCP for getting a short film for festivals and competitions. How to do this? Is there a tutorial? Is it possible to preserve or separate audio tracks in Canon XF200 MXF for further editing in FCP X.

The answer is Yes! Here I share with you a simple guide on how to convert Canon XF200 MXF files to Apple ProRes MOV format for FCP X editing flawlessly with multiple audio channels preserving.

At first, come and meet this multi-track MXF Converter for Mac - Pavtube iMixMXF which can preserve all or any audio tracks for output Prores .MOV and mix the multiple audio tracks into one if you need. Below is a brief guide for you.

Transcode Canon XF200 MXF to Multi-audio track ProRes 422 for FCP X with all audio tracks preserved

1. Connect your XF200 to Mac and keep it on. (Please make sure you have the entire MXF file structure as it saved on your camcorder’s card)

Get Pavtube iMixMXF installed. Now follow the top left two icons to load individual mxf or in batch.

Pavtube iMixMXF

2. Choose compatible format for FCP X native editing.

Click "Format" and choose Multi-track Video>Multi-track Apple ProRes 422(*.mov) as the most compatible codec for FCP X editing.

Tip:
If you don't need  multi-track format, choose Final Cut Pro > Apple Prores 422(*.mov)  for importing into FCP X.


compatible codec for FCP X editing

3. Click "Settings" to free select needed video/audio tracks.

Check the tracks you need and left others unchecked, thus you can get Multi-track MOV with your needed audio streams. Note there’s a mix into one track icon on the bottom, it will combine all your checked audio tracks into single one.

Multi-track audio settings

4. Click the red "Convert" and just let it go!

Wait for a while to get this Canon XF200 multiple audio track into ProRes MOV for FCP X editing on Mac.

Read more:

MP4 to FCP ǀ AVCHD to FCP ǀ MOV to FCP ǀ H.265 to FCP

Monday, July 21, 2014

Getting Blu-ray and DVD ISO images for playing back on TV via AC Ryan Player

If you have many Blu-ray/DVD ISO files collections, you may wonder how to play them on TV via AC Ryan Player? Get the solution below to learn how to convert BD/DVD ISO to AC Ryan Player best format here.

Have just bought A.C. Ryan and it is great but I have a fundamental issue which I can't find an answer anywhere. I want to rip my ISO files and stream the converted movie onto the TV for playback via A.C. Ryan player. Don't need to keep the original file size as I have limited storage, but want to get pretty good video quality. Any recommended tool?

AC Ryan Player

A.C. Ryan has been responsible for some of the better networked multimedia players of recent years. It supports every video format in popular use, including not just MOV and MKV but also such rarities as ASF, FLV and RMVB, etc. However, AC Ryan Player will not recognize Blu-ray or DVD ISO files without having to do something.

As far as I know, the best way to get iso images playable on your TV via AC Ryan Player is to convert Blu-ray/DVD ISO to AC Ryan Player friendly MP4 format with a Blu-ray ripping tool. Well, Pavtube BDMagic is such a program with strong capability of rolling off protection and transcoding latest Blu-ray/DVD ISO files to AC Ryan Player supported MP4 format. It's professional but easy to use: 1. load, 2. choose format, 3. convert; it's just as simple as that.

Tutorials: How to transfer Blu-ray/DVD ISO image files to TV for viewing via AC Ryan Player?

Step 1. Run ISO Converter for AC Ryan Player; load Blu-ray/DVD ISO.

This converter does not only support Blu-ray disc/folder/ISO, but also able to convert DVD disc/folder/ISO/IFO files. click "IFO/ISO" button to browse and import the Blu-ray/DVD ISO file. Your ISO image file would be recognized automatically so there's no need to run virtual drive to mount it any more.


Step 2. Choose format.

Although AC Ryan Player support lots of formats, I still recommend MP4/MKV format as it’s most acceptable by most devices and TV, so that you can watch the converted video on other devices also.

Click “Format” and choose “HD Video > H.264 HD Video(*.mp4)” or "HD Video > MKV HD Video (*.mkv)"as below:


Step 3. Adjust output settings (Optional)

Click “Settings” to change video size, bitrate, frame rate and audio specs. I chose “original” size to playback on TV.


Step 4. Start conversion

Click “Convert” in the main interface to start the BD/DVD ISO to AC Ryan Player conversion (batch conversion supported). After conversion, click “Open” which is below the “Settings” to find the converted video.

Use a USB drive to transfer the ripped MP4/MKV media file to AC Ryan Player, now just enjoy your Blu-ray/DVD ISO movies on TV! If you are mac users, learn how to backup Blu-ray/DVD to AC Ryan Player on Mac for TV playback here.

Tuesday, July 15, 2014

Play 1080p and 720p movies on Galaxy Tab S 10.5 and 8.4

Is it possible to transfer 1080p and 720p Videos to Galaxy Tab S 10.5 and 8.4 for viewing on the go? Get the best movie converter to convert them for playback easily. 

It is an amazing news that Samsung has unveiled its latest premium flagship tablets, the 8.4- and 10.5-inch Galaxy Tab S. Both the 8.4 and 10.5-inch models will be armed with 2560 x 1600 pixel resolution Super AMOLED displays, the first Samsung tablets to use a Super AMOLED display in two years. Both devices are incredibly thin, measuring just 6.6mm, and light, with the 10.5-inch model coming in at 465g, and the 8.4-inch model just 294g, which are perfect for taking on your trip for watching all kinds of movies.

However, Samsung Galaxy S supports only videos in limited formats, which means that videos in other formats like M2TS, MTS, TS, AVCHD, MOV, QT, F4V, VOB etc can't be played on Samsung Galaxy Tab S directly. In order to get 1080p and 720p movies playable on Galaxy Tab S 10.5 and 8.4, you need to convert these movies files to Galaxy Tab S playable format at first.

In this case, we suggest Pavtube Video Converter Ultimate which is an all-in-one ideal app to help you to convert Blu-ray, DVD, and HD videos to almost any other common video format such as VOB, FLV, WMV, AVI, MKV or backup the BD, DVD keeping the whole movie structure as you need. With it, you can enjoy 2D/3D Blu-ray/DVD and HD videos on Galaxy Tab S 10.5 and 8.4. The Mac version is iMedia Converter for Mac.


Now just download it and follow the tutorial below.

Convert 1080p and 720p movies for playing on Galaxy Tab S 10.5 and 8.4
1. Click the "Add video" icon to import 1080p and 720p movie files correspondingly.


2. Click "Format" menu and go through the dropdown list, you are recommended to choose the "Samsung -> Samsung Galaxy Tab 3 Video(*.mp4)". It is also fit for  Galaxy Tab S 10.5 and 8.4.


3. Check the pencil-like icon to activate the editing function. Here you can trim video for your needed length, crop video to get rid of annoying black edges, join multiple video clips into one, add text/image watermark and add subtitles. For example, if the original movie has no subtitle or the subtitles you need, you can download it from website and then add the subtitles into the output videos for full enjoyment with this software.

Notice the small triangles under the progress bar? Click them to adjust frame by frame easily.

4. Click on "Settings" to modify the video size (resolution) as 1280*800. For watching videos on Galaxy Tab S 10.5 and 8.4, 2000~2500kbps is just all right. 


Pls notes that the video quality improved with the bitrate, but not the higher the better. You need to consider your device configuration as the high bitrate required higher read&write speed.

5. Ok now click the “Convert” button to start converting 1080p and 720p movies for playing onGalaxy Tab S 10.5 and 8.4. It supports batch conversion, you can import and transcode multiple movies files at one time.

After conversion, click “Open” to locate the converted video directly. Transfer the result video file to your Galaxy Tab S 10.5 and 8.4. Now, you can watch 1080p videos and 720p movies on Galaxy Tab S 10.5 and 8.4 smoothly. 

Don’t know how to transfer videos from PC to Galaxy Tab S 10.5 and 8.4? You can view the posts below:

Easily transfer Media Files (Video, Music, Photo, iBook) from PC to Galaxy Tab 


And you can try the bundled software Video Converter Ultimate($65) + Vidpie($29) = Only $74.9, Save $19.1, and easily convert DRM and other common video to Galaxy Tab S 10.5 and 8.4 for playback. 

Friday, July 11, 2014

Carry Around Your Entire DVD Movie Collection In Your Pocket with Wi-Drive 64GB/32GB

If you’re like me and have trunk filled with DVDs, you should consider ripping them for storage on Wi-Drive. Not only does this create DVD backups just in case the discs become damaged, but you can also move them onto your favorite devices iPad, iPhone with ease.

For example, lately I’ve been feeling very nostalgic for older episodes of The Simpsons. Over the weekend I set out to pack my Kingston Wi-Drive with Simpsons episodes of my DVD discs so that I could stream them to iPad for watching on vacation without sacrificing my internal storage.
ipad on vacation

Wi-Drive 32GB or 64GB is the best ultra-portable hard drive where you can store all your movies, then stream them to your iPhone or iPad using a simple Wi-Fi network the drive creates.

Why choose Wi-Drive?

First, They're easy to set-up, and all you need on your device is an app to access all your content.

Plus, most of these drives are small enough to fit in your pocket.

Also, with most of these Wi-Fi hard drives, a few people can watch movies streaming from them simultaneously. This means that you can have three kids in the backseat, each with an iPhone, watching the same movie on different screens (if you're so lucky).

Lastly, these gadgets have built in rechargeable batteries so even if you don't have a power outlet nearby, you'll have enough juice for a plane ride or car trip.

Have a ton of DVD movies? Here's how to bring them with you on Wi-Drive.

simpsons

To bring your DVDs on the go, you'll need a piece of free software called Pavtube Free DVDAid to iPad/iPhone/Wi-Drive supported mov format.

Here's how to use the super simple freeware.
Which Is the Best Free DVD Ripper for Mac to rip DVD movies free

Once you've converted your movies to about 1-2 GB per movie, you can either import them into iTunes and sync them to your device, or drag them onto a Wi-Fi hard drive like the ones we mentioned.

Depending on how many movies you have and whether you're using an iPhone (small screen) or iPad (large screen), you can alter compression settings in Handbrake to fit your needs and how many movies you want to bring around.

For example, if you plan to only watch on an iPhone, the quality of a movie compressed to 500 MB could be quite good, but it might look pixelated on an iPad.
In that case, carrying a whole stack of DVDs with Wi-Drive on vacation is as easy as a pie, and it's pretty nice to lug your entire collection with your iPad on the road.  

Note: If you want to transfer your DVD videos to other portable devices and media players for freely watching, you'd better get the updated DVDAid to rip DVD into MP4 format.

How to Use AirVideo to stream movies to your iPhone or iPad

use airvideo to stream movies 

Use AirVideo for iPhone and iPad to stream movies from your home computer over Wi-Fi or over your cell network.

AirVideo won't play videos you've purchased on iTunes, but it will play everything else (it converts incompatible videos on the fly).

Price: $2.99

The comparison of Wi-Drive and its alternatives

1. The AirStash is wallet-friendly and fully featured

the airstash

The AirStash is ultra-light, only has one button, and lets you decide how much you want to spend on memory.

Th AirStash lets you slip in SD cards up to 32GB in size, which is killer, because you can pick how much memory you want to spend money on. If you have a bunch of SD cards lying around, you can bring tons of media with you.

AirStash has a companion app for accessing your media from an iPhone or iPad, and has great battery life too. Up to 8 people can view documents at the same time using the AirStash, and fewer for movies or music.

Also, since the AirStash has a SD card slot, traveling photographers can pop in their SD cards and view all their photos on the go.

Price: $99.99 (SD card not included)

2. The SeaGate GoFlex Satellite has the most storage, but isn't tiny

the seagate goflex satellite

Seagate

The GoFlex Satellite isn't small, but it holds tons more storage than some of the other portable solutions.

At 500GB, you can bring along hundreds of movies, but you'll sacrifice size and portability. The GoFlex Satellite has a good 5 hours of battery life, but apparently the software to use the device isn't as good.

Even if the software isn't great and directories are hard to navigate, the GoFlex uses the super fast USB 3.0 to transfer movies and other media.

Unlike the Wi-Drive, the GoFlex doesn't allow you to browse the internet over Wi-Fi while you're connect to the device.

Price: $199.99 (500GB)

3. The Kingston Wi-Drive is as big as an iPhone, but thinner.

the kingston

The Kingston Wi-Drive is another flash drive to hold all your media. It comes in 16GB and 32GB varieties, with no expandable memory slots.

The Wi-Drive isn't as small as the AirStash, and you have to charge it with a bundled in USB cable (which means you're bringing one more thing around). Up to three people can use the Wi-Drive simultaneously.

Kingston built a decent app for the Wi-Drive which lets you access all your media, and one killer feature is that you can connect to the Wi-Drive via Wi-Fi, but also use the internet via Wi-Fi simultaneously because it has a pass-through data feature.

Price: 16GB ($149.99), 32GB ($199.99)

4. The Panasonic DY-PS10 has superb battery life
the panasonic dy ps10


The Panasonic Pocket Server is kind of like the AirStash, because it reads SD cards, and is kind of like the Wi-Drive, because it's palm-sized.

The device takes SD cards up to 64GB (the AirStash's max is 32GB) and has about 10 hours of battery life, but we don't know much more than that since it was just announced today.

Price: $191.00 (launching in Japan September 15th)

You'll also need...


adapter

Never have to worry about battery life again using a cigarette lighter adapter that will let you charge your Wi-Drive, AirStash, or GoFlex Satellite on the go.

Get an adapter with extra ports or a USB port (like this one) to also conserve battery life on your iPhone or iPad.

Price: $19.99

Thursday, July 10, 2014

DVD IFO to Fire Phone Converter - Convert/Rip/Play DVD IFO to Amazon Fire Phone

I backed some of my DVD collections to local computer in IFO images already. And I want to move DVD IFO images from my computer to Amazon Fire Phone, which I plan to put into my shopping list. How to get it done?

Well, this article will share you the solution to convert/rip and play DVD IFO to Amazon Fire Phone.

Amazon doesn't just sell smartphones anymore — it makes one. In news that should surprise exactly no one, Jeff Bezos has officially unveiled Amazon's first cellphone, the Fire Phone. It'll be available July 25th with a 4.7-inch, 720p display, aluminum buttons, a Qualcomm processor, Adreno 330 graphics, and 2GB of RAM.

rip dvd ifo to fire phone

Well, here let's have a quick glance of Amazon Fire Phone video format list:

Amazon Fire Phone supported video format:

H.264/MPEG4/AVC, H.263, MPEG4, MPEG4 SP, HDCP2.x, AVI, VP8, PlayReady DRM

As above, I got know Amazon Fire Phone can fully support MP4 video, but not the DVD IFO files. In other words, if I want to play DVD IFO on Amazon Fire Phone, I need to convert them in advance. Now, I’ve a big success converting DVD IFO movies to Amazon Fire Phone optimized MP4 format by using Pavtube DVD to Amazon Fire Phone Converter.

This program is good at dealing with all kinds of DVD movies, like DVD discs, DVD ISO or IFO images files, etc to any common video format like MP4, AVI, WMV, FLV, MKV, VOB, MOV and more as you need. So, with this DVD Convert tool, it will be easy to rip DVD IFO to Amazon Fire Phone compatible formats, and then you can watch DVD IFO movies on Fire Phone as ease.

Easy Steps to rip DVD IFO to Amazon Fire Phone for watching

Free download DVDAid, or DVDAid for Mac

Step 1. Install this DVD IFO converter for Fire Phone on your computer. Run it and load your DVD IFO image file into it.

Rip DVD IFO to Amazon Fire Phone

Step 2. Choose output profile for Amazon Fire Phone. Here I recommend you “Common Video > H.264 Video (*.mp4)” which works for playing on Amazon Fire Phone.

Amazon Fire Phone Format

Tips:

1. You may set subtitles and audio language for DVD IFO movies as well.

Select subtitle

2. Click on Settings you could easily set bitrate, frame rate, codec, channels, sample rate, etc to adjust parameters that affect video quality and file size for the video you prefer. According to the resolution of Amazon Fire Phone, you can set size to 1280 *720.

fire phone format settings

Step 3. Hit Convert button to run this DVD IFO to Amazon Fire Phone conversion.

After transferring converted video file to Fire Phone, you can play DVD IFO on Amazon Fire Phone anywhere.

Thursday, July 3, 2014

Get 30% OFF BDMagic at 2014 Summer Holiday Biggest Promotion

Woo-hoo, after a long-term study, 2014 Summer Vacation begins! Havn't got any plans? If you are a frequent traveler or ready to prepare a travel this summer holiday by hiking, fishing, camping, or going to seaside with your kids, chances are they'll be clamoring to see some favorite movies when they aren't off at camp or jumping in the pool.


Now with 30% OFF Pavtube BDMagic, you can watch new released Blu-ray/DVD movie like Captain America: The Winter Soldier, Rio 2, The Amazing Spider-Man 2, etc. on your mobile devices on the go, wonderful experience!

Follow this link to enjoy 49% off and more FREE products~

https://www.facebook.com/pavtubefans/app_186981981345123

Expire on Jul. 15th.

It's never to later to make your choice!

More details here:

http://www.multipelife.com/summer-2014-deals

How to Get Freemake Subtitles Pack Key Serial License Code Free


Is it possible to get a Freemake Subtitles Pack serial key without paying? Want to activate Freemake Subtitles Pack? Now you can download the Freemake Alternative with powerful subtitles features.


What is Freemake Subtitles Pack?
 
Subtitles Pack is a set of advanced features for Freemake Video Converter to work with video subtitles. With it, you can freely have access to editing subtitle size, altering subtitle font, watching foreign movies with special symbols, Unicode and UTF subtitles and enjoying movies with subtitles to your movie and watch it on PC, TV, or any portable device: iPhone, iPad, Android, Xbox, PSP, cell phone.

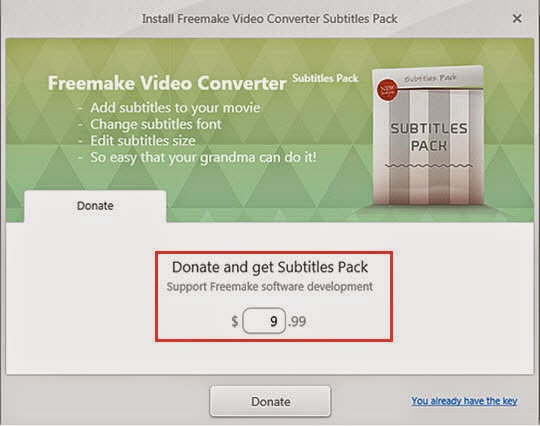
Get your Subtitles Pack right now! Edit subtitles for your movie easily. Watch movies with subtitles with pleasure! However, after I downloaded, it asked me to donate if I need to activate the Subtitles Pack function. Then how can I get a Freemake Subtitles Pack serial key free?

How to get Freemake Subtitles Pack? 

1. Download Freemake Video Converter here and run it. Then go to “Help” tab and click “Get Subtitles Pack” link. Enter any amount of money you are ready to donate for Freemake Subtitles Pack and click “Donate”. You’ll be forwarded to PayPal where you can pay using Visa, MasterCard, Discover, American Express or PayPal account.


2. Then we will send you an automatic email with an activation key for Freemake Subtitles Pack to the email address you provided in the payment data.

3. Copy the key from the email. Make sure you copied only the key without additional spaces.

4. Open Freemake Video Converter.

5. Go to Help-> Get Subtitles Pack-> Click “I already have a key”->Insert your key in a field->Click "OK". See the message that you've activated Subtitles Pack. That’s it. You can enjoy Subtitles Pack features now. 

How to Activate Freemake Subtitles Pack without a Key?

Is it possible to get Freemake Subtitles Pack key free or activate the subtitles pack of Freemake Video Converter without a key? The answer, directly, is no. However, there are always ways to find and get keys to active some other Freemake Alternative with powerful subtitle features!

Here recommend you : Pavtube Video Converter Ultimate- The best  Freemake Alternative
  • Integrate with BDMagic, DVDAid, and Video Converter.
  • Convert Blu-ray/DVD 3D/2D movies in batch to MP4, M4V, MOV, AVI, MKV, WMV, MPG, VOB, DV files with 3D/2D effects.
  • Support all Video files (MTS, TS, M2TS, M2T, MKV, MXF, AVI, VOB, MPG, M4V, WMV, FLV, VRO, EVO, M2V, 3GP, MOV) to to any file formats for palying, editing and sharing
  • Add *.srt, *.ass, or *.ssa subtitle files to BD/DVD movie or videos.
  • Directly copy the latest releases of Blu-ray/DVD movies in fast speed.
  • Help enjoy BD/DVD movies & camcorder videos on iOS/Android/Windows Tablets & Phones, and HD Media Players.


Now go to download, install and run Pavtube Video Converter Ultimate, and you’re allowed trying the trial version to test the functions firstly.

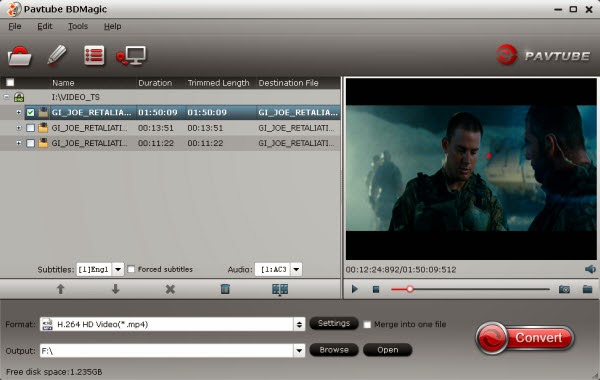
How to convert video embedded with SRT/ASS/SSA subtitle you need?

Step 1. Import your source files.

Click “Add Video” to load your videos files to Pavtube Video Converter Ultimate.


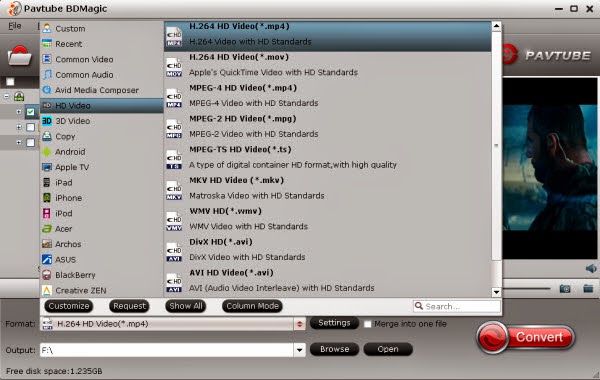
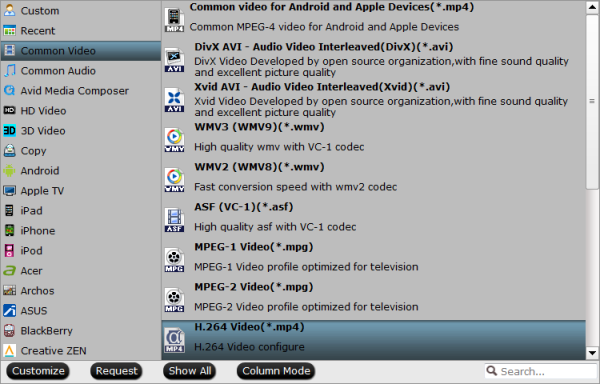
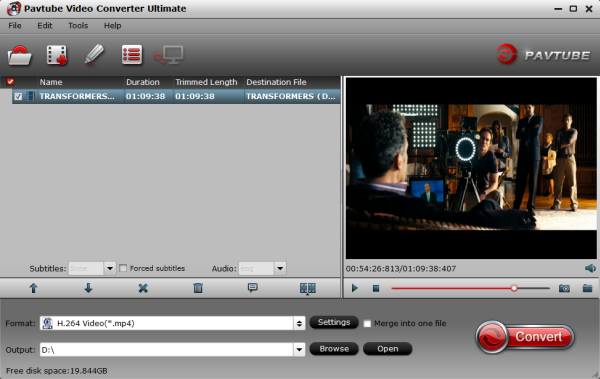
Step 2. Choose a suitable output format.

Choose a desired output format by clicking the “Format” option. Then, choose a video format (e.g. MP4 format) or device format (e.g. iPhone, iPod, iPad, Samsung, Asus, etc.) for playing.


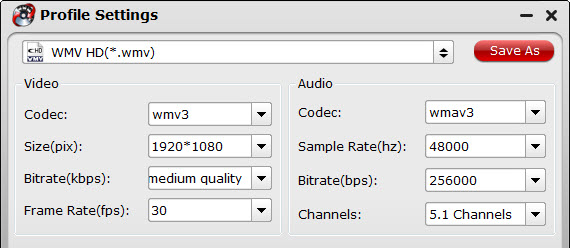
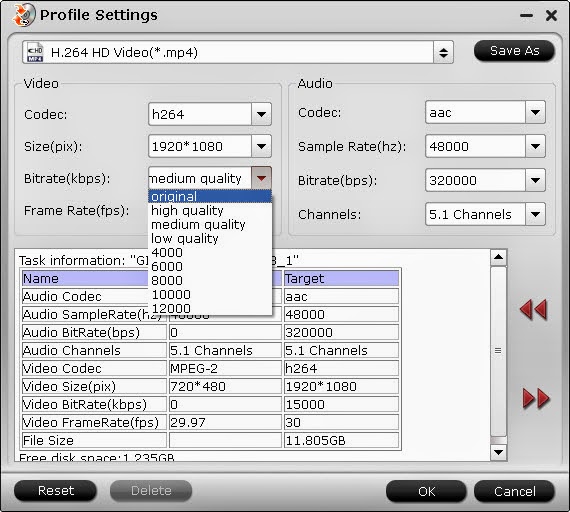
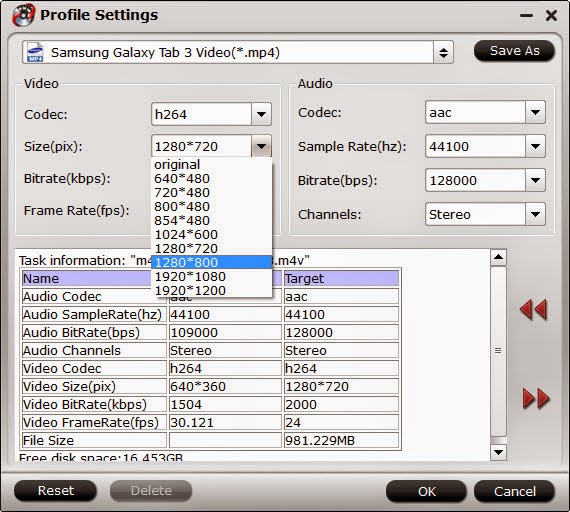
Tip: To get your video with high quality and meet your own demand, you are allowed adjusting the video and audio parameters for output files including Codec, Bitrate, Size, Frame Rate and so on.

Step 3. Export video with subtitle you want.

Now, it’s time to save subtitle to converted video permanently.

First of all, you need to find your language subtitle from website. Though there is no 100% guarantees of availability, you still have great chances to get you desired language subtitle after an easy search on Google. Best subtitle file searching method: “movie title” + “your preferred language” + “subtitle” as the search strings. Here I share four free subtitle files download website:
More Subtitle Download Sites at here: Top 5 Subtitle Download Sites

Of course, you can also download the subtitle edit software, make a custom subtitle you need and different style through font, color, size, position, transparency, etc.

After getting subtitle files from internet, choose “Edit” button to launch the video editing window. Go to “Subtitle” tab, check “Enable”, then click “Browse” button to load an external subtitle files (.srt, .ssa or .ass). After the subtitle is loaded, click “OK” button to return to the primary window.


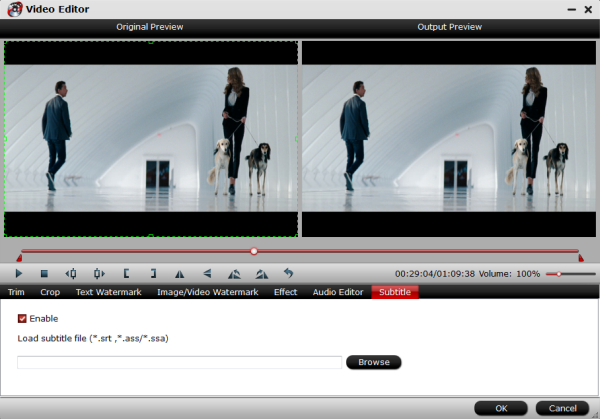
Tip: By click “Edit” button, you can also do some simple editor: Trim, Corp, Add Watemark, Add Special Effect, Deinterlacing, Audio Editor.

Step 4. Convert video embedded with subtitle you need.

Finally, click “Convert” button to start conversion. Then click “Open” button to find the generated MP4 files, the subtitle you need will be written permanently on the output video.

Tips: Acceleration will speed up the conversion and help to save time for you. You can find it under “Option”:


This Freemake alternative is an integrated software with easy-to-use interface. And it supports lots of input and output video formats, meanwhile, it is capable of ripping and converting DVD and Blu-ray disc embedded with srt/ass/ssa suntitle for playing. Let’s try this amazing software.

Read more:

MediaCoder Alternatives for Mac - Transcode any Video/Audio on Mac OS X
Why Is My MPEG Streamclip Not Working - Get Alternative MPEG Streamclip
No Found AnyDVD for Mac? Get a AnyDVD Mac replacement to Copy DVD on Mac
Rip HD/3D Blu-ray Movies with Forced Subtitles on Mac