Tuesday, December 26, 2017

Load iPhone Video to GoPro Studio

iPhone videos won't load properly into GoPro Studio

"I'm trying to make a video from some gopro videos I have, but I also want to include some videos from my iPhone too. However when I go to import the iPhone videos, the studio doesn't seem to load them properly. The video sound is nothing but a high pitched static noise, and the videos all play really slow, like they're being played at 1 frame a second. Has anyone had this issue before? This is my first time using the software, is it only able to process actual gopro videos?"

Video formats shot by all available iPhone models

iPhone Models

Video Format

Audio Format

iPhone 6S (Plus)

H.264 video up to 4K, 30 frames per second, High Profile level 4.2 with AAC LC audio up to 160 Kbps, 48kHz, stereo audio or Dolby Audio up to 1008 Kbps, 48kHz, stereo or multichannel audio, in .m4v, .mp4, and .mov file formats; MPEG 4 video up to 2.5 Mbps, 640 by 480 pixels, 30 frames per second, Simple Profile with AAC LC audio up to 160 Kbps per channel, 48kHz, stereo audio or Dolby Audio up to 1008 Kbps, 48kHz, stereo or multichannel audio, in .m4v, .mp4, and .mov file formats; Motion JPEG (M JPEG) up to 35 Mbps, 1280 by 720 pixels, 30 frames per second, audio in ulaw, PCM stereo audio in .avi file format

AAC (8 to 320 Kbps), Protected AAC (from iTunes Store), HE-AAC, MP3 (8 to 320 Kbps), MP3 VBR, Dolby Digital (AC-3), Dolby Digital Plus (E-AC-3), Audible (formats 2, 3, 4, Audible Enhanced Audio, AAX, and AAX+), Apple Lossless, AIFF, and WAV

iPhone SE

H.264 video up to 4K, 30 frames per second, High Profile level 4.2 with AAC LC audio up to 160 Kbps, 48kHz, stereo audio or Dolby Audio up to 1008 Kbps, 48kHz, stereo or multichannel audio, in .m4v, .mp4, and .mov file formats; MPEG 4 video up to 2.5 Mbps, 640 by 480 pixels, 30 frames per second, Simple Profile with AAC LC audio up to 160 Kbps per channel, 48kHz, stereo audio or Dolby Audio up to 1008 Kbps, 48kHz, stereo or multichannel audio, in .m4v, .mp4, and .mov file formats; Motion JPEG (M JPEG) up to 35 Mbps, 1280 by 720 pixels, 30 frames per second, audio in ulaw, PCM stereo audio in .avi file format

AAC (8 to 320 Kbps), Protected AAC (from iTunes Store), HE-AAC, MP3 (8 to 320 Kbps), MP3 VBR, Dolby Digital (AC-3), Dolby Digital Plus (E-AC-3), Audible (formats 2, 3, 4, Audible Enhanced Audio, AAX, and AAX+), Apple Lossless, AIFF, and WAV

iPhone 7 (Plus)

HEVC, H.264, MPEG-4 Part 2, and Motion JPEG

AAC-LC, HE-AAC, HE-AAC v2, Protected AAC, MP3, Linear PCM, Apple Lossless, FLAC, Dolby Digital (AC-3), Dolby Digital Plus (E-AC-3), and Audible (formats 2, 3, 4, Audible Enhanced Audio, AAX, and AAX+)

iPhone 8 (Plus)

HEVC, H.264, MPEG-4 Part 2, and Motion JPEG

AAC-LC, HE-AAC, HE-AAC v2, Protected AAC, MP3, Linear PCM, Apple Lossless, FLAC, Dolby Digital (AC-3), Dolby Digital Plus (E-AC-3), and Audible (formats 2, 3, 4, Audible Enhanced Audio, AAX, and AAX+)

iPhone X

HEVC, H.264, MPEG-4 Part 2, and Motion JPEG

AAC-LC, HE-AAC, HE-AAC v2, Protected AAC, MP3, Linear PCM, Apple Lossless, FLAC, Dolby Digital (AC-3), Dolby Digital Plus (E-AC-3), and Audible (formats 2, 3, 4, Audible Enhanced Audio, AAX, and AAX+)

Transcode iPhone video for GoPro Studio editing

The GoPro Hero supported editing formats is MOV or MP4, while the iPhone recorded video are mainly H.264 or H.265 formats. Therefore, to load iPhone video to GoPro Studio, you will need to perform a format or codec transcoding process. Here, you can easily fix the format incompatible issue by downloading our best iPhone Video Converter - Pavtube Video Converter.

Related article: Video Fails to Import to GoPro Studio | GoPro Studio Alternative for Windows 10 | GoPro Studio Supported Formats

The program has full support for both iPhone HD/4K H.264 or H.265 video. Thanks to its batch conversion mode, you can batch load multiple iPhone video into the application for conversion at time to save your precious time. This powerful yet simple to use application can assist you to efficiently transcode iPhone HD/4K H.264/H.265 video to GoPro Studio native supported MOV or MP4 with best quality and fast conversion speed.

To get better output file quality, you can flexibly adjust output profile parameters such as video codec, bit rate, frame rate, resolution and audio codec, bit rate, sample rate and channels, etc.

For Mac users, you can switch to download Pavtube Video Converter for Mac to perform the conversion on macOS High Sierra, macOS Sierra, Mac OS X El Capitan, Mac OS X Yosemite, Mac OS X Mavericks.

Step by Step to Transcode iPhone Video for GoPro Studio Editing

Step 1: Load iPhone video into the application.

Download the free trial version of the program. Launch it on your computer. Click "File" menu and select "Add Video/Audio" or click the "Add Video" button on the top tool bar to import iPhone video files into the program.

Load iPhone video

Step 2: Define the output format.

Clicking the Format bar, from its drop-down list, select GoPro Studio supported editing formats such as "H.264 HD Video(*.mp4)" under "HD Video" main category.

Output GoPro Studio supported editing formats

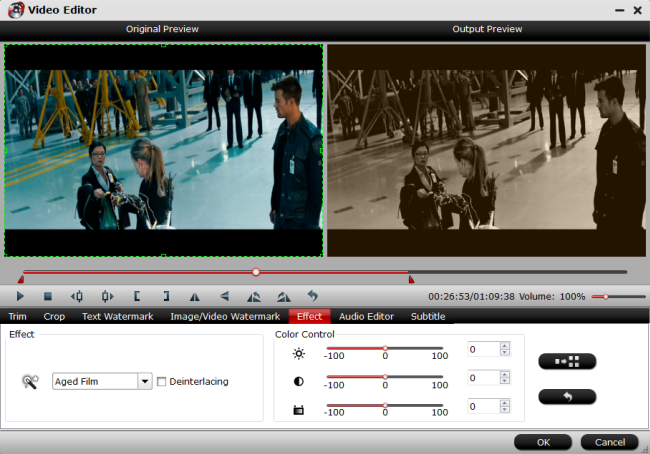
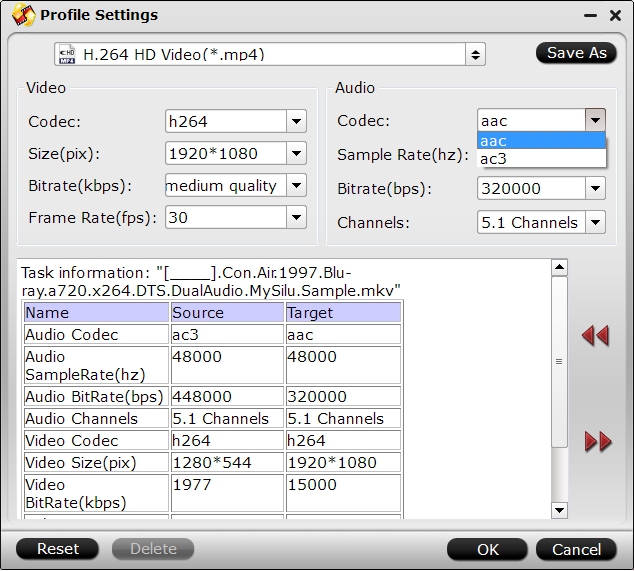
Step 3: Adjust output profile parameters.

Click "Settings" on the main interface to open "Profile Settings" window, here, you can flexibly choose or specify exactly the profile parameters including video codec, resolution, bit rate, frame rate, audio codec, bit rate, sample rate, channels, etc as you like to get better output video and audio quality.

Adjust output profile parameters

Step 4: Begin the conversion process.

After all setting is completed, hit the "Convert" button at the right bottom of the main interface to begin the conversion process from iPhone Video to GoPro Studio supported editing formats conversion process.

When the conversion is finished, click "Open Output Folder" icon on the main interface to open the folder with generated files. Then you will have no problem to import and edit iPhone video with GoPro Studio.

Tuesday, December 19, 2017

Edit Sony A7R III 4K XAVC S with Davinci Resolve

The Alpha A7R III Mirrorless Digital Camera from Sony is a versatile, high-performance camera characterized by not only its resolution, but by its multimedia versatility. With the camera, you can record up to 100 Mbps UHD 4K video in XAVC S format within an MP4 wrapper at a frame rate of 23.98, 25 and 29.97fps. Wish to import the A7R III 4K XAVC S footage into Davinci Resolve for professional post editing workflow, the following article will show you how to easily achieve a smooth editing workflow.

Media compatibility of 4K XAVC S with Davinci Resolve

From Davinci Resolve's media specification page, we can see that this world's leading NLE software has provided perfect compatibility with various post production file types, formats and post production software. The bad news is that 4K XAVC S is unfortunately excluded from its native importing support list.

Transcode A7R III 4K XAVC S to Davinci Resolve

To fix the format incompatible issue, you will need to perform a format transcoding process. Here, if you are looking for a powerful yet simple to use application to complete the job, we highly recommend you to download our best Mac XAVC S Converter - Pavtube Video Converter for Mac. The program supports batch conversion mode, so that you can load multiple Sony A7R III 4K XAVC S video into the application for conversion at one time to save your precious time. With this tool, you can easily and efficiently export Davinci Resolve supported editing formats such as QuickTime, Prores, DNxHD with remarkable file quality.

To get better output video and audio quality, you can flexibly tweak the output profile parameters including video codec, resolution, bit rate, frame rate, audio codec, bit rate, sample rate, channels, etc as you like to get better output video and audio quality.

The program has perfect compatibility with macOS High Sierra, macOS Sierra, Mac OS X El Capitan, Mac OS X Yosemite, Mac OS X Mavericks, etc. For your great convenience, it is also accompanied by an up-to-date Windows version Pavtube Video Converter for Windows 10/8.1/8/7.

How to Import and Edit Sony A7R III 4K XAVC S with Davinci Resolve?

Step 1: Import Sony A7R III 4K XAVC S video.

Download the free trial version of the program. Launch it on your computer. Click "File" menu and select "Add Video/Audio" or click the "Add Video" button on the top tool bar to import Sony A7R III 4K XAVC S video into the program.

Load Sony A7R III 4K XAVC S video

Step 2: Choose output file format.

Click the "Format" bar, from its drop-down list, select one of Davinci Resolve supported editing formats such as "Apple Prores 422(*.mov)" under "Final Cut Pro" main category.

Output Davinci Resolve supported editing formats

Step 3: Begin the conversion process.

After all setting is completed, hit the "Convert" button at the right bottom of the main interface to begin the conversion process from Sony A7R III 4K XAVC S to Davinci Resolve supported editing format conversion process.

When the conversion is finished, click "Open Output Folder" icon on the main interface to open the folder with generated files. Then feel free to load the Prores files into Davinci Resolve for post editing workflow.

Tuesday, December 12, 2017

Deinterlace All Kinds of Interlaced Files

What does deinterlacing videos mean?

Deinterlacing is the process of converting interlaced video, such as common analog television signals or 1080i format HDTV signals or recorded movie footages, into a non-interlaced form that can be playable on modern non interlaced display devices like LCD or Plasma screens.

Why we need to deinterlace video files?

Most cathode ray tube computer monitors, all LCD computer monitors and most HDTVs only work in deinterlace mode, because they are fixed-resolution displays and only support progressive scan. When you display an interlaced video on a progressive scan monitors, which scan lines of an image consecutively, the artifacts will become noticeable. To remove those annyoing artifacts, it would be much ideal for you to convert the interlace video into progressive form.

How to deinterlace interlaced videos?

There are many free programs such as VirtualDub, Handbrake, VLC, Avidemux, etc on the market can do the video deinterlacing work. However, if you are looking for a powerful yet simple to use application to complete the job, you can't miss Pavtube Video Converter Ultimate. The program not only assists you to deinterlace interlace digital video, but also commercial Blu-ray/DVD disc with complicated copy protection and region code limitation. The whole process can be easily done with just few clicks, just open the "Video Editor" window, navigate to the "Effect" tab, then check off "Deinterlacing" option to transform the interlaced video into a progressive form to keep good image quality.

Trim/Crop/Add watermark/apply effect to video

Besides deinterlacing interlaced video, the program also offer other beneficial video editing functions for you. You can trim or cut video to remove unwanted parts or segments in the beginning or end, split large video into small clips by file size, count or length, merge separate video into one file, crop video to remove the black borders or unwanted area, add video/image/transparent text watermark to video, flip or rotate video horizontally, vertically, clockwise or counterclockwise, apply special rendering effect to video, change video brightness, contrast, saturation, etc, remove/replace audio in video, insert external srt/ass/ssa subtitle to video.

For Mac users, you can fix Blu-ray/DVD/video interlaced issue by downloading Pavtube iMedia Converter for Mac on macOS High Sierra, macOS Sierra, Mac OS X El Capitan, Mac OS X Yosemite, Mac OS X Mavericks, etc.

Get Pavtube Video Converter Ultimate with 20% off discount, coupon codec: 45K2D47GJH

Step by Step to Deinterlace Interlace Video into Progressive Form

Step 1: Load interlaced digital video or Blu-ray/DVD disc into the program.

Download the install the program on your computer, click "File" > "Add Video/Audio" button to import interlaced digital video into the program. For loading Blu-ray or DVD disc, insert your interlaced Blu-ray/DVD disc into your computer's optical drive, then click "File" > "Load from disc" to load DVD disc into the program. For loading Blu-ray disc, there must be an external Blu-ray drive.

Load interlaced digital video or Blu-ray/DVD disc

Step 2: Define an output file format.

From "Format" drop-down list, select one of your desired file formats or device and program preset profile formats according to your own needs. If you do not want to re-encode the video, just select to output the same format as the original file format, also make sure do not change any profile settings for the output video.

Choose output file format

Step 3: Deinterlace interlaced video into progressive form.

Select an item on the main interface to activate the "Edit" menu, then click the "Edit" icon on the tool bar to open the "Video Editor" window, switch to the "Effect" tab, tick off "Deinterlacing" option to transform the interlaced video into a progressive form without any artifacts.

Deinterlace interlaced video into progressive form

Step 4: Complete the video deinterlacing process.

After all settings is over, hit right-bottom "Convert" button to start the interlace video deinterlacing process.

When the conversion is completed, you can get a deinterlaced video for better displaying on most new computers and HDTV.

Tuesday, December 5, 2017

Play DJI Phantom Pro 4K Video with 4K TV

The Phantom 4 Pro from DJI is capable of shooting H.264 4K videos at 60fps or H.265 4K at 30fps, both recorded in a 100 Mbps bit rate. For 4K TV owners, after transferring the 4K footage from the camera memory card to your computer hard drive, you can wonder how to play the DJI Phantom 4 Pro 4K on 4K TV. The following article will share you 3 solutions to get the job completed.

Solution 1: Play DJI Phantom 4 Pro 4K on 4K TV via USB

If the USB port on your 4K TV can be used for media playback, you can then be able to play any content saved on USB compatible storage device. To make the 4K video played on 4K TV, make sure that the 4K video are included in 4K TV supported file formats.

Related article: Import DJI Phantom 4 4K to FCP X | Downscale Phantom 4K Video to 1080p | Import Phantom 4K to Premiere Pro CC

Solution 2: Stream DJI Phantom 4 Pro 4K to 4K TV via Plex

If the Plex app is available on your 4K TV, you can download and install the Plex app on your 4K TV for streaming local 4K video to it. However, make sure that the DJI Phantom 4 Pro 4K video are supported by the Plex app of your 4K TV.

Solution 3: Stream DJI Phantom 4 Pro 4K to 4K TV via 4K Streaming Devices

If your 4K TV doesn't support the Plex app, it would be ideal for you to choose a 4K streaming devices such as Chromecast Ultra, Roku 4/Ultra/Premiere, Amazon Fire TV 2/3, etc.

Fix DJI Phantom 4 Pro format incompatible issue with 4K TV

No matter which solution you choose, it is pretty important that the DJI Phantom 4 Pro 4K video is supported by your 4K TV, Plex app on 4K TV or the 4K media streaming devices. If you fail to play the DJI Phantom 4 Pro 4K on 4K TV from USB, via Plex or through 4K media streaming devices or suffer other playback issues, then you can fix those playback issues by downloading our best 4K Video Converter - Pavtube Video Converter.

This program has full support for all 4K video encoded with various different compression codec such as H.264, H.265, Prores, etc and wrapped with different container file formats such as AVI, WMV, MP4, MOV, MXF, TS, XAVC, XAVC S, etc. The program supports batch conversion mode, so that you can batch load multiple 4K video into the application for conversion at one time to save your precious time.

With this application, you can easily convert the DJI Phantom 4 Pro 4K video to 4K TV, 4K TV plex app or 4K media streaming devices preset profile formats with perfect quality and super-fast encoding speed.

Adjust output profile parameters

To get better output video and audio quality, you can flexibly adjust output profile parameters such as video codec, resolution, bit rate, frame rate or audio codec, bit rate, sample rate and channels, etc as you like.

For Mac users, please switch to download Pavtube Video Converter for Mac to perform the conversion on macOS High Sierra, macOS Sierra, Mac OS X El Capitan, Mac OS X Yosemite, Mac OS X Mavericks, etc.

Step by Step to Transcode DJI Phantom 4 Pro 4K for 4K TV Playing or Streaming

Step 1: Load DJI Phantom 4 Pro 4K video.

Download the free trial version of the program. Launch it on your computer. Click "File" menu and select "Add Video/Audio" or click the "Add Video" button on the top tool bar to import DJI Phantom 4 Pro 4K video files into the program.

Load DJI Phantom 4 Pro 4K video

Step 2: Define the output format.

Clicking the Format bar, from its drop-down list, select 4K TV, 4K TV Plex app or 4K streaming devices supported 4K file formats such as 4K H.265 or 4K H.264 file formats.

Output 4K H.265

Output 4K H.265

Output 4K H.264

Output 4K H.264

Tips: Click "Settings" on the main interface to open "Profile Settings" window, here, you can flexibly choose or specify exactly the profile parameters including video codec, resolution, bit rate, frame rate, audio codec, bit rate, sample rate, channels, etc as you like to get better output video and audio quality.

Step 3: Begin the conversion process.

After all setting is completed, hit the "Convert" button at the right bottom of the main interface to begin the conversion process from DJI Phantom 4 Pro 4K to 4K TV, 4K TV via Plex, 4K streaming devices preset profile formats.

When the conversion is finished, click "Open Output Folder" icon on the main interface to open the folder with generated files.