The Canon EOS M100 is the company's entry-level mirrorless interchangeable lens camera. It features a 24MP APS-C CMOS sensor, DIGIC 7 processor and the company's impressive Dual Pixel AF system. With the camera, you can shot 1080p, 720p and 480p video in MP4 format with H.264 compression codec. For Davinci Resolve users, when the shooting is completed, you may come the idea to do some post editing workflow of the Canon EOS M100 MP4 video with Davinci Resolve. Wish to get a fast and smooth workflow, just read on...
How about native import EOS M100 MP4 video into Davinci Resolve?
The Canon EOS M100 records different resolution of MP4 video with H.264 compression codec, which is included in Davinci Resolve supported file formats. However, For those people who wish to do more effects editing with the EOS M100 MP4 video in Davinci Resolve, H.264 won't be good choice. The main reason is that H.264 is an 8-bit format, which means that you are potentially compromising your effects and, especially, color correction and compositing with gradients.
Best editing formats for Davinci Resolve with more effects editing
If you wish to get a high quality and high performance editing of Canon EOS MP4 video with Davinci Resovle, we highly recommended you to encode EOS M100 H.264 MP4 to another Davinci Resolve workable editing formats - Apple Prores. As a 10-bit container, Apple Prores can process a lot of more color data and make the color correction process easier.
Encode EOS M100 MP4 to Apple Prores codec
Here, a powerful and simple to use application called Pavtube Video Converter for Mac is highly recommended to you. The program supports batch conversion mode, so that you can load multiple video at one time into the application for conversion to save your precious time.
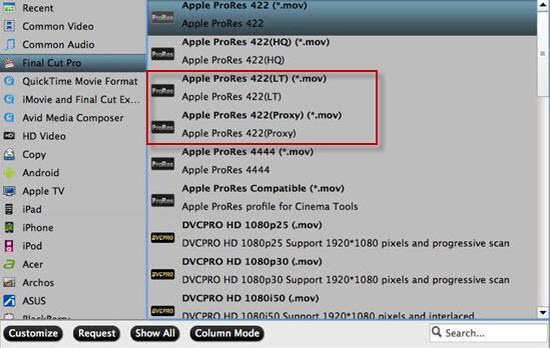
With the application, you can efficiently encode EOS M100 H.264 MP4 to Davinci Resolve best color correction editing format - Apple Prores codec with perfect quality and super fast encoding speed. The program can produce Apple Prores in various different types including "Apple Prores 422(*.mov)", "Apple Prores 422(HQ)(*.mov)", "Apple Prores Proxy)(*.mov)" and "Apple Prores (LT)(*.mov)", you can choose the suitable one by following the standards listed below:
If you computer is old or slow, or you just want to do some rough editing, you can select to output "Apple Prores Proxy)(*.mov)"or "Apple Prores (LT)(*.mov)"format to save more space and bandwidth. However, if your computer are powerful enough to handle multicam and high-resolution video and you are going to do many effects editing work with FCP X, you'd better choose to output "Apple Prores 422(*.mov)"or "Apple Prores 422(HQ)(*.mov)"for better performance.


Step by Step to Transcode Canon EOS M100 H.264 MP4 to Prores for Davinci Resolve
Step 1: Load Canon EOS M100 MP4 video.
Download the free trial version of the program. Launch it on your computer. Click "File" menu and select "Add Video/Audio" or click the "Add Video" button on the top tool bar to import Canon EOS M100 MP4 video files into the program.

Step 2: Define the output format.
Clicking the Format bar, from its drop-down list, choose Davinci Resolve best favorable Apple color correction editing codec - Apple Prores.
If you try to do more effects editing of the Canon EOS M100 MP4 with Davinci Resolve on powerful computer, it would be much ideal for you to choose "Apple Prores 422(*.mov)" or ""Apple Prores 422(HQ)(*.mov)"for high quality performance.

If you have a underpowered Mac computer, to get a smooth post editing workflow, it would be much ideal for you to choose"Apple Prores 422(Proxy)(*.mov)" or "Apple Prores 422(LT)(*.mov)" format.
Tips: Click "Settings" on the main interface to open "Profile Settings" window, here, you can flexibly adjust the output profile parameters including video codec, resolution, bit rate, frame rate, audio codec, bit rate, sample rate, channels, etc as you like to get better output video and audio quality.
Step 3: Edit Canon EOS M100 MP4 videos.
By default the Edit icon is grayed out. To activate the Edit menu, you have to select an item first. When a video or movie is selected, click the pencil like Edit icon on the left top tool bar to open the video editor window, here, you can play and preview the original video and output effects. Also you can flip or rotate video, trim, crop, add watermark, apply special effect, edit audio or insert external subtitle.

Step 4: Start the conversion process.
After all setting is over, go back to the main interface and hit right-bottom "Convert" button to start to convert Canon EOS M100 MP4 to Davinci Resolve most compatible Apple Prores editing formats encoding process.
When the conversion is completed, launch Davinci Resolve on your Mac computer to import converted video to Davinci Resolve for smooth post editing workflow.
Related Articles
Any Product-related questions?support@pavtube.com