Wednesday, April 25, 2018

Compress Video Smaller for Facebook Uploading

Thanks to Facebook social website, we can connect with our friends and the world closely. Over 4 billion video views happen to Facebook everyday. And users would like to tell rich stories with Facebook video, not only in the timeline, but also in business ads, and covers. During Facebook uploading process, you may meet some unknow factors that stop you uploading the videos to this social website. Nowadays, people prefer capturing videos with iPhone, GoPro, DJI drones, Sony/Panasonic/Canon camcoders you need to compress or convert footage to Facebook supported video format before uploading. This article makes it clear on Facebook video uopload specs and how to compress video smaller for Facebook without video quality loss.

Know Facebook Supported File Formats Well

When sharing video on Facebook, you may be recommended to use the MP4 and MOV format, in fact, you also can use the 3g2, 3gp, 3gpp, asf, avi, dat, divx, dv, f4v, flv, m2ts, m4v, mkv, mod, mov, mp4, mpe, mpeg, mpg, mts, nsv, ogm, ogv, qt, tod, ts, vob, wmv which are all supported by Facebbok, except the video format, Facebook limits the video parameters, like the video codec, video frame, video bitrate, audio channels, vudeo size, video length, etc. You must make sure your video is accepted by Facebook.

Video Profile Settings

Codec

The best format to upload to Facebook is H.264 video with AAC audio in MP4 or MOV format. It currently gives you a great bang for your buck in the file size to relative quality ratio, offering the best video compression available, and due to the file size limitations, this format is the optimal choice for Facebook video. And there's no need to change the parameter during Facebook uploading.

Resolution

Use a file with the larger edge of the video constrained to1280px. If your video is less than 1280px in size on the larger edge, try to keep your dimensions to multiples of 16px for best compression.

Frame Rate

Usually videos have the best quality if the frame rate is between 25-30 fps. So you are recommended to keep the frame rate of your video at or below30fps.

Aspect Ratio

The aspect ratio of the video must be within the range of9x16 to 16x9which most videos should have, and the video exceeding the file size or length that the upload page suggests will be rejected.

Bitrate

There is no recommendation for Bitrate as it highly rests upon codec. So you are suggested to optimize video for resolution, aspect ratio and frame rate rather than bitrate.

Audio Profile Settings
Codec MP3 is preferred
Samping Rate Use stereo audio with a sample rate of 44,100hz.
Channels The number of audio channels will be maintained for stereo and mono streams. 5.1-channel audio will be down-mixed to stereo. All other channel configurations are currently unsupported.

Other tips for Facebook video uploading

  1. Keep in mind that the maximum length for a video is 120 minutes and the maximum file size is 4.0 GB.
  2. Check that you're using the latest version of your browser.
  3. Uploading a video works best when you have a strong network connection.

Normally, many people would like to record their life via camcoders, and some recordings in a format that FaceBook doesn't support, or the video in high definition are too long or too large for Facebook and need to trim and compress. You need a video converter or video editor to help you reach that.

For Windows users, Pavtube Video Converter Ultimate is deserved to try. It is a video converter, as its name shown, but also a video editor with some simple and essential video editing functions. With it, you can easily transcode your life recordings, game play recordings to FaceBook playable video and audio format such as MP4, WebM, MOV, etc encoded with compatible video and audio codec. You can trim the recordings length to meet and FaceBook supported video length and size requirement. You also can compress videos by adjusting video resolution, bitrate to reduce the videos size.

To make your videos different, you also can add some subtitle to narrate the videos and add a text/image/video watermark to your videos. Aspect ratio is also supported to change in this video converter. If needed, you even can remove the audio in the video or replace audio from it. Now, download it and try to convert and compress your videos to Facebook supported one.

Quick Guide to Convert and Compress Videos to FaceBook

Step 1: Import video you want to upload to Facebook

Start the FaceBook video converter program on your computer, click "File" > "Load Video/Audio" or "Load from folder" button to import videos into the program. "Drag-and-Drop" and "Batch Conversion" features are also supported. If you loaded multiple clips, you also can merge the video into a single one file.

load video

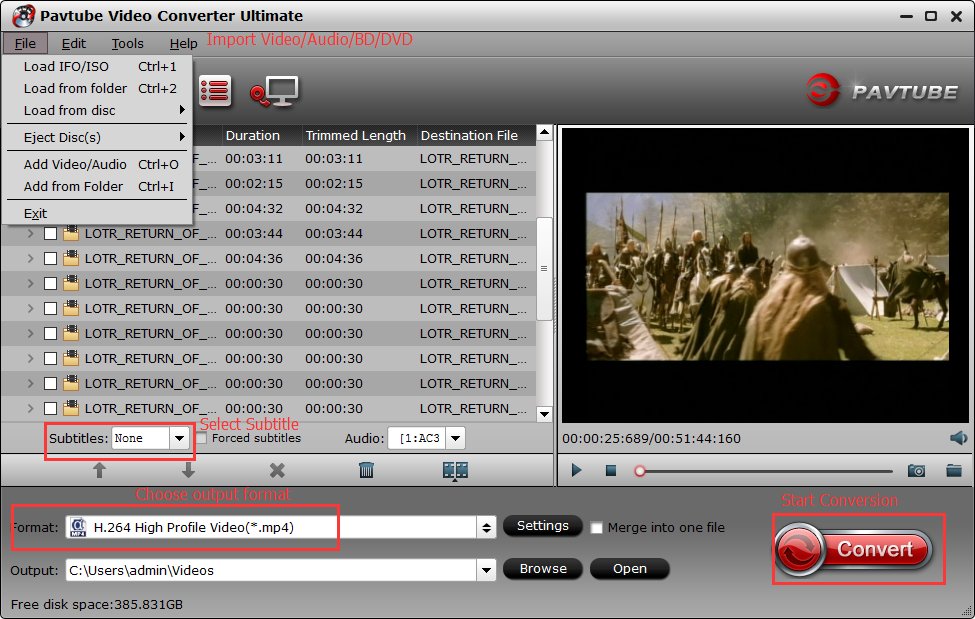
Step 2: Output FaceBook best uploading format

Click "Format" bar, from its drop-down options, choose FaceBook compatible uploading format from "Common VIdeo" > "H.264 High Profile Video(*.mp4)". You also can choose other FaceBook supported video formats such as HTML5 WebM.

Output facebook best uploading format

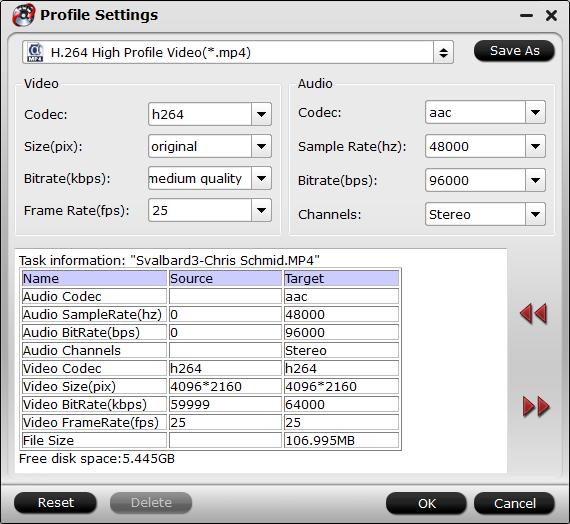
Step 3: Compress videos

Click "Settings" to open the "Profile Settings" window, here you can adjust the output video codec, resolution, bit rate, frame rate and audio codec, bit rate, sample rate and channels to let the videos more fit in FaceBook. To compress videos, the most effective way is to reduce the video bitrate. You can change the bitrate value to see the target video size in the below chart.

compress FB videos

Edit videos/recordings Before Export

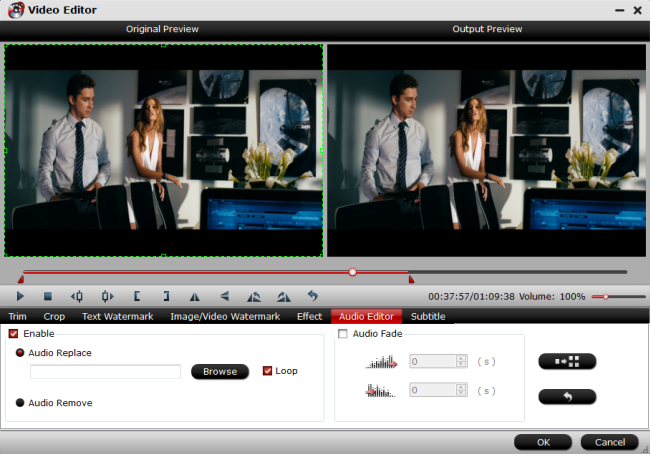
Trim videos/recordings: In “Video Editor” there are seven edit tabs: Trim, Crop, Text Watermark, Image/Video Watermark, Effect, Audio Editor and Subtitle.  The "Trim" feature allows users to decide where to start and where to end when converting the clips, so that unwanted segments will be cut out after conversion.

Crop videos/recordings: The "Crop" facility enables users to get rid of the black edges and unwanted area of the image.

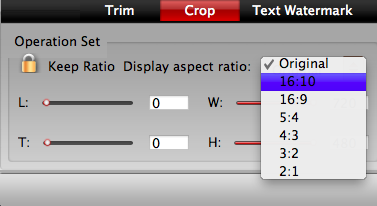
Keep original videos/recordings aspect ratio and cropped aspect ratio

To keep original aspect ratio, users need make sure the "Display aspect ratio” and the "Size (pix)" in "Settings" option are all set as "Original". If you want to keep the cropped aspect ratio, Pavtube software offers several aspect ratios for you to choose from, including 16:10, 16:9, 5:4, 4:3, 3:2, and 2:1.

crop videos

Add Watermark to Gameplay recordings: You can add text/video/image watermark to selected videos. You can either set parameters or drag the text on preview screen to set its location.

Audio Editor:You can either replace/remove original audio in the videos/recordings, or set audio fade in/out effects.

Subtitle: In this tab, you can add *.srt or *.ass/*.ssa subtitle-files to the videos/recording video as hard subtitles.

edit video for FB

Step 4: Start to Convert and Compress Videos for FaceBook

Clicking the Convert button on main interface, you can go to Conversion window to start to convert videos/recordings to FaceBook. After the conversion, you can click Open output folder to popup output directory with the converted files.

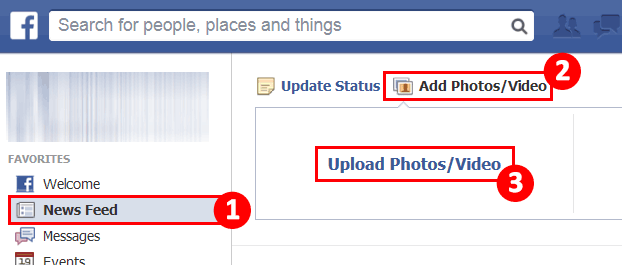
How to Upload video to FaceBook?

1. Choose Add Photo/Video in the Share box at the top of your Home page or Timeline.

2. Click Upload Photos/Video.

3. Select a video file from your computer.

4. Click Post.

video to facebook

Thursday, April 19, 2018

How to Use Nvidia GeForce Graphic Card to Encode H.265 with 30X Speed

More and more people prefer to encode media to H.265/HEVC codec, why? High Efficiency Video Coding (HEVC), or H.265, is a video compression standard designed to substantially improve coding efficiency when compared to its precedent, the Advanced Video Coding (AVC), or H.264. With an increasing growth of video streaming on the Internet over popular websites such as Netflix and YouTube, and with 4K cameras gaining new ground in the market, a considerable amount of storage and bandwidth is required. HEVC promises a 50% storage reduction as its algorithm uses efficient coding by encoding video at the lowest possible bit rate while maintaining a high image quality level. In the current market, more and more devices add support for playing HEVC videos, like iPhone X, Apple TV 4K and more.

You will find that H.265 codec encoding time is much longer than other codes especially when you are using a old dual-core desktop to do the encoding work. In the current market, there are dozens of video converter programs that support hardware acceleration techs for encoding HEVC, but few of them can really satisfy you. Fortunately, I will share the best one with you which allows you to speed up H.265 encoding speed to 30x. Can't wait? Here we go.

Nvidia Geforce Graphic Card that supports NVENC technology

To enable H.265 encoding with Nvidia NVENC GPU acceleration, your Nvidia Graphic card should support NVENC technology, following part has listed the specific Nvidia GeForce graphic cards with NVENC technology support:

Supported Nvidia GPU


Kepler

Maxwell

Pascal


GeForce GT 705 
GeForce GT 710 
GeForce GT 720 
GeForce GT 730 
GeForce GT 740 
GeForce GTX 760 
GeForce GTX 760 Ti 
GeForce GTX 770 
GeForce GTX 780 
GeForce GTX 780 Ti 
GeForce GTX Titan 
GeForce GTX Titan Z 
GeForce GT 640M LE 
GeForce GT 640M 
GeForce GT 645M 
GeForce GT 650M 
GeForce GTX 660M 
GeForce GTX 670MX 
GeForce GTX 675MX 
GeForce GTX 680M 
GeForce GTX 680MX 
GeForce GT 730M 
GeForce GT 735M 
GeForce GT 740M 
GeForce GT 745M 
GeForce GT 750M 
GeForce GT 755M 
GeForce GTX 760M 
GeForce GTX 765M 
GeForce GTX 770M 
GeForce GTX 780M 
GeForce 825M 
GeForce GTX 860M 
GeForce GTX 870M 
GeForce GTX 880M 
GeForce 920M

GeForce GTX 745 
GeForce GTX 750 
GeForce GTX 750 Ti 
GeForce GT 945A 
GeForce GTX 950 
GeForce GTX 960 
GeForce GTX 970 
GeForce GTX 980 
GeForce GTX 980 Ti 
GeForce GTX Titan X 
GeForce 830M 
GeForce 840M 
GeForce 845M 
GeForce GTX 850M 
GeForce GTX 860M 
GeForce 930M 
GeForce 940M 
GeForce GTX 950M 
GeForce GTX 960M 
GeForce GTX 965M 
GeForce GTX 970M 
GeForce GTX 980M 
GeForce GTX 980

GeForce GTX 1050 
GeForce GTX 1050 Ti 
GeForce GTX 1060 
GeForce GTX 1070 
GeForce GTX 1080 
Nvidia Titan X

Best tool for Encode H.265 on Nvidia GeForce Graphic Card

Pavtube Video Converter Ultimate | for Mac has perfect support for H.265 encoding acceleration on a PC that runs above listed Nvidia GeForce Graphic cards. With the program, you can comprehensively encode H.265 MP4/MKV codec from virtually any digital file formats and also commercial Blu-ray/DVD disc.

Other great features and functions of Pavtube Video Converter

- Encode virtually any digital file formats to H.265 MP4/MKV 
- Encode commercial Blu-ray/DVD disc to H.265 MP4/MKV 
- Adjust output H.265 profile parameters including video codec, resolution, bit rate, frame rate, audio codec, bit rate, sample rate and channels, etc. 
- Edit H.265 files by trimming, cropping, splitting, merging, adding watermark, applying special effect, change video brightness, contrast and saturation, deinterlacing video, etc. 
Decode H.265 to H.264 or other popular file formats, hot devices and programs preset profile formats.

How to Use Pavtube Video Converter Ultimate for fastest H.265 Encoding on Nvidia GeForce Graphic Cards?

Step 1: Import video or load Blu-ray/DVD disc into the program.

Start the program on your computer, click "File" > "Add Video/Audio" to import digital file formats into the program, for load Blu-ray or DVD disc, insert your DVD disc into your computer's optical drive and your Blu-ray disc into an external Blu-ray drive, click "File" > "Load from Disc" to load Blu-ray/DVD disc into the program.

load video/dvd/blu-ray

Step 2: Enable GPU Encode Acceleration.

Click "Tools" > "Options", in the opened "Options" window, click "Acceleration" menu, then check "Enable GPU Encode Acceleration" otpion so that the program will accelerate converion speed when encoding video/Blu-ray/DVD to H.265/HEVC codec.

Enable GPU Encode Acceleration

Step 3: Output H.265 MP4 or MKV format.

Click "Format" drop-down bar, scroll down to select "Common Video" > "H.265 Video(*.MP4)" as the output file format.

Output H.265 MP4 video

For outputting H.265 MKV format, select "HD Video" > "MKV HD Video(*.mp4)" to output, then hit "Settings" on the main interface to open "Profile Settings" window, under Video settings panel, click "Codec" drop-down selection, choose "H.265" as your final output file codec.

Output H.265 MKV

Step 4. Adjust output file parameters (Optional)

You are allowed to adjust video and audio parameters if you are not satisfied with the default settings. Presets like size, bitrate, frame rate, audio channels, etc. can be customized in your own way.

Adjust output profile parameters

Step 5: Begin the H.265/HECV codec encoding process.

After all settings is completed, hit right-bottom "Convert" button to begin the conversion from video/Blu-ray/DVD to H.265/HEVC encoding process. 
When the conversion is completed, you will get a perfect quality H.265/HEVC file with smaller file size for smoothly viewing and streaming on different devices.

Hot Saerch: How to Rip 4K Blu-ray to H.265 MKV Utilizing CUDA on Windows?

Friday, April 13, 2018

Get the Top UHD 4K Blu-ray Converter to Copy UHD Blu-ray Discs

Ultra HD 4K Blu-rays have the best picture quality possible for your 4K TV, even better than streaming 4K from Netflix or Amazon. Even better, many discs have high dynamic range (HDR) and wide color gamut (WCG) content, which provide a much more noticeable improvement than 4K resolution, provided your TV can deliver it.

What do you need to watch a UHD Blu-ray

Sadly, Ultra HD discs won't play on a normal Blu-ray player, though you can play older Blu-ray discs on an Ultra HD player. In order to get a true 4K experience, remember that you'll need an Ultra HD Blu-ray player, an Ultra HD TV and some discs, obviously. There are a few important caveats, though.

First, you'll need to make sure your TV supports at least the HDMI 2.0 standard. Most TVs from the last year or so will, but very cheap models and some models from 2014 or earlier might not. Check your manual or Google the model number to find out - the even newer HDMI 2.1 standard should also be fine.

If you don't have a 4K TV, your 4K Blu-ray player will still work, but it will only display images in 1080p. Buy a regular Blu-ray instead of a 4K version and it will still play in 3840 X 2160 resolution, but it won't be a native 4K image and will be noticeably different than had you used an Ultra HD Blu-ray.

There's no denying Ultra HD Blu-ray and 4K TVs are luxuries, but they're luxuries worth having. And if you want the absolute best possible picture from your 4K TV, Ultra HD Blu-ray is where you'll find it.

"But I hate physical discs," you say. I hear you. But for people who want peak image quality, a disc is still one way to go. What if you have no 4K Blu-ray Player or have no plan to buy one? The other way is to use a Blu-ray ripping tool to rip/convert 4K UHD Blu-ray to digital files for streaming to 4K TV without needing a 4K Blu-ray player.

Best UHD 4K Blu-ray Ripper - Pavtube ByteCopy

In fact, there are many Blu-ray ripping tools on the market that can deal with common Blu-ray discs. However, when it comes to dealing with 4K Blu-ray discs, many Blu-ray rippers fail to rip it cause a 4K Blu-ray has higher and stricter encyption and normal Blu-ray decrypter cannot bypass all the copyright protection. But you are lucky today, I will highly recommend you Pavtube ByteCopy (available for Windows and Mac users) which can rip, convert, and copy 4k Blu-ray discs seamlessly and losslessly.

The UHD 4K Blu-ray Ripper Output Options

  • Directly Copy UHD 4K Blu-ray Disc
    A 4K Blu-ray disc will be 50GB - 100GB. Full copy 4K Blu-ray disc to hard drive will take too much space. Pavtube ByteCopy can directly extract main title of the 4K Blu-ray without preserving other extras. Besides, you can also use the UHD Blu-ray Ripper to entire copy the 4K Blu-ray disc to a folder devided into BDMV folder and CERTIFICATE folder, making an exact copy, indistinguishable from the original. This way can contain the reviews, ads, subtitles, extras and other everything in the 4K Blu-ray disc, no any loss.
  • Lossless Copy 4K Blu-ray to Popular Video Formats
    Enables you to rip and convert 4K Blu-ray discs to popular video formats like MP4, MOV, M4V, AVI, MKV, MKV, FLV, M3U8, etc for playback on iDevice, Android devices, game console, PC, Mac, and editing software. Apart from as a 4K Blu-ray converter, it even can create 3D SBS/TB/Anaglyph MP4, 3D MKV, 3D WMV for Daydream View, PS VRGear VR, VR Box 2.0, Oculus Rift CV1, Oculus Rift DK2, HTC Vive, etc. What's more, Pavtube ByteCopy can rip 4K Blu-ray to HEVC MKV, H.265 MP4 keeping 4K resolution.
  • Keep Multiple Audio/Subtitle tracks
    Normally, Blu-ray contains DTS, AAC, Linear PCM (LPCM), Dolby Digital (DD), Dolby Digital Plus (DD+), Dolby TrueHD, DTS Digital Surround, DTS-HD High Resolution Audio, DTS-HD Master Audio. The best 4K Blu-ray Ripper can allow you to rip 4K Blu-ray keeping DTS-HD Master Audio, DTS Digital Surround, etc audio.
  • Customize 4K Blu-ray Movie Parameters
    Allows you to adjust video parameters like video audio codec, frame rate, bit rate, resolution, sample rate, channels according to your needs. This feature-rich software also work as a proferssional video editor. With it, you can trim BD movies length, add external subtitles to it, replace or mute audio, and more.

Quick Guide to Convert UHD Blu-ray Movies

Step 1. Load UHD BD with this program

Install the best UHD Blu-ray ripper on PC. then open it, click the "Load from Disc" icon to import the UHD Blu-ray Disc. You also can load the BDMV folder by choosing the "Load from folder" from the dropdown list of "File", of course, you also can choose to load the ISO images too.

load Blu-ray

Step 2. Choose output format according to your own needs

Click "Format" bar, you will see hundreds of video formats here. You can navigate to "HD Video" and select "H.264 HD Video(*.mp4)". Or you can choose other formats as you like.

set output formats

Tips: For those people who want to preserve multiple video/audio tracks you can navigate to "Multi-track Video" > "Lossless/encoded Multi-track MKV(*.mkv)" for output. You can get lossless audio streams without transcoding. At the video setting windows, you also can choose the chapters, audio tracks, and subtitles.

Output lossless multi-track MKV format with 7.1 audio

Click the Setting button and adjust the video. Here you can rip Blu-ray with Dolby 5.1/7.1 tracks, open "Multi-task Settings" window, click "Audio" tab, check "Encode" to get encoded MKV files with Dolby Digital 5.1/7.1 audio saved. In this way, you also can rip Blu-ray with original DTS-HD Master audio track.

Step 3. Adjust video parameters

If you have defined the output format, then click the "Settings", here you can adjust vdieo parameters like: video/audio codecs, bitrates, frame rates, channels, etc.

Image result for pavtube video converter settings h.264 hd mp4

Step 4. Start the UHD Blu-ray conversion

After all settings are done. Return back to main interface, and click convert, it will begin to copy your UHD Blu-ray movies. Wait for a while, when it is over, click Open, and it will pop up a folder with generated files. Now you can transfer the covnerted movies to your target devices for watching on the go.

Saturday, April 7, 2018

How to Attach External Subtitle File into a MKV File with Ease

When you have downloaded a MKV video from the internet but you found that there is no subtitle track in the movie during the playback, how to do now? As we all know, subtitle plays an important role in the movie, especially when the movie in a foreign language. Subtitles help us to know the movie better, so to solve the question in the first sentence, an easy way is to attaching subtitles to MKV files with a right tool you are available to get and use. This article will share the best tool for you, with Top 10 subtitle download sites for your movies & TV series.

Part 1. How to add SRT/ASS/SSA Subtitles to MKV Video with Pavtube Video Converter Ultimate

Though there are tons of subtitle to MKV software on the internet, many of them work slowly and output quality is not so satsiafactory. Well, Pavtube Video Converter Ultimate (available for both Windows and Mac users) always stands out from its competitors and will meet all your needs. It allow you to import 3D Blu-ray movies, 2D Blu-ray movies, Blu-ray Folder, Blu-ray ISO Image File, DVD movies, DVD Folder, DVD IFO File, DVD ISO Image File, H.264, MP4, MOV, MKV, VOB, WMV, MPG, Tivo, AVI, Divx, M4V, QT, M4A, WMA, WAV, MP3 ect as you like and output any video format you want. Furthermore, you also can output optimised device presets like Apple devices, Android devices, Windows devices, Game consoles and media players with the best standard settings, and you don't need to worry about A/V parameters anymore.

Best of all, it allows you to attach downloaded SRT/ASS/SSA subtitles to MKV, MP4, BD, DVD, MOV etc with just three steps. Below, we will show you the steps of adding subtitles to MKV file.

Step 1. Load MKV videos

To import your videos to the program, please go to the main menu and then choose "Add video" icon. Alternatively you can drag and drop the media into the converter.

LOAD MKV

Step 2. Add subtitles to your movie

Note: Before adding subtitles to your MKV, you have to define the output video format you want. Click Settings, you will enter a list with hundreds video formats, you can choose to keep the MKV as final generated file formats, or change it to MOV, MP4, AVI and others according to your needs.

video formats

Then click the "Edit" icon on the main interface to open "Video Editor" window, under the "Subtitle" panel, check "Enable", then browse your local drive to import the "SRT/ASS/SSA" subtitles that you want to add to movies.

how to add srt ass ssa subtitles to mp4 video

Kindly note:  The subtitles that you add your movies with our application is hard subtitles, which means the subtitles will be printed on the movies permanently.

Step 3. Start inserting subtitles to MKV file

Go back to the main UI and click "Convert" to start inserting SRT/ASS/SSA subtitles to your movies.When the conversion is over, click "Open output folder" to locate and find the generated files, then will be able to watch movies and TV series with subtitles easily either on your computer or portable devices.

Part 2. Top 10 Subtitle Download Sites for You

A great subtitle download site should not only be rich in resources but also be safe and flexible. Make sure you are not downloading any malware or getting any virus to harm your computer when you just simply want to download subtitles.

Subtitle Download Sites Descriptions
Moviesubtitles.org

The largest collection of subtitles for movies, here you can find subtitles for the most popular movies and TV series. Moviesubtitles.org offers multiple-language subtitles, and all subtitles here are packed with WinZip, you must unpack to use it. 

Subscene Subscene.com is the most widely used subtitle download site among the others, this Indonesia based subtitle download site offers the richest resource in Indonesian, and Arabian. No matter you want to watch South Korean soap opera or American Hollywood movies, and it got a great deal of loyal users and contributors.
Open Subtitles Subtitles free download for DivX movies, search in many languages from a multi-language website. Thousands of translated subtitles for XviD movies and TV series. You can download tonnes of DivX subtitles from the biggest Open Subtitles database.
DivX Titles DivxTitles.com is a place where you will find every single DVD or DivX subtitle you are looking for. There are 135218 DVD and DivX subtitles in their database so its unlikely you will not be able to find subtitle for your movie or TV show.
DivX Subtitles DivXSubtitles is well detailed with crucial information on all the latest movie subtitles in the market. There is the date of release, title of the movie, language used and its uploader, which makes it easy to choose the best subtitles to download.
Subtitles Box Subtitles Box uses divx subtitles for your favorite movies, free subtitles downloads, movie & subtitles news and gossip, actors and celebrities profiles update, hot new stories about movies and movie stars, a divx subtitles calendar with all the hot dates in movie industry this year.
My Subtitles In My Subtitles, you can download all the Subtitles of the DivX Movie Database hosted by MySubtitles.com. You can also upload subtitles by registering in My Subtitles. You can download all the latest subtitles for free.
All Subs All Subs contain all the subtitles in all the famous languages. You can download subtitles of all the DivX movies.
TVsubtitles.net TVsubtitles.net is famous for its diversity of TV program subtitles, on this subtitle download site you are free to find and download subtitles of TV shows, Talk shows, Netflix TV Series, Hollywood movies, etc.
SubtitleSource This site supports three main formats namely XviD, DivX and x264. They are all well suited for TV series and movies so make sure your searches are precise in relation to quality and language.