Summary: When you open an FLV file the player may give you a warning message saying that it doesn't recognize the file extension. This article will help you get out of that issue.As soon as one tries to play a FLV file with the help of Windows Media Player, a message will appear saying that the file can't be opened because the extension is invalid. Properly configured codecs needs to be installed to play FLV files using Windows Media Player. The formats supported by windows are .asf, .wmx, .au, .snd, .mov, .m4a, .dvr-ms, .asx, .m4v, .mp4, .wpl, .mpg, .miv, .mpa, .mp2, .mpeg, .3g2, .adts, .adt, .3gp2, .aiff, .wms, .3gp, .mp3, .m3u, .mid, .midi, .mpv2, .cda, .rmi, .wav, .wax, .aif, .wmv, .ivf, .3gpp, .wm, .mpc, .aifi, .aac, .wvx, .wma, .wm2, .m2ts, .mp4v, .avi and .wmd. Play FLV after Installing FLV codecs for Windows Media PlayerWMP uses codecs to play media files. Codecs of many formats are inbuilt in WMP to open files of that format. Yet the codec of FLV needs to be downloaded by the user to run FLV files on WMP. After successfully installing the codec, you will be able to run files with .flv extension in your WMP.If one is unable to view their files on Window Media Player because the file has .flv extension, then Pavtube Video Converter can be used to convert the videos in the format supported by the Window Media Player. In fact, this program can be used to complete conversion between various formats, including FLV, AVI, ASF, MOV, M4V, WMV, MKV, Xvid, MP4, and so on.
 Step-by-step guide to convert FLV to Windows Media Player supported formatsStep 1. Install iSkysoft Video Converter and put FLV files on the converterImport the FLV files to the video converter. You can do that in two ways:a) You can drag and drop the file directly in the application.b) You can click the "Add Files" button to browse, select and load the file in the application.windows media player flv codec
 Step 2. Choose the output formatVisit the bottom of the application and then select WMV as the output format. All the videos converted at the same time will be converted in the same output format.
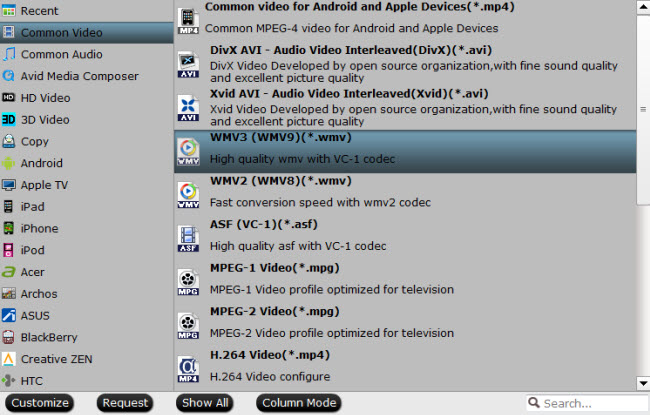 Step 3. Push convertYou just need to press the "Convert" button now. The video will be converted within seconds.Read More:
Summary: This article will show you easiest way to convert MKV on PS3 with it’s compatible formats, it aim to help you play all kinds of MKV on PS3.Can PS3 Play MKV Files Successfully?MKV is famous as an open standard free container format which can hold an unlimited number of video, audio, picture, or subtitle tracks in one file. It is intended to serve as a universal format for storing common multimedia content, like movies or TV shows. Although MKV is one of the most popular formats, it is still impossible to play MKV on PS3. To successfully play MKV on PS3, a widely used solution without limit is to convert MKV to PS3 compatible formats, no matter you are Windows user or Mac user.An MKV to PS3 Converter is needed to convert MKV to PS3 recognized formats. Here, I strongly recommend Pavtube Video Converter / Mac Version to you. Pavtube Video Converter is designed for PS3 owners. With it, playing MKV on PS3 just as easy as pie, even the source MKV file contains several video, audio or subtitle tracks.Besides acting as MKV to PS3 Converter, Pavtube Video Converter also supports to convert almost all video formats like MOV, 3GP, OGV, MXF, WebM, FLV, WTV, ASF, MP4, AVI, WMV, and DivX, etc to PS3 popular formats. In this way, you can play various of movie or video files on PS3 easily and fast.Furthermore, Pavtube Video Converter Converter has a powerful feature of transforming nearly all audio files like MP3, WAV, AC3, FLAC, AU, AIFF, CAF, 3GA, AAC, and DTS etc to play them on PS3.
  How to Convert MKV to PS3 for Playback?Here is the step by step guide to convert MKV to PS3 with Pavtube Video Converter.Step 1 Load MKV to Pavtube Video ConverterSimply drag and drop MKV to the main interface of Pavtube Video Converter and the file will show immediately.Step 2 Set PS3 supported formatsGo the format list to choose MP4 which is the most widely used format as the output by clicking the format bar to follow “HD Video” > “MPEG-4 HD Video (*.mp4).”
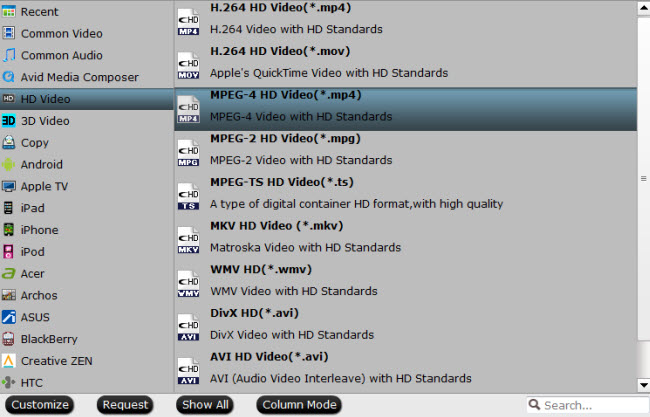 Step 3 Start converting MKV to PS3Click the big "Convert" button of Faasoft MKV to PS3 Converter to start MKV to PS3 conversion.Read More:
Summary: The article will give you the best solution about Sony ActionCam XAVC S to Adobe Premiere Pro CC/CS6-edit XAVC S in Adobe Premiere Pro CC/CS6 in an effective way.The Action Cam Mini from Sony is designed for capturing POV footage of adventures of all kinds. It features 1080p60 recording in the lower-compression XAVC S format at 50 Mbps. Well, for Sony AZ1 users, here comes the XAVC S to Adobe Premiere Pro incompatibility issues. Have you got XAVC S files from Sony ActionCam, and found that it is unable to import the XAVC S to Adobe Premiere Pro? Is it a Sony problem or more a problem of amateurs not understanding how to make it work? However, when we import the XAVC S videos from Sony ActionCam to Adobe Premiere Pro for editing, the result let us down- the XAVC S footage especially in 4K are not recognized by Adobe Premiere. So what’s the available workflow for Sony ActionCam XAVC S and Premiere Pro?To edit Sony ActionCam XAVC S in Premiere Pro CC/CS6/CS5 fearlessly, you need to transcode XAVC S to Adobe Premiere Pro more “edit” friendly codec for like MPEG-2. And based on multiple testing, Pavtube Video Converter /Mac Version is the solid tool to help users convert XAVC S to MPEG-2, which ensures the best results when using in Adobe Premiere Pro.Hot Search: MXF files with Premiere | H.265 in Premiere | AVCHD in Premiere Key Features of Pavtube Video Converter
- Three simple clicks to convert ActionCam XAVC S videos to Adobe Premiere Pro compatible formats, such as AVCHD, H.264, DV, QuickTime MOV, etc.
- Aside from Adobe Premiere Pro, you can directly convert ActionCam XAVC S to iMovie, QuickTime, Windows Movie Maker and more video editors supported formats without additional settings.
- Edit your ActionCam XAVC S videos before converting them. With the built-in editor, you can trim or crop your videos. And you are able to add subtitles and watermarks to the videos as well.
- Perfectly compatible with Mac OS X 10.11 El Capitan, 10.10 Yosemite, 10.9 Mavericks, 10.8 Mountain Lion, 10.7 Lion and 10.6 Snow Leopard; Windows 10, Windows8, Windows 7, Windows XP .
How to convert ActionCam XAVC S to Adobe Premiere Pro?Step 1. Download, install and run the XAVC S to Premiere Pro Converter; click “Add Videos” icon to load your source XAVC S videos from Sony ActionCam. Step 2. Click “Format” pull down list to select Adobe Premiere/Sony Vegas> MPEG-2(*.mpg) as the best video format for Premiere Pro. WMV, MOV formats are the good choice as well.
 Tips:In case the default settings do not fit your requirement, you can click “Settings” button and enter “Profile Settings” panel to adjust video size, bit rate, frame rate, sample rate and audio channels.Step 3. Hit the convert button, it will start converting Sony ActionCam XAVC S to Premiere Pro immediately. Soon after the conversion, just click “Open” button to get the generated files for natively editing in Premiere Pro CC/CS6/CS5 perfectly.Read More:
Summary: Anyone looking to stream video to Chromecast for playing, Here's a great solution for you!Chromecast can easily help us to play online video and music on TV or HDTV by directly streaming the media from Netflix, YouTube, Hulu Plus, Google Play Movies and Music, and Chrome. But at the same time many of us have been asking how to enable Chromecast play local video files. Step 1 Install Google Chrome Cast ExtensionInstall the Google Cast extension for your Chrome Browser:Ensure you're using the latest version of Chrome by navigating to Settings > About Google Chrome and update your Chrome browser to the latest version.Download the Google Cast Extension.Once installed, you should see the Cast button in the upper right hand side of your Chrome browser.Please note: You do not need to re-install the Google Chromecast app if your device is already set up. You only need to download the Google Chrome Cast Extension.Step 2 Cast Local Media to Chromecast for Play on TVOpen chrome or a new tab, and then connect your chrome browser to ChromecastDrag and drop the video/audio file you want to play into the Chrome browser or copy the media file local path to chrome URL boxClick the browser extension and select "Cast this tab", the local video or audio files will be streamed to TV directly for easy playback.How to stream Charomacast unsupported local video files like MKV, AVI, MP4, Apple ProRes, MOV, FLV, VOB, DAV, MPG, MXF, AVCHD, WTV, WMV, ASF, RMVB from Windows or Mac to Chromecast? To do the task, a professional video tool--Pavtube HD Video Converter / Mac Version is highly recommended here. Key Features of Pavtube HD Video Converter
- convert all kinds of video and audio files to Chromecast supported format to stream local media files to Chromecast for easy playback.
- Acting as the Chromecast Video Converter, Pavtube HD Video Converter can convert a variety of video formats including MP4, MKV, MOV, M4V, MPG, MXF, MTS, M2TS, M2T, MVI, MOD, TOD, ASF, AVI, Apple ProRes, FLV, VOB, RMVB, RM, R3D, WMV, WTV, DVR, DV, SWF, TS, and etc to Chromecast supported video format.
- Edit your .tivo videos with built-in video editor before converting them.
- Fully compatible with Mac OS X 10.6 or later, including the latest 10.11 El Capitan. Windows XP or later, including Windows 10.
Step-by-step guide on how to stream Charomacast unsupported local videoStep 1. Click "Add File" button to import the video or audio files which you like to stream from computer to Chromecast for easy playback on Chromecast-enabled TV or HDTV.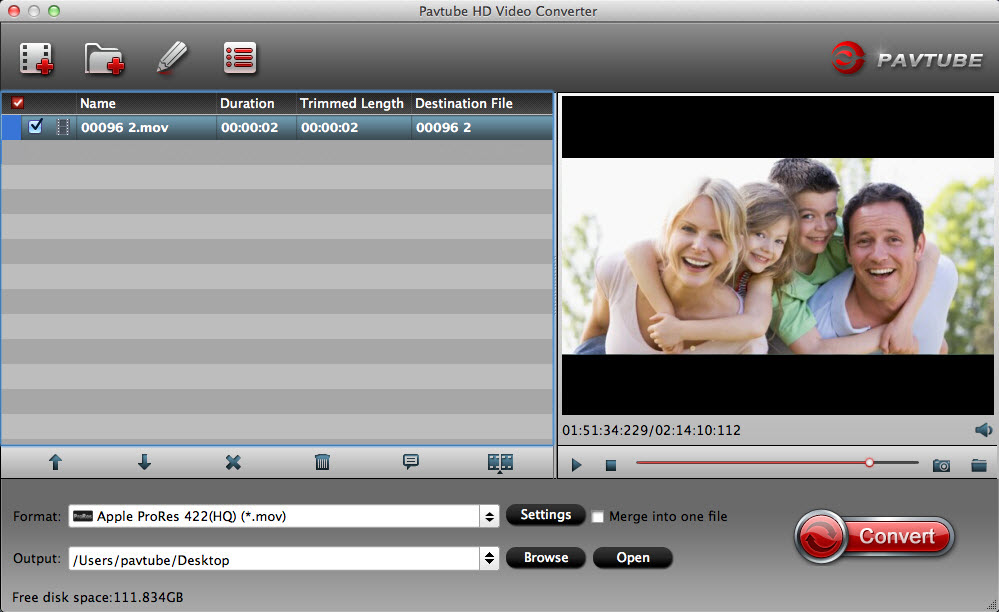 Or directly drag and drop the media files or the folder where you media files are to main window of the Chromecast Converter.Step 2. Click the "Profile" drop-down button to select Chromecast compatible video MP4 or WebM from the "Web Video"
 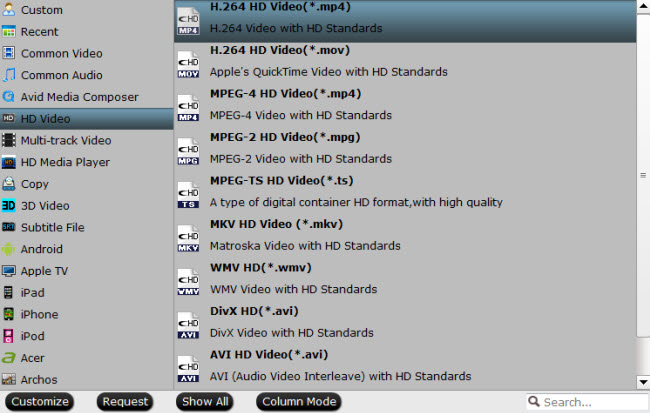 Step 3. Click the "Convert" button to start and finish converting the video files to Chromecast supported media format.Read More:
- FCP projects to MKV, MP4, WMV, AVI, MOV, MPG, etc
- Watch MKV/MOV/AVI Movies on HTC One M9
- Play MKV/AVI/VOB/TiVo on Hudl 3/2/1
- Play MKV/VOB/Tivo/FLV/WMV/MPG/AVI on Asus ZenPad S 8.0
- Play MKV, VOB, AVI, FLV, Tivo Files on Galaxy Tab 4
Summary: Follow this guide to easy import video MOV, MP4, MKV, AVI, WMV, FLV, MPEG, MP4, Canon/Nikon MOV to GoPro Studio in Win/Mac.About GoPro StudioGoPro Studio is available for Windows® and Mac® via free at the GoPro Studio Product Page. If you are the GoPro Hero series user, you may be very familiar with the GoPro Studio, for the Canon, Nikon users, the GoPro Studio is also the ideal editor software for them. Here I would like to show some more details on GoPro Studio, for the Canon, Nikon users, for whom interested in GoPro Studio.GoPro Studio software makes it easier than ever to create professional-quality videos with your GoPro content. It would take taken your most popular videos and turned them into GoPro Edit Templates that help fast-track you to an incredible edit. The music, edit points, slow motion effects and more have been dialed—all you have to do is replace our video clips with yours. Or if you want to create your edits from scratch, you can do that too. Trim and mix clips. Adjust video playback speed for fast or slow motion. Add titles, music, audio tracks and more. It’s never been easier to make epic GoPro-style videos to share with your friends. Limitation of importing video into GoPro StudioAlthough the GoPro Studio software is powerful enough, part of the users still have the importing issues on it. According to the GoPro official website we know that it have the strict limit for importing. As it shows in the below:
- Make sure that you are not trying to import the footage directly from an SD card. First copy the files to a folder on your computer.
- Make sure that you have the latest version of Quicktime installed.
- Next, make sure that there are no non-English characters in the name of the the file being imported, or the folder path where the file is saved.
- Do not rename the file(s) prior to importing into GoPro Studio.
- Make sure that you are trying to import the file into the correct "Room". GoPro Studio will not allow you to import the wrong file type into the wrong Room.
All files, including MP4 files generated by GoPro cameras, should only be imported into the Step 1: Import Room.
Files which have already been converted into GoPro Cineform AVI or MOV files, should only be imported into the Step 2: Edit Room.
- If you have confirmed that you are trying to import your files into the correct room, try playing the files with QuickTime Player or Windows Media Player to confirm that the files are not damaged.
- If your MP4 files still don’t import into the Step 1: IMPORT Room, make sure that they were not processed through some other application or import method, like iPhoto or iMovie. Files processed through iPhoto or iMovie are modified by those applications to the point where GoPro Studio doesn’t recognize them as GoPro camera footage. In this case copy the files directly from the SD card to your computer and then import into GoPro Studio.
- If your files are stored on an external drive, try copying your files to an internal drive and then import into Studio.
- Try creating a new project and then import.
How to edit any video form any camera in GoPro StudioAs we all know that the video recorded by GoPro, Canon and Nikon camera are storage in the SD card, and the GoPro Studio is not supported import the footage directly from an SD card. From the GoPro official site it clams supports GoPro, Canon, Nikon and other constant frame rate H.264 mp4 and .mov formats, how about the records in other codec, such as MXF, AVCHD, MOV, MKV, WMV, FLV, MP4? As the powerful the GoPro Studio is, you have satisfied with the GoPro Studio, you would like to edit all your camera video clips in GoPro Studio, now you just want to search for a professional video tool can help you import all the video you have recorded or the video you have get into GoPro Studio.Here you come to the right place, a professional video tools are recommended for you. Pavtube Video Converter for Mac(read the review), it can convert the video from any camera, or the other GoPro Studio unsupported video into it best supported AVI or MOV files. In face, Pavtube Video Converter can convert almost all video and audio formats from one to another, including MOV, MP4, M4V, AVI, WMV, MKV, MPG, TiVo, MTS, M2TS, MXF, RM, RMVB, FLV, etc. With this Video Converter software, you can also enjoy your favorite video on almost all popular portable devices anywhere and anytime, like iPad, iPhone, iPod, Apple TV, Galaxy Tab, Samsung Galaxy S4, Kindle Fire, and more.Hot Search: Mix MXF to Multi-track MOV | H.265 to QuickTime MOV | AVCHD/MTS/M2TS/M2T/TS to QuickTime MOVIf you are a 100 percent windows user, please turn to Pavtube Video Converter, it has the same powerful ability as Mac version. In the rest of the article I will show you the step by step guide of how to solve video cannot imported into GoPro Studio, in other word, the simple toturial will be showed. Just choose the right version and start your non-issue importing and editing with GoPro Studio.  How to convert any video to QuickTime MOV for GoPro Studio on Mac?Step 1. Transfer files from camera to Mac computer.As we mentioned above, GoPro Studio are not supported directly imported from SD card. You should plug in your camera to the computer with the memory card inside via the USB cable, turn on the camera, then you can find your files, copy and parse them on your Mac hard drive.Step 2: Input MOV, MKV, WMV, FLV, MP4 files.From "File" drop-down menu, select "Add Video/Audio" to import files to the software for conversion.Step 3: Specify output file format.Click "Format" bar, from its drop-down selection, define "MOV - QuickTime (*.mov)" as the output profile format.
 Step 4: Transcode files to QuickTime MOV format.Carry out video to QuickTime Conversion process by clicking the right-bottom "Convert" button.When the conversion is over, click "Open" on the main interface to locate the converted files to transfer and import into the GoPro Studio without any problem.Read More:
Summary: We will be distinguish the 1080p and 1080i in this article in the aspect of resolution, frames, fields, frequencies. And then give the solution on how to edit both 1080p and 1080i video in FCP X/7/6.Q: I have seen many times resolution of 1080p and I know that mean 1080 pixels but sometime I also seen option on the HDTV is 1080i. So I want to know the exact difference between them and is 1080i video quality available for the laptop too?
I have Googled 1080i some times rather than 1080p. Is there any difference between them? Or they represent the same?The question is specifically: What is the difference between 1080p and 1080i? so I will start by outlining the main similarities and differences, I’ll add some tips on how to choose the best format and then I will proceed to explain the problems that I found here.ResolutionBoth 1080p and 1080i have 1080 horizontal lines of vertical resolution which with a widescreen aspect ratio of 16:9 results in a resolution of 1920 × 1080 pixels (2.1 megapixels). It is not true that 1080i has a lower vertical resolution than 1080p.Frames vs. Fields1080p is a frame-based or progressive-scan video where you are dealing with frames. You have frame rate and it is expressed in frames per second.1080i is a field-based or interlaced or interleaved video where you are dealing with fields. You have field rate and it is expressed in fields per second.A field contains half of the lines of the frame, either even lines or odd lines, and if one field is composed of even lines, then the next one will be composed of odd lines and so on.Frequencies1080p has a frame rate of 25 frames per second for TV in PAL countries, 30/1.001 frames per second for TV in NTSC countries and 24 frames per second for cinematography.1080i has a field rate of 50 fields per second for TV in PAL countries and 60/1.001 fields per second in NTSC countries.How to edit both 1080p and 1080i video in FCP X/7/6 smoothly?For whatever video resolution, frames, fields, frequencies, we got the ultimate usage is make it more vivid or more moving for playback. We always want to add some video effects in the video, though FCP, Avid, Premiere or other NLEs you familiar with. Any editor have it’s natively format for editing, such as Apple Prores for FCP, MEEG-2 for Premiere, DNxHD for Avid. Here we choose FCP as example. Hot Search: XAVC S to Avid | QuickTime Files to Avid | Avid DNxHD MXF to FCP XIn order to edit 1080p and 1080i video in Fcp smoothly. First you should check out the format your 1080p or 1080i video is. In generally speaking the video may not codec in Apple Prores, you should convert the video format into Apple ProRes for FCP. Second, the video resolution, frames, fields, frequencies of 1080i are not suitable for editing in FCP. You’d better change it into 1080p and make it editable. Here we recommend you a professional video tool for you--Pavtube HD Video Converter for Mac(read the review). With it you can change the 1080p or 1080i video into Apple ProRes codec and make it can be edited in FCP smoothly. What's more, the program also boasts with some beneficial functions to enhance you video viewing experience on portable devices. For example, you can trim the video to cut unwanted clips from the video, adjust the output video aspect ratio to make it suitable for your output device, add external subtitles to YouTube movies to understand it better. Other Download:
Step 1: Import 1080p or 1080i video to the program.Click "Files" menu, from its drop-down option, select "Add Video/Audio" to load source 1080p or 1080i videos to the program. Step 2: Choose output format.Click "Format" bar, from its drop-down options, move your mouse to "Final Cut Pro > Apple ProRes 422 (*.mov)" to select it as the output file format.
 Step 3: Customize output ProRes parameters.Open "Profile Settings" window to adjust the output video codec, size, bit rate, frame rate, audio codec, sample rate, bit rate and channels.
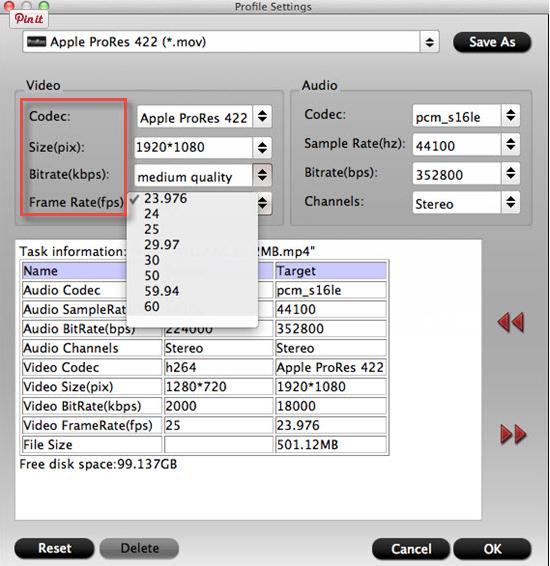 Step 4: Convert 1080p or 1080i video to FCP X/7/6.Hit the convert button under the preview windows, the program will start 1080p or 1080i video to Apple ProRes MOV conversion for Final Cut Pro X/7/6.When the conversion is completed, run FCP and import the ProRes codec footage for post production workflow.Read More:
Summary: Can Final Cut Pro X/7/6 edit DJI Phantom 4K mp4 files? Why my Final Cut Pro X/7/6 won’t play DJI Phantom 4k MOV files ? What should I do in order to open and play DJI 4k mov files in Final Cut Pro X/7/6? In this article, we will teach you how to convert DJI Phantom 3 4K MOV footage to Final Cut Pro X/7/6 for smooth editing.The DJI Phantom 3 is a well-built, ready-to-fly quadcopter that captures excellent 4K-resolution video. you're shooting 4K videos and capturing 12 megapixel photos that look crisper and cleaner. However, things would be a little more complicated when you work with the DJI Phantom 3 4K in Final Cut Pro X/7/6. Final Cut Pro X/7/6 does not recognize MOV files from DJI Phantom. The file type is a compressed output format; not ideal for editing in NLE system. Something else, Final Cut Pro X/7/6 lacks support for 4K video. To solve those problems, the quick workaround is to transcode Phantom 3 4K MOV files to Final Cut Pro X/7/6 natively supported formats (Apple PreRes 422 *.mov are highly recommended) in proper settings.That's where Pavtube Video Converter comes in: It supports converting DJI Inspire 3 4k MOV files to Final Cut Pro X/7/6 highly compatible Apple PreRes 422 *.mov without quality loss. Besides, it also supports the decent outputs for Avid MC, Adobe Premier Pro, Sony Vegas, Pinnacle Studio and more to meet different of needs. Just download it and follow the step-by-step guide to transcode DJI Inspire 4k MOV files for editing in Window Movie Maker smoothly. Other Download:- Pavtube old official address: http://www.pavtube.com/video_converter/- Amazon Download: http://download.cnet.com/Pavtube-Video-Converter/3000-2194_4-75734821.html- Cnet Download: http://download.cnet.com/Pavtube-Video-Converter/3000-2194_4-75734821.htmlSimple Guide : Convert and Import DJI Phantom 3 4K to FCP X/7/XStep 1. Install the Mac 4K Converter program and run it. Drag the 4K .mov files to the software. Or you can also click "Add" button on the top of the main interface to import video to the program.Step 2. Choose ProRes as output formatClick the "Format" bar and select Final Cut Pro> Apple PreRes 422(*.mov) as output format.3. Adjust video, audio settingsClick the "Settings" button and customize proper video/audio parameters including Video size, bitrate and fame rate and mroe. Usually 1920*1080 video size and 30fps video frame rate are recommended for FCP editing. Well, if you prefer to work with 4K video, you can adjust video size to get 4K ProRes for FCP.
 4. Start conversionAfter all necessary settings, hit the convert button to start the DJI Phantom 3 4K video to ProRes conversion on Mac OS X. Once the conversion process shows in 100%, click Open to get the output videos. Create a project and start editing DJI Phantom 3 4K MP4/MOV videos in FCP 6/7/X with light speed.When the conversion is completed, launch FCP X/6/7, go to "File" > "Import" > "Media" to add the converted prores files to FCP X/6/7 for further professional editing. You do not need to check "Create Optimized Media" or "Create Proxy Media" option since we already converted the media to ProRes which means Final Cut Pro X can use the footage without "optimizing" it. Checking this box would create a redundant and time consuming second transcode of your footage.Recommended Devices for control via the app.iOS: iPhone 5s, iPhone 6, iPhone 6 Plus, iPad Air, iPad Air Wi-Fi + Cellular, iPad mini 2, iPad mini 2 Wi-Fi + Cellular, iPad Air 2, iPad Air 2 Wi-Fi + Cellular, iPad mini 3, and iPad mini 3 Wi-Fi + Cellular. This app is optimized for iPhone 5s, iPhone 6, and iPhone 6 PlusAndroid: Samsung S5, Note 3, Sony Xperia Z3, Google Nexus 7 II, Google Nexus 9, Mi 3, Nubia Z7 mini.Read More:
Summary: In this article I will show you the best way to fix the general error in final cut pro 7 when you import some Canon video clip for editing. If you in the same trouble, just follow the article and you will fix the problem in short time.Q:Everytime I try to work with .mov files from my Canon, final cut pro gives me a general error after I've added a couple of clips to the timeline, it used to be no problem but I don't know how to solve the general error... any help?I once edited a whole project in FCP 7 using the native Canon 5D files and while it started well enough, it got more instable as the timeline filled and renders got glitches between edits.Using files straight from camera is ideal and works very well with Adobe Premiere or Final Cut X, and I highly recommend switching to one of those. You have to know FCP 7 is 32 bits, doesn't support more than one CPU, and is no longer supported by Apple. Chances are, the latest version of FCP 7 is older than your camera and it will stay that way forever. And unless you are using a computer from 6 years ago, you are also waiting way longer than you have to for your renders.If you absolutely want to keep using FCP 7, you are going to have to convert your footage to good old proRes beforehand. You can use FCP's media manager or Apple Compressor for that. Alternatively, do yourself a favour and get a modern NLE like FCPX which handles and optimises files from almost all cameras automatically. As FCP 7 are not workable with Canon files natively, if you want to load Canon files to FCP (including FCP 7 and FCP X), first you need to convert Canon files to FCP 7 friendly codec like Apple Prores. of course, losslessly. To do so, you need a professional Video Converter to help.Hot Search: H.264 MP4 Footage into Final Cut Pro | AVCHD M2TS to FCP | XC 10 4K/1080p MXF to Premiere ProHere I'd like to recommend an excellent HD Video Converter for Mac from Pavtube. It can convert ALL(Canon videos included) videos to Apple ProRes codec which is intermediate format that features high performance and quality, being less processor-intensive to work with FCP 7. Other Download:- Pavtube old official address: http://www.pavtube.com/hd-video-converter-mac/- Amazon Store Download: http://www.amazon.com/Pavtube-Video-Converter-Mac-Download/dp/B00QI9GNZS- AppStore Download: https://itunes.apple.com/de/app/pavtube-hd-video-converter/id502792488?mt=12- Cnet Download: http://download.cnet.com/Pavtube-HD-Video-Converter/3000-2194_4-76177786.htmlHow to load All(Canon) videos to FCP 7?Step 1: click top left icons to load your sources. You can load individual videos from by clicking "add videos", or load the entire folder by clicking ‘add from folder'.Step 2: Choose Apple ProRes 422 codec for Final Cut Pro 7.Click the "Profile" option, and move mouse cursor to Final Cut Pro > Apple ProRes 422 HQ (*.mov) as output format.Tips:To keep original video quality for editing in FCP, select “Apple ProRes 422”;For SD levels – 480i/p and 576i/p and offline workflows, select “Apple ProRes 422 (Proxy)”;To edit and finish 4:4:4 material, choose “Apple ProRes 4444″.Learn more Apple ProRes, please refer to Types of Apple ProRes CodecsTo get 1080 videos, we need to click the "Settings" button and choose 1920*1080 as output video resolution.Step 3: Convert all video files for FCP 7.Click the read button Convert to start transcoding alll video files to MOV for FCP 7. When the conversion is completed, click "Open" button to locate the converted Apple ProRes 422 MOV files for editing with Final Cut Pro 7.Pavtube Video Converter for Mac: An all-in-one program integrating conversion and editing 4K videos, 1080p/720p MKV, MXF, M2TS, etc. on Mac OS X El Capitan.Pavtube iMedia Converter for Mac: An all-inclusive converter to complete 2D/3D Blu-ray, DVD, ISO, SD/HD/4K Video to m3u8, H.265 MP4, do H.265 to non-H.265 conversion on Mac OS X El Capitan.MP4 to FCP ǀ
AVCHD to FCP ǀ
MOV to FCP ǀ
H.265 to FCP
Summary: As for the professional NLEs, a few years ago the answer was simple FCP or Premiere. Over the past 2 years the industry has gone through some major changes. Here we talk about the different between the Final Cut Pro and Adobe Premiere and give the solution of how to import any video into them for editing natively.Apple abandoned FCP7 and launched an all new NLE called FCPX. It was a radical change and it broke many professional post houses workflows. This created a major backlash for Apple. FCPX has improved since launch and some Pros are using it.Adobe Premiere has gained enormous market share from FCP users. Many loyal FCP editors refer to Premiere Pro CS6 as the FCP8 they wanted but did not get. Premiere has become far more professional, stable and powerful over the past couple of years.Since the release of Final Cut Pro X, there have been a number of professional video editors moving to Adobe Premiere Pro and Avid Media Composer, due to Apple's seeming lack of interest in the professional market.I'm not to sure about the recent updates for FCP, but last I heard there were a great many features that were considered necessary tools for professional work that Apple had decided not to include.I've been cutting on Adobe Premiere Pro for years now, and I love everything about it. The Mercury Playback Engine makes rendering simple effects unnecessary, and the integration with the rest of the Adobe Creative Suite is simply phenomenal. Premiere Pro let's you edit most video formats natively (P2, Red, Arri, Canon XF, etc.) without having to transcode into an intermediate codec like Apple ProRes.In the rest of the article we talk about how to import any video into them for editing natively.As we all know that like all the = professional non-linear video editing program, Final Cut Pro and Adobe Premiere different also has its own native editing codec - MPEG-2 for Adobe Premiere and Apple ProRes for Final Cut Pro, which is specially designed for nonlinear editing and complex multi-generation composing in post production. To create Final Cut Pro and Adobe Premiere editing codec, you can download Pavtube HD Video Converter for Mac(read the review), a professional Mac video decoder to beneficially encode all kinds of videos to Final Cut Pro and Adobe Premiere optimized MPEG-2/Apple ProRes codec.Moreover, Pavtube HD Video Converter for Mac also allows you to customize profile settings to get a desired and better output. Movie creation with this program is no big deal. You can edit your video files by trimming, cropping, attaching external subtitles, adding watermarks, change video effect, etcBy the way, if your are a one hundred percent Windows user, please turn to Pavtube HD Video Converter. It has the same ability as Mac version. Other Download:
How to Convert any Video to Final Cut Pro and Adobe Premiere for Smoothly EditingStep 1: Input video files.Start the program on your computer, add video to the program by clicking the "Add Video" or "Add folder" button. Step 2: Choose format to output.For FCP users, from "Format" drop-down option, choose "Final Cut Pro"> "Apple Prores 422(*.mov)" as output format. To output higher quality video, it is ideal for you to output "Apple Prores 422(*.mov)" or "Apple Prores 422(HQ)(*.mov)" format. To output small size video, choose Apple Prores 422(LT)(*.mov) or Apple Prores 422(Proxy)(*.mov) format.For Premiere users, click "Format" bar, from its drop-down list, select "Adobe Premiere Pro/Son..." > "MPEG-2 (*.mpg)" to output for editing with Premiere Pro CC. Step 3: Customize output video and audio settings.Open "Profile Settings" window to adjust output video and audio parameter settings according to your own preference.
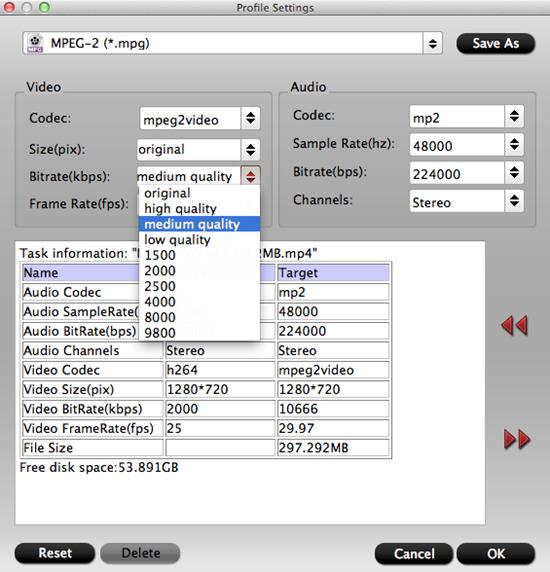 Step 4: Start the conversion process.After all the setting is over, go back to the main interface and hit right-bottom "Convert" button to start the Apple Prores 422 or MPEG-2 conversion process.When the conversion is completed, launch FCP/Premiere and import the converted video to it and then you can be editing the converted video smoothly.Read More: