Showing posts with label Windows 8. Show all posts

Thursday, April 24, 2014

Acer Aspire Z3 Review - This all-in-one PC is built for looks, not power

If Windows 8 deserves credit for anything positive, it's that the operating system spurred an era of touchscreen desktops. With that comes the challenge of producing a touchscreen system with a strong spec sheet and features that remains relatively affordable. Acer enthusiastically takes up this task with the Aspire Z3-605-UR22, an all-in-one PC that sports a large touchscreen and an impressive set of features.

The Aspire Z3's minimalistic design downplays its front-facing hardware, which includes an adjustable webcam, a sound bar-style speaker, headphone jack, USB 3.0 port and SD card reader. Located discreetly on the right side is a DVD drive. On the back are additional audio jacks for an external microphone and speakers. You'll also find an Ethernet jack, three more USB ports (one being 3.0), and a handy HDMI-in port.

Underneath the hood are built-in 802.11a/b/g/n Wi-Fi, Bluetooth 4.0 and a 1TB, 7200 rpm hard drive. Sadly, that's about where the impressive specs end. Powering this system is a 1.9GHz, dual-core Intel Core i3-3227U processor with Intel HD Graphics 4000 for video and 4GB of RAM. This all-in-one PC is essentially a large Windows 8 tablet dressed up as a desktop system, trying desperately to keep up the act.


To be clear, this is not an actual tablet-desktop like the Dell XPS 18, but it sure wants to be, minus the convenience and portability. Acer had to trim the specs down somewhere to keep the computer affordable. Unfortunately, it chose to skimp on the heart and soul of the system to bring the price tag down to $799.99 US (about £477, AU$851).A sensible design

Offering its own PC-centric spin on the Apple 21-inch iMac design, the Aspire Z3 shares a lot with the Lenovo IdeaCentre B540p. Both have 23-inch, 1920 x 1080 screens set in minimal black frames that prop it up, making them appear more like super large digital picture frames than desktop computers. This system practically invites you to forget about the little wireless keyboard and mouse that come packed with it. If it weren't for the somewhat schizophrenic nature of Windows 8, maybe you could.

The Z3 looks great on an office desk, where it has a relatively small, albeit wide, footprint. It would also be just as fitting in the living room or kitchen in place of a TV. There's even a convenient handle on the back for easy transport, and it has a sturdy frame. Despite all this, the machine's design doesn't fully commit to the living room entertainment PC spec.


Pictures and videos look great on the Z3's bright LED screen, and sound booms from the built-in speaker, making it ideal for streaming media and looking at photos. I plugged a Sony PS3 into the HDMI port to watch Blu-ray movies and play games, which looked fantastic. I was also pleasantly surprised to discover that I could still use the display through the HDMI after shutting down the computer. However, past this point, many of the unit's flaws started to show.

The Z3 is designed for light everyday use and entertainment, but the all-in-one feels like it's missing a few pieces. Here's the Acer Aspire Z3 configuration sent to TechRadar in detail:Spec sheet

CPU: 1.9GHz Intel Core i3-3227U (dual-core, 3MB cache)
Graphics: Intel HD Graphics 4000
RAM: 4GB DDR3
Screen: 23-inch, 1920 x 1080 IPS, LED backlit display with 10-point multi-touch control
Storage: Seagate Barracuda 1TB, 7200 rpm hard drive
Ports: 2 USB 3.0 (1 front facing) ports, 2 USB 2.0 ports, 1 HDMI, 1 headphone jack (front facing), 1 microphone jack (rear), 1 line out jack, 1 SD card reader
Connectivity: 802.11a/b/g/n Wi-Fi, Bluetooth 4.0
Camera: 1280 x 720 HD webcam
Weight: 19.84 pounds
Size: 22.3 x 17.4 x 2.1 inches (W x D x H)


Performance

The Acer Aspire Z3 certainly isn't a powerhouse. As these benchmark scores show, the system is best used for non-intensive tasks that won't tax the processor or video:

3DMark: Ice Storm: 20,656; Cloud Gate: 1,789; Fire Strike: 185
Cinebench Graphics: 5.97 FPS; CPU: 167 points
Nice to watch, but tough to touch

Despite some glaring shortcomings, Acer was spot-on in other ways with the Z3 display. It's big, bright, and usually responsive when browsing and launching apps from the Modern UI. Tasks like browsing a photo gallery, reading news feeds, and messing around with different touchscreen apps worked smoothly.


Things got a little sticky in the desktop UI, where buttons for closing and maximizing windows are tiny in comparison. There is also a significant delay when using the touchscreen to resize windows.

Sometimes the response time would take a dip and I had to swipe more than once, at varying speeds, to close and switch between applications. Even worse is that the glossy touchscreen is rather reflective and lights produce a noticeable glare.

The built-in 720p webcam can tilt up and down using a lever on the back. It is acceptable for video calls, but with a considerable amount of graininess. It's also terrible in low light, as the picture goes completely dark. Lastly, the DVD tray feels quite flimsy and fragile, so it's best to stick with digital formats.


Sounds like a mess

Another bummer: although loud, the speakers pump out weak bass, which produces a lot of distortion. There is no physical volume control on the system, nor is there a remote control. Whatever you plug into the device's HDMI port must have its own independent volume settings. You can adjust the Windows sound using the task bar or the wireless keyboard, but neither have any control over the HDMI audio.

Speaking of which, the HDMI input can also be finicky. Switching to the input wasn't a problem at first, but then I started getting a black screen, and it would continually revert back to the main PC screen. Eventually, both the picture and sound were corrupted. The input appeared broken after a day of use, but miraculously started working again.

As for wireless connectivity, I tried numerous times to connect the Z3 with a punchier Bluetooth speaker, but was unsuccessful. It didn't matter if it was a Samsung AirTrack soundbar or a tiny Jawbone Mini Jambox – devices would pair, but wouldn't connect. This was due to a Bluetooth audio driver, or lack thereof, that might point to a Windows 8 issue, but Acer doesn't supply driver support for this problem. No matter the reason, the inability for something as simple as Bluetooth audio was disappointing.


A widely weak machine

There's no shaking the feeling that the Aspire Z3 is designed to be an oversized tablet, and not a very good one at that. The system is hamstrung by its dated processor, with problems that manifest in different ways.

This PC did a good job at either performing one medium task, or a number of small tasks that aren't processor intensive. Performance took a severe hit when something as straightforward as a system update or app installation happened in the background. Streaming video stuttered, touch gestures wouldn't register, and nearly every application had fits and starts until the background process finished. Even typing and web browsing became annoyingly slow.

Making matters worse is how the only system light is the power button. There's no way to know if the hard drive is in heavy use. While it's bad enough that the Z3 is pretty much a mono-tasking computer, it gets worse when you further consider what it can actually run.


The computer comes pre-installed with the PointGrab Hand Gesture software, which lets you navigate and perform basic commands using the webcam. Think of it as the layman's Kinect controller. Granted, it's silly to wave your hands at a touchscreen that's within arm's reach, but it could come in handy in the kitchen for hands-free navigation. Unfortunately, this CPU struggles to power the app. After constant stutters and stalls, I was forced to leave it shut off. Just as well, since the software often confused me generally waving my hands for control gestures.

If you want to game on this PC, stick to those with relatively simple graphics and designed for Windows 8. Even then, finding what works well is largely guesswork. Halo: Spartan Assault played well, but Asphalt 8: Airborne displayed noticeable stuttering.


In testing Civilization V's touch controls, I had to tone down the graphics quite a bit. The game started off well, but slowed to a crawl as it progressed. It reached a point where there was a five second delay after pressing the "End Turn" button, even after I stopped using the touch controls and stuck with the included mouse.

It's clear that we live in a world where tablets and Ultrabooks are in while big, while heavy desktops are steadily becoming less relevant. An all-in-one PC that looks more like a work of art than a desktop computer is a good start. Having the most features for the lowest price is also a solid strategy. However, in the quest to create a sort of desktop that feels like a tablet, the designers lost sight of what makes a desktop worthwhile.We liked

That 23-inch, 1920 x 1080 screen is so beautiful that I could almost forgive some of the computer's problems. Movies like Gravity look positively stunning, especially if you hook a Blu-ray player into the system. If only there weren't performance hang-ups that completely drag down the user experience. The pretty, responsive touchscreen actually serves to highlight the computer's other shortcomings.We disliked

The weak CPU is not the only issue here, but it's at the root of many of this PC's worst problems. The dated chip drastically limits the computer's capabilities, and thereby its overall usefulness. While most of the Z3's features look impressive on paper, they're rather poor in reality – from an HD webcam that records grainy video to a built-in speaker that's loud, but lacks depth. Even worse is that unreliable HDMI-in port with zero volume control.Final Verdict

The concept behind the Acer Aspire Z3 sounds wonderful: a budget-minded, all-in-one PC designed for light, everyday use. The machine's large, attractive screen is an added bonus that makes video and images pop. It's as if most of Acer's resources were funneled into crafting an attractive system, at the expense of what's inside. It's not until you use the Z3 at length that its flaws come to light. And after adding them up, it's easy to feel misled, the victim of a bait and switch.

Furthermore, this PC is barely useable until Window 8 completes its initial updates; all but the most simple tasks are a hassle. Even afterward, be wary of automatic system updates and background processes that could gobble up what little processing power this machine holds. Considering the mounting disappointments, even when the bar was set pretty low, the Aspire Z3 is a gorgeous PC that difficult to recommend. 

From: http://www.techradar.com/us/reviews/pc-mac/pc-mac-desktops/acer-aspire-z3-review-1244342/review#articleContent

Thursday, December 5, 2013

ISO to Surface tablets - Watch Blu-ray ISO images on Surface 2, Surface Pro 2

With the help of this article, you can easily watch Blu-ray ISO images on Surface 2 and Surface Pro 2 with best video settings anytime and anywhere on Windows 8.1/8/7.

Which file types are supported on Surface 2, Surface Pro 2, Surface RT/Pro?

As a windows follower, it is big news that Microsoft released the new Surface 2 and Surface Pro 2 tablet. Now, I can throw away heavy Notebook; take Surface 2 with me on my road. The new Surface 2 can support playback videos up to 1920*1080 pixels. With a Surface 2 tablet, I can enjoy HD movies on such high resolution screen. Want to view Blu-ray ISO images on Surface 2 like me? No problem, with this useful Blu-ray to Surface 2 converter, you can easily convert Blu-ray ISO images to Surface 2 support format on Windows 8.1/8/7.

News: Buy it now can enjoy the 30% off on Thanksgiving Special Offer 2013

Software required:

Please download the right version of Pavtube Blu-ray Ripper first, and the following guide is based on windows version.
  1. Windows: BDMagic
  2. Mac: BDMagic for Mac
Step 1: Load Blu-ray ISO image files.

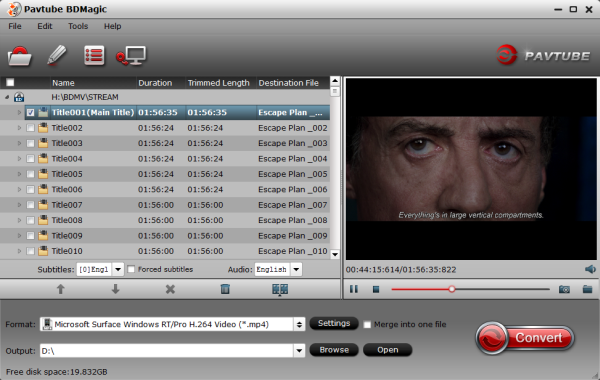
After launching Pavtube Blu-ray to Surface Tablet Ripper, click the “Add files” button to load your blu-ray ISO images to program. This Blu-ray to Surface converter also supports loading Blu-ray discs.


Step 2: Choose “Surface” profile.

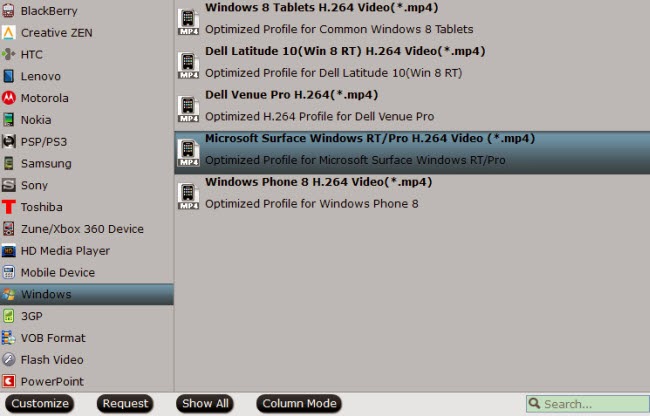
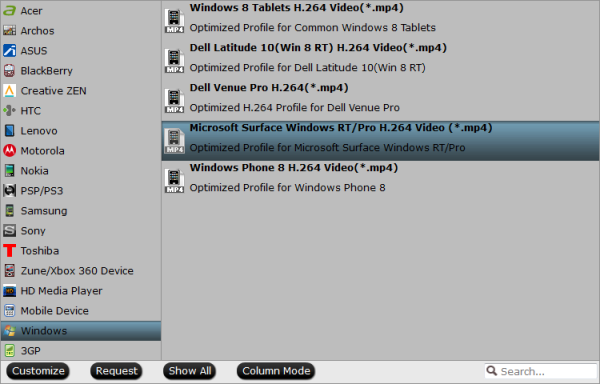
This Blu-ray ripper for Surface 2 embedded “Surface” profile with pre-set parameters. Click the drop-down list and choose “Windows> Microsoft Surface Windows RT/ Pro H.264 Video (*.mp4). The output videos could fit on Surface 2 perfectly.


Tips:

1. If the preset profile settings cannot meet your need, you can click “Settings” icon to adjust the video size, bitrate, frame rate, audio channels and so on.


2. If you want to leave out the title and tail leader of the film when you transfer your ISO images on Surface 2, click "Edit" selected task, Then use the “trim” function to set start and end time of your videos. The length of the output video could depend on your own need.

Step 3: Start the Blu-ray ISO to Surface tablets Conversion.

Back to the main interface, and click the “Convert” icon to start converting Blu-ray ISO images to Surface 2 and Surface Pro 2. After ripping, you will get a .mp4 file for Surface 2 then you can enjoy Blu-ray movies anytime and anywhere.

Note: If you want to convert Blu-ray ISO images to MP4 with multiple audio tracks (languages) for your Surface, try our ByteCopy

Articles you may want to read:
Good News! Thanksgiving Day 2013 is coming to the end. Did you miss any discount especially for Blu-ray/DVD Ripper, Video Converter, DRM Media Converter and more?

You still have the chance to win! Only 3 days left for Free Products and up to 66% discount at the page:http://www.pavtube.com/thanksgiving-giveaway-2013.html

Read More:

Friday, November 29, 2013

Digital Copy to Surface 2 - Transfer Digital Copies into Surface 2, Surface Pro 2

Description: The best solution of transferring Blu-ray/DVD Digital Copy to Surface 2 & Surface Pro 2 so that you can playback Digital Copy Movies on your Surface 2 & Surface Pro 2 tablet. 


What is Digital Copy? 

Digital Copy is a standard definition digital version of your purchased DVD/Blu-ray; it's usually located on a stand-alone disc which bundled with your sets and in your choice of iTunes or Windows Media formats. It's Mac & PC compatible. 

Literally, Digital Copies are DRM protected digital version of your Blu-rays. Usually it will be attached as an independent disc (DVD) with its code in your Blu-ray set; it requires a code to be playback on Windows, Mac, IOS devices or authorized tablets. 

However, if you really want to transfer Digital Copy movies to your Surface 2 & Surface Pro 2, you will find it takes up large memory space; moreover, playback large files are always stuttering. 

So how to transfer Digital Copy to DRM-free videos and playback on Surface 2 & Surface Pro 2? 

With Pavtube ChewTune - a top Digital Copy to Surface 2 Converter (Reach the Mac version here: Digital Copy to Surface 2 Converter for Mac), you can easily accomplish this goal painless. 


The professiona Digital Copy to Surface 2 & Surface Pro 2 recorder can legally remove DRM protection from BD/DVD Digital Copy movies, and convert Digital Copy movies to Surface supported format like MP4. Besides, this Digital Copy movie converter can also convert iTunes M4V, Amazon WMV, BBC iPlayer videos to MKV, AVI, WMV, MOV, M4V, MP4, FLV, etc. so it is an useful tool for your all portable devices, like Samsung Galaxy Note 3, Galaxy Tab 3, Nexus 7 2, Nexus 10, Sony Xperia Z1, LG G-Pad, Moto X, Asus Transformer Prime and more. 

Tips: Money saving bundles: 

Tutorials: Convert Blu-ray/DVD Digital Copy Movies to Surface 2 & Surface Pro 

Step 1. Load source files. 

Run this Pavtube Chewtune as Digital Copy to Surface 2 & Surface Pro 2 converter; load Digital Copy file. Drag and drop your videos to it directly, or you can click icon to import them as below. 


Step 2. Choose proper format for Surface 2 & Surface Pro 2. 

Click the drop-down-list besides "Format" and choose "Windows >Microsoft Surface Windows RT/Pro H.264 Video (*.mp4)" as the most compatible format for Surface 2 & Surface Pro 2. 


Step 3. Change video specs (Optional). 

Click "Settings" to enter Profile Settings window, you can find settings for video size, codec, bitrate and frame rate, all according to your own needs. Usually the default settings should be good enough. 

Step 4. Start Digital Copy movies to Surface 2 & Surface Pro 2 conversion. 

Now click the big red icon to start converting Digital Copy movies to Surface 2& Surface Pro 2. The ChewTune will automatically start to play this video; this windows cannot be removed or closed during this period. 

In the meanwhile, it will start to record this video in MP4 real-time. The conversion time is equal to the video length itself; you can do other tasks during the converting the process. 

Note: the system volume could turn off temporally during this period; no worries and do not touch it to get perfect DRM removed video. 

After the conversion, click "Open output folder" to quick locate the converted video. Connect your Surface 2 & Surface Pro 2 to computer, then you can transfer the result videos to your SD card for your Surface. There now you know how to get Digital Copy movies onto your Surface 2 & Surface Pro 2 tablet so you can watch them on that gorgeous screen! 

This workaround works with Windows 8 as well, of course. 

Additional Tips: 

1. About ChewTune - An easy-to-use yet intuitive and stable DRM converter which can help you strip DRM protection from iTunes, Blu-ray/DVD Digital Copy movies Amazon, Zune, BBC iPlayer, Napster, Blockbuster, etc. and convert videos to all popular video formats like MP4, MOV, MKV, WMV, AVI, FLV, etc. for playing and sharing anywhere you like. The audio/video synchronization is very good and the quality of the converted videos too. It's completely free for protected Audio files. 

2. Check out "The Ways Transferring Files to Your Surface" if you have no idea about Surface file transfer. 

Related Articles:

Thursday, November 21, 2013

Tips for Converting DVD movies to Surface 2 and Surface Pro 2 playable video format - MP4 format

As one of the most popular Windows 8 tablet, Surface 2 or Surface Pro 2 is not equipped with DVD drive or support to DVD ISO image file. So "How do I play DVD movies on Surface 2 and Surface Pro 2 without DVD drive?" This guide will show you the easiest way to rip DVD protection and convert DVDs to Surface Pro 2/Surface 2 support format (MP4/HD MP4) for playback without DVD drive.


For watching DVD movies on Surface Pro 2 or Surface 2 without any problem, a good DVD to Surface Pro 2 converter will give you big help. Here we recommend you to take a free try on our DVD to Surface Pro 2 Converter, this is top DVD Ripper for Surface Pro 2/Surface 2 tablet, which can rip latest DVD discs/floder/ISO/IFO image files to any formats you need, such as MP4, MOV, AVI, WMV, FLV, MPG, etc. when you converted DVD to compatible formats, you can transfer DVD movies to Surface Pro 2/Surface 2 tablet, Android/Apple/Windows 8 tablet or smartphone, or other playable devices for freely viewing.
  
Note: If you are Mac users, view Pavtube DVDAid for Mac; well support Mac OS X 10.9 Mavericks!

Steps: How to convert DVD disc/ folder/ISO/IFO to Surface 2 & Surface Pro 2 playable MP4 format? 


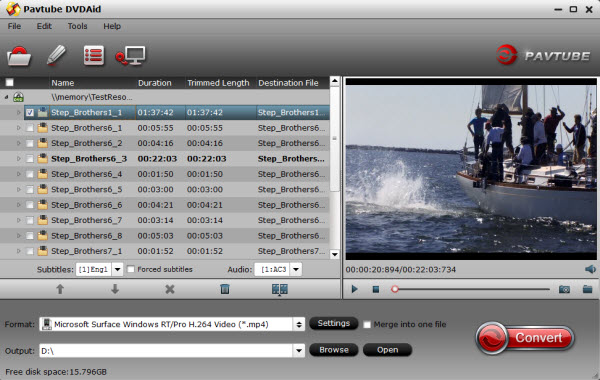
Step 1. Run DVD to Windows 8 Converter; load DVD disc/ISO/IFO/folder.

Click the disc button to browse and import DVD disc from ROM, or load the ISO/IFO file that you want to convert for viewing on Windows 8 Surface Pro 2.


Pavtube DVD Ripper will detect and list the main title (the full length of this movie) and check it by default. So just keep it untouched and let’s move on to Step 2.

Step 2. Choose format.

Highlight the movie title you want to rip, and then you can click the dropdown menu below “Subtitles” and “Audio” respectively, you will see many presets for difference devices and programs. In this case, you are suggested to select “Microsoft Surface Windows RT/Pro H.264 Video (*.mp4)” as the best MP4 preset for Surface 2 and Surface Pro 2. Or you can also "Format -> HD Videos -> H.264 MP4" as output video format.

surface 2 best video format

If you prefer a much better video quality and don’t mind the output file size, you can rise the video bit rate higher than 1500. Generally speaking, the higher video bit rate will result in the larger output file size, and vice versa.

Step 4. Start conversion.

Now hit the big red “Convert” to start converting DVD movies to Surface 2/Surface Pro 2 MP4 with best video quality for playback.
  
After the conversion, you can get the converted DVD rips in .mp4 format by clicking the “Open” or “Open output folder” icon and transfer the result videos to your Surface Pro 2 via USB cable.

This DVD to Surface Pro 2 Ripper also equipped with NVIDIA CUDA and AMD APP acceleration technology, so it can rip DVDs at a fast speed, it will save you much time. Now please take a try, hope it can help you.

And now you can transfer DVD movies to Surface Pro 2 at your leisure time freely. Enjoy.

Tips: If you have other media files like Blu-ray movies, Blu-ray ISO image files, MKV, AVI, MTS, MPG, VOB, TiVo, FLV, F4V, MOV, etc. HD videos, and want convert and watch them on your Surface Pro 2 or other devices(Surface 2, Surface RT, Surface Pro, iPhone 5S, iPhone 5C, iPad Air, iPad Mini 2, Kindle Fire HDX, Moto X, Motorola Droid Mini, Galaxy Note 3, Galaxy Tab 3, Nexus 7 (2), Xperia Z1, LG G-Pad, Xperia Z Ultra, Acer Liquid E2/S2, Fonepad 7, MeMO Pad Smart 10, MeMO Pad HD 7, MeMO Pad ME172V, Motorola Droid Ultra, HTC One Mini, Galaxy Note 10.1 2014 Edition, SkyPad tablets,  Toshiba Encore , Toshiba Thrive 10.1, etc.), you can try the package tool Pavtube Video Converter Ultimate (Mac users: iMedia Converter for Mac) to achieve your goal. Both are 20% off on Thanksgiving Hot Deals 2013. 

Related Articles:


Tuesday, November 19, 2013

Transfer Blu-ray to Surface Pro 2, Put Blu-ray Folder/ISO to Surface Pro 2 for playback

To view Blu-ray movies on your new Surface Pro 2 tablet, the best way to rip Blu-ray disc/folder/ISO files to Surface Pro 2 support video format so that you can playback Blu-ray on Surface Pro 2 smoothly.
“For software that has to be loaded from a Blu-ray movie, how will I get my software on the Surface Pro 2? Will I have to use an external blu-ray drive whenever I want to watch Blu-ray movie on Surface Pro 2? Or is some other method involved??”
Surface Pro 2 is just a laptop without a keyboard. You can plug in a disk drive or any of the other peripherals that can be connected to any Windows computer. You could connect an external Blu-ray drive to play a blu-ray disc; but you don’t have to so this every time when you want to play (3D) Blu-ray movie on Surface Pro 2 as it’s inconvenient. In my way, I’d prefer to rip Blu-ray disc to MP4 format that works perfect on Surface Pro 2 for playback.

play blu-ray movies on surface pro 2

If you want to transfer Blu-ray movies to Surface Pro 2, a professional powerful ripping program will help you a lot.Pavtube Blu-ray to Surface Pro 2 Converter is such a tool with the easiest workflow to help you rip off Blu-ray disc/ISO/folder protection, then convert the decrypted movie to MP4 format with best video settings for Surface Pro 2. Get Blu-ray to Surface Pro 2 Converter for Mac here; well support Mac Mavericks!

Tutorials: How to transfer Blu-ray to Surface Pro 2? 

Step 1. Run Blu-ray to Surface Pro 2 Converter; load Blu-ray.

This converter does not only support Blu-ray disc/folder/ISO, but also able to convert DVD disc/folder/ISO/IFO files. Your ISO image file would be recognized automatically so there’s no need to run virtual drive to mount it any more.


Step 2. Choose format.

Click the drop-down list besides “Format” list, you can find many presets and columns for different devices and programs. Let’s switch to “Windows” column and select “Microsoft Surface Windows RT/Pro H.264 Video (*.mp4)” as the best preset for Surface Pro 2. (For Surface 2 users, refer the guide: How to copy Blu-ray movies to Surface 2 for playback easily)

Or you can enter “Surface” in the small search box at bottom right corner.


Step 3. Adjust specs or edit video before conversion (Optional).

If you want to customize output video size, bitrate, frame rate and others, just click “Settings” to enter profiles settings window.

And you can click the pencil-like icon on the top to crop, trim, edit audio/subtitles/ or add watermarks before conversion.

Step 4. Start conversion.

Now hit the big red “Convert” to start converting Blu-ray movies to Surface Pro 2 MP4 with best settings for playback.

After the conversion, you can get the converted Blu-ray rips in .mp4 format by tapping the Open button.

How to transfer media files to Surface Pro 2?

To see how much storage space you have:
  1. Open the Settings charm, tap or click Change PC settings.
  2. Tap or click General.

Scroll down to Available storage, to see how much storage space you have.
Or don’t move files to Surface. Store them in the cloud instead using your files on SkyDrive. This way you can access your files from other computers or your phone.

You can pick using one of the following methods to transfer video to Surface Pro 2
  • -Connect to a networked computer
  • Use a USB flash drive or a memory card -- microSD, microSDHC, or micro SDXC cards all work with Surface.
Connect to a network computer

Surface can access music, pictures, videos, and documents on computers that are part of your home network. To see the files and folders that have been shared on your network, go to the Start screen and open File Explorer. Shared items appear under HomeGroup or Network.

Use a USB flash drive or memory card
  
You can also move files to Surface, by copying them to a USB flash drive or memory card (microSD, microSDHC, or micro SDXC cards all work with Surface) and then adding the files to Surface. Here’s how:

1. Copy files onto a USB flash drive or memory card on your other computer.
2. Insert the USB flash drive or memory card into Surface.
3. Tap or click the notification that appears in the upper-right corner of the screen.
4. Tap or click Open folder to view files.
File Explorer opens.
5. Select the files or folders you want to add to Surface, tap or click Home, and then tap or click Copy to.
6. Select a location. For example, choose Documents if the flash drive or memory card contains documents.

Related Articles:

Tuesday, September 17, 2013

Windows Blu-ray Ripper - Ripping Blu-ray movie on Windows 8/Windows 8.1

As we all know that the new Windows 8/8.1 operating system is not support Blu-ray playback natively. To accomplish this work, you have to ask for the third party tools. Read the article to learn details.

Blu-ray is getting more and more popular for its large storage and excellent quality so that many people prefer watching Blu-ray movies at home. It may be majestic, but is also has heavy disc copy protection from film studios so that you can only watch the Blu-ray movie with the discs on hand. What’s more, frequently changing discs is not convenient at all; and the disc damage in everyday using is also an issue that cannot be neglected.

So, how to get rid of the problems above?

Basically the most recommended solution is to extract Digital Copy of Blu-ray discs.

How to rip Blu-rays on Windows 8/8.1?

There are a lot of different methods for ripping and converting Blu-Rays from the Internet; we combed through the options to pull together the simplest, working method using the most reliable program we could find, the Pavtube Windows 8/8.1 Blu-ray Ripper.
Follow this article to learn how to backup your Blu-rays in order to get rid of frequently disc change or disc damage in everyday using.

Free download the trial version and install it on your PC.

FYI: Mac users can get the Mac version Blu-ray Ripper for Mac.

Step 1. Get this Windows 8/8.1 Blu-ray Ripper installed; import DVD/Blu-ray to it.
  
Click this icon to import Blu-ray/DVD discs, folders and ISO files to Blu-ray Ripper: 

This Pavtube Windows Blu-ray Ripper supports importing Blu-ray/DVD ISO files, which means you will not need to extract the ISO via virtual drive like IsoBuster, CDmage, Daemon Tools and Winmount firstly. Just drag and drop the ISO file into it directly.

It will pop up a window to show you the importing progress as below:


See the main interface of Pavtube Windows 8/8.1 Blu-ray Ripper:


There’re many titles inside one commercial Blu-ray/DVD; the longest one is known as the main title which contains the full length of this movie. But for disc encryption consideration from film studio, there could be several fake titles with disordered chapters and they have the same length with the real one, which makes it hard to find and rip the real movie. But no worries, Pavtube Blu-ray Ripper will recognize the real main title and check it by default.

Step 2. Choose output video format.

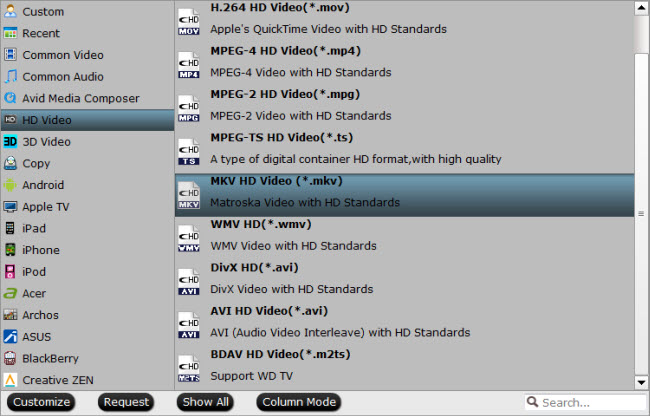
Click the drop-down list besides “Format”, you will find various presets for video player, NLEs and devices. Free choose the one you need; you can also submit keywords in the search box to quick locate the corresponding profile.

choose windows 8 video formats

Basically, if you want to get an exactly 1:1 copy of the Blu-ray, you can start the Full Disc Copy by clicking this icon: full disc copy. It will keep all the files and folders as original in your Blu-ray discs.

And if you just want to get a single file to playback on PC, you can try this MKV HD Video(*.mkv) for its good video quality; WMV HD (*.wmv) is also recommended as you can playback it in Windows Media Player directly. Or you can choose “Copy -> Directly Copy” to output an intact .m2ts file in the full length of this movie which will have 1:1 video quality as the original Blu-ray.

Step 3. Choose subtitles and audio tracks in the drop-down list above the “Format”. (Optional)

choose subtitles and audio tracks

Step 4. Customize video specs. (Optional)

Click “Settings” on the right of “Format”, you can free set target video size, bitrate, frame rate, sample rate (Hz) before conversion. Usually the higher bitrate you choose, the better video quality will be.

Step 5. Start ripping Blu-ray on Windows 8/8.1.

Now click the big red “Convert” to start ripping Blu-ray movies on Windows 8/8.1. Wait for moments and after the conversion, you can click “Open output folder” to locate the converted video quickly.

You may want to read:

How to playback Full Disc copied Blu-ray on Windows 8/8.1?

If you choose to do a Full Disc Copy, the Blu-ray will be decrypted and save 1:1 save the original disc including all the folders and info files. Many of you have Blu-ray player program on PC already; but if you have no idea about which one to choose, you can read this:

Thursday, May 16, 2013

Tivo to AVI-Encode TiVo shows to AVI for playback on Windows 8


Probably you are in same dilemma of finding recorded TiVo files not so easy to play back and edit as common video files when you transfer your recorded shows by TiVo to your Windows 8 PC. How to fix this? There is one, that is to convert your TiVo recordings to something more common for your Windows 8 desktop or laptop. Pavtube TiVo to AVI Video Converter is a handy tool to help you complete this in shortest time and perfect quality. Meanwhile, it is capable of cutting ads clips off, trimming and cropping video clips, and putting your shows in your pocket and take them with you. TiVo files are well supported by Pavtube Video Converter Ultimate and can be en-decoded fast and properly. It will generate various container formats encoded with MPEG, H.264, Divx, Xvid, etc. This guide shares with you how to convert TiVo recordings to Divx AVI for playback on Windows 8 step-by-step.

Step One. Transfer recorded TV shows to your PC.

In the first place, you got to transfer shows from your TiVo DVR to your PC. TiVo Desktop software for the PC is required, and you can access the instructions on how to transfer TiVo file to PC from their website.

Step Two. Run Pavtube Video Converter Ultimate and load TiVo files.

Pavtube offers free trial version of TiVo Video Converter for you to evaluate the software. So just go ahead, download and install Pavtube TiVo to AVI Converter (30% off to celebrate Mother's Day continues till May 22) and try it out!

Launch the utility and here pops up an intuitive interface. Click "Add Video" or "Add from folder" to load recorded TiVo TV shows, or you just drag the files in. When first loading, Pavtube TiVo to AVI Converter will ask you to input your Media Access Key. Simply enter your Media Access Key, and click "OK" to confirm.

 TiVo shows to AVI for playback on Windows 8
 
Step Three. Crop out unwanted edges and trim off ads

Click on "Edit" menu to enter editor panel where you could edit selected files. "Crop" feature allows you to cut off unwanted black edges, while "Trim" feature enables you to select specific length of video and convert it to specified format. Just drag the slider or input start time and end time.

Step Four. Set output format and A/V settings.

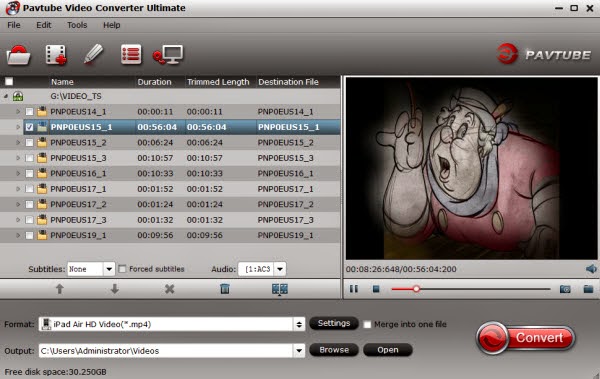
In order to encode TiVo shows to DivX AVI, you can click on "Format" bar and follow either "Common Video -> Divx AVI" or "HD Video -> Divx AVI". Next specify location for generated files in "Output" box. To adjust video and audio parameters like codec, aspect ratio, bit rate, frame rate, sample rate, you could click on "Settings" button.

Step Five. Convert TiVo files to AVI Divx on Windows 8. Go!

Now it comes to the final click. Click "Convert" button and wait. The View Log will present you all the info such as conversion progress, conversion state, elapsed and estimated conversion time, and generated and estimated conversion file size. You may check "Shut down computer after conversion" and leave it be.

Why choose Pavtube Video Converter Ultimate Software?

Pavtube Video Converter Ultimate is a very powerful all-in-one BDMagic + DVDAid + Video Converter as well as editor, with super fast conversion speed.

You can use the software to convert Blu-ray/DVD movies and virtually any audio and video files formats for playback on most popular devices including all Android Tablets/Phones, Windows 8 Tablets/Phones, iPad, iPod, iPhone, Apple TV, Zune, PSP, Pocket PC, Creative Zen, and Archos, Adobe Premiere, Sony Vegas, Avid Media Composer and so on. It also makes it super simple to output to a mobile device.

It is the Best Video Converter Ultimate that can convert different file formats like MKV, AVI, VOB, MPG, Tivo, WMV, MOV, MP4, VRO, EVO, FLV, F4V and even convert video to Youtube friendly format or convert downloaded Youtube to video with best image and sound quality without causing you any audio and video out of sync issues. It even has the tools to trim certain video clips, crop black bars, add watermarks, change brightness, choose special effects, specify aspect ratio, and more.

Backup Blu-ray 3D movies to 3D/2D video files like MP4, AVI, MKV, MOV, WMV, etc.

Another feature of the program is that it supports NVIDIA CUDA and ATI Stream (AMD APP) acceleration technologies.

Meanwhile, you can check out this review by Comparing the 5 Best Video Converter Ultimate.