Description: With the P2 MXF to Sony Movie Studio converter you can easily find the best video and audio codec for converting Panasonic HPX-171E P2 MXF footages to edit in Sony Movie Studio Platinum 12.
Question:
To edit Panasonic HPX-171E P2 MXF footages in Sony Movie Studio Platinum 12, you need to know which video and audio codec/formats this video editing tool supports. On Sony Movie Studio Platinum 12 official website, I find it works well with AAC, AA3, AIFF, AVI, BMP, CDA, FLAC, GIF, JPEG, MP3, MPEG-1, MPEG-2, MPEG-4, MVC, OGG, OMA, PCA, PNG, QuickTime®, RealMedia®, SND, SFA, W64, WAV, WDP, WMA, WM. Among them, I prefer MPEG-2 as video codec since they can be supported only by Sony Movie Studio as well as the computer and TV you request.


Here is a brief instruction about how to convert Panasonic P2 MXF files to MPEG-2/AC3 for Sony Movie Studio Platinum 12.
Setp 1. Free download the P2 MXF to MPEG-2 Converter. I used this app to successfully convert many MXF footages shot by my Canon XF100, so I guess it would also work well for your Panasonic P2 camcorder.
Tip 1: If you are using a Mac OS X computer, Mac P2 MXF Converter is available as well.
Tip 2: When you import P2 MXF files from computer, don’t forget to copy the complete CONTENT folder from your camcorder to hard disk in advance.
Step 2. Hit the “Add video” button, navigate to the source file location and import your P2 MXF file.

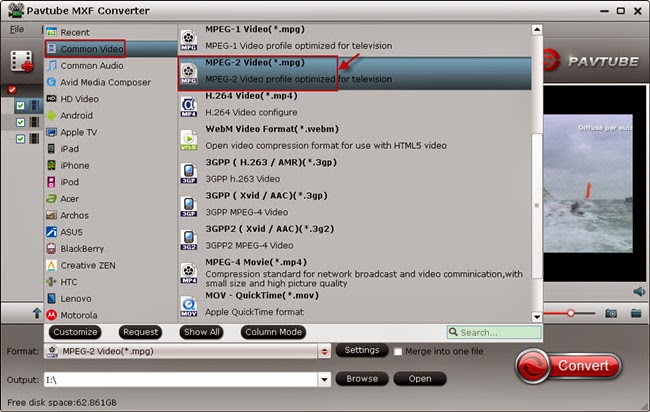
Step 3. Then follow the path “Common Video > MPEG-2 Video(*.mpg)” and choose MPEG-2 as output format. Of course you would find other MPEG-2 profile under the “Format” list, but I would recommend this one because it allows you to change audio codec.
![]() Step 4. Enter the “Settings” tab, and you can freely set profile presets in your own way. BTW, all these parameters under Profile Settings, including video codec, display resolution, bitrate, frame rate, etc, can be customized as you like to get better video and audio quality. To get better audio quality, you are suggested to switch Audio Codec from MP2 to AC3.
Step 4. Enter the “Settings” tab, and you can freely set profile presets in your own way. BTW, all these parameters under Profile Settings, including video codec, display resolution, bitrate, frame rate, etc, can be customized as you like to get better video and audio quality. To get better audio quality, you are suggested to switch Audio Codec from MP2 to AC3.

Step 5. Return back to the P2 MXF to Sony Movie Studio converter main UI, hit the big “Convert” button and start converting your P2 MXF files for Sony Movie Studio Platinum 12. Once it finishes, open output folder to locate the created MPEG-2 file and transfer it to Sony Movie Studio Platinum 12 for video editing.
“What’s the best video and audio codec for converting P2 MXF footages to edit in Movie Studio Platinum 12? Actually I am new one in this entire story about videos. My camera is 171e-Panasonic. My audio codec is pcm_s16le. I have a material and before I start to make editing in Movie Studio I would like to give the converted file to my friend for a first look on his computer or TV. What should I do?”Solution:
To edit Panasonic HPX-171E P2 MXF footages in Sony Movie Studio Platinum 12, you need to know which video and audio codec/formats this video editing tool supports. On Sony Movie Studio Platinum 12 official website, I find it works well with AAC, AA3, AIFF, AVI, BMP, CDA, FLAC, GIF, JPEG, MP3, MPEG-1, MPEG-2, MPEG-4, MVC, OGG, OMA, PCA, PNG, QuickTime®, RealMedia®, SND, SFA, W64, WAV, WDP, WMA, WM. Among them, I prefer MPEG-2 as video codec since they can be supported only by Sony Movie Studio as well as the computer and TV you request.


Setp 1. Free download the P2 MXF to MPEG-2 Converter. I used this app to successfully convert many MXF footages shot by my Canon XF100, so I guess it would also work well for your Panasonic P2 camcorder.
Tip 1: If you are using a Mac OS X computer, Mac P2 MXF Converter is available as well.
Tip 2: When you import P2 MXF files from computer, don’t forget to copy the complete CONTENT folder from your camcorder to hard disk in advance.
Step 2. Hit the “Add video” button, navigate to the source file location and import your P2 MXF file.
Step 3. Then follow the path “Common Video > MPEG-2 Video(*.mpg)” and choose MPEG-2 as output format. Of course you would find other MPEG-2 profile under the “Format” list, but I would recommend this one because it allows you to change audio codec.
Step 5. Return back to the P2 MXF to Sony Movie Studio converter main UI, hit the big “Convert” button and start converting your P2 MXF files for Sony Movie Studio Platinum 12. Once it finishes, open output folder to locate the created MPEG-2 file and transfer it to Sony Movie Studio Platinum 12 for video editing.