Monday, September 30, 2013

Convert Sony Handycam HDR-PJ790V/PJ780 MTS to iMovie/FCE

Follow this article to quick learn how to convert and import Sony Handycam HDR-PJ790V/780 AVCHD MTS file to iMovie/FCE for editing on Mac.

Sony Handycam HDR-PJ790V/PJ780 are very popular models among Sony Handycam series and many people prefer to shoot vacation videos with them; for that they are not large in size and capable of shooting high quality AVCHD videos in MTS. Hereby many mac users would prefer to edit the Sony Handycam HDR-PJ790V/PJ780 MTS videos on Mac directly, in programs like iMovie 8/9/11, Final Cut Express 4, etc.

Here comes the problem: can I import Sony Handycam AVCHD footage to iMovie/FCE for editing?

Convert Sony Handycam AVCHD Footage to iMovie/FCE

The answer is yes! Follow these steps, you can easily import and editing Sony Handycam HDR-PJ790V/780 AVCHD MTS videos in iMovie 8/9/11 and Final Cut Express 4 with the help of  Pavtube MTS/M2TS Converter for Mac. With it you are able to fast convert Sony MTS videos to iMovie/FCE editable video easily. Also it provides a high conversion speed and supports bath conversion. What’s more, its built-in video editor enables you custom MTS files freely.
 
Step-by-step guide on converting Sony Handycam HDR-PJ790V/780 MTS videos to iMovie/FCE.

Step 1. Directly Download this mac-based program here to your Mac. Install and run it successfully.

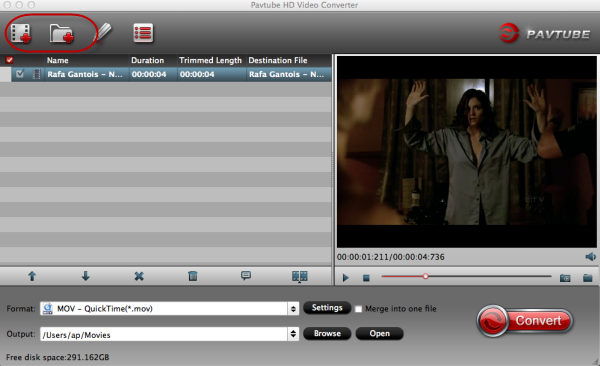
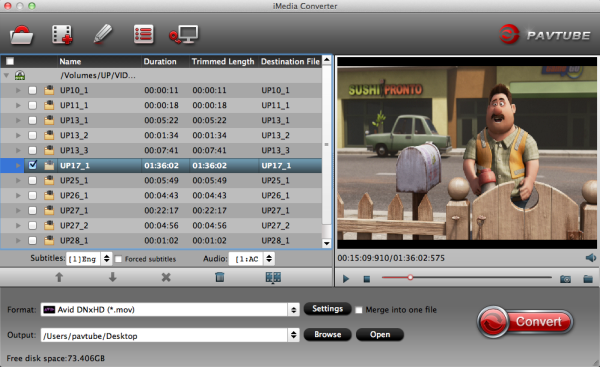
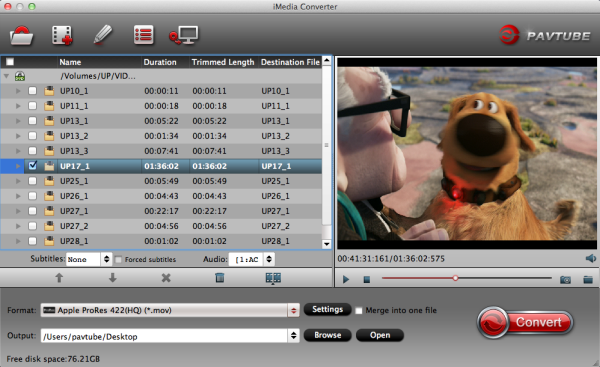
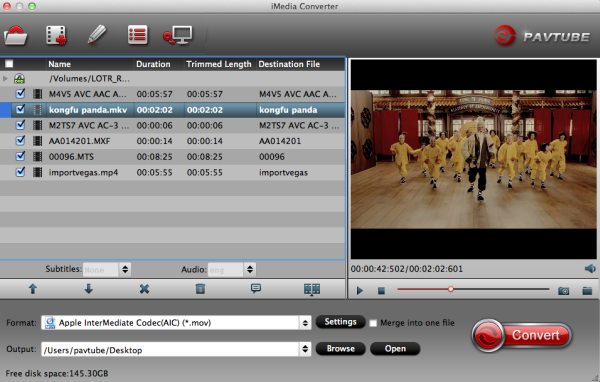
Step 2. Add MTS file.

Use USB cable to hook your Sony Handycam to Mac and keep it on. Thus this camera will show as a hard drive icon on desktop.

Pavtube MTS/M2TS Converter for Mac

Pls note the top left icons; you can click the first one to load individual MTS (real video clips), or click the second one to load the entire AVCHD folder. Wait a moment,source files will be load soon.

Attached the AVCHD footage file structure:
  
AVCHD file structure

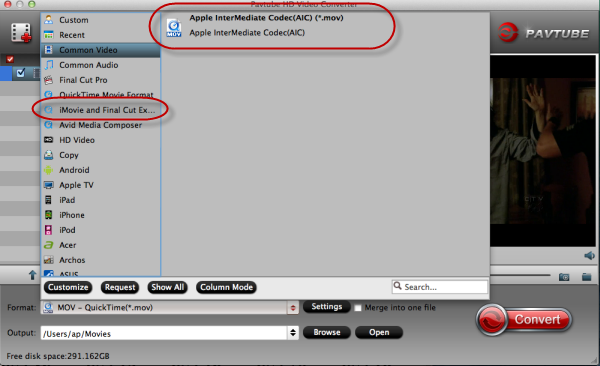
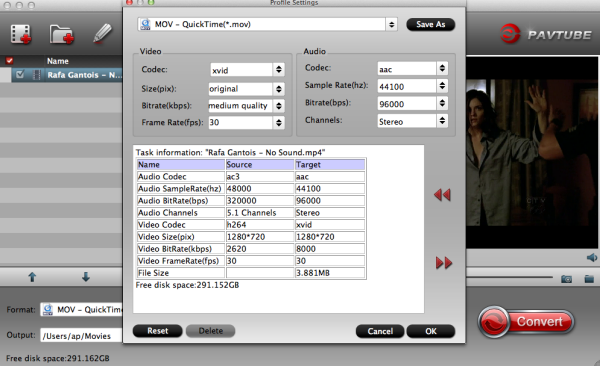
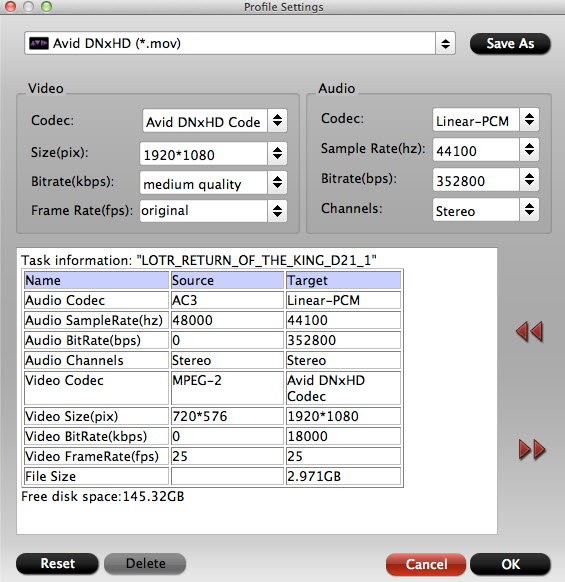
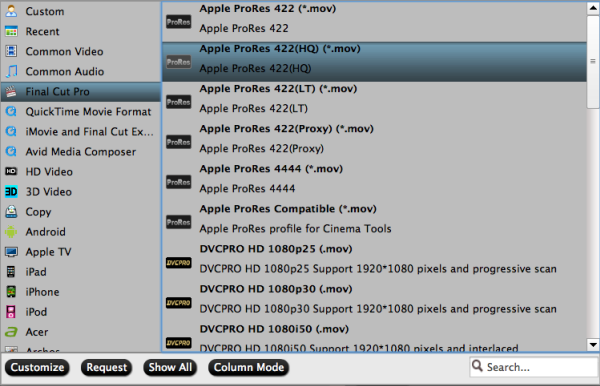
Step 3. Output Settings for iMovie and Final Cut Express.

Click “Format” and choose “iMovie and Final Cut Express -> Apple InterMediate Codec(AIC)(*.mov)“ as the best video codec for iMovie 8/9/11 and FCE 4.

Convert AVCHD to iMovie/FCE

Step 4. Click "Convert" to start converting Sony Handycam HDR-PJ790V/PJ780 MTS to AIC for iMovie/FCE. Wait for a few moments, click “Open” to locate the converted video.

After format conversion finished, you can launch iMovie and add the converted camera clips to your Even library through "File -> Import -> Movies..." like this:
Import Video File to iMovie

Read More:

How to Solve the freezes when importing MTS media to Premiere CC-2015.3?
How to Convert MTS/M2TS with Handbrake Easily?
Best Solution to Play Sony MTS/M2TS Files on MacBook Pro
Play MTS on Smart TV (Windows and Mac Solutions)
Top 5 MTS/M2TS Video Editors for Mac
Top 5 MTS/M2TS Video Editors for Windows (10, 8.1, 8, 7, XP, etc)
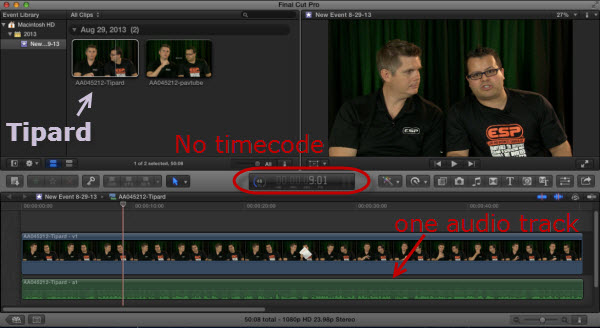
Fix Choppy Issues When Importing AVCHD Files to FCP
Join and Convert MTS/M2TS Files for playing with VLC Player
How to Convert 3D AVCHD MTS to 3D Tablet for Watching?

Saturday, September 28, 2013

Problem Importing M4V files into Final Cut Express

Having difficulty in importing M4V in Final Cut Express? This detailed guide will show you the reason and how to convert M4V files to Final Cut Express for smooth editing.

“I'm trying to edit together many .M4V files in Final Cut Express but it is saying they are not supported. Is there any software out there that can convert these to a supported file or anyway to update FCE to support this file type? Any info will be helpful, thanks”

Do you have difficulty in importing M4V in Final Cut Express? Many Apple users have downloaded a mass of videos from iTunes and they want to make their own funny videos with Final Cut Express for sharing with family and friends or uploading to their blogs. But when they try to put M4V files into FCE, the files are just grayed out and they cannot edit it. What’s wrong?

FCE is professional video editing software designed for advanced editing of digital video as well as high-definition video, which was used by many amateur and professional videographers. And it is very picky about video formats. M4V format is a standard video file format developed by Apple and uses MPEG-4 compression. Due to video codec issue, M4V file is not supported by FCE. In order to edit M4V files in FCE you need a professional M4V to FCE converter to transcode M4V to AIC MOV for FCE.

Pavtube HD Video Converter for Mac can meet your need completely. Various native codecs like ProRes, Apple Intermediate Codec and DNxHD etc are provided, and the optimized preset is also available for Final Cut Express. So you can convert M4V to the optimized formats for FCE with one click.

Now let me show you how to convert M4V files for editing in FCE. First of all, make sure that you have downloaded and installed it. 

1. Import M4V files.

Click “Add video” icon to browse your computer and import the M4V files, or click nearby “Add from folder” button to import the whole folder. And directly drag and drop the M4V files to the software is all right as well. Multiple tasks can be imported for conversion together. 


Note: If you want to combine several videos into one output file, “Merge into one file” on the interface will help you to get it done.

2. Choose video format for FCE.

Click “Format” menu to go through the dropdown list. There is a preset “iMovie and Final Cut Express”. Hit it to choose “Apple Intermediate Codec(AIC)(*.mov)” for output. 


Note: The video and audio parameters for output can be adjusted. If you want to do it, click “Settings” button to check and change parameters like bitrate, channels, size, etc.

3. (Optional) Edit the video.

Some simple edit can be done to the videos before conversion. You can trim video for your needed length, crop video to get rid of annoying black edges, add text/image/video watermark or add subtitles, etc. If you need it, click “Edit” icon to simply edit the videos.


4. Convert M4V to FCE.

It’s time to convert M4V to AIC MOV for FCE on Mac OS X. Click “Convert” button to get started. Then press “Open” button to get the generated files for FCE.

Lifetime license will provide you lifetime free upgrade and service support. Easy-to-sue workflow and output high quality videos will give you a pleasing experience. Just go to try it.

Read More Topics:

Can Final Cut Pro X Edit DJI Phantom 4K video?
Import and Edit Sony A6300 4K XAVC S to Avid Media Composer
Tapeless MTS Workflow with Final Cut Pro 7
Premiere Pro CC 2015 cant import MPEG2 files
Importing Typhoon-H 4K videos to FCP X for editing
Tips for Importing and Editing Canon 5D Mark IV 4K MOV with Avid MC
Top 5 best MXF video converter for Mac

Thursday, September 26, 2013

Enable Galaxy Tab 3 to play MKV/AVI/VOB/Tivo/MPG/WMV/FLV/F4V video without any limitation

This guide helps you to easily transfer SD/HD videos (MKV, AVI, VOB, Tivo, MPG, WMV, MOV, M4V, VRO, FLV, F4V Videos) to Samsung Galaxy Tab 3 in best video quality.

Samsung Galaxy Tab 3 become one of the most remarkable multimedia devices again Apple iPad this year. It comes with a 1280*800 TFT LCD display and a powerful 1.6GHz dual-core CPU for effective graphics processing. With such a portable device in hand, watching videos could be a great enjoyment especially when you want to share videos with family anywhere without device limitation.

But as most other Android tablets, Galaxy Tab 3 is still not able to support most video formats such as MKV/AVI/VOB/Tivo/MPG/WMV/MOV/M4V/VRO/FLV/F4V unless you convert them to Galaxy Tab 3 preferred MP4 format.
put and play hd videos on galaxy tab 3
How to convert MKV/AVI/VOB/Tivo/MPG/WMV/FLV/F4V to Galaxy Tab 3?

Preparation:
  1. Your Galaxy Tab 3 10.1 or Tab 8.0
  2. Your favorite Videos or Movies
  3. A Professional Galaxy Tab 3 Video Converter  is a professional video to Galaxy Tab 3 conversion program which support most mainstream video formats, and convert them to perfect video size and format for playback on Galaxy Tab 3 10.1/8.0. (Mac users: Mac Video Converter for Galaxy Tab 3)
Step 1. Import source videos to the Video to Galaxy Tab 3 Converter.

Install and run the best Video to Galaxy Tab 3 converter on your computer. Add videos in the 
following two ways:

1. Click “Add video” button to choose video files from your hard drive for converting. 2. Directly drag the videos to the Galaxy Tab 3 Video Converter.

Tips: To save your time, you can add multiple video files for converting at a time since batch conversion is well supported.

Step 2. Choose presets for Galaxy Tab 3.

Click the “Format” list to check all the profiles. This Video to Galaxy Tab 3 Converter integrates various presets for different devices; click “Samsung” on the left column to find MP4 presets for Galaxy Tab 3. Or you can key in “galaxy tab” in the little search box to get all the presets specific for Galaxy Tab 10.1, Galaxy Tab 2 7.0, Galaxy Tab 3 and more:


Step 3. Edit video and customize specs before conversion. (Optional)

You can edit these videos before conversion by clicking the pencil-like icon on the top. Some of the source video such as MXF/MTS/MKV could be interlaced which is not good for playback; in this case you can check “Deinterlacing” in Effect tab to get perfect progressive HD MP4 videos. Trim, crop, edit audio, add srt/ass/ssa subtitles and 3D effect are all supported in this edit window.

Back to main interface, you can click Settings to free customize video size, bitrate(quality), frame rate, sample rate and other specs.

Step 4. Start converting all Videos for Galaxy Tab 3.

Click the red “Convert” to start converting MKV/AVI/VOB/Tivo/MPG/WMV/FLV/F4V to Galaxy Tab 3 MP4.
Wait for a few moments, and you can click “Open output folder” to locate the converted video quickly. Now you can transfer videos to your Galaxy Tab 3 for entertainment. (Learn more: How to transfer videos from PC to Galaxy Tab with Kies?)

You may also like:

Monday, September 23, 2013

iPhone 5S vs iPhone 5 vs iPhone 5C: Side By Side Hardware Comparison [VIDEO]

Here's a complete side by side video comparison of iPhone 5S vs iPhone 5C vs iPhone 5. This video that we have put together compares all the said phones, you can find it embedded at the end of this post.

Apple released their seventh and eighth iteration into their iPhone category with the addition of the iPhone 5S and the iPhone 5C. Whilst the 5S – as is typically the case with 's' upgrades – stays physically very similar to the iPhone 5, the new iPhone 5C is very different. Instead of an aluminum rear housing, we see a solid unibody polycarbonate construction, resulting in a slightly deeper handset.

When I opened the box of my iPhone 5C, I was expecting to be presented with what could only be described as a 'cheap alternative' to the iPhone 5S. I was expecting a shoddy product that Apple were trying to shift for a price not far off from the premium. I don't particularly know why I was expecting this, it seems I shouldn't do so in the future, as Apple have so far only impressed me with the iPhone 5C.

 
iPhone 5 vs iPhone 5S vs iPhone 5C. Red iPhone 5 courtesy MendMyi Color Lab

The plastic unibody construction of the rear shell results in a phone which fits snugly in the hand, and the tapered edges only add to this experience. Whilst the iPhone 5S certainly feels more premium than the iPhone 5C, it's hard not to when the entire phone is constructed with aluminum and glass, Apple have done an incredible job by making the 5C not feel second best. This may well have something to do with the fact that the 5S could now be classified as an outdated design, as we've been accustomed to it for a little over a year now in the iPhone 5 itself. We've put together a hardware comparison to compare the iPhone 5S, 5C and, which can be found below.

 
Blue iPhone 5C with Space Gray iPhone 5S

It's certainly too early for me to pass full judgment on any of these devices. A few hours of playing around is only enough to give you a consolidated first impression. With this being said, I'll be surprised if my base opinion changes much. If it does, I'd be more inclined to say that the 5C is likely to be my favorite out of the two new additions to Apple's lineup, the camera and speed optimizations may well be the iPhone 5S's saving grace, however. It's certainly interesting to see Apple continue with the tradition of including an ‘s' model after a redesign, and whether this will ever change or develop into something more.


Source: Redmond Pie

Related Tips:


Tuesday, September 17, 2013

Windows Blu-ray Ripper - Ripping Blu-ray movie on Windows 8/Windows 8.1

As we all know that the new Windows 8/8.1 operating system is not support Blu-ray playback natively. To accomplish this work, you have to ask for the third party tools. Read the article to learn details.

Blu-ray is getting more and more popular for its large storage and excellent quality so that many people prefer watching Blu-ray movies at home. It may be majestic, but is also has heavy disc copy protection from film studios so that you can only watch the Blu-ray movie with the discs on hand. What’s more, frequently changing discs is not convenient at all; and the disc damage in everyday using is also an issue that cannot be neglected.

So, how to get rid of the problems above?

Basically the most recommended solution is to extract Digital Copy of Blu-ray discs.

How to rip Blu-rays on Windows 8/8.1?

There are a lot of different methods for ripping and converting Blu-Rays from the Internet; we combed through the options to pull together the simplest, working method using the most reliable program we could find, the Pavtube Windows 8/8.1 Blu-ray Ripper.
Follow this article to learn how to backup your Blu-rays in order to get rid of frequently disc change or disc damage in everyday using.

Free download the trial version and install it on your PC.

FYI: Mac users can get the Mac version Blu-ray Ripper for Mac.

Step 1. Get this Windows 8/8.1 Blu-ray Ripper installed; import DVD/Blu-ray to it.
  
Click this icon to import Blu-ray/DVD discs, folders and ISO files to Blu-ray Ripper: 

This Pavtube Windows Blu-ray Ripper supports importing Blu-ray/DVD ISO files, which means you will not need to extract the ISO via virtual drive like IsoBuster, CDmage, Daemon Tools and Winmount firstly. Just drag and drop the ISO file into it directly.

It will pop up a window to show you the importing progress as below:


See the main interface of Pavtube Windows 8/8.1 Blu-ray Ripper:


There’re many titles inside one commercial Blu-ray/DVD; the longest one is known as the main title which contains the full length of this movie. But for disc encryption consideration from film studio, there could be several fake titles with disordered chapters and they have the same length with the real one, which makes it hard to find and rip the real movie. But no worries, Pavtube Blu-ray Ripper will recognize the real main title and check it by default.

Step 2. Choose output video format.

Click the drop-down list besides “Format”, you will find various presets for video player, NLEs and devices. Free choose the one you need; you can also submit keywords in the search box to quick locate the corresponding profile.

choose windows 8 video formats

Basically, if you want to get an exactly 1:1 copy of the Blu-ray, you can start the Full Disc Copy by clicking this icon: full disc copy. It will keep all the files and folders as original in your Blu-ray discs.

And if you just want to get a single file to playback on PC, you can try this MKV HD Video(*.mkv) for its good video quality; WMV HD (*.wmv) is also recommended as you can playback it in Windows Media Player directly. Or you can choose “Copy -> Directly Copy” to output an intact .m2ts file in the full length of this movie which will have 1:1 video quality as the original Blu-ray.

Step 3. Choose subtitles and audio tracks in the drop-down list above the “Format”. (Optional)

choose subtitles and audio tracks

Step 4. Customize video specs. (Optional)

Click “Settings” on the right of “Format”, you can free set target video size, bitrate, frame rate, sample rate (Hz) before conversion. Usually the higher bitrate you choose, the better video quality will be.

Step 5. Start ripping Blu-ray on Windows 8/8.1.

Now click the big red “Convert” to start ripping Blu-ray movies on Windows 8/8.1. Wait for moments and after the conversion, you can click “Open output folder” to locate the converted video quickly.

You may want to read:

How to playback Full Disc copied Blu-ray on Windows 8/8.1?

If you choose to do a Full Disc Copy, the Blu-ray will be decrypted and save 1:1 save the original disc including all the folders and info files. Many of you have Blu-ray player program on PC already; but if you have no idea about which one to choose, you can read this:

Monday, September 16, 2013

Smoothly Import AVCHD .mts files to iMovie (From Sony NEX-VG10/VG20/VG30 camcorder)

If you want to edit AVCHD .mts files shot by Sony NEX-VG10/VG20/VG30 smoothly in iMovie, here is right for you. Go to following article to get the instruction.

Sony NEX-VG10/VG20/VG30, which offer excellent image and video quality with interchangeable-lens systems, capture footages in both AVCHD format high definition video and MPEG-2 format standard definition video. Most users prefer to choose AVCHD format in order to get high quality videos. However, many users will face the similar issue about editing in iMovie on Mac OS X as below:  

“I'm strictly an amateur hobbyist hoping to make some good videos for a hugely popular blog. I wanted to covert the AVCHD 60p clips from my recently purchased Sony NEX-VG10 to a mac friendly format for editing in imovie.” 

That is probably because the AVCHD .mts files cannot be recognized by iMovie. In this case, we can count on third-party software to transcode them to a compatible format for iMovie. Here comes Pavtube MTS/M2TS Converter for Mac, a professional MTS to iMovie Converter tool for converting MTS/M2TS/M2T/TS files to a variety of video formats. It will help to transcode Sony NEX-VG10/VG20/VG30 AVCHD .mts files to iMovie friendly AIC codec MOV format, which is intermediate format that features high performance and quality, being less processor-intensive to work with on Mac OS X. With it you are able to edit AVCHD .mts files in iMovie smoothly and then share a better video with friends or post the edited videos to blog. Now follow me to learn how to convert AVCHD .mts files to iMovie on Mac OS X Mavericks.

You are free to download the MTS to iMovie Converter and install on your Mac. Then go to the guide here:

1. Load AVCHD .mts files to the MTS to iMovie Converter.

pavtube mts to imovie converter for mac

Tips: You can joint multiple AVCHD files on to one output file by checking "Merge into one file" on the interface. 

2. Select AIC MOV format for iMovie.

Many output format here and you are recommended to select “AIC .mov” files under “iMovie and Final Cut Express” because it best compatible format for iMovie.

3. Adjust output settings and edit the video. (Optional)

Settings: You are allowed to change the parameters of video and audio, such as Size, Bitrate, Frame Rate, etc.

Edit: Here you are able to edit the video before conversion. You can cut off the unnecessary part of the video in Trim, crop the video, add watermark or 3D effect, attach subtitle and so on.

video editor

4. Convert AVCHD MTS to iMovie.

Click “Convert” button to start conversion and then click “Open” button to locate the generated files for iMovie.

If you want to convert more videos in different formats, you could try iMedia Converter for Mac, which is capable of converting both various HD videos and latest DVD/Blu-ray. You are also allowed to 1:1 backup the whole discs for further playback or editing. 20% discount will be provided if you get it during the time of Back to School Promotion. Just give a try.

Read More:

Covnert Sony F55/F5 4K XAVC Files to Avid Media Composer on Mac OS X

This guide easily show you how to use XAVC Video Converter to convert Sony F55/F5 4K XAVC footage to Avid DNxHD MOV for editing in Avid Media Composer on Mac.

“I just got a new Sony F55 for summer vacation and shot lots of videos. The final goal is to edit some of them in Avid Media Composer. I know that these XAVC footage need to transcode, but the problem is that I just need to extract some part of them to edit and don’t want to waste lots of time converting the full length. Is that possible?”

As one of Sony’s most popular XAVC cameras, Sony F55 is quite a good update of F5 and attracts more users. Both the Sony F5 and F55 shot HD videos with 4096×2160 high definition, which presents exquisite videos for playback on Mac or editing in NLEs like Avid Media Composer.

To solve the problem above, the first point is that you should realize that the XAVC MXF files could not be imported in Avid Media Composer, for that its preferred video format and codec should be DNxHD(*.mov). In this case we need to transcode the video. 

To convert Sony F5/F55 4K XAVC MXF to Avid DNxHD MOV on Mac, this Sony XAVC to Avid Converter for Mac is highly recommended for its simplicity, efficiency and reliable work flow.

1. Import XAVC files to the Mac XAVC Video Converter.

Downlod the best XAVC Video Converter for Mac, install it on your Mac. Hook your Sony F5/F55 to Mac and keep it on; click the two icons which are marked as 1 to load XAVC footage from Sony F55/F5 to Mac XAVC Video Converter like this:


2. Trim out a few clips before converting XAVC to Avid.
  
Now click the pencil-like icon (Edit) and locate the Trim icon:


Drag the small triangle icons to locate the opening and ending; or click the icons in blue to adjust frame by frame. It also supports setting “Start” and “End” point-in-time.

3. Choose output video format for Avid.

Click the drop-down list and choose “Avid Media Composer -> Avid DNxHD(*.mov)” as the most compatible format/codec for AMC editing.


You can free choose the output video quality, size, frame rate by clicking the “Settings”.


4. Convert XAVC files to DNxHD MOV.

Now hit “Convert” and let it running; you can easily locate the converted video by clicking “Open” at the bottom.

Related Articles:

Convert Tivo to Apple ProRes MOV for editing in Final Cut Pro X on Mac

This guide reveals how to convert your TV shows (.tivo) to Apple ProRes 422 MOV for editing in FCP X smoothly; more presets are integrated for NLEs or playback Tivo on portable devices.

We all know the TV shows can be recorded into Tivo files with the help with Tivo Desktop software; it’s much more convenient for us to playback, to edit the TV plays/shows without catching time all the time. But the fact is that video in .tivo format is not very good for playback on computer not to mention edit them

If you also have this problem to figure out how to edit tivo videos on Mac, this article is right here to help you out.

Here I’d like to introduce the Mac Tivo to FCP X Converter, a professional tivo converting program on Mac which supports outputting various video formats. (it can convert Blu-ray, DVD and any HD Video files to FCP support format on Mac OS X.)

Follow this link to download a free trial version

Step One. Download and install this Tivo to FCP X Converter for Mac, click the top left icon to import your tivo files.


Step Two.
 Choose “Final Cut Pro -> Apple ProRes 422(HQ)(*.mov)” as the best intermediate video format for editing tivo in Final Cut Pro X.
 

Pavtube programs also support customizing video size, bitrate(quality), frame rate and other settings; click “Settings” and change the figure as your needs.

Step Three. Trim out ads before conversion.

If you want to share the ultimate video with others or just enjoy by yourself, the ads could be very annoyed. No worries, Pavtube iMedia Converter for Mac enables trim, crop, add subtitles and edit audio features, thus you can do a clear conversion and save the waiting time correspondingly.

Step 4. Now click the big “Convert” to start this easy conversion. Wait for a few moments; you can click “Open” to locate the converted video directly.

OK, let’s import video files into FCPX for editing.

Read more:

MP4 to FCP ǀ AVCHD to FCP ǀ MOV to FCP ǀ H.265 to FCP

Friday, September 13, 2013

GoPro MP4 to iMovie: Editing native GoPro MP4 files in iMovie

Facing problems when you try to import native GoPro MP4 files to iMovie? This article will provide you an easy way to transcode GoPro MP4 to iMovie (iMovie 11/9/8 included) on Mac OS X.

Known for being lightweight, rugged, wearable, or mountable in unusual place such as outside planes, cars, bicycle or boats, GoPro HD camcorder, as a brand of high-definition personal cameras, is often used in extreme action video photography. When you go skiing, surfing, diving or biking outside, it is a great companion to record every wonderful moment. Being an “always-on” type of camera worn on your helmet, attached to your bike, surfboard or other, it usually record long sequences of footage and then you need to edit down. And GoPro HD camera captures footage in MPEG-4 and outputs its files as .MP4 files which are compressed using the h.264 codec.

iMovie is a powerful video edit software and free for Mac users, so many people Mac users use iMovie to edit videos. However, when they import GoPro HD MP4 files to iMovie, MP4 files cannot be recognized by iMovie. MP4 codec is not compatible to iMovie. Here Apple Intermediate Codec is natively supported by iMovie. To resolve the problem, the quick workaround is to convert native GoPro MP4 files to iMovie supported AIC MOV format.

Along with the help of third party software, it will be done effortlessly. Here I share a simple guide on how to transcode native GoPro HD MP4 files for editing smoothly with iMovie. If you're facing the issues, read on to find the answer.

Download Pavtube iMedia Converter for Mac and install it.

It is easy-to-use yet all-in-one ultimate converter. With it, you can effortlessly transcode GoPro MP4 as well as your Blu-ray and DVD movies to Apple Intermediate Codec, which is an iMovie friendly file format keeping the Gopro HD original quality. Besides iMovie, this software can also output DNxHD for Avid, MPEG-2 for Sony Vegas, Premiere Element, AVI for Pinnacle Studio, ProRes for FCP, more NLE systems for native editing.

How to convert MP4 files from GoPro HD cameras to iMovie for editing?

Step 1. Load MP4 files to the Best GoPro MP4 to iMovie Converter for Mac.

Launch the GoPro MP4 to iMovie Converter for Mac and add MP4 files to it. Click “Add video” or “Add from folder” button to load single MP4 video file or the entire folder. Or directly drag and drop the source MP4 file you want to the software. Then you can preview the whole videos in the preview window on the right.


Notes: If you need to join multiple source MP4 file into one output file, you can go to select the desired tasks and check “Merge into one file” for conversion.

Step 2. Choose AIC MOV for iMovie.

Click “Format” option to choose the output format for iMovie. Choose the moset compatible “Apple InterMediate Codec (AIC) (*.mov)” under “iMovie and Final Cut Express” option as output format. 


Notes: If the default settings do not fit your needs, you can click “Settings” button to customize output video parameters like bitrate, channels, frame rate, etc, such as to set higher bitrate to get much better image quality. In general, the higher video bit rate, the larger output file size, and vice versa.

3. Convert GoPro MP4 to iMovie AIC.
  
Hit the big “Convert” button to start converting GoPro MP4 to iMovie AIC. Once finished, hit “Open” button to get the generated files for iMovie.

Now you can import GoPro HD MP4 file into iMovie and then further edit it without any problems. Try it right now.

Read More:

Thursday, September 12, 2013

Top MXF Converter for Mac Review: Pavtube iMixMXF vs Tipard MXF Converter for Mac

Which MXF Converter for Mac is the best MXF Converter software in 2016 or future? If you want to get a top MXF Converter for Mac to convert Panasonic P2 MXF, Canon MXF, Avid MXF and Sony XAVC MXF/XDCAM MXF preserving multiple audio channels and original timecode, etc., this Mac MXF Converter Review will be helpful. We give you top MXF Converter for Mac software reviews for you here. You can according the review to choose a best multi-tracks MXF Converter for you. 

A Brief Review on top MXF Converter for Mac: Pavtube iMixMXF vs Tipard MXF Converter for Mac

Note: If you are running on Windows, please refer to the review Best Multi-track MXF Converter Review

Main interface


Import

Pavtube iMixMXF offers two icons on the top left for "add videos" and "add from folder"; Tipard MXF Converter for Mac integrates them into one, the same place on the top left.

We load three mxf clips in different Camera models.

Source video properties

In Pavtube iMixMXF, we can find a bubble under the three titles. Click it to check the input video/audio properties including video/audio stream, format, resolution, frame rate, bitrate and duration.


Tipard MXF Converter for Mac also has an icon to show source file properties as following. But it seems it didn't show all the info of audio stream. If you want to check/switch them, you'll need to click and select in "Audio Track".


Output Presets:

As a beginner, the output presets (or profiles) are very important to give you conversion guidance with no need to change the bitrate, framerate, size or other figures. Both Pavtube and Tipard have various presets for different devices, and NLEs. Both of them support customize outputting preset if it's needed.


Video Edition:

Let's move on to edit videos before conversion.

Click the 3D icon on top of Pavtube iMixMXF, it pops up a windows to let you trim, crop, add text/image/video watermark, remove/replace audio, add subtitles and add 3D effect. Well organized.


In Tipard MXF Converter for Mac, the Trim feature is listed separately. The rest crop, effect, edit audio and add 3D effect work the same with Pavtube iMixMXF, except the preview window is difficult to see. Besides, the Tipard MXF Converter for Mac is not able to add video watermark as the former.


Now let do a test to convert mxf to prores on both the converters.

Test: workflow of converting MXF to ProRes 422 for FCP X

We test with one MXF clip from Canon XF100 with two audio tracks.

1. We choose "Multi-track video -> Multi-track Apple Prores 422(*.mov)" in Pavtube iMixMXF and "Final Cut Pro -> Apple ProRes 422(*.mov)" in Tipard MXF Converter for Mac.


2. Choose audio tracks in Settings.

Pavtube iMixMXF offers settings for Video and Audio; all the audio streams are showed here. We check both the audio track as apparently we want to save all the sound we recorded. Also it offers a mix into one track option; we keep it unchecked.


In Tipard MXF Converter for Mac main interface, we found the options for Audio Track; but there's no way to select all of them. So we just check the first stream.


3. Start conversion.

Click the Convert icon at nearly the same time. We can see Pavtube iMixMXF (right) shows the percentage while Tipard MXF Converter for Mac (left) doesn't, the preview window changes with the process, but it's stuttering all the time.


4. Import to Final Cut Pro X.

Both the two converted completes at the same time. Now click Open output folder to locate the converted video and import them into FPCX.

We can see both the audio tracks saved separately as original in Pavtube converted video, and the timecode is kept.


While in converted video from Tipard MXF Converter for Mac, it only includes one audio track—the first one we selected. And the original timecode is removed; it's really confusing us as we thought it's basic and should be not difficult to realize.


All the steps done; thanks to Pavtube and Tipard for bringing us the great MXF converting programs despite that we have made a decision
FYI: during our research online, there's another MXF Converter for Mac from Pavtube but it seems to be the lite version of Pavtube iMixMXF. For users who only records one audio track, the former is recommended and it costs less than the latter Pro version. 

Read More: