Having difficulty in importing M4V in Final Cut Express? This detailed guide will show you the reason and how to convert M4V files to Final Cut Express for smooth editing.
“I'm trying to edit together many .M4V files in Final Cut Express but it is saying they are not supported. Is there any software out there that can convert these to a supported file or anyway to update FCE to support this file type? Any info will be helpful, thanks”
Do you have difficulty in importing M4V in Final Cut Express? Many Apple users have downloaded a mass of videos from iTunes and they want to make their own funny videos with Final Cut Express for sharing with family and friends or uploading to their blogs. But when they try to put M4V files into FCE, the files are just grayed out and they cannot edit it. What’s wrong?
FCE is professional video editing software designed for advanced editing of digital video as well as high-definition video, which was used by many amateur and professional videographers. And it is very picky about video formats. M4V format is a standard video file format developed by Apple and uses MPEG-4 compression. Due to video codec issue, M4V file is not supported by FCE. In order to edit M4V files in FCE you need a professional M4V to FCE converter to transcode M4V to AIC MOV for FCE.
Pavtube HD Video Converter for Mac can meet your need completely. Various native codecs like ProRes, Apple Intermediate Codec and DNxHD etc are provided, and the optimized preset is also available for Final Cut Express. So you can convert M4V to the optimized formats for FCE with one click.
Now let me show you how to convert M4V files for editing in FCE. First of all, make sure that you have downloaded and installed it.
1. Import M4V files.
Click “Add video” icon to browse your computer and import the M4V files, or click nearby “Add from folder” button to import the whole folder. And directly drag and drop the M4V files to the software is all right as well. Multiple tasks can be imported for conversion together.
![]()
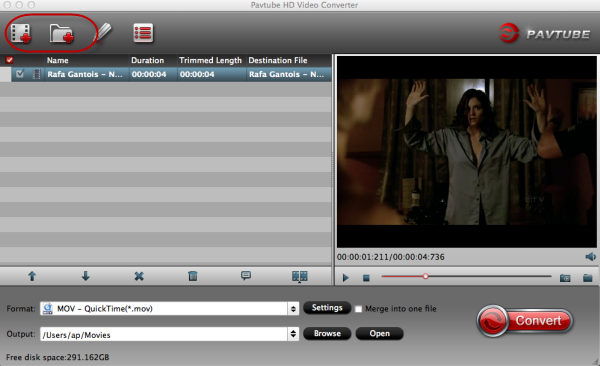
Note: If you want to combine several videos into one output file, “Merge into one file” on the interface will help you to get it done.
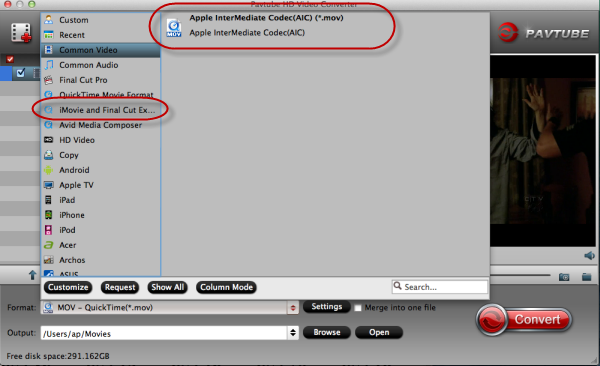
2. Choose video format for FCE.
Click “Format” menu to go through the dropdown list. There is a preset “iMovie and Final Cut Express”. Hit it to choose “Apple Intermediate Codec(AIC)(*.mov)” for output.
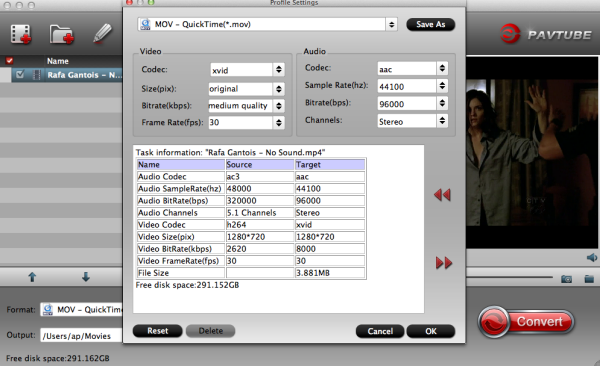
Note: The video and audio parameters for output can be adjusted. If you want to do it, click “Settings” button to check and change parameters like bitrate, channels, size, etc.
3. (Optional) Edit the video.
Some simple edit can be done to the videos before conversion. You can trim video for your needed length, crop video to get rid of annoying black edges, add text/image/video watermark or add subtitles, etc. If you need it, click “Edit” icon to simply edit the videos.
4. Convert M4V to FCE.
It’s time to convert M4V to AIC MOV for FCE on Mac OS X. Click “Convert” button to get started. Then press “Open” button to get the generated files for FCE.
Lifetime license will provide you lifetime free upgrade and service support. Easy-to-sue workflow and output high quality videos will give you a pleasing experience. Just go to try it.
“I'm trying to edit together many .M4V files in Final Cut Express but it is saying they are not supported. Is there any software out there that can convert these to a supported file or anyway to update FCE to support this file type? Any info will be helpful, thanks”
Do you have difficulty in importing M4V in Final Cut Express? Many Apple users have downloaded a mass of videos from iTunes and they want to make their own funny videos with Final Cut Express for sharing with family and friends or uploading to their blogs. But when they try to put M4V files into FCE, the files are just grayed out and they cannot edit it. What’s wrong?
FCE is professional video editing software designed for advanced editing of digital video as well as high-definition video, which was used by many amateur and professional videographers. And it is very picky about video formats. M4V format is a standard video file format developed by Apple and uses MPEG-4 compression. Due to video codec issue, M4V file is not supported by FCE. In order to edit M4V files in FCE you need a professional M4V to FCE converter to transcode M4V to AIC MOV for FCE.
Pavtube HD Video Converter for Mac can meet your need completely. Various native codecs like ProRes, Apple Intermediate Codec and DNxHD etc are provided, and the optimized preset is also available for Final Cut Express. So you can convert M4V to the optimized formats for FCE with one click.
1. Import M4V files.
Click “Add video” icon to browse your computer and import the M4V files, or click nearby “Add from folder” button to import the whole folder. And directly drag and drop the M4V files to the software is all right as well. Multiple tasks can be imported for conversion together.
Note: If you want to combine several videos into one output file, “Merge into one file” on the interface will help you to get it done.
2. Choose video format for FCE.
Click “Format” menu to go through the dropdown list. There is a preset “iMovie and Final Cut Express”. Hit it to choose “Apple Intermediate Codec(AIC)(*.mov)” for output.
Note: The video and audio parameters for output can be adjusted. If you want to do it, click “Settings” button to check and change parameters like bitrate, channels, size, etc.
3. (Optional) Edit the video.
Some simple edit can be done to the videos before conversion. You can trim video for your needed length, crop video to get rid of annoying black edges, add text/image/video watermark or add subtitles, etc. If you need it, click “Edit” icon to simply edit the videos.
4. Convert M4V to FCE.
It’s time to convert M4V to AIC MOV for FCE on Mac OS X. Click “Convert” button to get started. Then press “Open” button to get the generated files for FCE.
Lifetime license will provide you lifetime free upgrade and service support. Easy-to-sue workflow and output high quality videos will give you a pleasing experience. Just go to try it.
Read More Topics:
Can Final Cut Pro X Edit DJI Phantom 4K video?
Import and Edit Sony A6300 4K XAVC S to Avid Media Composer
Tapeless MTS Workflow with Final Cut Pro 7
Premiere Pro CC 2015 can’t import MPEG2 files
Importing Typhoon-H 4K videos to FCP X for editing
Tips for Importing and Editing Canon 5D Mark IV 4K MOV with Avid MC
Top 5 best MXF video converter for Mac