Have some movies that use VC-1 codec can't playback? Here offers an easy solution to convert VC-1 video files to WMV format for editing or playing.
VC-1, which was initially developed as a proprietary video format by Microsoft. It is today a supported standard found in Blu-ray Discs, Windows Media, Microsoft's Silverlight framework, Slingbox, and the now-discontinued HD DVD.

At first Pavtube Video Converter Ultimate probably would be the best choice to finish the conversion. It is simple to use and features fast conversion speed. The advanced encoding technology accelerates its conversion speed to great extent. With this VC-1 to WMV Converter, you can convert videos (including DVDs, Blu-rays) with VC-1 stream much faster than other similar tools. The Mac version is Pavtube iMedia Converter for Mac.
Step 1. Load VC-1 files
Have the Pavtube Video Converter installed on your computer. Run the app and click “Add Video” button to load source VC-1 video files. The converter works with WMV files encoded with WMV9 and supports batch conversion.

Step 2. Select output format
Click on the “Format” bar and find “HD Video” group. For VC-1 to WMV conversion, you may select “WMV HD(*.wmv)". The format creates WMV3 ideos in high quality and perfect sync.

Step 3. Convert VC-1 to WMV.
Click “Convert” to start converting. When the VC-1 to WMV conversion completes, click “completed”, back to the Pavtube Video Converter interface, and click “Open” to find converted WMV videos for streaming to your media players or importing to your editing programs.
Tips and Tricks:
a. Click “Settings” button, the “Profile Settings” windows pops up, on which you are allowed to reset video resolution, video bit rate, frame rate, audio bit rate and sample rate.
In order to avoid quality loss, you may set a higher bitrate before conversion. Find “Bitrate” in Video column, and set it to “high quality”. Or you may type in a bitrate the same with original video.
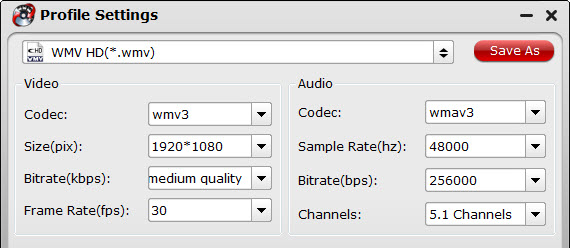
b. To maintain 5.1 surround sound, you may click “Settings” and select “5.1 channels” in the drop-down list of Audio Channels.
c. The trial of Pavtube Video Converter produces video with a Pavtube logo on the screen and you can purchase a license to get rid of the watermark.
d. You can also convert Blu-ray and DVD collections with WMV format using Pavtube VC1 to WMV Converter.