Showing posts with label avchd mts video converter. Show all posts

Wednesday, January 28, 2015

Tips on Loading AVCHD MTS Videos on Mac (FCP, Avid, Premiere)

As long as we mention about AVCHD MTS files, we have to firstly pay attention to MTS file structure. If you’re working with AVCDHD files then these helpful tips should assist with any kinks in your workflow. The most important thing to remember with any digital card format is to copy the entire card, as this will maintain the folder/file structure that a lot of non-linear editing applications need to work with the files such as FCPAvid or Premiere Pro, etc.


Several popular editing apps for AVCHD MTS files:

1 .Avid Media Composer
An incredibly detailed step by step guide to ingesting AVCHD media into Avid Media Composer is allowed here. For visual learners, open the AMA workflow using AVCHD media:

2. Adobe Premiere Pro.
Importing your AVCHD files into Adobe Premiere is incredibly simple – you just drag and drop them into the bin and you’re done. If you’re looking for a document on the ins and outs of working with AVCHD media and the Adobe suite of programs check out this handy official paper.

3. To FCPX.
When importing .MTS files into FCPX it’s important to remember to go to ”Import from Camera > Open Archive” rather than going straight to ”Import”.

4. Final Cut Pro 7
It is pretty straight forward to work with AVCHD files in FCP7 – just copy the card structure to your hard drive and then ingest via Log and Transfer. Set the transcode codec in the preferences cog of Log and Transfer.

Free Apps for Converting AVCHD MTS files.

1.Re-wrap in Quicktime Pro X: Apparently you can simply use Quicktime Pro X on Mountain Lion to re-wrap your AVCHD media out of its .MTS wrapper and into a friendly .mov wrapper (keeping the internal H.264 codec that was inside the .MTS file all along).  As I’m still on Snow Leopard I can’t check this for myself but Apple talks about it here

2. Media Converter: This free app  lets you batch re-wrap .mts files into QuickTime H.264 .mov with uncompressed audio.

Paid MTS Converter for AVCHD MTS files.(Strongly suggested!)

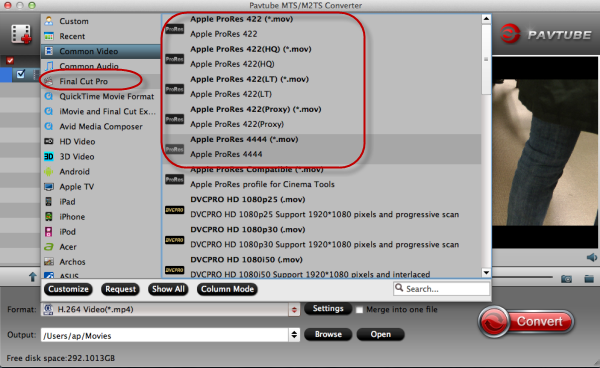
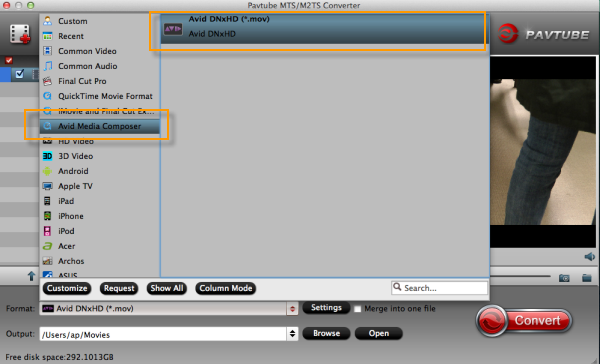
Pavtube MTS Converter for Mac, a comprehensive converter offering you so many video formats including: FCP best supported Apple ProRes, Avid best supported DNxHD mov or Adobe best supported mpg, wmv and mov. Some starting steps are also followed here:

Import your AVCHD MTS files correctly with ‘Add Video’ or ‘Add From Folder’Click ‘Format bar’ to choose your best format we mentioned above.


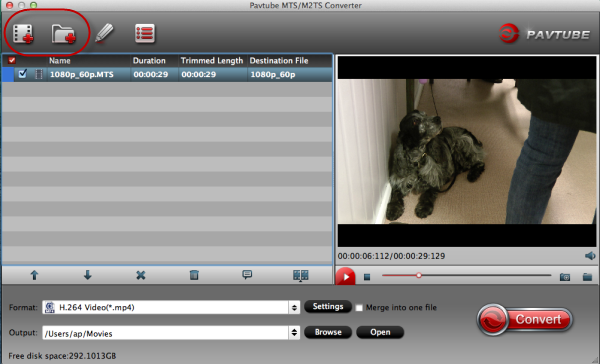
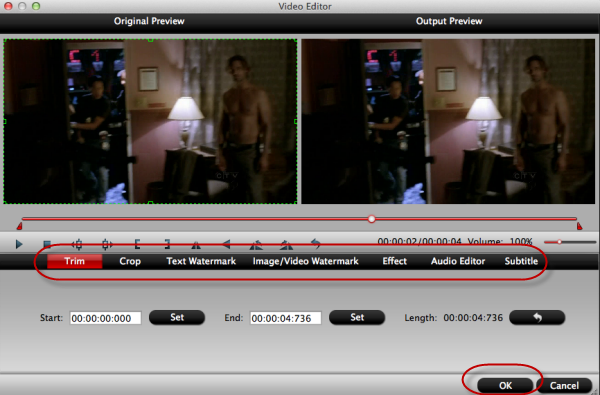
’Settings’ button is also offered for you.’ Video size, bitrates or frame rate’


Then ‘Convert’ to start you conversion.

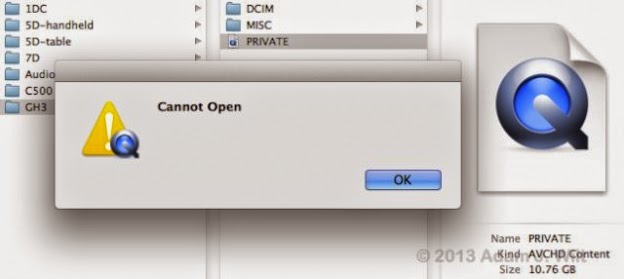
The AVCHD Folder ‘Cannot Open’ Error.
If you’ve ever run into the situation where you get a ”Cannot Open” message from Mac OSX while using a NAS (network-attached storage) device or a case sensitive disk, then this 

Read More:

How to Solve the freezes when importing MTS media to Premiere CC-2015.3?
How to Convert MTS/M2TS with Handbrake Easily?
Best Solution to Play Sony MTS/M2TS Files on MacBook Pro
Play MTS on Smart TV (Windows and Mac Solutions)
Top 5 MTS/M2TS Video Editors for Mac
Top 5 MTS/M2TS Video Editors for Windows (10, 8.1, 8, 7, XP, etc)
Fix Choppy Issues When Importing AVCHD Files to FCP
Join and Convert MTS/M2TS Files for playing with VLC Player
How to Convert 3D AVCHD MTS to 3D Tablet for Watching?

Friday, September 5, 2014

Thought on A Workflow for AVCHD in FCPX and DaVinciResolve 9

When you have a thought on a workflow for AVCHD in FCPX and Resolve 9, why not take the following paper for a reference? 
Do U know here?

FCPX---(pronounced "Final Cut Pro Ten") is a video editing app for OS X from Apple Inc. and the successor to Final Cut Pro. FCP X was announced in April 2011 simultaneously at the Los Angeles Final Cut Pro Users Group held at Bally's Las Vegas and at the NAB Show in the Las Vegas Convention Center and released in June 2011.

Resolve 9As one of the earliest pioneers in post production products, Davinci Systems introduced several innovative products and was considered a significant player in the post production industry during its 25 years of operation.


With Blackmagic DesignDaVinci Resolve 9 Lite being free and a really powerful grading tool, many users are trying it out. It makes a great companion to Apple Final Cut Pro X and is really easy to move files between both applications via XML.

However, we have found that it performs really badly with AVCHD files. When you import AVCHD files, like those from the Sony NEX-FS100 / 700, FCPX creates ProRes Proxy files in the background. FCPX then uses those files in the timeline, so you are not actually editing with the AVCHD file but rather the proxy.

Here is a simple workflow for you to get a smooth working process in Resolve from FCPX with AVCHD. Let’s have a look.

In FCPX: Select your Event containing your clips. Select “File/Transcode Media…” and then select “Create optimized media”. Let FCPX do its thing. FCPX is now transcoding the AVCHD files to ProRes 422. Now export your project XML file.

In Resolve: Launch and browse your Final Cut Events Folder in Media panel. Find the Event folder for your project, inside it you’ll see a folder called “Transcoded Media” in there you’ll find 3 folders, open “High Quality Media”. Select all the files, right click and select “Add to Media Pool”.

Now move to the Conform tab and import the FCPX XML file and uncheck “Automatically import source clips into media pool”.Resolve will use the files already in the Media Pool, which are high quality ProRes 422 files, rather than the original AVCHD files. Things should run a lot smoother.

Question: How to make it easier for editing AVCHD MTS files both in FCPX or Resolve9?
Answer: An AVCHD MTS Video Converter for you!

If you wanna know more about the specific process of converting AVCHD MTS to Apple Prores mov for FCP and DNxHD mov for Resolve, here we can go.

Step1. Import AVCHD MTS files from ‘Add videos’ or ‘Add from folder’


Step 2. Make it easier to choose output formats.(1).’Final Cut Pro>>Apple ProRes 422 codec mov.’  (2).’Avid Media Compose’ >> “Avid DNxHD (*.mov)


Step 3.More ‘Settings’ for you! Set something about your video and audio.  Including Video size, bitrates and fame rate and more. Usually 1920*1080 video size and 30fps video frame rate are recommended for FCP editing. Well, if you prefer to work with 4K video, you can adjust video size to get 4K ProRes for FCP.


Tip: More small functions are waiting for you. ’Edit’>>’Crop, Trim, Subtitles, etc.’


Start conversion with ‘Convert’ button.

Not only for FCP or Resolve, but also for other editing system like iMovie or Premiere. MTS Video Cnverter for Mac will help you import the file correctly and saving the rendering time.

More:
Import Panasonic GH4 4K Videos to DaVinci Resolve 9
Make Avid DNxHD MXF Load to Resolve