The following post is reproduced from Bitstreaming Dolby TrueHD and DTS-HD with the Intel Core i3, Published on Do it Yourself HTPC Blog, written by ddewaele, to whom I would like to say THANK YOU.
“When the Intel Core i3 platform was announced, it was hailed as being the holy grail for HTCP enthusiasts. The reason being that the Core i3 chip (that combines both CPU and GPU onto one physical chip) offers more then the current Atom based platforms have to offer. Not only is the Core i3 platform a lot more powerful compared to the Intel Atom platform, is also maintains a fairly low power consumption. Obviously, it cannot compete with the power consumption of the Atom. However, combine the Atom with an Ion chipset and a blu-ray player, and the difference becomes a lot smaller.
One of the biggest strengths of the Core i3, and the H55 chipset is that it also supports HDMI Audio Pass Through for Native Dolby TrueHD & DTS-HD Master Audiostreaming.
The primary goal off this writing was to get the Dolby TrueHD & DTS-HD Master Audio up & running. And guess what …. it really worked !
I hooked up the Corei3 build to my Onkyo TX SR-507 receiver via HDMI
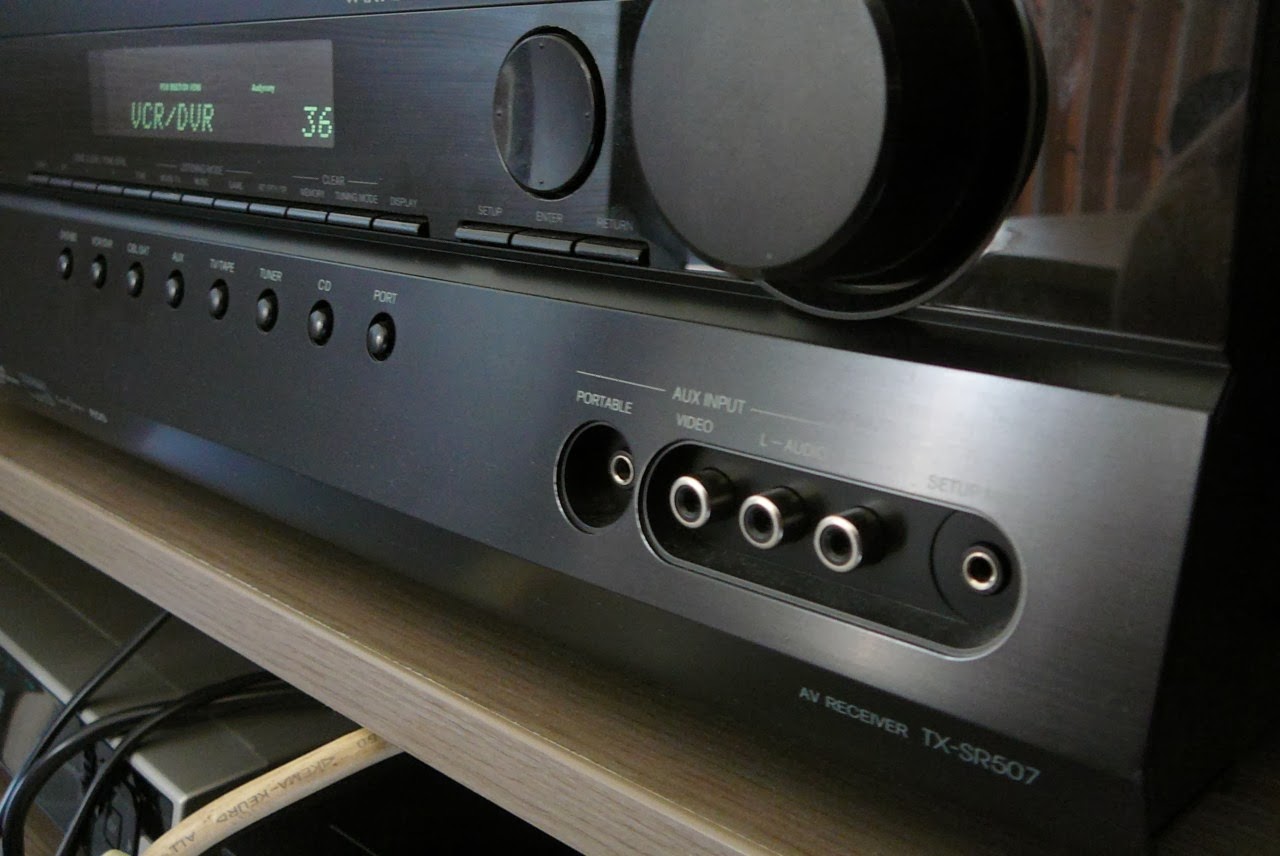
The receiver has support for HD audio formats such as Dolby TrueHD and DTS-HD Master Audio making it an ideal combo for a high definition audio experience.

Streaming DTS-HD/Dolby TrueHD from HTPC
Most Blu-ray discs contain either a DTS HD Master Audio, or a Dolby True HD soundtrack They’re basically the successors of the DTS 5.1 and Dolby Digital 5.1 coded. Most HTPC boxes support DTS 5.1 and Dolby Digitial 5.1 without much effort. Most Atom/Ion combos for example, when hooked up to a receiver through HDMI, will have no problem sending the DTS / Dolby stream to the receiver. With DTS HD Master Audio, or Dolby True HD, it’s a different story.
If you’re not all that familiar with audio formats, try to think of DTS or Dolby as a compressed format (much like a ZIP file). The audio is encoded or compressed (to consume less space on a Blu-ray disc). That encoded / compressed audio is sent to the receiver, and it’s the receivers responsibility to decode the audio stream. Because the receiver is receiving the encoded / compressed audio from the player (your HTCP), it notices this and turns on the DTS or Dolby symbol on your receiver display.
There are basically 2 types of audio
uncompressed audio = LPCM
lossless compressed = DTS HD / DD TrueHD
So bitstreaming means sending undecoded True HD or DTS HD Bitstream over a digital link (minimum HDMI 1.3) to an external device (receiver / amplifier). The amplifier with True HD and DTS HD decoding capabilities can then decode that stream, rather than the software on the HTPC.
An alternative to bitstreaming is software decoding. Here, a piece is software (ex: ffdshow) is responsible for decoding the True HD / DTS HD bitstream. It then goes on to send multi channel linear PCM to the receiver (MCH PMC). Here, your receiver is unaware that it’s receiving either Dolby True HD or DTS HD, so there will be no indicators on the receiver telling you that it is actually playing Dolby True HD / DTS HD. The receiver just gets the multi channel linear PCM and outputs that.
Cards that support bitstreaming :
Asus Xonar 1.3 HDMI
Auzen X-Fi HomeTheater HD.
ATI 57* graphic card series
The Core i3 HTCP build
Today I got my gigabyte motherboard replacement (the mini-ITX version I had originally ordered), so I could finally start building my first Core i3 based HTCP. The core components of the build are the GigaByte H55N-USB3 motherboard, and the Intel Core i3 530 CPU.


Everything was assembled in my Lian Li PC-Q07 mini-ITX case.
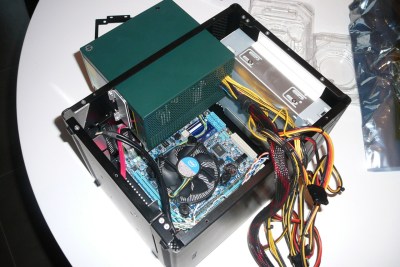
First some general figures on the Core i3 system:
Idle
CPU32/38 degrees
Intel stock cooler1200rpm (audible – but very quiet)
Idle (windows desktop)50W
Load (Prime95
CPU67/70 degrees
Intel stock cooler2500rpm (audible – noisy)
Idle (windows desktop)90W
I installed Windows 7 on it (I’ll write up my experiences with Linux in a future story). After installing all the drivers from the Gigabyte CD (+ updates received via the internet), the system booted and the Intel TV Wizard allowed me to calibrate the screen on my Sony LCD TV.
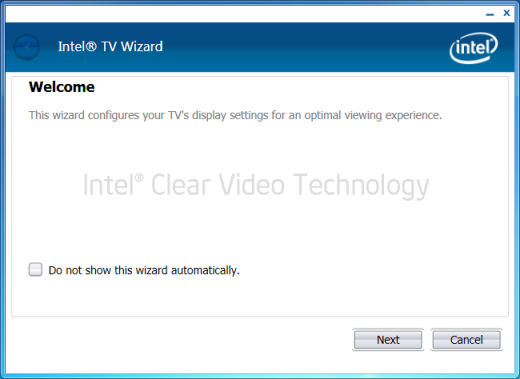
This allows you to calibrate the screen, as initially, there were black borders around the screen, so it needed to be stretched a little.

After that, it was time to configure my audio settings.
For some reason, the Realtek Digital Output was selected as the default playback device. I had to manually select the Intel(R) Display Audio as the default playback device in order to get sound up & running.
The sound settings in control pannel allow you to configure the playback device by selecting your speaker set (in my case, 5.1 speaker setup).
It also allows you to test the speaker setup by emitting a sound through each individual speaker.
Once this was done, the sound was up & running in both the windows environment, and my other media player software (XBMC, TotalMedia Theatre3,….)
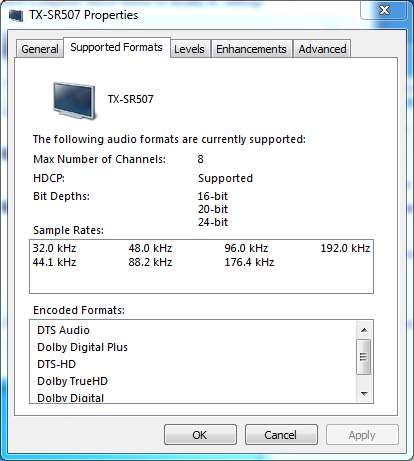
The Intel Display Audio device supports all the major high definition audio formats such as :
DTS Audio
Dolby Digital Plus
DTS-HD
Dolbu TrueHD
Dolby Digital
I supports up to 8 channels.
Obviously, the DTS-HD and Dolby TrueHD is the main interest for this topic.Test setupSoftware required for the tests
As the goal is to bitstream some Dolby TrueHD and DTS-HD Master Audio to the receiver, we’ll be needing some software to do so.
I’ve selected a commercial player (required for Blu-ray disc playback), and an open-source video player for HD media formats (H264 encoded video in a mkv container).
TotalMedia Theatre 3 Platinum. (trial version or full version)
Blu-ray movie player
Homepage : http://www.arcsoft.com/estore/software_title.asp?ProductCode=TMT3P
Media Player Classic – HomeCinema v1.4.2499.0 (latest version at the time of writing)
Free audio and video player for Windows.
Homepage : http://mpc-hc.sourceforge.net/
ffdshow tryouts revision 3556
DirectShow and Video for Windows codec with support for a wide range of audio and video formats, such as Xvid, DivX, and H.264.
Homepage : http://ffdshow-tryout.sourceforge.net/index.php
The latest stable beta is rev3154 (released on 20091209).
For these tests however, you’ll be needing rev3556 (built on 20100902)
Media required for the test
Obviously, if we want to test we also need some files containing high definition audio.Demo World contains a large number of Dolby / DTS trailers, some of them Dolby True HD and DTS-HD Master Audio.
There’s a lot of talk on the internet regarding the playback of these high definition audio codecs. Some say that you can only bit-stream them to your receiver when played from an original Blu-ray disc. We’ll soon find out….
I’ve downloaded 2 media files from Demo World that we’ll be using in the test :
Terminator 2 (Lossless) : DTS-HD MA 5.1
Bit Harvest (Lossless) : Dolby TrueHD 7.1
Inspecting the media files
When dealing with media files, it’s always very interesting to know what kind of video and audio tracks are included. Media Player Classic Home Cinema allows you to view the properties of a media file by either
right-clicking in the video screen and clicking properties
using the File menu – Properties
SHIFT – F10
Terminator 2 (Lossless) : DTS-HD MA 5.1
Video: WVC1 1920×1080 29.97fps [Video - VC-1, 1920x1080, 29.970 fps (1011,fd,00)]
Audio: DTS 48000Hz 6ch 1509kbps [Audio - DTS-HD Master Audio, 48.0 kHz, 6 chn, 1509.8 kbit/s (1100,fd,00)]
Subtitle [No subtitles]
Bit Harvest (Lossless) : Dolby TrueHD 7.1
Video: MPEG4 Video (H264) 1920×1080 23.98fps [Video - AVC (H.264), High Profile, Level 4.1, 1920x1080, 23.976 fps (1011,e0,00)]
Audio: Dolby AC3 48000Hz 6ch 640kbps [Audio - Dolby TrueHD, 48.0 kHz, 6 chn, 640.0 kbit/s (1100,fd,00)]
Subtitle [No subtitles]Test #1 : Playing a Blu-ray disc
The first test I did was playing a Blu-ray disc using TotalMedia Theatre 3 Platinum. As you can see, both the Dolby True HD and DTS-HD Master Audio lights started blinking on my Onkyo Receiver.


Test #2 : Playing a media file using TotalMedia Theatre.
We played the media files (m2ts) using TotalMedia Theatre :
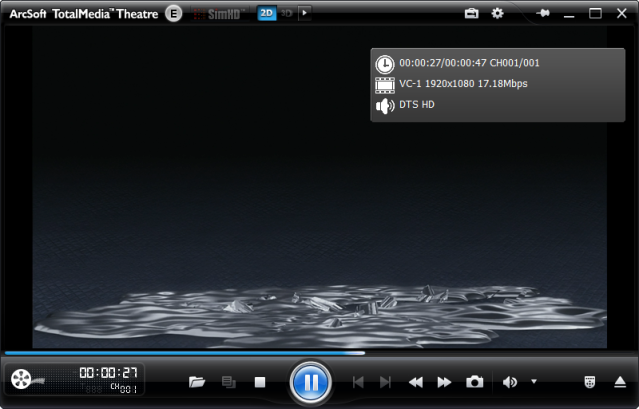
The Dolby TrueHD movie was also bitstreamed correctly to the receiver.

Test #3 : Playing the m2ts media file using Media Player Classic
ArcSoft TotalMedia Theatre is a great product, but it comes at a price. Most HTPC enthousiast use free players like Media Player Classic Home Cinema (MPC-HC), VLC or XBMC. Would it be possible to bitstream the HD Audio using these free players as well ? Lets find out….
When playing media files using Media Player Classic, you’lI get this on the receiver :

Media Player has a DTS / AC3 Decoder. By default, it decodes 16 bit PCM as stereo to the speakers.
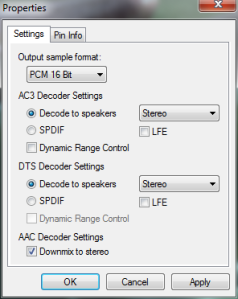
Be sure to change this to your 5.1 or 7.1 configuration in order to get surround sound instead of stereo.

We’re going to disable the DTS/AC3 decoder by adding an external filter. We’ll select the ffdshow audio decoder. (Options – Filters – External Filters – Add Filter)

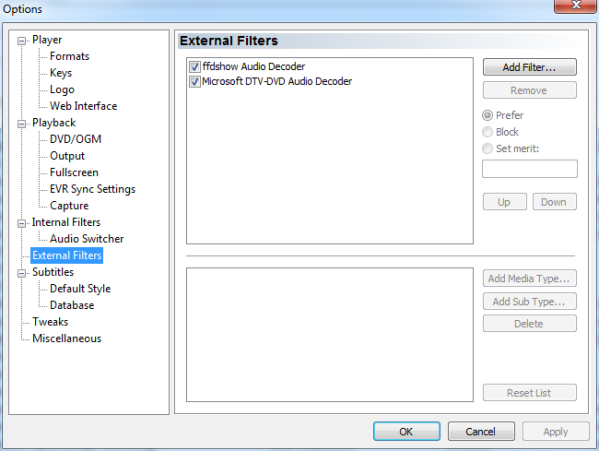
When we now play the media file, the ffdshow audio decoder will be used (instead of the built-in DTS/AC3 Decoder)
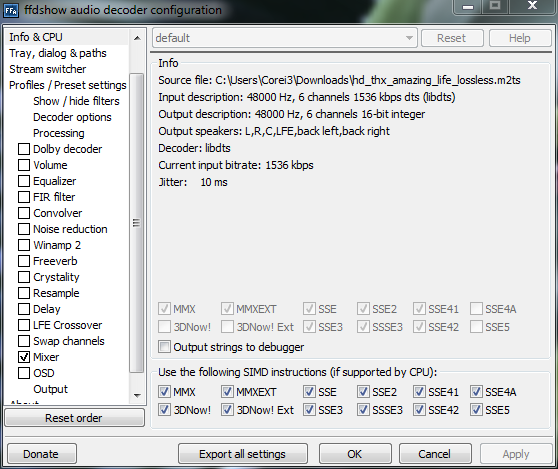
During my first attempt with ffdshow, I still wasn’t able to get the DTS-HD or Dolby TrueHD bitstreaming up & running. As you can see from the ffdshow audio decoder configuratio (output section), only AC3 and DTS were mentioned.
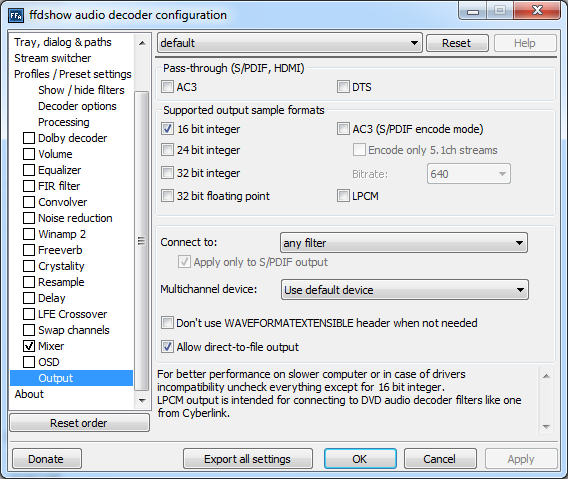
I was using the latest stable beta (rev3154).
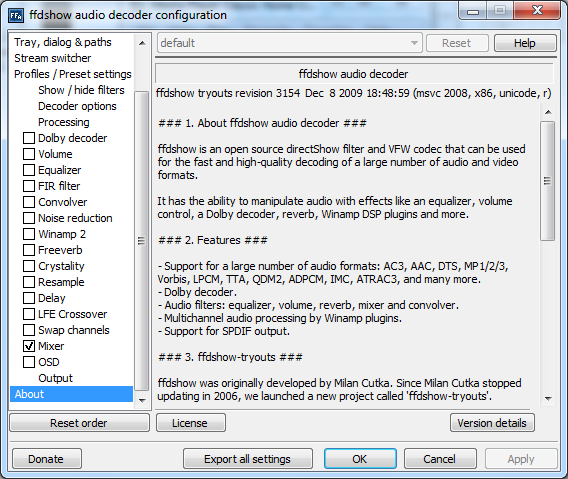
When using the latest revision (at the time of writing , rev 3556), things started to change.

In the output section, I now had the option of selecting Dolby TrueHD and DTS HD. And from that moment on, Dolby TrueHD and DTS HD was up & running using Media Player Classic HomeCinema.

Related Apps:
More Blu-ray Disc Media Players- PowerDVD, WinDVD, etc
Blu-ray Disc Rippers (for ripping Blu-ray to HTPC with original HD audio) – Pavtube Blu-ray Ripper (for Windows/Mac)
Read more:
“When the Intel Core i3 platform was announced, it was hailed as being the holy grail for HTCP enthusiasts. The reason being that the Core i3 chip (that combines both CPU and GPU onto one physical chip) offers more then the current Atom based platforms have to offer. Not only is the Core i3 platform a lot more powerful compared to the Intel Atom platform, is also maintains a fairly low power consumption. Obviously, it cannot compete with the power consumption of the Atom. However, combine the Atom with an Ion chipset and a blu-ray player, and the difference becomes a lot smaller.
One of the biggest strengths of the Core i3, and the H55 chipset is that it also supports HDMI Audio Pass Through for Native Dolby TrueHD & DTS-HD Master Audiostreaming.
The primary goal off this writing was to get the Dolby TrueHD & DTS-HD Master Audio up & running. And guess what …. it really worked !

The receiver has support for HD audio formats such as Dolby TrueHD and DTS-HD Master Audio making it an ideal combo for a high definition audio experience.

Streaming DTS-HD/Dolby TrueHD from HTPC
Most Blu-ray discs contain either a DTS HD Master Audio, or a Dolby True HD soundtrack They’re basically the successors of the DTS 5.1 and Dolby Digital 5.1 coded. Most HTPC boxes support DTS 5.1 and Dolby Digitial 5.1 without much effort. Most Atom/Ion combos for example, when hooked up to a receiver through HDMI, will have no problem sending the DTS / Dolby stream to the receiver. With DTS HD Master Audio, or Dolby True HD, it’s a different story.
If you’re not all that familiar with audio formats, try to think of DTS or Dolby as a compressed format (much like a ZIP file). The audio is encoded or compressed (to consume less space on a Blu-ray disc). That encoded / compressed audio is sent to the receiver, and it’s the receivers responsibility to decode the audio stream. Because the receiver is receiving the encoded / compressed audio from the player (your HTCP), it notices this and turns on the DTS or Dolby symbol on your receiver display.
There are basically 2 types of audio
uncompressed audio = LPCM
lossless compressed = DTS HD / DD TrueHD
So bitstreaming means sending undecoded True HD or DTS HD Bitstream over a digital link (minimum HDMI 1.3) to an external device (receiver / amplifier). The amplifier with True HD and DTS HD decoding capabilities can then decode that stream, rather than the software on the HTPC.
An alternative to bitstreaming is software decoding. Here, a piece is software (ex: ffdshow) is responsible for decoding the True HD / DTS HD bitstream. It then goes on to send multi channel linear PCM to the receiver (MCH PMC). Here, your receiver is unaware that it’s receiving either Dolby True HD or DTS HD, so there will be no indicators on the receiver telling you that it is actually playing Dolby True HD / DTS HD. The receiver just gets the multi channel linear PCM and outputs that.
Cards that support bitstreaming :
Asus Xonar 1.3 HDMI
Auzen X-Fi HomeTheater HD.
ATI 57* graphic card series
The Core i3 HTCP build
Today I got my gigabyte motherboard replacement (the mini-ITX version I had originally ordered), so I could finally start building my first Core i3 based HTCP. The core components of the build are the GigaByte H55N-USB3 motherboard, and the Intel Core i3 530 CPU.


Everything was assembled in my Lian Li PC-Q07 mini-ITX case.

First some general figures on the Core i3 system:
Idle
CPU32/38 degrees
Intel stock cooler1200rpm (audible – but very quiet)
Idle (windows desktop)50W
Load (Prime95
CPU67/70 degrees
Intel stock cooler2500rpm (audible – noisy)
Idle (windows desktop)90W
I installed Windows 7 on it (I’ll write up my experiences with Linux in a future story). After installing all the drivers from the Gigabyte CD (+ updates received via the internet), the system booted and the Intel TV Wizard allowed me to calibrate the screen on my Sony LCD TV.

This allows you to calibrate the screen, as initially, there were black borders around the screen, so it needed to be stretched a little.

After that, it was time to configure my audio settings.
For some reason, the Realtek Digital Output was selected as the default playback device. I had to manually select the Intel(R) Display Audio as the default playback device in order to get sound up & running.
The sound settings in control pannel allow you to configure the playback device by selecting your speaker set (in my case, 5.1 speaker setup).
It also allows you to test the speaker setup by emitting a sound through each individual speaker.
Once this was done, the sound was up & running in both the windows environment, and my other media player software (XBMC, TotalMedia Theatre3,….)

The Intel Display Audio device supports all the major high definition audio formats such as :
DTS Audio
Dolby Digital Plus
DTS-HD
Dolbu TrueHD
Dolby Digital
I supports up to 8 channels.
Obviously, the DTS-HD and Dolby TrueHD is the main interest for this topic.Test setupSoftware required for the tests
As the goal is to bitstream some Dolby TrueHD and DTS-HD Master Audio to the receiver, we’ll be needing some software to do so.
I’ve selected a commercial player (required for Blu-ray disc playback), and an open-source video player for HD media formats (H264 encoded video in a mkv container).
TotalMedia Theatre 3 Platinum. (trial version or full version)
Blu-ray movie player
Homepage : http://www.arcsoft.com/estore/software_title.asp?ProductCode=TMT3P
Media Player Classic – HomeCinema v1.4.2499.0 (latest version at the time of writing)
Free audio and video player for Windows.
Homepage : http://mpc-hc.sourceforge.net/
ffdshow tryouts revision 3556
DirectShow and Video for Windows codec with support for a wide range of audio and video formats, such as Xvid, DivX, and H.264.
Homepage : http://ffdshow-tryout.sourceforge.net/index.php
The latest stable beta is rev3154 (released on 20091209).
For these tests however, you’ll be needing rev3556 (built on 20100902)
Media required for the test
Obviously, if we want to test we also need some files containing high definition audio.Demo World contains a large number of Dolby / DTS trailers, some of them Dolby True HD and DTS-HD Master Audio.
There’s a lot of talk on the internet regarding the playback of these high definition audio codecs. Some say that you can only bit-stream them to your receiver when played from an original Blu-ray disc. We’ll soon find out….
I’ve downloaded 2 media files from Demo World that we’ll be using in the test :
Terminator 2 (Lossless) : DTS-HD MA 5.1
Bit Harvest (Lossless) : Dolby TrueHD 7.1
Inspecting the media files
When dealing with media files, it’s always very interesting to know what kind of video and audio tracks are included. Media Player Classic Home Cinema allows you to view the properties of a media file by either
right-clicking in the video screen and clicking properties
using the File menu – Properties
SHIFT – F10
Terminator 2 (Lossless) : DTS-HD MA 5.1
Video: WVC1 1920×1080 29.97fps [Video - VC-1, 1920x1080, 29.970 fps (1011,fd,00)]
Audio: DTS 48000Hz 6ch 1509kbps [Audio - DTS-HD Master Audio, 48.0 kHz, 6 chn, 1509.8 kbit/s (1100,fd,00)]
Subtitle [No subtitles]
Bit Harvest (Lossless) : Dolby TrueHD 7.1
Video: MPEG4 Video (H264) 1920×1080 23.98fps [Video - AVC (H.264), High Profile, Level 4.1, 1920x1080, 23.976 fps (1011,e0,00)]
Audio: Dolby AC3 48000Hz 6ch 640kbps [Audio - Dolby TrueHD, 48.0 kHz, 6 chn, 640.0 kbit/s (1100,fd,00)]
Subtitle [No subtitles]Test #1 : Playing a Blu-ray disc
The first test I did was playing a Blu-ray disc using TotalMedia Theatre 3 Platinum. As you can see, both the Dolby True HD and DTS-HD Master Audio lights started blinking on my Onkyo Receiver.


Test #2 : Playing a media file using TotalMedia Theatre.
We played the media files (m2ts) using TotalMedia Theatre :

The Dolby TrueHD movie was also bitstreamed correctly to the receiver.

Test #3 : Playing the m2ts media file using Media Player Classic
ArcSoft TotalMedia Theatre is a great product, but it comes at a price. Most HTPC enthousiast use free players like Media Player Classic Home Cinema (MPC-HC), VLC or XBMC. Would it be possible to bitstream the HD Audio using these free players as well ? Lets find out….
When playing media files using Media Player Classic, you’lI get this on the receiver :

Media Player has a DTS / AC3 Decoder. By default, it decodes 16 bit PCM as stereo to the speakers.

Be sure to change this to your 5.1 or 7.1 configuration in order to get surround sound instead of stereo.

We’re going to disable the DTS/AC3 decoder by adding an external filter. We’ll select the ffdshow audio decoder. (Options – Filters – External Filters – Add Filter)


When we now play the media file, the ffdshow audio decoder will be used (instead of the built-in DTS/AC3 Decoder)

During my first attempt with ffdshow, I still wasn’t able to get the DTS-HD or Dolby TrueHD bitstreaming up & running. As you can see from the ffdshow audio decoder configuratio (output section), only AC3 and DTS were mentioned.

I was using the latest stable beta (rev3154).

When using the latest revision (at the time of writing , rev 3556), things started to change.

In the output section, I now had the option of selecting Dolby TrueHD and DTS HD. And from that moment on, Dolby TrueHD and DTS HD was up & running using Media Player Classic HomeCinema.

Related Apps:
More Blu-ray Disc Media Players- PowerDVD, WinDVD, etc
Blu-ray Disc Rippers (for ripping Blu-ray to HTPC with original HD audio) – Pavtube Blu-ray Ripper (for Windows/Mac)
Read more: