If you have problems about playing Amazon Instant Video on your Nexus 10 tablet, you can check out the tutorial to Remove DRM from Amazon WMV and record Amazon Instant Video(.wmv) to your Nexus 10.
Have you purchased lots of WMV videos from Amazon store and want to put these Amazon Instant videos to your Google Nexus 10? As is known to everybody, the WMV videos purchased from Amazon store, including music, videos, movies, and TV show etc. are usually format type unsupported by the Google Nexus 10. The problem is, those WMV videos you downloaded from Amazon are protected (by DRM), and can't be played on any Android/Windows 8 tablet except for the Amazon Kindle Fire (HD). So if you would like to transfer Amazon WMV videos to Nexus 10 for playback, you have to remove DRM from Amazon Instant Video and convert/record it to Nexus 10 compatible formats.
Refer to Google Nexus 10 supported codecs
To do it, Pavtube ChewTune is a great help. It is an all-in-one DRM Removal Program to help you convert/record Amazon WMV videos effortlessly to Nexus 10 supported MP4 format in high quality. After that, you can play your Amazon Instant Video(WMV) on Nexus 10 very smoothly. Now, let's start to convert and transfer Amazon WMV to Nexus 7. (Note: For the common WMV videos, Pavtube Video Converter is recommended to you).
The screen is undoubtedly one of the standout features of the Nexus 10. As the name suggests, it measures 10 inches on the diagonal but more importantly packs an astounding 2,560x1,600-pixel resolution. We were previously blown away by the pin-sharp display of the new iPad with its 2,048x1,536-pixel resolution. The Nexus 10 casually swans past that, to offer an even more refined viewing experience.
Now you want to put some Amazon Instant videos to the Google Nexus 10? Wait a minute. The Amazon Instant videos, though mainly .wmv format, are not supported by Google Nexus 10. The problem is, those WMV videos you downloaded from Amazon are protected (by DRM), and can't be played on any Android tablet except for the Amazon Kindle Fire. To get the Amazon WMV playable on Nexus 10, you'll have to remove the DRM protection first.
The tools you need to transfer Amazon WMV movies to Nexus 10: A powerful Amazon WMV video DRM remove tool and a WMV to Nexus 10 converter. Pavtube ChewTune combines these two tools together and makes it possible to watch purchased DRM videos on Nexus 10.
Read more: Pavtube ChewTune Review - Free M4V/WMV videos from DRM protection
To convert videos to Google Nexus 10 with best settings, you can download profile patch for the software(Windows only).
Remove DRM protection off Amazon video and convert WMV to the Nexus 10 for playing
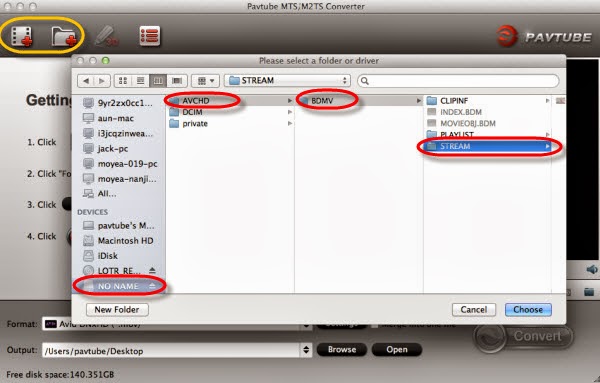
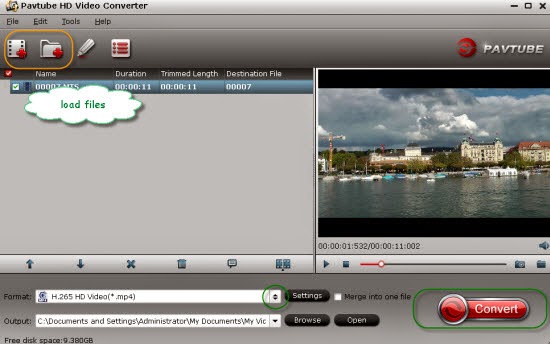
Step 1: Load Amazon WMV video files to Pavtube ChewTune.
Install and launch the Pavtube WMV to Nexus 10 Converter, then click the add button to load the WMV video files to the program.
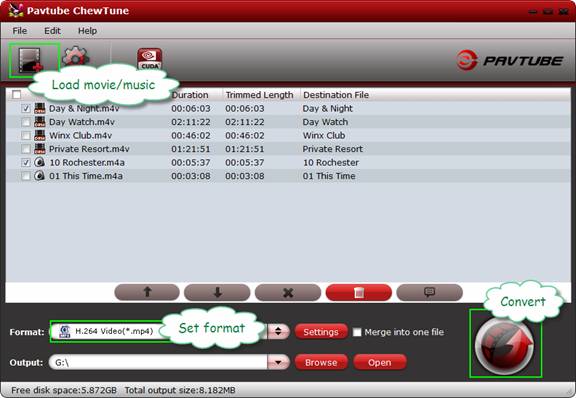
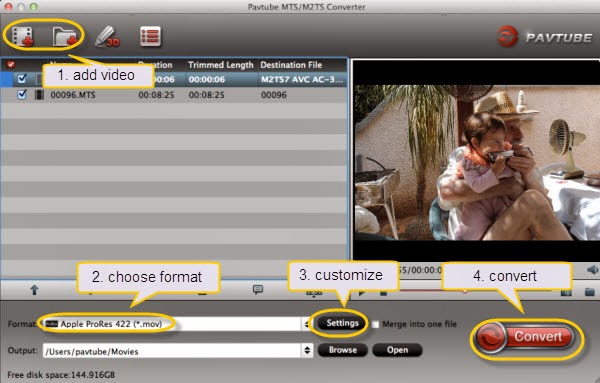
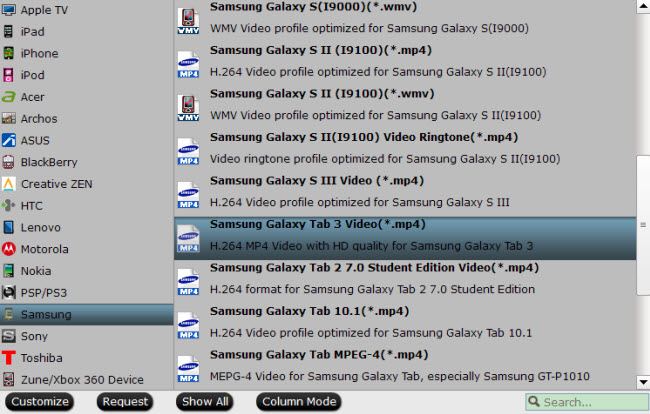
Step 2: Choose H.264 codec format for the Google Nexus 10 playing.
Click "Format" and select an output format for the Google Nexus 10. Here I choose "Android -> Google Nexus 10 H.264 Video (*.mp4)".

Step 3: Optimize the settings for Amazon video to Nexus 10 conversion.
If you find the default settings may not satisfy your need, can click the "Settings" button to change the settings by yourself.
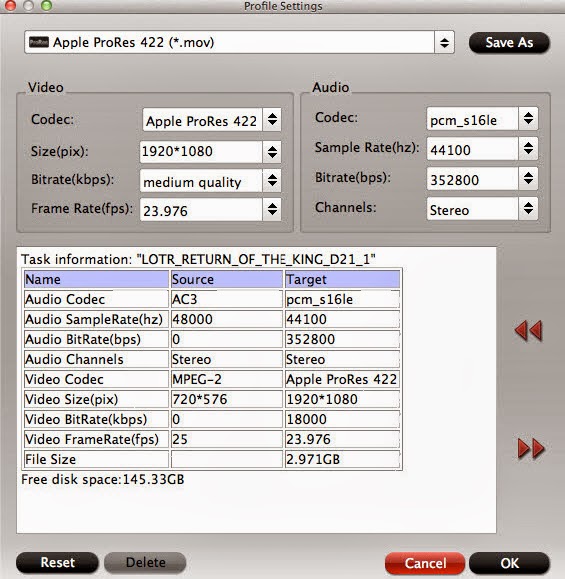
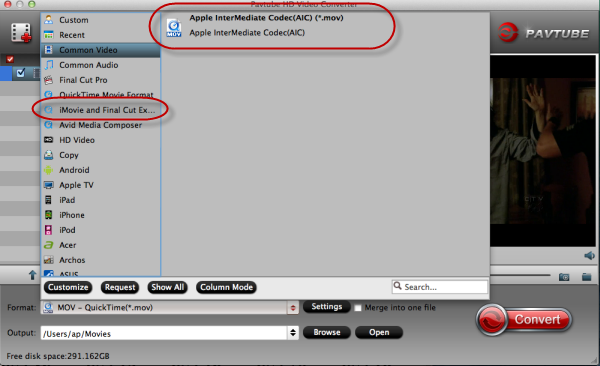
For Mac users, it is necessary to custom profile settings, since there's no profile patch for OS X. Similarly, you can choose Nexus 7 format and custom the profile for Nexus 10 by clicking "Settings" and set the recommended settings as it shows below:

Video
Audio
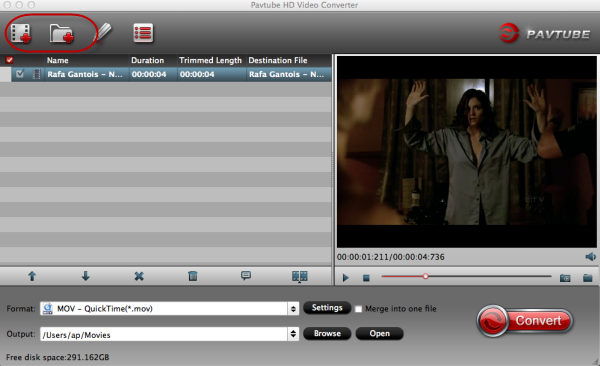
Step 4: Convert Amazon video to Nexus 10 video format.
Having finished the settings? OK, just click the convert button and start to convert Amazon video to Google Nexus 10 format with ease.
When the conversion task is finished, you can click "Open" button to get the final output files for your Google Nexus 10 and transfer the converted videos to Google Nexus 10.
If you have music and videos to watch on the tablet, here's a guide for copying local videos to Google Nexus 10.
Transferring videos and music from PC to Nexus 10?
1. Use the USB cable that came with your 16 GB or 32 GB Nexus 10 to connect the tablet to your PC, and you'll receive a notification that the USB is connected.
2. Open the Notifications panel and touch USB connected. Then touch Turn on USB storage in the screen that opens to confirm that you want to transfer files. The Nexus 10 tablet is connected as USB storage, and the screen will indicate that USB storage is in use and you receive a notification. The Nexus 10 is mounted as a drive on your computer.
3. You can now copy videos from PC to the Google Nexus 10. During this time, you can't access the SD card from your Nexus 10 or share your tablet's data connection with your computer via USB.
4. When the videos are copied to the 16 GB/32 GB Nexus 10, you can disconnect your Nexus tablet from PC.
Like the Nexus 7, it does not include an SD card slot for additional storage, so you may need a Video Converter to compress very big file to smaller file size. (Learn more on Nexus 7 Column)
Tips: MKV, MOV, TS, MPG, Tivo, FLV, F4V and some AVI videos are not accepted formats and you have to convert them to Nexus 10 optimized H.264 .mp4 videos before downloading them to the device.
Good news! Pavtube is offering Money-saving Tips, Up to 35% Off, Saving Up to $35. such as:
Plus, Like Pavtube on Facebook and you would get Free DVD Ripper, DVD Ripper for Mac, Video DVD Converter Ultimate!
If you have any problem to buy or use Pavtube, pls feel free to contact support@pavtube.com (for windows user), macsupport@pavtube.com (for Mac users).
Have you purchased lots of WMV videos from Amazon store and want to put these Amazon Instant videos to your Google Nexus 10? As is known to everybody, the WMV videos purchased from Amazon store, including music, videos, movies, and TV show etc. are usually format type unsupported by the Google Nexus 10. The problem is, those WMV videos you downloaded from Amazon are protected (by DRM), and can't be played on any Android/Windows 8 tablet except for the Amazon Kindle Fire (HD). So if you would like to transfer Amazon WMV videos to Nexus 10 for playback, you have to remove DRM from Amazon Instant Video and convert/record it to Nexus 10 compatible formats.
Refer to Google Nexus 10 supported codecs
- Video codec: H.263, MPEG-4 SP, H.264 AVC
- Audio codec: AAC LC/LTP, HE-AACv1 (AAC+), HE-AACv2 (enhanced AAC+), AMR-NB, AMR-WB 9, MP3, MIDI SMF, Ogg Vorbis, WAV
To do it, Pavtube ChewTune is a great help. It is an all-in-one DRM Removal Program to help you convert/record Amazon WMV videos effortlessly to Nexus 10 supported MP4 format in high quality. After that, you can play your Amazon Instant Video(WMV) on Nexus 10 very smoothly. Now, let's start to convert and transfer Amazon WMV to Nexus 7. (Note: For the common WMV videos, Pavtube Video Converter is recommended to you).
The screen is undoubtedly one of the standout features of the Nexus 10. As the name suggests, it measures 10 inches on the diagonal but more importantly packs an astounding 2,560x1,600-pixel resolution. We were previously blown away by the pin-sharp display of the new iPad with its 2,048x1,536-pixel resolution. The Nexus 10 casually swans past that, to offer an even more refined viewing experience.
Now you want to put some Amazon Instant videos to the Google Nexus 10? Wait a minute. The Amazon Instant videos, though mainly .wmv format, are not supported by Google Nexus 10. The problem is, those WMV videos you downloaded from Amazon are protected (by DRM), and can't be played on any Android tablet except for the Amazon Kindle Fire. To get the Amazon WMV playable on Nexus 10, you'll have to remove the DRM protection first.
The tools you need to transfer Amazon WMV movies to Nexus 10: A powerful Amazon WMV video DRM remove tool and a WMV to Nexus 10 converter. Pavtube ChewTune combines these two tools together and makes it possible to watch purchased DRM videos on Nexus 10.
Read more: Pavtube ChewTune Review - Free M4V/WMV videos from DRM protection
To convert videos to Google Nexus 10 with best settings, you can download profile patch for the software(Windows only).
Remove DRM protection off Amazon video and convert WMV to the Nexus 10 for playing
Step 1: Load Amazon WMV video files to Pavtube ChewTune.
Install and launch the Pavtube WMV to Nexus 10 Converter, then click the add button to load the WMV video files to the program.
Step 2: Choose H.264 codec format for the Google Nexus 10 playing.
Click "Format" and select an output format for the Google Nexus 10. Here I choose "Android -> Google Nexus 10 H.264 Video (*.mp4)".
Step 3: Optimize the settings for Amazon video to Nexus 10 conversion.
If you find the default settings may not satisfy your need, can click the "Settings" button to change the settings by yourself.
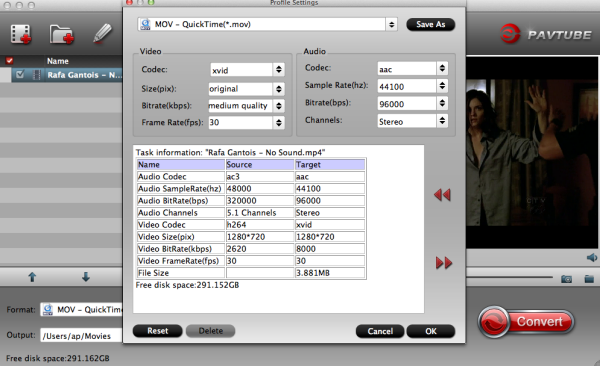
For Mac users, it is necessary to custom profile settings, since there's no profile patch for OS X. Similarly, you can choose Nexus 7 format and custom the profile for Nexus 10 by clicking "Settings" and set the recommended settings as it shows below:
Video
- Codec: h264
- Size (pix): 1920*1080
- Bitrate (kbps): 2000
- Frame Rate (fps): original
Audio
- Codec: aac
- Sample Rate (hz): 44100
- Bitrate (bps): 128000
- Channels: Stereo
Step 4: Convert Amazon video to Nexus 10 video format.
Having finished the settings? OK, just click the convert button and start to convert Amazon video to Google Nexus 10 format with ease.
When the conversion task is finished, you can click "Open" button to get the final output files for your Google Nexus 10 and transfer the converted videos to Google Nexus 10.
If you have music and videos to watch on the tablet, here's a guide for copying local videos to Google Nexus 10.
Transferring videos and music from PC to Nexus 10?
1. Use the USB cable that came with your 16 GB or 32 GB Nexus 10 to connect the tablet to your PC, and you'll receive a notification that the USB is connected.
2. Open the Notifications panel and touch USB connected. Then touch Turn on USB storage in the screen that opens to confirm that you want to transfer files. The Nexus 10 tablet is connected as USB storage, and the screen will indicate that USB storage is in use and you receive a notification. The Nexus 10 is mounted as a drive on your computer.
3. You can now copy videos from PC to the Google Nexus 10. During this time, you can't access the SD card from your Nexus 10 or share your tablet's data connection with your computer via USB.
4. When the videos are copied to the 16 GB/32 GB Nexus 10, you can disconnect your Nexus tablet from PC.
Like the Nexus 7, it does not include an SD card slot for additional storage, so you may need a Video Converter to compress very big file to smaller file size. (Learn more on Nexus 7 Column)
Tips: MKV, MOV, TS, MPG, Tivo, FLV, F4V and some AVI videos are not accepted formats and you have to convert them to Nexus 10 optimized H.264 .mp4 videos before downloading them to the device.
Good news! Pavtube is offering Money-saving Tips, Up to 35% Off, Saving Up to $35. such as:
- ChewTune ($29) + Blu-ray Video Converter Ultimate($65) = Only $75, Save $19
- ChewTune for Mac($29) + iMedia Converter for Mac($65) = Only $75, Save $19
- ChewTune($29) + ByteCopy($42) = Only $54, Save $17
- ChewTune for Mac($29) + ByteCopy for Mac($42) = Only $54, Save $17
Plus, Like Pavtube on Facebook and you would get Free DVD Ripper, DVD Ripper for Mac, Video DVD Converter Ultimate!
If you have any problem to buy or use Pavtube, pls feel free to contact support@pavtube.com (for windows user), macsupport@pavtube.com (for Mac users).