Monday, June 24, 2013

Transcoding/Deinterlacing Sony DSC-WX80 1080/60i AVCHD to Final Cut Pro 6/7


The article will offer you the easiest and fastest way to import Sony Cyber-Shot DSC-WX80 1080 60i AVCHD footage to FCP 6/7 via transcoding and deinterlacing WX80 1080/60i MTS to Apple ProRes .mov with the best MTS/M2TS Converter for Mac.


Take your best shots yet. Sony Cyber-shot DSC-WX80 camera's host of powerful yet user-friendly features makes it easy. Like a 16.2MP Exmor? R CMOS sensor that delivers richly-detailed photos and Full HD 1080i video at 60fps in the AVCHD format - even in difficult low-light conditions. Zero in on distant subjects and snap high quality close-ups thanks to 8x optical zoom/16x Clear Image digital zoom. 

Additionally, still images can simultaneously be taken while recording movies in order to provide multiple options as to how you depict the scene. 

And with built-in Wi-Fi?, you can share your shots instantly with friends, family, Facebook? and more. You can Burn your .mts video clips to DVD or edit these videos with FCP, etc.

  • Buy Sony Cyber-shot DSC-WX80 camera at Sony Store. 


The following is a Sony WX80 camera user's question:

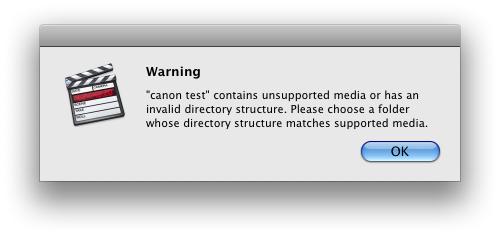
"I have a Sony Cyber-shot DSC-WX80 camera, I recorded many video clips during father's day, has anybody else had issues when attempting to import Sony WX80 1080/60i AVCHD video clips to FCP 7? The codec is AVCHD. This is the first time I've ever had crashing problems with AVCHD, please help."

The bottom line: Apple Final Cut Pro 6/7 can't natively support AVCHD videos well. So, if you attempt to import and edit Sony WX80 1080/60i MTS videos in FCP 7 or FCP 6, the easiest and fastest way is to transcode AVCHD 1080/60i MTS content to a format that is best suited for Final Cut Pro, such as Apple ProRes 422 MOV. Pavtube MTS/M2TS Converter for Mac meet your requirements.

Overview

Pavtube MTS/M2TS Converter for Mac can help you transcode Sony DSC-WX80 AVCHD 1080/60i MTS to Apple ProRes 422, ProRes 422 HQ, ProRes 4444, ProRes 422 Proxy, ProRes 422 LT, etc on Mac OS X(Mountain Lion included). What's more, it can deinterlace the DSC-WX80 1080/60i footage to make the converted files more smoothly in Apple Final Cut products.

Just free download or buy the Mac conversion tool


Now you can install the software, then according to the following steps to start the whole workflow on Mac, very simple.

Transcode and Deinterlace Sony DSC-WX80 AVCHD 1080/60i footage to Apple ProRes for FCP 6/7


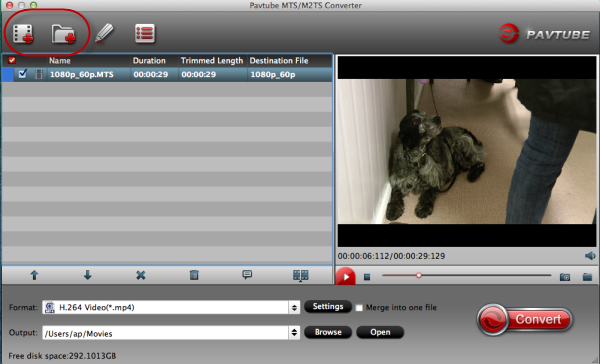
Step 1. Launch Pavtube MTS/M2TS Converter for Mac as the best Mac Sony AVCHD to ProRes Converter. Click "Add video" or "Add from folder" icon to load your source files directly from your Sony Cyber-shot DSC-WX80 camera, or from a card reader, or from the file folder that contains the source MTS videos stored on your Mac computer's hard disk drive.


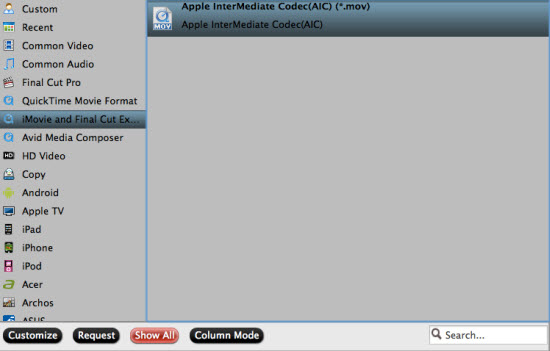
Step 2. Click "Format" bar to choose the output format. Click and choose Final Cut Pro -> Apple ProRes 422 (*.mov). 

Read More: Final Cut Pro Column


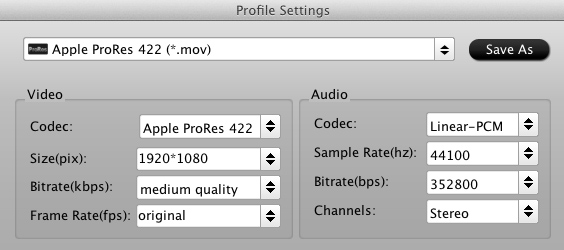
Step 3. You can click "Settings" to customize the output parameters, adjust the resolution, bitrate as you want. 


Click "Edit" button and you can deinterlace Sony DSC-WX80 1080i AVCHD for Final Cut Pro 6/7 via ticking the"Deinterlacing" box in the Video Editor interface.


Step 4. OK, now click the big button "Convert" to begin transcoding Sony WX80 1080/60i MTS to ProRes 422 for FCP 6/7. When finished, click "Open" button to get the generated ProRes 422 QuickTime media files for Final Cut Pro 6/7. 

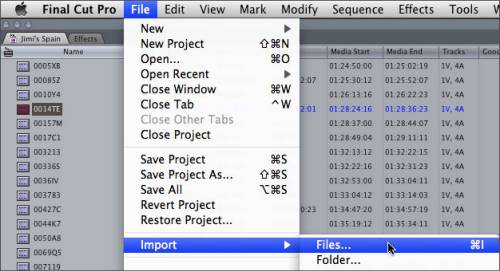
Open up Final Cut Pro 6/7, follow "File > Import > Files…" to import and edit the converted Sony Cyber-shot DSC-WX80 AVCHD MTS videos. You can also reference the following guide: 


What's more, if you want to burn AVCHD files to DVD disc or ISO files or folder files for backup or watching, you can try Pavtube DVD Creator for Mac, which can burn HD videos to DVD easily. The steps refer to: 

           
PS: Recommended A free choice for free converting AVCHD MTS/M2TS to MP4 for YouTube/vimeo upload on Mac - Free MTS M2TS Converter for Mac from Mac App Store released by Pavtube Studio.

Read more:

MP4 to FCP ǀ AVCHD to FCP ǀ MOV to FCP ǀ H.265 to FCP

Make Sony A58 AVCHD footages working with iMovie/FCE on Mac

"Hi, I'm using a Sony SLT-A58 on a MacBook Pro. I need to upload these videos to iMovie so that I can edit them later. But it seems iMovie does not like to work with my videos, I think I'm just missing something that is pretty simple. Can anyone help?

The Alpha SLT-A58 is one of the SLRs camera from Sony which apparently want to enter the SLRs market with such a worthy entry level product. The Alpha A58 replaces Sony SLT A57, and become a competitive camera in this price class with incredible video quality. Sony A58 record full hd videos at 1080p resolution and in 60i or 24p for your choice. What's more, the videos it outputs is wrapped in AVCHD codec for blu-ray-like picture quality.

However, here comes the problem. The AVCHD codec allows people save large extraordinary videos without quality loss, but the output video size is pretty large correspondingly. It's not easy for permanent preservation. Also, AVCHD is not a Mac friendly video codec, and the mts format is not support by many nonlinear editing programs on Mac, such as Final Cut Pro, iMovie/Final Cut Express, Avid Media Composer, etc. What should we do to make Sony A58 AVCHD footages working with iMovie/FCE on Mac

Since Mac and NLE do not work with AVCHD or MTS format natively, you need to convert Sony SLT-A58 AVCHD files to iMovie/FCE compatible codec for editing, which can be as simple as a few clicks with this Pavtube AVCHD MTS/M2TS Converter for Mac

How to convert Sony SLT-A58 AVCHD MTS for editing in FCE/iMovie?


Step 1. Connect your Sony SLT-A58 to Mac and turn it on; launch Mac Sony MTS/M2TS Converter, click top left two icons to load your footage.


Step 2. Choose iMovie/FCE compatible video format.

Click "Format", you will many profiles for different programs and usage.

For Mac iMovie or FCE users, click "iMovie and Final Cut Express > Apple InterMediate Codec(AIC)(*.mov)" as the best codec for editing.


You can also click "Settings" which is marked as 3 above, to set the output video specs manually.

Step 3. Click the big red circle to start converting Sony SLT A58 AVCHD MTS to AIC MOV for using in FCE/iMovie. Check "start streaming server after conversion", you can share/edit the converted video directly on anther Mac.

Read More:

How to Solve the freezes when importing MTS media to Premiere CC-2015.3?
How to Convert MTS/M2TS with Handbrake Easily?
Best Solution to Play Sony MTS/M2TS Files on MacBook Pro
Play MTS on Smart TV (Windows and Mac Solutions)
Top 5 MTS/M2TS Video Editors for Mac
Top 5 MTS/M2TS Video Editors for Windows (10, 8.1, 8, 7, XP, etc)
Fix Choppy Issues When Importing AVCHD Files to FCP
Join and Convert MTS/M2TS Files for playing with VLC Player
How to Convert 3D AVCHD MTS to 3D Tablet for Watching?

Thursday, June 20, 2013

Transfer Sony XDCAM EX MP4 footage to Aperture 3 on Mac Mountain Lion 10.8


Read this article and you will know how to convert Sony XDCAM EX MP4 footages to Apple Aperture 3 preferred codec for editing on Mac Mountain Lion 10.8.

"I have some mp4 files from a Sony XDCAM EX camera. These common mp4 videos can play back in quicktime player, but the wired thing is when I load it into Aperture 3, it said the video is not supported! Did I do something wrong? How to get MP4 files from Sony XDCAM MP4 to Aperture 3?"
Aperture 3 enables you to use many video and audio formats from popular still cameras; the supported video varies from 1080 24p, 25p to 60p. But not all the quicktime player compatible video format is well supported in Aperture. Apple list a tablet of supported camera models, unluckily, Sony XDCAM EX series is not included.

Therefore, for Sony XDCAM EX series camera users, the best way to get Sony XDCAM EX MP4 working in Apple Aperture 3 is to convert the XDCAM encoded MP4 files into Aperture preferred ProRes codec. It's not complex at all, get this Pavtube HD Video Converter for Mac installed, and follow these steps, you will have it done within a few clicks.

How to convert Sony XDCAM EX MP4 to ProRes 422 for Aperture 3 on Mac

Step 1. Connect your Sony XDCAM EX camera to mac and keep it on, launch the Sony XDCAM EX MP4 to ProRes Converter, click top lest two icons to load the footages.


Step 2. Click the drop-down list desides Format, choose Final Cut Pro > Apple ProRes 422 (*.mov) as the best video codec for Aperture as well as FCP.


Click "Settings" and choose the output video size, bitrate, framerate and others as you need.


Step 3. Now just click the big red circle to start transcoding your Sony XDCAM EX MP4 footage to Apple ProRes for Aperture 3 without quality loss on Mac Mountain Lion 10.8.

Wait for a while or choose to shut down computer after conversion done, or you can lauch stream server so that you can share the converted video on another Mac directly.

How to import Apple ProRes MOV files to Aperture 3?

Launch Aperture 3, choose "File > Import > Files...", and browse to the folder you saved the converted video to. Choose the videos that you'd like to import.


Read More:

How to keep Dolby Digital 5.1/Dolby TrueHD 7.1 audio when ripping Blu-ray movies?

How to keep best audio quality(Dolby Digital 5.1/Dolby TrueHD 7.1 audio) when backup/ripping Blu-ray Disc to PC? This is a frequently asked question. such as:
"What I am wanting to do is be able to take my 100+ Blu-rays that i have bought and convert them into a digital format and put them on my pc so I can just watch movies off the pc and not the blu-ray disc. I also have 7.1 surround sound as well so if there is a way to keep that it would be nice."  
In the Blu-ray specification, Dolby TrueHD, DTS-MA, LPCM, Dolby Digital, DTS and PCM are optional codecs for Blu-ray audio encoding. Earlier Blu-ray Discs save audio in Dolby Digital and DTS codec, most recent Blu-ray movies usually comes with Dolby TrueHD and DTS-MA audio tracks to deliver higher quality audio with 7.1 channels. Not every AV receiver/amplifier can decode Dolby TrueHD and DTS-MA audio, but most of them support Dolby Digital, i.e., AC-3 5.1 audio codec. When ripping Blu-ray Disc for playing back with PC and HD media players, better check the supported codec of your device first to set a best fit for your player.

Refer to below how to keep Dolby Digital 5.1 or Dolby TrueHD 7.1 audio when ripping Blu-ray Discs with Pavtube ByteCopy, it is a best BD ripping tool and backup disks without quality loss, allow full preservation of all audio tracks, subtitles and chapter markers, what's more, it saves 7.1 surround audio from original disks, just like you mentioned.
Software availability:
  1. Pavtube ByteCopy Trial version - A trial is free but functional-restricted. Lossless output can be used 3 times only. You may download a trial and see how it works.
  2. Pavtube ByteCopy Retail version. A full version is offered at $42 by Pavtube Studio.                         
How to keep Dolby Digital 5.1/Dolby True HD 7.1 audio when ripping Blu-ray movies?

Step 1. Hook up an external BD drive with my desktop (if there is not an internal one), and place a Blu-ray Disc into the BD drive.

Step 2. Run Pavtube ByteCopy software and click the "Load BD/DVD" icon to import movie files from Blu-ray Disc.

keep Dolby Digital 5.1/Dolby TrueHD 7.1 audio

Step 3. Select the whole disc, and click the "Edit Disc" button. Now the "Edit Disc" screen pops up. Here you decide whether keep the original Dolby True HD 7.1/Dolby Digital 5.1 audio or encode the audio streams into Dolby Digital 5.1 audio tracks.

  1. To pass-through original TrueHD/Dolby Digital/DTS/PCM audio, just select "lossless" quality in "Format" box. In this way you get lossless audio streams as they are burned into BD. Dolby TrueHD track will be copied and packed into generated MKV file without transcoding. But note that the original BD may not contain Dolby TrueHD audio.
  2. To transcode the BD audio streams into Dolby Digital 5.1 tracks, you may select "HD Player" and press "Settings". In this way you get H.264/AC3 encoded MKV file.              
Step 4. Click the "Convert" button to start ripping the Blu-ray movie to MKV file. After conversion I click "Browse Export Path" and get an MKV file. Pavtube ByteCopy extracts the main movie with all subtitles from disc and seals the contents with encoded AC3 audio streams into MKV container, which preserves the best possible quality.

Additional Tip: How to check audio information of the Blu-ray Disc?

Pavtube ByteCopy lets you check the audio info. Once the movie source is opened you will see its contents as a tree structure. Expand the directory to check file information. "Title1 (Main Title)" contains Blu-ray movie, and other Titles bonus and extra features. You can find Audio info such as codec, channels and language under "Title1(Main Title)".
     
Read More:

Monday, June 17, 2013

Sony HDR-PJ790V/PJ780 AVCHD footage Compatible with Premiere Pro, Avid Media Composer on Mac

Description: This article offers a brief guide about how to transcode and transfer Sony Handycam HDR-PJ790V/PJ780 AVCHD footages to editing programs like Avid and Adobe Premiere Pro on Mac.

Sony recently announced new member to their Handycam family - Sony HDR-PJ780/PJ790V, which is capable of recording 1920x1080 24p/60p Full HD digital video footages and high quality 24.1MP still images.

The PJ790V/PJ780 camcorder will be the first flagship Handycam in years to arrive without the option to ditch the built-in projector. Meanwhile, technology like WiFi remains an optional add-on which make much easier to share recorded videos and images with family members and friends.

All these new features together contribute to make Sony Handycam HDR-PJ790V/PJ780 become an excellent camera for us to record vivid videos, especially the AVCHD format can deliver stunning picture quality.

Unfortunately, most editing programs on Mac including Avid, Adobe Premiere Pro, FCP, iMovie don't favor AVCHD .MTS videos from your camera Sony PJ790V/PJ780.

To obtain Sony HDR-PJ790V/PJ780 AVCHD footages into Avid/Premiere Pro on Mac, you'd better transcode Sony AVCHD MTS footages to Avid/Adobe Premiere Pro compatible .MOV format first.

Pavtube MTS/M2TS Converter for Mac is highly recommended, which considered as a Mac Sony AVCHD MTS Converter, a Canon Vixia MTS Converter for Mac, a Panasonic AVCHD Converter for Mac etc., is specially developed for AVCHD camera/camcorder users to tanscode any AVCHD MTS/MTS footage to iMovie, Final Cut Express, Final Cut Pro,Premiere ProAvid, Apple Aperture 3, Kdenlive, Adobe After Effects CS6 and more similar video editing software compatible file types with least quality loss.


How to transcode Sony Handycam HDR-PJ790V/PJ780 AVCHD MTS footage to Avid/Premiere Pro on Mac?

PS: Please refer to the guides "Sony AVCHD MTS to Premiere" and "AVCHD MTS to Avid MC" if you are running Windows.

Step 1. Load Sony HDR-PJ790V/PJ780 AVCHD MTS files.

Connect your Sony Handycam camcorder to your Mac via USB, or insert your SD card to Mac, browser the .mts files from AVCHD > BDMV > STREAM. Load your source media from Sony Handycam camcorder or local computer which you have copied from camcorder before into Pavtube MTS/M2TS Converter for Mac. 


Step 2. Select Output format.

Click on the "Format" bar and you would see all profile presets this Mac Sony AVCHD to MOV Converter provides. You are recommended to choose "Avid DNxHD (*.mov)"as output format for Avid Media Composer:


and "MOV (AVC) (*.mov)" as output format under Adobe Premiere/Sony Vegas catalogue for Adobe Premiere Pro:


Tip: You are allowed to adjust profile preset before conversion, including codec, bit rate, frame rate, sample rate and audio channel according to your needs and optimize the output file quality. But it's better you use the default profile settings because they are the most optimized for each output devices.

Step 3. Convert Sony Handycam HDR-PJ790V/PJ780 AVCHD footages to MOV.

Click the "Convert" button to start the fast transcoding Sony HDR- PJ790V/PJ780 MTS to MOV for Avid/Adobe Premiere Pro on Mac.

Once finished, you could locate the generated .MOV files by clicking "Open" icon and transfer these MOV files to Avid and Adobe Premiere Pro for video editing on Mac.

Read More:

How to Solve the freezes when importing MTS media to Premiere CC-2015.3?
How to Convert MTS/M2TS with Handbrake Easily?
Best Solution to Play Sony MTS/M2TS Files on MacBook Pro
Play MTS on Smart TV (Windows and Mac Solutions)
Top 5 MTS/M2TS Video Editors for Mac
Top 5 MTS/M2TS Video Editors for Windows (10, 8.1, 8, 7, XP, etc)
Fix Choppy Issues When Importing AVCHD Files to FCP
Join and Convert MTS/M2TS Files for playing with VLC Player
How to Convert 3D AVCHD MTS to 3D Tablet for Watching?

Thursday, June 13, 2013

Import MTS Clips from Canon C100 to Final Cut Pro on Mac


Many of us only copy the Canon C100 .mts files to Mac hard drives without knowing that Final Cut Pro doesn't work with individual .mts/.m2ts files unless the AVCHD file structure is preserved from the camera archive. If you'd like to import single .mts file from C100 to Final Cut Pro 7/6, here's a Canon C100 camera user's issues.

"I'm using a Canon C100 AVCHD camera. I want to log and transfer the raw footage to Final Cut Pro 7 for editing, then export the video and compress it to H.264 HD for normal playback. But I am confronted with a warning that reads "Invalid directory structure."…

Is there any easy way to do this?"

It's kinda complicated but could be easy if you have every step done easily and efficiently.

The correct way to backup AVCHD is copying the entire AVCHD folder with all directories and files to your Mac HDD. The AVCHD folder structure and all of its files must stay intact. If not, the video editing program will throw an error message when trying to import. You can try importing AVCHD from C100, or getting an AVCHD to Apple ProRes decoder that reads single .mts files, for instance, above mentioned Pavtube MTS Converter for Mac.

Here you need to do two conversions, first convert Canon C100 MTS clips to ProRes 422 MOV for FCP editing, then convert ProRes MOV to H.264 MOV for normal playback. Have a try firstly.


Notes:
  • The free trial version is provided for you to see if it would be able to convert your AVCHD format video from a Canon C100 camera.
  • The trial version will create videos with PAVTUBE logo standing in the center of the output image. To bypass the watermark, you should purchase its full version. 

How to import Canon C100 raw footage to edit in Final Cut Pro? First convert C100 MTS clips to ProRes 422.

Step 1. Load source mts files shot with your Canon C100 camera

Launch Pavtube MTS Converter for Mac as C100 MTS to ProRes Converter. Click "Add video" or "Add from folder" icon to load your source files directly from your Canon C100 camera, or from a card reader, or from the file folder that contains the source MTS videos stored on your computer's hard disk drive. Or drag and drop Canon C100 AVCHD MTS file to the program. You can batch load several files to the program directly.


Step 2. Select "Apple ProRes 422 (*.mov)" as output format for Final Cut Pro

Go to "Format" menu, move to "Final Cut Pro" option, and choose "Apple ProRes 422 (*.mov)" as target format for FCP 6/7 or FCP X.

Tip: If you want to get to a smaller file, you’d better choose ProRes 422(LT)(*.mov).


Do some settings as you want before conversion:


Click "Edit" to deinterlace 1080i MTS files for FCP.

Step 3. At last, hit the "Convert" button to convert Canon C100 MTS clips to ProRes 422 MOV for FCP editing.

After the fast conversion process, you are able to get the converted file by clicking "Open". Then you can import C100 MTS files to FCP 7 for editing.

Launch Final Cut Pro 7, choose "File > Import > Files…", and browse to where you save the converted AVCHD clips to. Choose the videos that you'd like to add.


Apple ProRes encoded videos should be added instantly to FCP project. No rendering is required. Just drag the clips to timeline for editing.

If you want to export the video from FCP and compress it to H.264 HD for normal playback, Pavtube HD Video Converter for Macis the best choice for you.

Good Luck

Read More:

Wednesday, June 12, 2013

ClipWrap vs Pavtube Media Magician for Mac | Best Camcorder Partners for Mac users

Are you a digital enthusiasts? If yes, maybe you'll find a great many of today's camcorders record to a variety of media types whether they be to hard-disk, Compact Flash or SD cards. These transport files tend not to be suited well for post production, especially on a Mac.

Camcorder users often have demand to edit their camera videos on kinds of editing software, such as Final Cut Pro, Final Cut Express, iMovie, Sony Vegas, Adobe Premiere, Avid and more. But, many users have problems to import their camcorder videos into the editors, such as:

Question 1: 
"I got Canon XF305 recently and it output MPEG-2 MXF files. I tried to import the MXF videos to Final Cut Pro 7, but it did not recognized. Any suggestions? I'm new to Mac and I take tons of videos of the kids and I do not want to switch back to my old PC (which can't process HD movies without skipping them). Thanks in advance!"

Canon XF305 generates video in MXF and it is not compatible with most Mac video nonlinear edit programs such as?FCP and FCE. Some of Canon camcorders is supported by FCP X but not working with FCP 7. You need to get a professional Mac MXF Converter. I recommended Pavtube Media Magician for Mac for it's easy to use and works efficiently and it's well commented on website. ClipWrap does not support MXF files.

Question 2: 
"Hi, I have a Sony HDR-TG1 and a Macbook Pro. I am looking for a good video editing software that will allow me to work with my camera's AVCHD format. I have read a lot of things about Final Cut Pro and how it doesn't support AVCHD without conversion. I was wondering if there is a loss of quality that arises from the conversion or if the video is just as good?"

Any conversion reduces quality, it's just a fact.?AVCHD?is a nightmare, highly compressed, when you try to edit it, your computer will have to do a lot of work. Since you need to edit them in FCP, the best codec FCP preferred is Apple ProRes. I recommend Pavtube Media Magician for Mac or ClipWrap.

By google, you can find more questions about importing various camcorder videos to Mac.

Here is a guide about the easiest video editor for Camcorder Beginners, hope it can help you.

Because camcorder recordings aren't always supported well by such editing software, or they need a long time for rendering, actually, the process of transcoding Camcorder footage to editor preferred video codec. Most of the time, we need the help of 3rd party tool to help us easily making the editing. Today this article is mainly talking about the two camcorder partners, ClipWrap and Pavtube Media Magician.

Free Trail Link:

Pavtube Media Magician for Mac | ClipWrap

ClipWrap vs Pavtube Media Magician for Mac


ClipWrap is a Mac only application designed to make an HDV or AVCHD file compatible with your NLE application whether it be Final Cut Pro, iMovie, Avid, or Adobe Premier Pro. According to my own tests, Pavtube's Media Magician almost contains all the features the ClipWrap has. While the price is much cheaper. Pavtube Media MagicianWindows version also available.

Satisfied with it? Ready to Buy? Leaked a way for you to save money: if you buy Pavtube Media Magician in Facebook Giveaway page, you will Get 45% OFF, Save $20, God! Awesome! If you are camcorder fans, this product is absolute value for money!


Free Download and Trial for Windows or Mac

Free Trial on Windows
Free Trial on Mac 10.5 & 10.6
Free Trial on Mac 10. 7 & 10.8