Thursday, June 13, 2013

Import MTS Clips from Canon C100 to Final Cut Pro on Mac


Many of us only copy the Canon C100 .mts files to Mac hard drives without knowing that Final Cut Pro doesn't work with individual .mts/.m2ts files unless the AVCHD file structure is preserved from the camera archive. If you'd like to import single .mts file from C100 to Final Cut Pro 7/6, here's a Canon C100 camera user's issues.

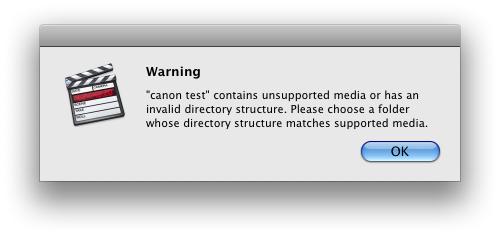
"I'm using a Canon C100 AVCHD camera. I want to log and transfer the raw footage to Final Cut Pro 7 for editing, then export the video and compress it to H.264 HD for normal playback. But I am confronted with a warning that reads "Invalid directory structure."…

Is there any easy way to do this?"

It's kinda complicated but could be easy if you have every step done easily and efficiently.

The correct way to backup AVCHD is copying the entire AVCHD folder with all directories and files to your Mac HDD. The AVCHD folder structure and all of its files must stay intact. If not, the video editing program will throw an error message when trying to import. You can try importing AVCHD from C100, or getting an AVCHD to Apple ProRes decoder that reads single .mts files, for instance, above mentioned Pavtube MTS Converter for Mac.

Here you need to do two conversions, first convert Canon C100 MTS clips to ProRes 422 MOV for FCP editing, then convert ProRes MOV to H.264 MOV for normal playback. Have a try firstly.


Notes:
  • The free trial version is provided for you to see if it would be able to convert your AVCHD format video from a Canon C100 camera.
  • The trial version will create videos with PAVTUBE logo standing in the center of the output image. To bypass the watermark, you should purchase its full version. 

How to import Canon C100 raw footage to edit in Final Cut Pro? First convert C100 MTS clips to ProRes 422.

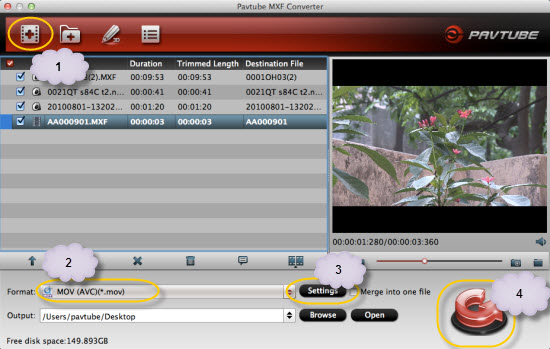
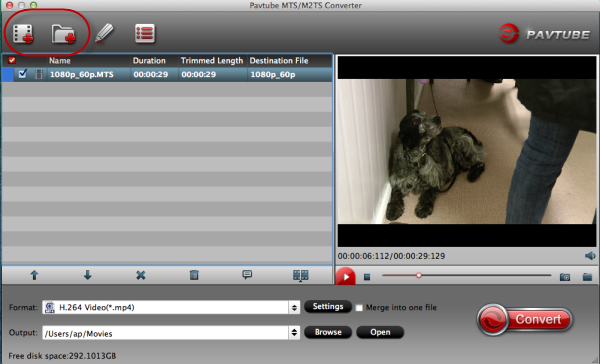
Step 1. Load source mts files shot with your Canon C100 camera

Launch Pavtube MTS Converter for Mac as C100 MTS to ProRes Converter. Click "Add video" or "Add from folder" icon to load your source files directly from your Canon C100 camera, or from a card reader, or from the file folder that contains the source MTS videos stored on your computer's hard disk drive. Or drag and drop Canon C100 AVCHD MTS file to the program. You can batch load several files to the program directly.


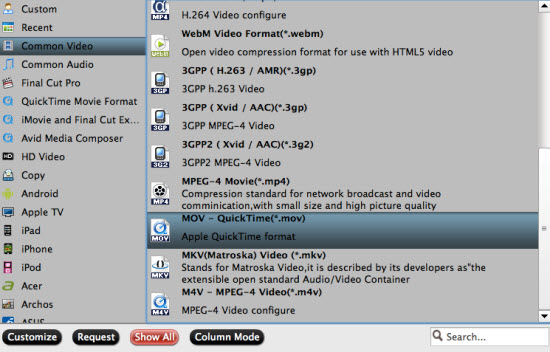
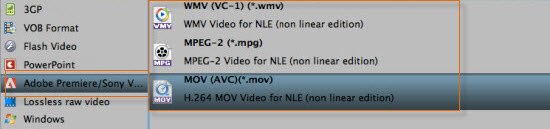
Step 2. Select "Apple ProRes 422 (*.mov)" as output format for Final Cut Pro

Go to "Format" menu, move to "Final Cut Pro" option, and choose "Apple ProRes 422 (*.mov)" as target format for FCP 6/7 or FCP X.

Tip: If you want to get to a smaller file, you’d better choose ProRes 422(LT)(*.mov).


Do some settings as you want before conversion:


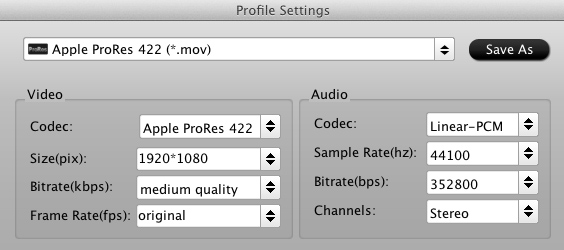
Click "Edit" to deinterlace 1080i MTS files for FCP.

Step 3. At last, hit the "Convert" button to convert Canon C100 MTS clips to ProRes 422 MOV for FCP editing.

After the fast conversion process, you are able to get the converted file by clicking "Open". Then you can import C100 MTS files to FCP 7 for editing.

Launch Final Cut Pro 7, choose "File > Import > Files…", and browse to where you save the converted AVCHD clips to. Choose the videos that you'd like to add.


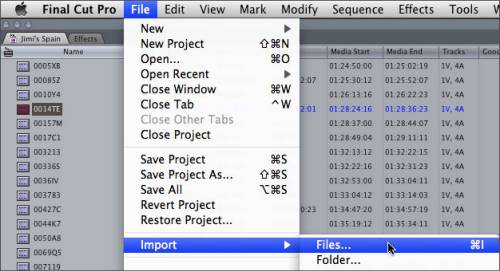
Apple ProRes encoded videos should be added instantly to FCP project. No rendering is required. Just drag the clips to timeline for editing.

If you want to export the video from FCP and compress it to H.264 HD for normal playback, Pavtube HD Video Converter for Macis the best choice for you.

Good Luck

Read More:

Wednesday, June 12, 2013

ClipWrap vs Pavtube Media Magician for Mac | Best Camcorder Partners for Mac users

Are you a digital enthusiasts? If yes, maybe you'll find a great many of today's camcorders record to a variety of media types whether they be to hard-disk, Compact Flash or SD cards. These transport files tend not to be suited well for post production, especially on a Mac.

Camcorder users often have demand to edit their camera videos on kinds of editing software, such as Final Cut Pro, Final Cut Express, iMovie, Sony Vegas, Adobe Premiere, Avid and more. But, many users have problems to import their camcorder videos into the editors, such as:

Question 1: 
"I got Canon XF305 recently and it output MPEG-2 MXF files. I tried to import the MXF videos to Final Cut Pro 7, but it did not recognized. Any suggestions? I'm new to Mac and I take tons of videos of the kids and I do not want to switch back to my old PC (which can't process HD movies without skipping them). Thanks in advance!"

Canon XF305 generates video in MXF and it is not compatible with most Mac video nonlinear edit programs such as?FCP and FCE. Some of Canon camcorders is supported by FCP X but not working with FCP 7. You need to get a professional Mac MXF Converter. I recommended Pavtube Media Magician for Mac for it's easy to use and works efficiently and it's well commented on website. ClipWrap does not support MXF files.

Question 2: 
"Hi, I have a Sony HDR-TG1 and a Macbook Pro. I am looking for a good video editing software that will allow me to work with my camera's AVCHD format. I have read a lot of things about Final Cut Pro and how it doesn't support AVCHD without conversion. I was wondering if there is a loss of quality that arises from the conversion or if the video is just as good?"

Any conversion reduces quality, it's just a fact.?AVCHD?is a nightmare, highly compressed, when you try to edit it, your computer will have to do a lot of work. Since you need to edit them in FCP, the best codec FCP preferred is Apple ProRes. I recommend Pavtube Media Magician for Mac or ClipWrap.

By google, you can find more questions about importing various camcorder videos to Mac.

Here is a guide about the easiest video editor for Camcorder Beginners, hope it can help you.

Because camcorder recordings aren't always supported well by such editing software, or they need a long time for rendering, actually, the process of transcoding Camcorder footage to editor preferred video codec. Most of the time, we need the help of 3rd party tool to help us easily making the editing. Today this article is mainly talking about the two camcorder partners, ClipWrap and Pavtube Media Magician.

Free Trail Link:

Pavtube Media Magician for Mac | ClipWrap

ClipWrap vs Pavtube Media Magician for Mac


ClipWrap is a Mac only application designed to make an HDV or AVCHD file compatible with your NLE application whether it be Final Cut Pro, iMovie, Avid, or Adobe Premier Pro. According to my own tests, Pavtube's Media Magician almost contains all the features the ClipWrap has. While the price is much cheaper. Pavtube Media MagicianWindows version also available.

Satisfied with it? Ready to Buy? Leaked a way for you to save money: if you buy Pavtube Media Magician in Facebook Giveaway page, you will Get 45% OFF, Save $20, God! Awesome! If you are camcorder fans, this product is absolute value for money!


Free Download and Trial for Windows or Mac

Free Trial on Windows
Free Trial on Mac 10.5 & 10.6
Free Trial on Mac 10. 7 & 10.8

Friday, June 7, 2013

Transcode Nikon D7100 H.264 MOV to Quicktime MOV for playing and editing on Mac

Description: This tutorial will help you transcode Nikon D7100 1080p H.264 MOV to Quicktime MOV format for playing or editing on Mac Mountain Lion 10.8.


"I recorded some 1080p mov videos with a Nikon D7100 from a friend, but somehow these mov files could not playback smoothly in Quicktime? I can watch them normally on camera without jerky so the videos are ok. Can someone help?"

Nikon D7100 is a newly launched high-end DSLR camcorder, with the 24.1-megapixel enthusiast-level device and price tag topping the £1,000 marker. It is equipped with some new features, such as the DX-format CMOS sensor of 24.1 effective megapixels and the high-performance EXPEED 3 image-processing engine without a low-pass filter, which enable sharp focusing with high resolution. The incredible combination of the high pixel count and the full HD quality of the D7100 can be enhanced further with NIKKOR lenses, which offer superior rendering performance made possible with Nikon's own optical technologies.

However, you may have hard time playing Nikon D7100 1080p MOV footage in QuickTime Player, for it is H.264 encoded high-def streams. Many nonlinear editing programs on mac do not support H.264 codec directly, not even QuickTime player.

If you have a powerful PC with powerful editing software like Adobe Premiere Pro CS5 (or Sony Vegas Movie Studio HD, Avid MC) installed, it won't be a problem for playing and editing the 60D footage, otherwise you may get involved in playing back and editing issues. In that case, many people convert the H.264 codec into other codecs that are more common, e.g. Quicktime mov format. So is there an easy-to-use converting program to help with this?

I've tested a lot and finally found this Nikon H.264 MOV to QuickTime MOV Converter is exactly what I need. No need to install third party plug-in, no need to fix the settings manually, just import, choose QuickTime MOV, and click Convert; it's just as simple as that. The software does a good job in editing H.264 .mov files directly and easily convert Nikon D7100 video to AVI, WMV, MPG, FCP, iMovie/FCE, etc. You can also remux, Trim, cut, split, mix videos, overlays, add 3D effect to D7100 H.264 footages. Now Mac 10.8.3 is supported, feel free to have a try!

See Also: 

           
Now get this Nikon MOV converter for Mac installed; you can order a license directly or download a trial version here.
Ok let's move on.

How to convert Nikon D7100 1080p Videos to Quicktime MOV for playing and editing on Mac?

Step 1. Connect your Nikon D7100 camera to Mac with USB cable or use card reader to transfer the MOV files to Apple hard drive disk.

Step 2. Add Nikon D7100 1080p H.264 MOV videos to Nikon 1080p Video to Quicktime MOV Converter for Mac

Run this Pavtube HD Video Converter for Mac, and click the "Add Files" button to load individuals mov videos; or you can click "Add from folder" to load the entire folder. 


Step 3. Choose editing program compatible format. 

Click the "Profile" option, you will find various video formats sorted by different programs/devices. To get high video quality with least quality loss, you can choose Common Videos > MOV-QuickTime(*.mov).


Click "Settings", you can fix the size to 1920*1080 to get better video quality; also you can fix the bitrate, frame rate as what you need.

Step 4. Now click the big red "Converter" and wait for a while to get the fresh hot converted video. Click "Browse" to locate them directly. Ok now the transcoded files now are ready for editing and playing back in QuickTime Player.    

This HD Video Converter for Mac is not only capable of converting Nikon footages, but also able to convert various video formats to each other. Refer to here to learn how to convert CanonPanasonic and Sony footages to iPadFCP orApple TV, etc.

Nikon Cameras Related Guide


Convert Panasonic AG-HPX500 P2 MXF recordings to Premiere Pro CS6/5.5/5 on Mac

Many people choose to record wonderful moments with a Panasonic AG-HPX500 for its great video presenting ability. And it could be better to transcode the Panasonic AG-HPX500 P2 MXF to Adobe Premiere Pro CS6/5.5/5 for further editing. Follow this guide, you will learn how to accomplish it within a few clicks.
"The camera that we are using is a Panasonic HPX500. We are shooting at 1080p 60i. But the videos are wrapped in MXF which I am not familiar with. I'm wondering whether I can edit these P2 MXF videos in Adobe Premiere Pro CS6? Thanks in advance!"
Panasonic AG-HPX500 is an HD P2 camcorder with high resolution. Many photography fans choose it for its outstanding video recording ability with 4:2:2 10-bit sampling, records in DVCPRO50, DVCPRO and DV, and other HD, SD formats at 1080 in 60i, 50i, 30p, 25p and 24p; as well as four independent audio channels.

The Panasonic AG-HPX500 recorded videos are really excellent among the high-end cameras; and you may want to edit them in some editing programs on mac, such as Adobe Premiere Pro, iMovie/FCE, FCP, After Effects and so on. But all of them are nonlinear editing programs which mean the MXF encoded files are not supported directly. So here comes up the original question: how can we convert Panasonic AG-HPX500 P2 MXF recordings to Premiere Pro CS6/5.5/5 compatible format?

After lots of searching and testing among the top converting programs, this Pavtube Panasonic P2 MXF Converter for Mac is recommended for that it's capable to convert Panasonic AG-HPX500 P2 MXF to Premiere Pro efficiently and stably. Click here to download the free trial version, get it installed and let's start!

free download pavtube mxf converter for mac

 
How to convert Panasonic AG-HPX500 P2 MXF footage for Premiere Pro CS6/5.5/5

Step 1. Add MXF files to Pavtube Mac P2 MXF Converter.

Connect you camcorder to Mac and keep it on until it show as a hard drive on desktop.

Install and run Pavtube MXF Converter for Mac.

Click top left icon to load you footages. You can choose "Add videos" or "Add from folder" directly.

pavtube mxf converter for mac

Step 2. Choose compatible format for Adobe Premiere Pro CS6/5.5/5

Click "Format" and find Adobe Premiere Pro at left, choose "MPEG-2 (*.mov)" or "MOV(AVC)(*mov)" etc. as it's the preferred codec for Premiere Pro. Or you can choose "Final Cut Pro > Apple ProRes 422 (*.mov)".

Apple ProRes 422:
best format for importing mxf to premiere pro

MOV, MPEG, WMV:
panasonic p2 mxf to mov mpeg wmv

Step 3. Set up output videos settings for Premiere (Optional)

Click "Settings" which is marked as 3, you can fix the bitrate, frame rate, sample rate and video size, it's all up to you. Usually the higher bitrate you choose, higher video quality will be, and larger video size correspondingly.

Step 4. Start converting AG-HPX500 P2 MXF for Premiere Pro

Now click the big red circle at right bottom, wait for moments till the conversion complete. You can click "Open" to locate the converted video directly.

For beginners, here is a guide on how to import video files to Premiere Pro

Learn More MXF related guide:


Thursday, June 6, 2013

2013 Best Father's Day Gifts: 5 Tech Gifts for Your Beloved Dad

Father's Day is just around the corner (mark your calendar: June 16th). With Father's Day approaching, it is a great time to buy something special for dad, like a new bottle of his favorite cologne or one new Nautica grosgrain watch. But if your father has a taste for the latest and greatest technology, what should you surprise him with? Here we have tried to list out some Father's day best tech gifts for dad 2013. Just read on to get started.


Tablets: iPad 3, iPad Mini, Galaxy Tab 3 or Nexus 10

Get one tablet for your father is also a good idea on father's day. So why not get the best tablet? Yes, the iPad, iPad Mini and Samsung Galaxy Tab 3, Google Nexus 10, Nexus 7 or Microsoft Surface Pro etc. Sure it's great for all those stereotypical dad things - watching sports through the ESPN app, playing high-resolution, 3D games - but it's also just a great reading companion and perfect for skimming emails before bed.


However, there are other really good options. I have list you the Best Android Tablets in The World and 2013 Top 5 Cheapest Android Tablets in India.

Smartphones: Samsung Galaxy S4, iPhone 5, Sony Xperia Z, BlackBerry 10 or HTC One

Okay, now is the best time to get a new smartphone due to Samsung and HTC both released its flagship smartphone several months ago, the Galaxy S4 and HTC One. Both of these two devices are power with strong processor, powerful camera and own a lot of new features. The Samsung galaxy s4 is the most powerful android phone, HTC one is the best HTC android phone, you can also choose iPhone 5, Sony Xperia Z, BlackBerry 10. Google Nexus 4, Galax S3 and so on, so in my eyes it is the perfect time to get one for your father if your dad has been hinting at for weeks.


Want to see the more phone details, just check Best smartphones of 2013.

Camera: Sony PMW-F55

The Sony PMW-F55 a next-generation CineAlta 4K digital cinema camera, featurs high-data-rate on-board recording of XAVC 4K and 180 fps XAVC 2K/HD with a free planned upgrade. With its revolutionary electronic global shutter and outstanding professional features, it has won lots of fans and owners. 


If you want to edit Sony F55 shooting for sharing, playing or managing, etc., just check:


Streaming Media Player: Roku 3


A Roku 3 box is the easiest way to bring broadband television directly into any living room, provided there's an HDTV and a fast Internet connection. Think lightning-quick searches across Netflix, Hulu Plus, Amazon Instant Video, plus hundreds more. And plugging headphones directly into the remote means he can watch without waking anyone.

Headphones: Bose QuietComfort 15 headphones, Beats by Dre Executive

Yes, they're on the pricey side at $299, but we haven't met a dad who wouldn't mind getting a pair of these headphones as a gift. Thanks to its extracomfortable design, improved sound, highly effective noise-canceling circuitry, device folds for compact storage in included carrying case, the Bose QuietComfort 15s currently offer the best sound and silencing capabilities in a pair of noise-canceling headphones.

And everyone knows Beats Executive? headphones are designed to take you from boardroom to the tarmac and everywhere in between. These over-ear headphones deliver the legendary Beats sound in a refined premium package that's easier than ever to take on the road.


For cheap headphones, the Panasonic RP-HTX7 Monitor Stereo Headphones is a really good option which only cost you around $50.

Want to get more gifts for your beloved Dad? Click https://www.facebook.com/pavtubefans?v=app_198826126804423

So just show your love to your dad with these Best Father's Day Tech Gifts on this Father's Day 2013.

Wednesday, June 5, 2013

Blu-ray to iMovie Converter-Convert Blu-ray to iMovie/FCE on Mac

Today's technology requires the use of digital formats for movie fans to watch or edit Blu-rays on Mac(iMovie, FCE, FCP, Avid, etc.). Also, digitizing your discs collection is an ideal form of insurance against damage, theft or loss. This guide will show you how to ingest and convert Blu-ray to iMovie/FCE for editing, playing on Mac.

"I happen to come up with an idea to ingest the audio of my Blu-ray and edit them on Mac using programs like iMovie, FCE, etc. I know there're some Blu-ray Ripper programs but are they safe? Is it possible to get the audio/video only?"

Commercial Blu-rays bring extraordinary video quality to us for family watching and sharing for the large amount of content that can be stored. It's a great fun if you have a pretty large Blu-ray collection, or movie collection. However, what if you want to have the digital copies of these movies saved on your hard drive or personal server? Not everyone would like to take a stack of the blu-ray discs with himself. Also some of us may like to not only get the digital copies of blu-rays, but also edit Blu-rays in nonlinear editing programs such as iMovie/FCE, FCP, Adobe Premiere Pro and so on.


In this case, it comes with the problems that how can us rip Blu-rays and edit Blu-ray movies in iMovie/FCE? iMovie is not so that picky on formats but it prefers AIC(Advanced Intermediate codec) in editing.  Is there any quick and easy way to do this?
  
OK, after lots of searching in google, finally a powerful conversion program is founded to be able to ingest Blu-ray to iMovie or FCE on Mac, an all-in-one Pavtube BDMagic program on Mac. This software does a good job in decrypting and transcoding Blu-rays so that you can easily get the files you want, no matter audio/video only, or both.

Get this Best Mac Blu-ray Ripper for iMovie/FCE installed here; you can order a license directly or download a trial version for free before purchase.


How to Rip Blu-ray to iMovie/FCE with Best Blu-ray Ripper for Mac?

Step 1. Load your disc.

There is a disc icon on the top left which let you load from disc, folder or ISO/IFO respectively.


Step 2. Choose your Output directory down which is marked as 2.

For editing Blu-ray movies in iMovie/FCE, the AIC is preferred. Click "Format" and choose "iMovie and Final Cut Express > Apple Intermediate Codec(AIC) (*.mov)".


PS: It has various profiles and formats so that you can rip blu-ray to various formats according to your needs.

Step 3. set up frame rate, bitrate and other output settings. 

Click Settings, you can find file details including codec, size, bitrate and frame rate. You are able to fix them according to your needs. FYI: the higher bitrate you choose, the better video quality it outputs.

Step 4. Now just press the big circular "Start Conversion" button to convert Blu-ray to AIC MOV for iMovie/FCE and let it do its magic. Wait for moments and you will get the fresh hot AIC videos for iMovie/FCE.

Tips:

1. Refer to here to learn how to import video files into iMovie.

2. Here are some step-by-step guides of how to import Blu-ray to FCP and import DVD to FCP, iMovie, FCE.

Read More:

Import Sony PDZ-VX10 XDCAM MXF to FCP 6/7 without rendering on Mac Mountain Lion

Sony PDZ-VX10 is one of Sony XDCAM series, the high-end professional camcorders which cam capture stunning-quality HD images; it can offer very high HD footages at a data rate of up to 50 Mbps at MXF format. But it becomes a pain if you want to edit the video recorded, because the high quality MXF files do not work with traditional nonlinear editing program natively on mac. You may really not feel good if you cannot edit the raw Sony XACAM MXF files in iMovie/FCP/Avid/Adobe Premiere Pro directly. Is there any way to import Sony PDZ-VX10 XDCAM MXF to FCP 6/7 efficiently without Log and Transfer?


Rejoice, Mac users, rejoice. For that finally there's a program can handle this within a few clicks, it does exactly as it claim for. Come and meet this Sony XDCAM MXF to FCP Converter for Mac which would be a vital part of your workflow.

No rendering, no stuttering, you just need to load your Sony PDZ-VX10 XDCAM MXF videos to the professional Pavtube Sony XDCAM MXF Converter for Mac software, choose FCP friendly format and click big red circle to get the fresh hot videos that can work in FCP 6/7 smoothly.

Now get this Sony XDCAM MXF Converter for Mac installed and let's go ahead to this fantastic workflow.

How to Convert Sony PDZ-VX10 XDCAM MXF to Apple ProRes for importing to FCP 6/7 without L&T?

At first, you should get your MXF video backup on your Mac. Connect your Sony PDZ-VX10 Camcorder to Mac with USB cable or use card reader to transfer the MXF files to Apple hard drive disk; do not forget to keep your camcorder on.

Run the Pavtube Mac Sony XDCAM MXF Converter for Mac. Then you can click "Add video" to load the MXF file into it, or click "Add from folder" to load the entire folder.

After that, you can select FCP 6 or 7 compatible codec. Click the "Format" bar, you will find various video formats sorted by different programs / devices. For FCP 6/7 users, the "Final Cut Pro > Apple ProRes 422 (*.mov)" preset can work well for you. If you want to get better video quality, it's recommended to choose "Apple ProRes 422 HQ".


If you want to do some editing like trim a certain MXF segment file to smaller ones, get rid of black edges of source file, add video effects, etc. this Sony XDCAM MXF Converter for Mac will be do these. 

When the setting is finished, you can click the big red button to start converting Sony PDZ-VX10 XDCAM MXF to ProRes 422 for FCP 6/7. Wait for a while to get the converted Apple ProRes 422 MOV video.

After conversion you can click the "Open" button to locate the converted files and load the ProRes MOV files to FCP X. Now you are able to import/edit Sony XDCAM MXF in FCP 6/7 freely without any rendering.

Open up Final Cut Pro 6/7, choose "File > Import > Files…" to select and load the generated ProRes 422 MOV files to FCP for editing use.


Tip:

Pavtube XDCAM MXF Converter for Mac is a converter that allow you to convert Canon MXF/Sony XDCAM MXF/Panasonic P2 MXF footage to other format like ProRes MOV, AIC MOV, Avid DNxHD MOV, MP4, AVI, MPG, WMV, MKV, DV, etc. You can select the output format as you like, after converted, you can play them on Android, iOS, Windows 8 tablets/phones etc., or import the converted MXF to iMovie, FCE, Premiere Pro, etc. Mac Editing Software for editing will be easy.

Read more:

MP4 to FCP ǀ AVCHD to FCP ǀ MOV to FCP ǀ H.265 to FCP