Showing posts with label Adobe. Show all posts

Friday, June 28, 2013

Adobe Prelude: Ingesting and Converting DSLR Footage to ProRes

Speed up your tapeless workflow using Prelude to Ingest and Transcode at the same time.


Adobe has added a new tool to the Creative Cloud / Master Collection / Production Premium for video producers/editors called Prelude.  Use Prelude to ingest and transcode tapeless media from cameras recording to cards, as well as a basic video editing tool for producers (Premiere Pro can read timelines created in Adobe Prelude).

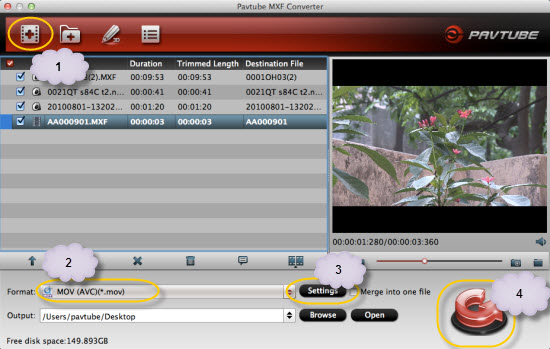
Transcoding your DSLR footage to ProRes in Adobe Prelude gives you a 10 bit, edit friendly codec that FCP, AVID, & Premiere can all handle.  This is a great file choice when you work with a variety of nonlinear apps (it’s a popular intermediate codec for FCP).  ProRes is also a solid option if you  plan on color correcting in Apple Color or Black Magic Resolve.  Trancoding changes the codec – footage off the cards is H.264 8bit and Pro Res is 10 bit.

Read More: Types of Apple ProRes Codecs | Apple ProRes Format Specifications

1. First, to work with ProRes you need to have Final Cut Pro 7, FCPX , Motion, or Compressor installed on your system.

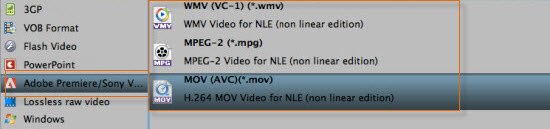
2. Then, download the ProRes presets from Adobe.

3. Once you install the presets into Media Encoder, ProRes will be available in Adobe Prelude. (same applies If you want to create your own custom presets).

4. After you download and install the ProRes presets, launch Adobe Prelude.

5. Click the Ingest button, and the Ingest window opens.


6. Select your card that has the video footage on it.


7. Check Transfer Clips to Destination.

8. Check the Transcode button and pick the ProRes setting that matches your footage.


9. Click the Ingest button and your footage will be ingested and encoded to ProRes.

After you finish ingesting and transcoding the video off a card, input another one or go straight to Adobe Premiere and start editing your footage!


More Posts:


Friday, June 7, 2013

Convert Panasonic AG-HPX500 P2 MXF recordings to Premiere Pro CS6/5.5/5 on Mac

Many people choose to record wonderful moments with a Panasonic AG-HPX500 for its great video presenting ability. And it could be better to transcode the Panasonic AG-HPX500 P2 MXF to Adobe Premiere Pro CS6/5.5/5 for further editing. Follow this guide, you will learn how to accomplish it within a few clicks.
"The camera that we are using is a Panasonic HPX500. We are shooting at 1080p 60i. But the videos are wrapped in MXF which I am not familiar with. I'm wondering whether I can edit these P2 MXF videos in Adobe Premiere Pro CS6? Thanks in advance!"
Panasonic AG-HPX500 is an HD P2 camcorder with high resolution. Many photography fans choose it for its outstanding video recording ability with 4:2:2 10-bit sampling, records in DVCPRO50, DVCPRO and DV, and other HD, SD formats at 1080 in 60i, 50i, 30p, 25p and 24p; as well as four independent audio channels.

The Panasonic AG-HPX500 recorded videos are really excellent among the high-end cameras; and you may want to edit them in some editing programs on mac, such as Adobe Premiere Pro, iMovie/FCE, FCP, After Effects and so on. But all of them are nonlinear editing programs which mean the MXF encoded files are not supported directly. So here comes up the original question: how can we convert Panasonic AG-HPX500 P2 MXF recordings to Premiere Pro CS6/5.5/5 compatible format?

After lots of searching and testing among the top converting programs, this Pavtube Panasonic P2 MXF Converter for Mac is recommended for that it's capable to convert Panasonic AG-HPX500 P2 MXF to Premiere Pro efficiently and stably. Click here to download the free trial version, get it installed and let's start!

free download pavtube mxf converter for mac

 
How to convert Panasonic AG-HPX500 P2 MXF footage for Premiere Pro CS6/5.5/5

Step 1. Add MXF files to Pavtube Mac P2 MXF Converter.

Connect you camcorder to Mac and keep it on until it show as a hard drive on desktop.

Install and run Pavtube MXF Converter for Mac.

Click top left icon to load you footages. You can choose "Add videos" or "Add from folder" directly.

pavtube mxf converter for mac

Step 2. Choose compatible format for Adobe Premiere Pro CS6/5.5/5

Click "Format" and find Adobe Premiere Pro at left, choose "MPEG-2 (*.mov)" or "MOV(AVC)(*mov)" etc. as it's the preferred codec for Premiere Pro. Or you can choose "Final Cut Pro > Apple ProRes 422 (*.mov)".

Apple ProRes 422:
best format for importing mxf to premiere pro

MOV, MPEG, WMV:
panasonic p2 mxf to mov mpeg wmv

Step 3. Set up output videos settings for Premiere (Optional)

Click "Settings" which is marked as 3, you can fix the bitrate, frame rate, sample rate and video size, it's all up to you. Usually the higher bitrate you choose, higher video quality will be, and larger video size correspondingly.

Step 4. Start converting AG-HPX500 P2 MXF for Premiere Pro

Now click the big red circle at right bottom, wait for moments till the conversion complete. You can click "Open" to locate the converted video directly.

For beginners, here is a guide on how to import video files to Premiere Pro

Learn More MXF related guide: