Wednesday, May 22, 2013

FaceBook Leak: 45% OFF to Get Pavtube Media Magician - A Useful Video Editor and Converter


Leak Source: Pavtube FaceBook Giveaway Page.

Get Media Magician with 45% OFF, Save $20! Remember that the offer is limited!


Pavtube Media Magician for Mac or Windows will turn you into a video wizard -- at a fraction of the cost of other programs. Easily, professionally edit and convert camcorder videos(MTS, MXF, MOV, MP4, AVI), MKV, FLV, F4V, Tivo, MPG and other files in non-linear editing software for viewing, watching on iOS/Android/Windows RT tablets and phones, or direct uploading to YouTube.

It features smart camcorder wizardlossless trim/cut MTS/M2TS frame by frame, preset optimized output formats,Apple ProRes encoding (for Mac only), 3D effect adding, and more for you to explore.

If you have hundreds of videos from smart phones, cameras, and tablets in different formats and would like to trim off unwanted parts, merge into one family video collection and direct upload to YouTube; if you want to losslessly edit AVCHD MTS/M2TS videos by merging/ trimming/cutting; if you want to get Apple ProRes encoded videos for FCP from MXF/AVCHD MTS/M2TS and more, Pavtube Media Magician (for Mac or Windows) is right the tool for help.


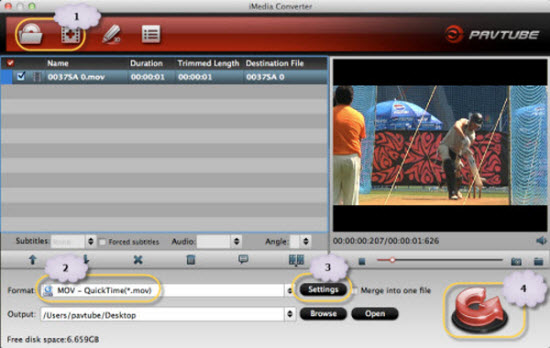
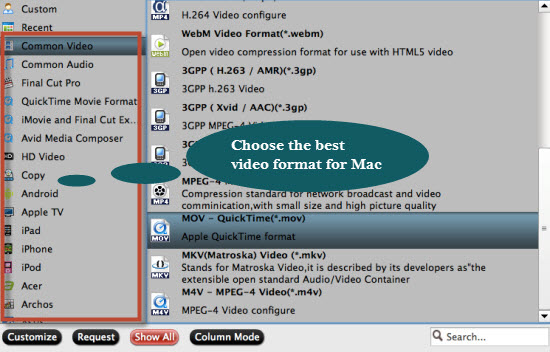
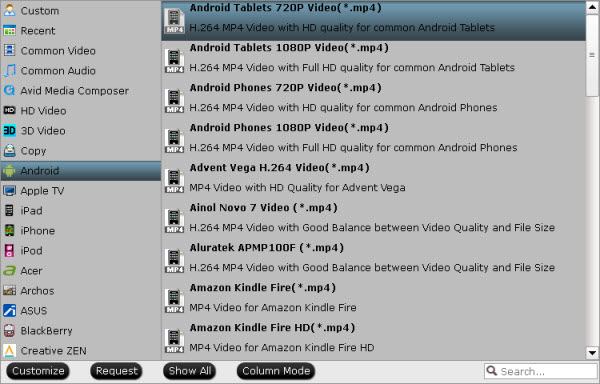
It helps import various videos formats from any of your devices and output compatible formats for iOS/ Android/ Win 8 RT tablets & phones, non-linear editing programs, YouTube, and more. The lossless output feature helps trim and/or merge MTS/M2TS/MOD/TOD videos and output original format or MKV. With the Mac version, you can easily output Apple ProRes MOV for editing in Final Cut Pro without rendering. 

Other notable features include: Smart Camcorder Wizard to manage and organize camcorder videos; timeline-oriented editing for intuitive cutting/ trimming/ order rearranging/ deleting/ merging; effect adjusting to add special effects and adjust brightness/ saturation/ contrast; volume adjustment for volume reducing or enlarging; 3D Effects adding, Multi-task encoding; automatic deinterlacing, and more.

Features
  • Import/backup/manage camcorder footage: connect camcorders to your PC and import video directly to your hard drive
  • Easy timeline editing: just drag the source from the resource list and trim, cut, delete, and join. Search clips frame by frame!
  • Amazing 3D, simple Gauss blur, old film appearance and other special effects at your fingertips
  • Brightness, contrast, and saturation controls let you easily enhance the quality of original footage shot with low light or bad color
  • Preset output profiles let you choose the right format with one click
  • Directly upload videos to YouTube

System Requirements

Windows
  • Windows XP/2003/Vista/ Windows 7/Windows 8
  • DirectX Version: 9.0 or above
  • 500MHz or above Intel or AMD processor Memory: at least 64 MB
  • Hard Disc Space: at least 512 MB

Mac
  • Mac OS X Leopard (10.5), Snow Leopard (10.6), Lion (10.7), Mountain Lion (10.8)
  • 1 GHz or above Intel processor
  • 512 MB physical RAM (memory) or above
  • 1024x768 or higher resolution display

Related Guide:
         
Try it free and you will find it easy and useful!

Tuesday, May 21, 2013

Working Natively with Sony AVCHD Format in Mac (FCP, iMovie, Avid, Premiere Pro)


"I have several mts clips in my Sony Cyber-Shot DSC-RX100 which produces files of AVCHD format, and I want to do some editing on my Mac, but I can't open the files. Is there a Mac software which can help me convert the Sony Cybershot videos for playing on Mac?" - A Mac user asked in a forum.


Nowadays, more and more people tend to capture the happiest and sweetest moments with Sony Cyber-shot digital cameras. We may shoot lots of smooth and sharp HD (high definition) footages during travelling or family time, and we usually save or import those great movies to our computer rather than locking them in our camera, because:

1. The captured HD videos will take up precious storage space in camera; High definition video file often takes up more space than standard definition file.

2. We may not directly edit, play or share those great movies as we like.
Note: Most of Sony Cyber-shot digital cameras are HD video recording (The movie definition of W and H series camera is 1280 x 720, while other camera is 1920 x 1080).

  • W-Series: W610, W620, W650, W690, WX70, WX100, WX50, WX150, etc.
  • H-Series: H90, HX10V, HX20V, HX30, HX30V, HX200V, etc.
  • T-Series: TX20, TX66, TX200V, etc.
  • R-Series: RX100, etc.

As we know, Sony Cyber-shot camera shoots HD AVCHD (Advanced Video Coding High Definition, a format using the MPEG-4 AVC/H.264 standard, with file extensions like M2TS, M2T, MTS, TS, TR, TP, TRP, TOD, MOD etc.) files, and many Mac users will experience many difficulties with Cyber-shot AVCHD files on Mac, because Sony Cyber-Shot video in the .mts format which is not supported/recognized by mac iPhoto/iMovie/QuickTime. So you just need to convert the .mts video to the Mac supported .mov format. But don't worry, this article will offer you the best solution to import?Sony Cybershot MTS clips to Mac?with ease.

What we need to get start:

In order to import Sony Cyber-shot AVCHD to Mac for editing or convert AVCHD movies for playing, all you need is a powerful and all-in-one iMedia Converter for Mac, which will enable you to convert Sony Cyber-shot AVCHD files to Mac friendly video formats like QuickTime .mov or iTunes .mp4 format. With this?Mac sony cybershot software, you can easily convert and edit AVCHD footage on Mac OS, that is to say, you can convert Cyber-shot AVCHD files to any popular video format, such as MOV, MP4, AVI, WMV, M4V, 3GP, SWF, FLV, MKV, etc.

(You can try with the trial version, or click here to get 30% OFF on Mother's Day Special Offer.)

How to Convert and Import Sony Cyber-shot AVCHD Files to Mac

Now let's get the best Mac Sony AVCHD Converter and convert Sony Cyber-shot mts video files to Mac friendly video formats in a few clicks:

Step 1. Add AVCHD video files.

Install and launch Pavtube Sony AVCHD Converter for Mac, and click "Add File" to import your Sony Cyber-shot AVCHD files; or click "Add from folder" to load videos in batch.


Step 2. Choose output video format and adjust output settings.

Choose output video format from the "Format" preset, and click "Output" to change converted video path. Such as:
  1. For FCP 6/7/X Users, choose "Final Cut Pro > Apple ProRes 422 (*.mov)"
  2. For iMovie/FCE Users, choose "iMovie and Final Cut Express -> Apple InterMediate Codec (AIC) (*.mov)"
  3. For Avid Media Composer Users, choose "Avid Media Composer -> Avid DNxHD (*.mov)"
  4. For Adobe Premiere Pro Users, choose "Adobe Premiere > MPEG-2 (*.mpg)" or "Final Cut Pro > Apple ProRes 422 (*.mov)".


If you want to locate your videos quickly, click Browse. The "Settings" icon will meet your requirements of adjusting video bitrate, frame rate and so on.

You could edit your Cyber-shot AVCHD videos before converting. By clicking the pencil icon on the top of Cyber-shot AVCHD Converter for Mac, you can trim/crop the video clips, add or adjust video effect, or take snapshots from video as you like.

Step 3. Start converting Sony Cyber-shot AVCHD MTS on Mac.

Click the big red circle to convert Sony Cyber-shot HD AVCHD MTS videos for importing to Mac.

After conversion finished, you then are able to edit or share your Sony Cyber-shot HD videos on the go.

Tips:

1. This remarkable program is not only able to convert AVCHD files to various file formats, but also able to import most mainstream video formats; what's more, iMedia Converter is capable of ripping blu-rays and DVDs which may enlighten your movie collections in an efficient way.

2. Get more step-by-step guides about how to work with Sony camcordersFinal Cut Pro topics and AVCHD/MTS files.

Read More:

How to Solve the freezes when importing MTS media to Premiere CC-2015.3?
How to Convert MTS/M2TS with Handbrake Easily?
Best Solution to Play Sony MTS/M2TS Files on MacBook Pro
Play MTS on Smart TV (Windows and Mac Solutions)
Top 5 MTS/M2TS Video Editors for Mac
Top 5 MTS/M2TS Video Editors for Windows (10, 8.1, 8, 7, XP, etc)
Fix Choppy Issues When Importing AVCHD Files to FCP
Join and Convert MTS/M2TS Files for playing with VLC Player
How to Convert 3D AVCHD MTS to 3D Tablet for Watching?

Monday, May 20, 2013

Galaxy S III software leak reveals potential S4-class upgrades


Samsung appears to be making good on its promise to port Galaxy S4 features to the Galaxy S III. A test Android 4.2.2 update, discovered by SamMobile, includes the lockscreen effects and widgets, enhanced screen modes, updated settings, and new S Voice control features found in Samsung's new flagship. Samsung previously said it would include updates that were "not dependent on hardware," ruling out gestures like Air View and the smart TV remote app.

The Android update is currently undergoing internal testing and is available as an unofficial pre-release ROM, suggesting that the company could add or remove features before an official rollout — which is reportedly slated for June. Given the unofficial nature of the ROM, we don't recommend that you install it at this time.

Best Android Video Converter-Transfer 1080p/720p Video to Android Tablet & Phone

Google's Android mobile OS is considered one of the best alternatives to Apple's iOS when it comes to tablets computers and smartphones. More and more people are getting fond of Android OS to watch video and movies on their tablets including Asus Infinity TF700, Google Nexus 7, Transformer Prime,  Samsung Galaxy Note 2, Galaxy Tab 2and smartphones like Samsung Galaxy S3, Galaxy Mega 5.8 and 6.3, Galaxy S4, HTC One, Google Nexus 4, HTC One Xand more.
            

We're not really surprised, and have seen this trend with our client, colleagues, friends and family members because of its open-source nature and powerful system equipments. Nowadays, it's common to have loads of 1080p/720p HD videos and movies stored on your HDD or home server. These 1080p/720p video materials always come from Blu-ray backups, camera footage, TiVo recordings, downloaded movie torrents, etc. Due to format restrictions, Android-based devices do not have native support for all these videos in different file types. 

Read Supported Video Formats for Android

"Dear all, 
Can you please suggest what is the best (or good) video Converter tool to convert videos/movies in nexus 7 format for loading in Nexus 7 tablet? 
I tried searching a few..all of them look good but before buying, I would appreciate your feedback to make the best buy. Thanks"
 

If you attempt to watch videos in your Android device unsupported file format, you need to do format conversion previously. The following guide demonstrates how to convert 1080p/720p HD Videos and Movies to Android Tablets or Phones on Windows or Mac. 

Required Tools:
Good News! Pavtube Release a New Site - multipelife.com with Product Migration and Name Change.

To thanks for your continued support all along our previous site and the new www.multipelife.com, we are holding a 'New Site Special' with fantastic discounts up to 40% off. You can get 20% off BDMagic, 30% off ByteCopy, 40% off DVDAid and 20% off Video Converter Ultimate on Windows/Mac platform:

https://www.facebook.com/pavtubefans/app_209569249055691

Read more: http://mediaconverting.blogspot.com/2014/05/pavtube-new-official-website.html

The above mentioned two programs have the same operation procedure, but running on different platforms. Here we run Pavtube Video to Android Converter Windows Version to guide you through how to transcode 1080p/720p Full HD movies to Android devices for playback.

How to put any 1080p/720p video to Android Tablet or Phone?

Step 1: Start up Pavtube 1080p/720p video to Android Converter, then click "Add video" or "Add from folder" tab to load your 1080p/720p source files.


Step 2: Click format menu to choose output format for playing any videos on your Android tablet or smartphone.

Most Android devices support below video and audio formats:

Video Codec: H.264
If there're universal codecs for Android devices, they must be H.264, MPEG-4 and H.263. Among them, H.264 is regarded as the most advanced codec and is widely used accepted.

Audio Codec: AAC/MP3
Every smartphone plays AAC and MP3 audio, but I'll suggest you choose AAC for better audio quality.

Video Format: MP4
MP4 is recommended because it is a most widely accepted video format for portable devices. Indeed, MKV and AVI video are OK for most Android tablets and phones, but MP4 can not only be transferred to Android handsets, but also be put onto iPad, iPod Touch, PSP and over majority of portable media players.

Pavtube software comes with optimal format presets for Android devices developed by different brands, such as ASUS, HTC, Samsung, Motorola, Google, Amazon and more, so that you can select a target format for your Android device directly in an easy way.


Step 3: Click "Convert" button to start converting 1080p/720p video to MP4 for transferring to Android tablet or phone. When finished, click "Open" button to get the generated video files for playing with your Android tablets or phones.  

Additional Tips

Android tablets only recognize SD cards formatted in FAT 32, this limits a single file size less than 4GB. If you worry about getting a big video file larger than 4GB, you can use split feature in Pavtube software to split a large 1080p/720p file into multiple chunks under 4GB. Learn to split a large video file into several small files under 4GB for Android device.

See Also:

Download Blu-ray movies to Android Tablet & Samrtphone 
Convert DVD movies to Android Phone/Tablet for freely playback 
Top MKV Converter for Android Tablets and Smartphones 

Thursday, May 16, 2013

Tivo to AVI-Encode TiVo shows to AVI for playback on Windows 8


Probably you are in same dilemma of finding recorded TiVo files not so easy to play back and edit as common video files when you transfer your recorded shows by TiVo to your Windows 8 PC. How to fix this? There is one, that is to convert your TiVo recordings to something more common for your Windows 8 desktop or laptop. Pavtube TiVo to AVI Video Converter is a handy tool to help you complete this in shortest time and perfect quality. Meanwhile, it is capable of cutting ads clips off, trimming and cropping video clips, and putting your shows in your pocket and take them with you. TiVo files are well supported by Pavtube Video Converter Ultimate and can be en-decoded fast and properly. It will generate various container formats encoded with MPEG, H.264, Divx, Xvid, etc. This guide shares with you how to convert TiVo recordings to Divx AVI for playback on Windows 8 step-by-step.

Step One. Transfer recorded TV shows to your PC.

In the first place, you got to transfer shows from your TiVo DVR to your PC. TiVo Desktop software for the PC is required, and you can access the instructions on how to transfer TiVo file to PC from their website.

Step Two. Run Pavtube Video Converter Ultimate and load TiVo files.

Pavtube offers free trial version of TiVo Video Converter for you to evaluate the software. So just go ahead, download and install Pavtube TiVo to AVI Converter (30% off to celebrate Mother's Day continues till May 22) and try it out!

Launch the utility and here pops up an intuitive interface. Click "Add Video" or "Add from folder" to load recorded TiVo TV shows, or you just drag the files in. When first loading, Pavtube TiVo to AVI Converter will ask you to input your Media Access Key. Simply enter your Media Access Key, and click "OK" to confirm.

 TiVo shows to AVI for playback on Windows 8
 
Step Three. Crop out unwanted edges and trim off ads

Click on "Edit" menu to enter editor panel where you could edit selected files. "Crop" feature allows you to cut off unwanted black edges, while "Trim" feature enables you to select specific length of video and convert it to specified format. Just drag the slider or input start time and end time.

Step Four. Set output format and A/V settings.

In order to encode TiVo shows to DivX AVI, you can click on "Format" bar and follow either "Common Video -> Divx AVI" or "HD Video -> Divx AVI". Next specify location for generated files in "Output" box. To adjust video and audio parameters like codec, aspect ratio, bit rate, frame rate, sample rate, you could click on "Settings" button.

Step Five. Convert TiVo files to AVI Divx on Windows 8. Go!

Now it comes to the final click. Click "Convert" button and wait. The View Log will present you all the info such as conversion progress, conversion state, elapsed and estimated conversion time, and generated and estimated conversion file size. You may check "Shut down computer after conversion" and leave it be.

Why choose Pavtube Video Converter Ultimate Software?

Pavtube Video Converter Ultimate is a very powerful all-in-one BDMagic + DVDAid + Video Converter as well as editor, with super fast conversion speed.

You can use the software to convert Blu-ray/DVD movies and virtually any audio and video files formats for playback on most popular devices including all Android Tablets/Phones, Windows 8 Tablets/Phones, iPad, iPod, iPhone, Apple TV, Zune, PSP, Pocket PC, Creative Zen, and Archos, Adobe Premiere, Sony Vegas, Avid Media Composer and so on. It also makes it super simple to output to a mobile device.

It is the Best Video Converter Ultimate that can convert different file formats like MKV, AVI, VOB, MPG, Tivo, WMV, MOV, MP4, VRO, EVO, FLV, F4V and even convert video to Youtube friendly format or convert downloaded Youtube to video with best image and sound quality without causing you any audio and video out of sync issues. It even has the tools to trim certain video clips, crop black bars, add watermarks, change brightness, choose special effects, specify aspect ratio, and more.

Backup Blu-ray 3D movies to 3D/2D video files like MP4, AVI, MKV, MOV, WMV, etc.

Another feature of the program is that it supports NVIDIA CUDA and ATI Stream (AMD APP) acceleration technologies.

Meanwhile, you can check out this review by Comparing the 5 Best Video Converter Ultimate.

Friday, May 10, 2013

2013 Mother's Day Bes Gifts: 30% OFF Blu-ray/DVD Ripper, 30% OFF Ultimate Converter from Pavtube

Surprising!!! Happy Mother's Day 2013! Pavtube Facebook Offer 30% Discount Coupon for 2013 Mother's Day

2013 Mother's Day is coming soon! If your mom like watching 1080p Blu-ray movies, DVD movies or all kinds of videos (such as: MKV, AVI, TV Shows, WMV, Flash videos, etc.) on her Tablet or Phone? Do you think what is most appropriate gift? Guessed it! A Blu-ray Ripper, DVD Ripper tool or a Video Converter Ultimate and a iMedia Converter for Mac is the Hottest Gifts for Mother's Day 2013 for your mom. These Video/Movie Converters can help your mom to convert Blu-ray/DVD collections, MKV, AVI, VOB, Tivo, Flash Videos etc. to her tablet or phone support playback formats for watching anytime and anywhere.


From May 8 to May 22, 2013. Pavtube FaceBook put into effect a Special Offer as the 2013 Mother's Day Special Gifts for your Mom, Up to 30% discount has arrived! We offer a 30% discount coupon in return! Click "2013 Mother's Day Coupon Code", you will get the most useful and powerful Video Movie Converter on Windows or Mac:

1. 30% OFF BDMagic for Windows or Mac (Save $16)

   
2. 30% OFF DVDAid for Windows or Mac (Save $10.5)
   
3. 30% OFF Video Converter Ultimate - Save $20

4. 30% OFF iMedia Converter for Mac - Save $20

Happy Mother's Day 2013!

Monday, May 6, 2013

How to make a Copy of a DVD on Mac OS X Lion/Mountain Lion with freeware

Summary: If you want to backup/copy non-protected/protected DVDs to hard drive, hard disk, or copy DVD to a new DVD disc on Mountain Lion, there is a great Pavtube DVD Creator and DVD Ripper for Mountain Lion for you. 

When faced with the necessity of making a copy of an unprotected DVD disc, Mac users should not worry--Mac OS X makes it simple. The built-in Disk Utility can easily back up/save a DVD movie to disk image (.cdr) file and make additional burns at a later date. If you want to take full advantage of your lightening speed DVD-ROM so as to shorten the burning process, go ahead to get Pavtube DVD Creator for Mac that lets you create/copy a DVD three to five times faster. 

Part One: How to make a Copy of a DVD (unprotected) on Mac OS X Lion/Mountain Lion

What you need: Pavtube DVD Creator for Mac, DVD writer, blank disc (DVD-5/DVD-9)

1. Place the DVD that you want to copy into the Mac.

2. Connect a DVD writer to Mac with blank disc in it. 

3. Run the DVD Creator for Mac from Applications. Select "Quick Burn" from drop-down menu of Quick Start button.


4. In the pop-up window, check "From DVD folder".


5. Browse to the source DVD, choose it. 

6. Press "Burn" button. And the DVD maker software should start copying DVD movie to the blank disc. In this way you can make a 1:1 copy of self-created DVD. 

More features of Pavtube DVD Creator for Mac:
  • Burn DVD folder/ISO image/various video formats to DVD on Mac 
  • Create high quality DVDs from AVI, MKV, WMV, MXF, MOV, DivX, XviD, MP4, VOB, M2TS, MTS, TIVO and many other video files(Free Burn AVI, MKV, MP4 to DVD on Mac)
  • Create Slide Show DVD with photos and music you designed 
  • Customize DVD with eye-catching DVD menus, edit video effect and clip video to burn DVD movie 
  • Burn movies and TV shows to DVD for backup or sharing easily and quickly
             
Keep in mind that these directions are only for copying DVDs that do not have any form of copy protection encoded on them. To make a duplicate of commercial DVD, you'll first need Pavtube DVDAid for Mac software to crack and archive the whole DVD directory to hard drive.

Part Two: How to make a Copy of a commercial DVD on Mac OS X Lion/Mountain Lion

What you need: Pavtube DVD Ripper for Mac, Pavtube DVD Creator for Mac, DVD writer, blank disc (DVD-5/DVD-9)

If you have at hand a great number of DVD movie collections, there's good chance that you wanna backup DVD movies to blank DVD discs so as to still take the copy out even if the original disc is broken or out of use. What frustrated is that copyright protection prevents DVD burning apps from copying the DVD movies. That's where DVD Ripper come in – by cracking CSS+ and region code restriction it turns commercial DVDs into fair-use movies. Follow the guide below to rip a DVD into VIDEO_TS folder without making change of the original files

1. Place the DVD that you want to copy into the Mac.

2. Run Pavtube DVD Ripper for Mac, click "DVD ROM" to hack protections and load movies.


3. Click the small folder icon in Output field to specify an output location on your hard drive. Make sure there is enough free space for the DVD VIDEO_TS folder.

4. When the movie is loaded, press "Copy" button to start backing up DVD folder onto your Mac hard drive

Tip: DVDs have a number of copy prevention mechanisms. When you rip the DVD, you strip off those mechanisms but copy the rest of the video unadulterated. This means that the ripped DVD will take up as much space as the files on the DVD itself.

Once the process complete, you can click "Open" to find the free-region VIDEO_TS folder, which contains VOB streams, as well as IFO and BUP files. You can easily import the copied VIDEO_TS folder to Pavtube DVD Creator for Mac and make a duplicate copy. 

More features of Pavtube DVD Ripper for Mac:
Read More: