For VirtualDub users, sometimes, you may have some MP4 files that you wish to load into VirtualDub, but just receive an "file not supported" error message just as the condition listed below:
"Hi, How to open .MP4 files in virtualdub? it says file is not supported or something.. i hope there's a plugin that allows me to open .mp4 files. The reason i want to open it in virtualdub is so that i can run a sharpen filter for the mp4 video. this is so tahti can watch on my PSP. I figured that I can convert the mp4 to avi then sharpen, but it would lose alot of quality that way. Thanks."
Why VirtualDub not open MP4 files?
As a free and open-source video capture and video processing utility, VirtualDub is designed to process linear video streams, including filtering and recompression. However, one of the biggest drawbacks of this program is that it was made to operate exclusively on AVI files, it also means you can only load AVI container format video into VirtualDub. The good news is that you can still load MP4 to VirtualDub with the 2 solutions offered in the following article.
Solution 1: Download plugins of VirtualDub for MP4 formats
Solution 2: Convert MP4 to VirtualDub compatible file format
Solution 1: Download plugins of VirtualDub for MP4 formats
You can use the following plugins to open MP4 files that VirtualDub not handle originally.
1. VirtualDub FFMpeg Input Plugin
Handles 31 different formats, including MP4, MKV, MOV, FLV, WMV and other popular formats.
2. VirtualDub FccHandler Mirror
Handles MPEG-2, MKV, FLV, WMV, FLI, FLC and AC-3 ACM codec
3. Haali Media Splitter
Handles MP4, MKV, MTS, M2TS.
4. ffdshow-tryouts
Handles MP4, MKV, MTS, M2TS.
Solution 2: Convert MP4 to VirtualDub supported editing formats
Since VirtualDub only supported AVI files, therefore, you can easily fix this format incompatible issue by converting MP4 to VirtualDub workable file formats. Here, you can get the job easily done by downloading Pavtube Video Converter, which has full support for all 4K/2K/HD/SD MP4 files encoded with various different compression codec such as H.264, H.265, MPEG-1, MPEG-2, VC-1/WMV, MPEG-4 (A)SP, etc. The program supports batch conversion mode, so that you can load multiple MP4 file at one time for conversion. You can easily convert MP4 to VirtualDub editable AVI files with various different compression codec such as Divx, Xvid, DV or H.264, etc.
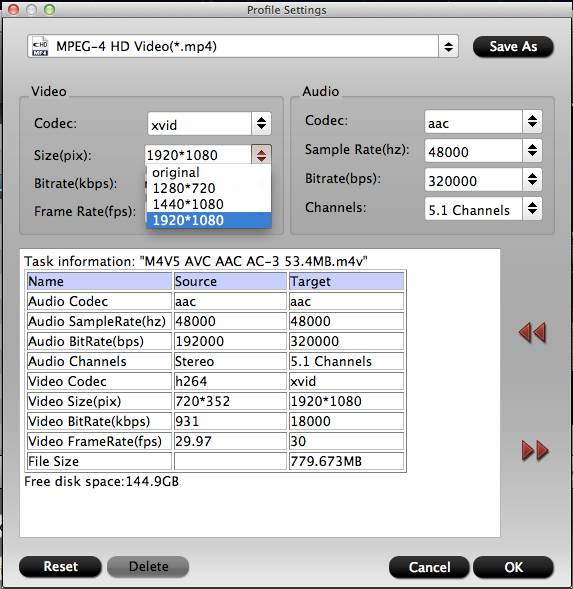
To get better output video and audio quality, you can flexibly adjust output profile parameters such as video codec, resolution, bit rate, frame rate, audio codec, bit rate, sample rate, channels, etc as you like.
For Mac users, you can switch to download Pavtube Video Converter for Mac to complete the conversion on macOS High Sierra, macOS Sierra, Mac OS X El Capitan, Mac OS X Yosemite, etc.
Step by Step to Convert MP4 to VirtualDub Editable File Formats


Step 1: Load MP4 files into the program.
Install and launch the MP4 video converter program on your computer, click "File" > "Add Video/Audio" or "Add from Folder" to load unsupported MP4 files into the program.

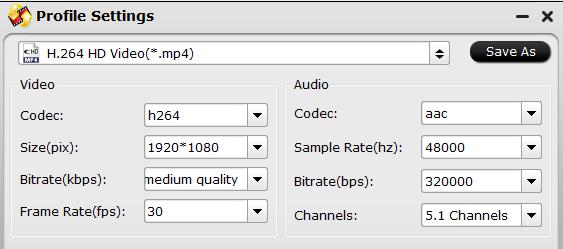
Step 2: Choose output file format.
Click "Format", from its drop-down option, choose VirtualDub supported AVI format such as "Divx AVI - Audio Video Interleaved (Divx)(*.avi)" or "Xvid AVI - Audio Video Interleaved (Xvid)(*.avi)" under "Common Video" main category.

Tips: You can flexibly adjust the output video codec, bit rate, frame rate, resolution and audio codec, bit rate, sample rate and channels according to your own needs.
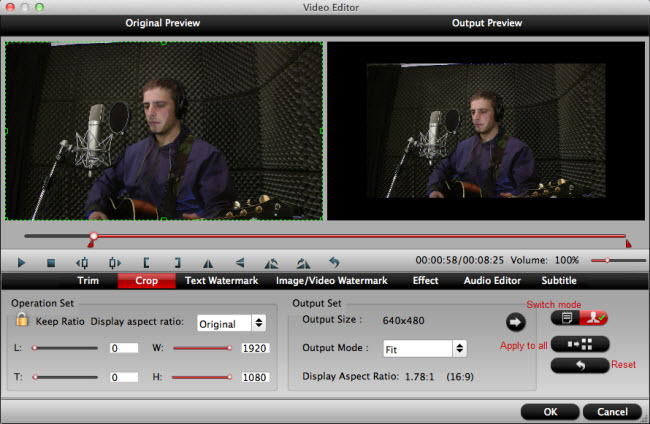
Step 3: Edit MP4 video (optional).
Check an item to active the "Video Editor" function, then click the pencil like icon on the top tool bar to open the "Video Editor" window, you can trim video length, crop video black bars, add watermark, apply sepcial rendering effect, remove/replace audio in video, etc.

Step 4: Begin MP4 to VirtualDub conversion process.
After all setting is completed, hit right-bottom "Convert" button to begin the conversion from MP4 to VirtualDub conversion process.
When the conversion is completed, you can click "Open Output Folder" button to get the output files effortlessly, and now you will have no problems to import and edit MP4 files with VirtualDub.
Related Articles
Any Product-related questions?support@pavtube.com