The EOS 5D Mark IV captures incredible still and 4K video clips suitable for significant post-processing, retouching and cropping. When the shooting is complete, a lot of people find that it is not convenient to play the Canon 5D Mark IV 4K video on computer, smartphone, HD TV, etc or edit with professional NLE editing on slow computer. In addition, due to the large file size of 4K video, 4K video sharing on popular video sharing sites is still very time consuming. The good news is that all those head-scratching issues can be easily fixed by compressing Canon 5D Mark IV 4K to 1080p. The following article will show you how to make this job easily completed.
Best tool to downscale 4K to 1080p
Although there are many tools on the market can do the job for you. However, if you are looking for a powerful yet simple to use program to compress Canon 5D Mark IV to 1080p on Mac, you can's miss Pavtube Video Converter for Mac. The program has perfect importing support for the M-JPEG 4K video recorded with Canon 5D Mark IV and also other 4K format and codec like 4K Prores, 4K H.264, 4K H.265 or 4K AVI/WMV/MP4/MOV/MKV/MXF/XAVC/XAVC S, etc. Thanks to its batch conversion mode, you can load multiple Canon 5D Mark IV 4K video into the program at one time to save your precious time.
Then let's talking about the core compression function. With the program, you can efficiently compress Canon 5D Mark IV 4K M-JPEG to 1080p or 720p in various different HD file formats including H.264 HD MP4, H.264 HD MOV, H.265 HD MP4, MPEG-4 HD MP4, MPEG-2 HD, MPEG-TS HD, MKV HD, WMV HD, Divx HD, AVI HD and BDAV HD for smoothly playing and viewing on computer, smartphones, tablets, HDTVs, etc. Besides that, you can also choose devices or applications preset HD profile formats with the optimal playback settings.
For Windows users, you can download Pavtube Video Converter to compress 5D Mark IV 4K to 1080p on Windows 10/8.1/8/7 with best output quality.
Split/Trim/Crop Canon 5D Mark IV
Don't want to suffer any quality loss when compressing Canon 5D Mark IV 4K video. Never mind, you can make that by using the program's built-in trimming function to cut off unwanted parts or segments, split large 4K video into small parts by file size, count or length or crop the 4K video to remove the unwanted black bars or areas from the 4K video.


How to Compress Canon 5D Mark IV 4K to 1080p on Mac?
Step 1: Load Canon 5D Mark IV 4K video.
Download the free trial version of the program. Launch it on your computer. Click "File" menu and select "Add Video/Audio" or click the "Add Video" button on the top tool bar to import Canon 5D Mark IV 4K video into the program.

Step 2: Choose output file format.
To compress 5D Mark IV 4K to 1080p, it would be ideal for you to choose one of your desired HD file format under "HD Video" main category.

Tips: Click "Settings" on the main interface to open the "Profile Settings" window, to compress 4K to 1080p, make sure to change the output file resolution as "1920*1080" or "1080*720" from "Size(pix)" drop-down list. You can also do other tweaking according to your own needs.
Step 3: Trim/Split/Crop Canon 5D Mark IV video.
Trim video length
In the video editor window, choose the "Trim" tab and this tab is selected by default when the editing window appears. You can use the trim function to cut off unwanted parts from start and end. You can either drag pointers on the process bar or set exact time point in Start and End boxes to set.

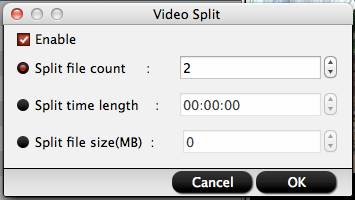
Split large video
Click the split button on the file list to launch the Video Split window. Ticking "Enable" option, you can split the file by file count, time length, or file size.
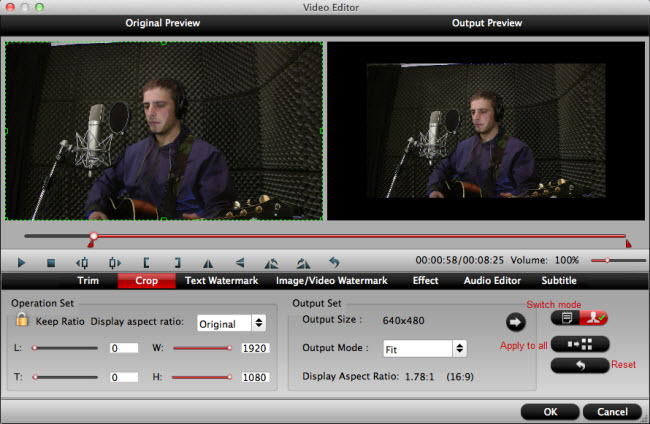
Crop video area
The "Crop" facility enables users to get rid of the black edges and unwanted area of the image. In the video editor window, navigate to the "Crop" tab. Follow the below methods to crop selected video:
A: Crop video by dragging and dropping the crop frame. Simply move your mouse cursor to drag and adjust the green frame to desired position.
B: Crop video by setting values. There are "Simple Mode" and "Advanced Mode" under Crop feature.
Step 4: Begin the conversion process.
After all setting is completed, hit the "Convert" button at the right bottom of the main interface to begin the compression or downscaling process from Canon 5D Mark IV to 1080p or 720p resolution with your desired HD file formats.
When the conversion is finished, click "Open Output Folder" icon on the main interface to open the folder with generated files. Then you can smoothly view, play the compressed files on Mac with video players, transfer to iPhone, iPad, stream to HD TV or load into Mac editin
Related Articles
Any Product-related questions?support@pavtube.com