As the best Drone of 2017, the DJI Mavic Pro is the perfect marriage of unparalleled flying ability, a high quality camera, and a low profile design. With this great drone, you can shoot both DCI 4K and UHD 4K in MOV wrapper with MPEG-4 AVC/H.264 compression standard. When the shooting is done, you may wish to do some professional post editing work with the DJI Mavic Pro 4K video with Premiere Pro CC. The following article will show you how to achieve a high quality and high performance workflow of Mavic Pro 4K video with Premiere Pro CC.
Work Mavic Pro 4K with PPC on slow computer
Although Premiere Pro CC can handle 4K resolution video editing very well, in addition, the H.264 MOV formats shot with Mavic Pro is also included in Premiere Pro CC supported file formats. However, it is well known that 4K video editing is very processor intensive, if your computer doesn't meet the minimum standards to edit 4K video, you will inevitably suffer video stuttering or lagging issues when playback the 4K video on the timeline of Premiere Pro CC. To fix this issue, you can use the following 2 solutions:
Solution 1: Create Proxy Media with Premiere Pro CC
Solution 2: Compress DJI Mavic Pro 4K to 1080p
Solution 1: Create Proxy Media with Premiere Pro CC
You can create proxies directly from items in the project panel. Choose Create Proxis from the project panel context menu to open the Create Proxies dialog. The menu item is enabled when one or more items in the panel are selected that can be proxied. Premiere Pro can create proxies for master clip project items if they have video, have no captions, and are not growing files. The media must also be online.
In the Create Proxies dialog you can choose one of several built-in presets to use when transcoding high-resolution originals to create proxies. You can also add presets created in Adobe Media Encoder by clicking the Add Ingest Preset button. You can also choose to create proxies in a "Proxies" directory next to the original media, or in a custom location.
If you allow the progress dialog box to complete, a proxy job is created in Adobe Media Encoder for each of the project items chosen that can be proxied, and an offline proxy is attached to each project item. You can monitor the progress of these jobs in the Premiere Pro Progress panel, or in Adobe Media Encoder.
While the jobs are processed, you can continue to work with the corresponding high-resolution project items in Premiere Pro. When the proxy jobs complete, Premiere Pro automatically switches to displaying the proxy video in the Timeline if Enable Proxies is enabled in the Media preferences panel.
Solution 2: Compress DJI Mavic Pro 4K to 1080p
If you wish to export the 4K footage from Premiere Pro CC to 1080p for smooth playback on HD TV, smartphones, tablets, etc. Then it would be much ideal for you to choose the 2 solution: compress 4K to 1080p. Here, you can easily downscale DJI Mavic Pro 4K to 1080p by downloading Pavtube Video Converter, which can assist you to efficiently compress Mavic Pro 4K to 1080p or 720p in various file formats including H.264 HD MP4, H.264 HD MOV, H.265 HD, MPEG-4 HD MP4, MPEG-2 HD, MPEG-TS HD, MKV HD, WMV HD, Divx HD, AVI HD, BDAV HD, etc. Here, you can choose any of Premiere Pro CC supported HD file formats as the final output file format according to your own preference.
For Mac users, you can download Pavtube Video Converter for Mac to complete the conversion on macOS High Sierra, macOS Sierra, Mac OS X El Capitan, Mac OS X Yosemite, Mac OS X Mavericks.


How to Compress DJI Mavic Pro 4K Video to 1080p for Smooth Post Editing Workflow?
Step 1: Load 4K video into the program.
Open the program, click "File" menu, from its drop-down option, select "Add Video/Audio" to load DJI Mavic Pro 4K Video to the program.

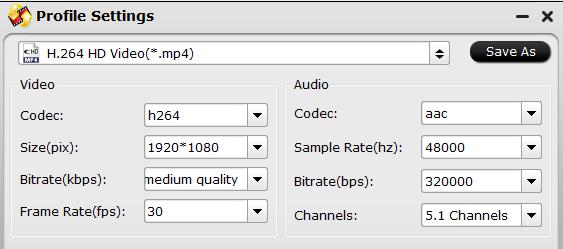
Step 2: Choose output file format.
To downscale DJI Mavic Pro 4K to 1080p, first chose to output DJI 4K H.264 to HD H.264 from the "Format" drop-down list below.

Then click "Settings" icon on the main interface to open the "Profile Settings" window, from "Size(pix)" drop-down options, select "1920*1080" or "1080*720" to compress 4K to 1080p.
Step 3: Start the conversion process.
After all settings are done, click right-bottom "Convert" button to begin to convert and compress DJI Mavic Pro 4K video to Premiere Pro compatible editing codec or resolution.
When the conversion is completed, you will have no problem to import video to Premiere Pro CC for smooth post video editing workflow.
Related Articles
Any Product-related questions?support@pavtube.com