Monday, April 10, 2017

Upload ShadowPlay recordings to Vimeo/Instagram/Youtube

Nvidia Share (formerly Nvidia ShadowPlay) is a hardware-accelerated screen recording utility for Windows PCs using GeForce GPUs, made by Nvidia Corp as part of its GeForce Experience software. It can be configured to record continuously a time behind, allowing the user to save the video retroactively. You can capture screenshots up to 4K and upload them to Facebook, Google or Imgur with the click of a button. And it records up to 4K resolution at 130 Mbps.

If you've recorded some videos with Shadowplay, chances are you want to upload them to YouTube or posting on Faceboo, Instagram etck. When you try to do it, you might encounter some problems uploading ShadowPlay video to Vimeo/Instagram/Youtube. That’s because your ShadowPlay videos are not friendly with Vimeo/Instagram/Youtube. So you’d better convert your ShadowPlay recordings to Vimeo/Instagram/Youtube friendly videos.

Best Program to Convert ShadowPlay videos to Vimeo/Instagram/Youtube supported videos

That’s easy. In the following parts, I am going to introduce to you how to carry out the converting exactly. What you need is one professional  video converter for YouTube/Instagram/Vimeo/Facebook etc. Pavtube Video Converter Ultimate is your smart choice. With it, you can fast convert ShadowPlay videos to YouTube/Instagram/Vimeo/Facebook compatible format like H.264 MP4 without quality loss. Besides, this program also can convert ShadowPlay videos to some NLEs for editing like Premeire Pro, Sony Vegas Pro etc for getting nice videos.

What's more, with the built-in video editor, it's freely for you to trim the ShadowPlay videos into multiple segments with short duration. The most important is that, it allows you to modify the video bitrate, frame rate, video size, audio channel, etc for your original ShadowPlay recordings for easier uploading.

Mac user can get its Mac version - Pavtube iMedia Converter for Mac

Free download this ShadowPlay video converter

How to Convert ShadowPlay recordings to Vimeo/Instagram/Youtube on Windows (10)

Step 1. Add ShadowPlay videos

Install and run the Video Converter on your computer, then click "Add Video" button to browse and load your videos which you've transferred to your Windows PC.

Step 2. Set right output format.

Click "Format" bar, and select .mp4 from "Common video" or "HD video" to fit Vimeo/Instagram/Youtube.

Tip: If you're skilled at advanced settings about video and audio parameters, you're able to customized settings, such as select bitrates, encoders, resolution, frame rate, audio channel, etc.

Step 3. Click the "Convert" button on the main interface and the software will start to convert ShadowPlay recordings to Vimeo/Instagram/Youtube friendly video formats immediately. When the conversion finishes, click "Open" to find the converted video files. Then you can effortless transfer the video files to Vimeo/Instagram/Youtube for playback on the go.

Read More:

Tuesday, April 4, 2017

Load AVI to iTunes on macOS Sierra

Some users try to add AVI video files to iTunes library and then sync them to iDevices. But when they click "add file to library" or drag the files to iTunes, nothing showed. Why? How to solve “iTunes won't accept AVI files?” Read on to get it.

We all know AVI is a common video format widely used on Windows platform, but it cannot be supported by Apple iTunes (Mac applications only accept avi files format with Motion JPEG (M-JPEG) up to 35 Mbps, 1280 by 720 pixels, 30 frames per second, audio in ulaw, PCM stereo audio). This not only happened on the latest iTunes 12, but iTunes 11. So if you want to add AVI video files to iTunes, you can convert AVI to iTunes supported MOV, MP4, and M4V format.

Best Program to Add AVI to iTunes

In order to perform this conversion task, you'll need the solid and AVI Video Converter - Pavtube Video Converter for Mac. This program is popular for its simplicity, efficiency and quality. With it, you can do conversion from not only AVI to iTunes, but also MKV to iTunes, MP4 to iTunes, MTS to iTunes, VOB to iTunes, MOV to iTunes highly compatible MOV, MP4, M4V files without quality loss.

With it, you don't need to know what is the audio codec in the AVI format that'll be best for your iTunes. You just need to choose the mov, mp4, m4v with one click. A while later, the video conversion will be finished and you'll be able to watch the awesome media content on iTunes without having to compromise on the quality. Plus, it offers kinds of preset profiles for media players including iPhone, iPad, QuickTime, Apple TV etc to meet your different needs. The following guide will show you how to convert AVI to iTunes compatible format for perfect playing.

Highlights of Pavtube Video Converter for Mac

  • Convert AVI, MKV, MP4, MTS, MXF, FLV, WMV, XAVC, MPEG etc to iTunes supported video
  • Convert AVI, MKV, MP4, MTS, MXF, FLV, WMV, XAVC, MPEG etc to iTunes, iPhone, iPad, QuickTime, Apple TV etc supported video
  • Convert AVI, MKV, MP4, MTS, MXF, FLV, WMV, XAVC, MPEG etc to MP3, AAC, WMA etc
  • Convert AVI to NLEs like FCP, iMovie, Premiere Pro, Avid Media Composer, Resolve etc
  • Basic (AVI) video editing functions: split, merge, trim, crop, add watermark, adjust video effect, edit audio and insert subtitles.
  • Allow you to complete the AVI to iTunes conversion process with three simple clicks.
  • Compatible with macOS Sierra, El Capitan Yosemite, Mavericks, Lion.

Free download this AVI to iTunes video converter for Mac

Get AVI into iTunes for smooth playing with Pavtube Video Converter for Mac

Step 1: Import AVI videos

Drag & drop the AVI files to the converter, or click the "Add File" button to open the file browser window and locate the AVI files you want to add.

Step 2: Select iTunes supported files as the output format

Now select a format to which you want to convert the AVI video. Click "Format" drop-down menu to open the format list, and then choose a format (mp4, mov, m4v) from "Common Video" or "HD Video"category.

Step 3: Start the AVI to iTunes conversion

Click the "Convert" button on the main interface and the software will start to convert AVI to iTunes friendly video formats immediately. When the conversion finishes, click "Open" to find the converted video files. Then you can effortless transfer the video files to iTunes for playback on the go.

Free download this AVI to iTunes video converter for Windows

Read More:

Monday, March 27, 2017

Convert MKV to QuickTime on macOS Sierra

It is common for Mac users to get some movies/videos in MKV format, either from the internet, digital cameras or shared from friends who use Windows. However, disappointingly, these MKV videos can't be recognized by our QuickTime. As we known, QuickTime supports MOV well. I An MOV file type is natively supported by al of the Mac OS X including of macOS Sierra as well as iOS-based devices. If you want to play and edit MKVI videos on QuickTime, just convert MKV to MOV.

Best MKV to MOV Video Converter for QuickTime

If you're choosing the most useful and simplest MKV to MOV Converter for Mac/Windows, Pavtube Video Converter for Mac is the right one for you. The output video quality and the converting speed must be the key factors that you should be looking out for. It provides Mac users the easiest and smartest way to convert MKV to MOV on Mac (El Capitan) and play MKV files on QuickTime, iPhone (7), iPad (Pro), the new Apple TV. Equipped with high quality engine and hyper threading technology, even support Multi-core CPU and hardware encoding technology.

Hot search MXF to QuickTime XAVC to QuickTime
MP4 to QuickTime DVD to QuickTime Blu-ray to QuickTime

Free download this MKV to QuickTime Video Converter for Mac:

Note: If your are a Windows user, you can free download this free software - Free Video DVD Converter Ultimate to convert MKV to MOV on Windows including Windows 10.

Step-by-step Guide to Convert MKV to QuickTime playable format on Mac

Step 1. Load MKV Files

After free download this professional MKV converter to MOV on Mac, launch it and click "Add File" to load the MKV files you want to convert.

Step 2. Select "MOV" as the Output Format

Select MOV format from the format list as the output format. What's more, the default optimized video settings make the output QuickTime MOV video looks great on your player.

Step 3. Start MKV to MOV Conversion

After finish the above steps, click the "Convert" button to start converting MKV to MOV format on Mac OS X (El Capitan included), you could view the conversion progress and are able to cancel the converting process at anytime.

Other Two Ways to Play MKV on Quicktime

1. Get Perian QuickTime Component

The QuickTime player is mostly used in Mac OS, if you don’t want to use the first solution to convert the MKV files to QuickTime compatible formats, you can try this solution, but no 100% work guarantee.

Perian, is a great open-source QuickTime component that allows playback of different video formats that cannot be played natively on your Mac computer. If you want to use QuickTime as your main video player, you may choose to download Perian because it provides the necessary codecs or components that will allow you to play MKV on Mac. If you have QuickTime 7, you may be glad to discover that it can actually play MKV files without needing any additional plug-ins and codecs.

2. Using VLC Player

The VLC media player, is an excellent open-source media player that is known for supporting a wide range of audio and video files. Unlike other media players which have limited format-support, you will be surprised that VLC can play a video or audio file that you didn’t even know existed. If your OS is Snow Leopard or higher, installing VLC is definitely a good choice especially if you only plan on watching MKV files on your computer.

Read More:


Monday, March 20, 2017

Play MKV on Sony Bravia TV with Kodi 17

All your movies, TV shows, music, photos, podcasts, and videos can be easily organized and played by Plex. If you have some videos in .mkv format, you can also play them on Sony Bravia TV with Kodi 17. But sometimes your MKV videos can’t be played on Sony Bravia TV via Kodi 17. While in this article, you will learn about how you can Play MKV on Sony Bravia TV with Kodi 17.

If your MKV videos can’t be played on Sony Bravia TV and Kodi 17, maybe because your MKV videos are not friendly with Sony Bravia TV and Kodi 17. MKV as a containt format, it has various different codecs.

Get Best MKV Video Converter for Sony Bravia TV, Kodi 17

So as to avoid the Sony Bravia TV or Kodi 17 can't play MKV issues, you need to use a professional, easily, safe and top-ranked MKV video converter software to re-encode the incompatible MKV to Sony Bravia TV & Kodi 17 with the friendly codec or audio. The software recommended here is Pavtube Video Converter Ultimate.

AC3 DTS to Kodi 17 4K to Kodi 17 DVD to Kodi 17 MOV to Kodi 17

It easily convert MKV to Sony Bravia TV, Kodi 17 supported video format like H.264 MP4. Besides, the best MKV Video Converter is also a functional video editor, which you can easily merge, trim, crop, add watermark and create 3D/VR effects on MKV videos with Kodi 17 & Sony TV and convert MKV to 160+ video codecs for playing on various platforms, incl. iPhone, iPad, iPod, Apple TV, Android phone and tablet, smart TVs, VR Headsets, PPT, even all Non-linear editing softwares, etc. Mac please get iMedia Converter for Mac.

Key features of this program

  • Convert MKV, MP4, MOV, AVI, H.265, FLV, MXF, XAVC etc to Sony Bravia TV, Kodi 17 supported formats.
  • Convert MKV to PS3/PS4, mobile phones, Android, iPad, iPhone, Apple TV, NLE and other popular end devices.
  • 30X faster conversion speed and high output quality.
  • Basic video editing functions: split, merge, trim, crop, add watermark, adjust video effect, edit audio and insert subtitles.
  • Lossless Conversion: Convers any video files without the risk of losing its original quality.
  • Compatible with Windows 10, Windows 8.1, Windows 8, Windows 7, Windows XP.

Free download the MKV video converter for Kodi 17

Step-by-step guide to Convert MKV to Kodi 17 supported video format

Step 1. Add MKV videos

Install and run the MKV Video Converter on your computer, then click "Add Video" button to browse and load yourvideos which you've transferred to your Windows PC.

Step 2. Set right output format. Click "Format" bar, and select .mp4 from "Common video" or "HD video" for Kodi 17, Sony Bravia TV. Or direclly choose Sony TV format.

hd-video-h-264

Tips: The default settings may not satisfy you, and you can click the "Settings" button to change the settings by yourself including video resolution, bit rate, audio sample rate, audio channel etc. for full screen playback smoothly. Or keep no changes, which is also a good choice.

Step 3. Click the "Convert" button on the main interface and the software will start to convert MKV to Kodi 17, Sony TV friendly video formats immediately. When the conversion finishes, click "Open" to find the converted video files.

Read More:


Monday, March 13, 2017

Quicker way to import XDCAM EX files to Edius

What is XDCAM EX?

XDCAM EX is a variation of XDCAM HD that records full HD resolution as either 1920 x 1080 or 1280 * 720 footage. XDCAM EX footage is recorded on SxS cards, based on the PCMCIA ExpressCard/34 form factor.

XDCAM EX supports the following formats and frame rates:
·1080i60, 1080p30
·1080i50, 1080p25
·1080p24

XDCAM EX also supports the 720p format at 23.98, 25, 29.97, 50, and 59.94 fps.

How to Import XDCAM EX files to Ediu for editing?

XDCAM EX file is not friendly with Edius. So you can adjust your XDCAM EX file to a suitable format for Ediu. To achieve the goal, Pavtube Video Converter is highly recommended. With it, you can effortlessly rconvert XDCAM EX to Edius compatible video formats without losing quality. Besides XDCAM EX, this video convert program can also help to convert between any popular video and audio formats as you need. Plus, with the built-in video editing feature of the program, you can trim, crop, add watermark and more to your video files. Mac user please get the Pavtube Video Converter for Mac.

4K to Edius Pro MP4 to Edius Pro MKV to Edius Pro QuickTime MOV to Edius Pro

Now download the program and follow the step-by-step guide to convert XDCAM EX files for Edius.

Step-by-step guide to Convert XDCAM EX file to Edius editable format

Step 1. Add XDCAM EX video source

Run the best Edius Video Converter program you just set up. Drag and drop the Edius video files to the converter. You can also hit Add files button to import videos to the app. If you wanna combine several videos into one file, you can click the "Merge into one" box.

Step 2. Choose output format

Click the "Format" bar and select "Adobe Premiere/Sony Vegas > MPEG-2 (*.mpg)" as output format on the drop-down menu. It ensures the smooth editing with Edius.

Tip: Click "Settings" button if you'd like to customize advanced audio and video parameters like Video Codec, aspect ratio, bit rate, frame rate, Audio codec, sample rate, audio channels. Note: If you want to get original 4K resolution, just keep the video size as original.

Step 3. Start converting XDCAM EX file

Hit the Convert button of the best XDCAM EX file converter. It will start converting XDCAM EX video file for importing to EDIUS Pro immediately. Soon after the conversion, just click "Open" button to get the generated files for natively editing in EDIUS Pro 7/8 beautifully.

Related Articles:


Monday, March 6, 2017

Downscale Yuneec Breeze 4K video to 1080p on Mac

Yuneec Breeze flying camera designed with you in mind. Both convenient and compact, Breeze is controlled by your iOS or Android device with the Breeze Cam app and weighs just under 1 pound. Now capture aerial photos and video of your daily adventures effortlessly– and do it in stunning 4K Ultra High Definition. So have recorded some 4K videos by uneec Breeze? Have problems playing, editing, sharing Yuneec Breeze 4K videos? Read on to find the solution here.

It has also confused many Yuneec Breeze users in playback 4K files on such like tablets or edit in NLEs like Adobe or iMovie, etc. So for easily work the Inspire 4K files well on Mac and PC, we suggest you to resize theYuneec Breeze 4K to 1080P, which could be nicely accepted.

Hot search: DJI Mavic Pro 4K to 1080p I DJI Inspire 1 4K to 1080p I DJI Phantom 4 4K to 1080P

Best Video Converter for Comporessing Yuneec Breeze 4K to 1080p

Just find the Pavtube HD Video Converter for Mac, which we can choose to achieve the goal so easily. In general, you can effortlessly encode Yuneec Breeze 4K footage for smoothly importing and editing in various non-linear editing systems (NLEs). Besides, Yuneec Breeze 4K clips, it also can deal with other video formats such as MKV, MTS, MXF, FLV .etc. If you are a PC user and willing to transfer Yuneec Breeze 4K files to any other media players. Now, let’s follow the guide to know how to resize Yuneec Breeze 4K videos to 1080P below:

Free download this Yuneec Breeze 4K to 1080p Compressor for Mac

User guide on Compressing Yuneec Breeze 4K video to 1080p video

Step 1. Load Yuneec Breeze 4K Video

Launch the 4K to 1080p Converter; click “Add Video” and load your 4K files from Yuneec Breeze 4K or hard drive.

Step 2. Decide Output Format

Click the “Format” drop down list to select MP4, MOV, MPG, AVI, etc format from “Common Video” as you want. Since this video converter also provides optimal profiles for kinds of editing programs and media devices, you can also select a proper format that best meets your needs.

Step 3. Downsize original 4K resolution at 1080p

Click “Settings” button; you can adjust video and audio settings, including codec, aspect ratio, bit rate, frame rate, sample rate, and audio channel. To down-convert Yuneec Breeze to 1080p, do remember adjusting video size to 1920*1080. That is the exact 1080p.

Step 4. Start 4K to 1080p Conversion

Hit “Convert” button to let the Yuneec Breeze 4K to 1080p conversion begin. When the conversion finished, check the generated 1080p video, you will certainly be satisfied with its final video quality. It would be much easier for you to playback and edit.

Read More:

Monday, February 27, 2017

Get the Best ClipConverter Alternative

ClipConverter, working as a free online video converting tool, enables users to download and convert nearly any videos and audios from YouTube (HQ &HD), My Space, Vimeo, Metacafe, Dailymotion, MyVideo and many more. However, clipconverter.cc limits the number of output file formats that you can convert videos to, meaning you are only allowed to download YouTube videos to MP3, M4V, AAC, MP4, 3GP, AVI and MOV formats, which is absolutely not enough for people to view videos on various kinds of devices. ClipConverter does have some limits and sometimes it doesn’t work well on Mac..

For tips on solving "clipconverter.cc not working" errors, go directly to the following solution part. If you just need a best ClipConverter alternative to safely convert YouTube videos at one go, please turn to the Pavtube iMedia Converter for Mac. It is an excellent video converter for Mac.

Why choose iMedia Converter for Mac as the Best ClipConverter Alternative?

It is the best alternative to clip converter for Mac, enabling you to convert videos (including 4K UHD video, 3D video/movie) from YouTube to Mac, MOV, MP4, AVI, WMV, MKV, H.265, MP3, M4V, AAC, AC3, etc with high quality reserved that ClipConverter doesn't manage to do, and convert YouTube video to iPhone 7/7Plus, 6s/Plus, iPad Pro, iPad Air 2, iPad Mini 4 with Retina display, Samsung Galaxy S7 (Edge)/S6/Note 7, Surface Pro 4, etc. Besides, it can freely change output video codec, size, frame rate, bitrate and audio codec, sample rate, bitrates and channels for better display quality. In addition, by following the user-friendly interface, you can get all your tasks done in clicks! What’s more, professional editing functions are provided to you: split, merge, trim, crop, add watermark, adjust video effect, edit audio and insert subtitles. (You can read its review to know more features of it). Windows user can get Pavtube Video Converter Ultimate .

Features of Pavtube iMedia Converter for Mac

1. Media Formats Supported

Video: Pavtube supports converting to 250+ video formats without any quality loss, including all the formats supported by Clip Converter and other formats, like MKV, M4V, WMV and HD, 3D video formats.

Audio: Wondershare supports more audio formats. Except MP3. M4V, AAC, it can also convert to LAC, AIFF, MKA, APE, OGG, WAV, WMA, and etc.

2. Perfect Compatibility with All Portable Devices

Output video to optimized formats to play on iOS devices like iPhone, iPad, iPod, Android devices, Windows devices, game consoles. Other devices also supported well by the program.

3. Edit Videos

Pavtube lets you edit videos before any conversion. You can trim, crop, or add watermark and subtitles to personalize it. This feature is not available by Clip Converter.

4. Create 3D Movies for Virtual Reality Experience

Make 3D movies from both 2D or 3D resources to watch on 3D media players, TV, game consoles or mobile phone with side by Side by Side, Red/Blue and Top/Bottom 3D effects.

5. Backup any DVD and Blu-ray with 1:1 Original Quality

You are free to backup your Blu-ray/DVD movies with two ways: Full Disc Copy, Copy Main Movie only. Full disc copy means to help users to backup the whole contents of a Blu-ray/DVD disc remaining the original structures. And using "Directly Copy" function, you can copy the .vob/.m2ts files only which contains the main movie of Blu-ray and DVD. It's really a functioned DVD and Blu-ray backup program.

6. Better User Experience

Pavtube iMedia Converter for Mac has a user friendly interface. Though you are a green hand, you will quickly know how to use it.

Fee download this video converter for Mac

Easy guide to Use ClipConverter for Mac Alternative

1. To import files to program, please click "Add File" independently according to the types you own. Or, you could drag the video/audio or files into program window directly. After that, you will find a list imported video/audio is available for next steps. Please see as the pictures。

2. Select your output format in the right box. All formats are grouped into 6 categories and all devices are grouped into 7 categories. Find your desired output format or device.

TIP:You can also click "Setting" to change the format parameter like code, resolution, bitrate, etc. of output files. And appoint the output storing route by clicking the "..." at the bottom box of "Open output Folder". Or you could skip this step to leave it default.

3. After the settings are completed, simply click the "Convert" button where it between "Source" and "Output" of task and the program will complete soon. You'll see the status changed below the item bar.

Related Topics:

Wednesday, February 22, 2017

2017 Best Free DVD Copy Software from Pavtube

Always making DVDs damaged or scratched soon after buying a DVD? Want to free copy a DVD effortlessly and fast? Your search is over! If you're a DVD owner, you must be in need of relying on DVD copy software to copy DVD to any digital formats, VIDEO_TS folder, or customize DVD copy mode like full disc copy, copying main movie only, certain chapter only, video or audio only, etc. Rather than aimlessly searching from mass data, you're suggested to read the reviews for finding the best Free DVD Copy software 2017 first. 

----------See also: Top 5 DVD Ripper Review 2017

How to evaluate a good free DVD Copy Software?

What are the most important factors to be considered while selecting a free DVD copy program? Here's a tips list for you: 

1. Powerful decryption technology is required when it comes to copyrighted DVDs. 

2. Easy-to-use (UI & design) - The simple and intuitive user interface for both novice and experts. 

3. Quality (stability & output quality) - Keep original quality even higher. DVD copy speed and operation stability. 

4. After-sale service - Fast customer service & tech support. 

Now, We offer you the lists of best DVD Copy softwares:

2017 Top 2 Free DVD Copy Softwares

Top 1. Pavtube Free DVDAid (Windows and Mac)

Free DVDAid is the leading Windows and Mac program to backup your DVD collection, create multiple DVD copies for personal use and simply copy a DVD to any digital formats anytime you need. This fast, safe and easy free software will copy any DVDs for free and convert its video content into popular MKV, AVI, MOV, MPG, WMV, FLV, etc. formats so that you can use in any mobile device, smart tv, youtube, hd media player, game console, nle, etc. for movie playing, sharing, editing. Just click "Download" button to get the fastest and reliable DVD copy software on your PC or Mac. 

Free DVDAid for Windows 


Pavtube Free DVDAid for Mac


Top 2. Pavtube Free DVD Video Converter Ultimate (Windows)

Pavtube Free DVD Video Converter Ultimate is a straightforward software tool that can help you convert a DVD from a disc or from your hard drive to a different playable, editable and shareable format. The program includes all features of Free DVDAid. Morever, the Free DVD Video Converter Ultimate can also any video and audio formats in MP4, MKV, AVI, VOB, M2TS, TS, MXF, M4V, FLV, WMV, MPG, 3GP, MPEG, MP3, M4A, AC3, WMA, AAC, MKA, etc. to various other formats with fast conversion speed. 

Equipped with a built-in editor, in case you need to, Pavtube Free Video DVD Converter Ultimate enables you to perform a few basic adjustments to the movies you want to export. With the help of some practical sliders, menus and check-boxes, the application allows you to trim a clip, crop the image, add watermarks and subtitles. 

With a PC running on a CUDA-enabled Graphics card, or an AMD graphics card with AMD APP technology, Pavtube Free Video DVD Converter Ultimate could take full advantage of the NVIDIA CUDA technology and AMD ? Accelerated Parallel Processing (APP) to largely accelerate video encoding speed. The GPU acceleration saves users time when transcoding video files by using H.264 codec. (Tips: Upgrade to Pavtube Video Converter Ultimatesupporting H.265 codec encode accelerate

Overall, Pavtube Free DVD Video Converter Ultimate is your all-in-one solution to rip, encode DVD and convert even edit videos in one place. With it, you could effortlessly achieve all your multimedia demands and enjoy video/DVD anywhere and anytime you like. Meanwhile, it provides large amounts of DIY features including trimming, cropping, splitting, adding subtitle. 

Download The Free DVD Video Converter Ultimate 


Conclusion

To sum things up, Pavtube Free Video DVD Converter Ultimate might not be an all original tool but it does get the job done and its comprehensive nature makes it accessible to anyone who is looking to convert and copy DVDs for free, even convert your all video and audio files.

Hot Articles:

Monday, February 20, 2017

Free Copy DVD to Hard Drive with DVD Shrink

DVDShrink is software to backup DVD discs. You can use this software in conjunction with DVD burning software of your choice, to make a backup copy of any DVD video disc. You can use it to copy DVD movie to a hard drive. Follow this article to learn how to copy DVD to hard drive with DVD Shrink and copy DVD to hard drive with another easy-to-use program.

Part 1. How to Copy DVD to Hard Drive with DVD Shrink?

1. Download DVDShrink and install it on your PC.
2. Insert the movie DVD in the optical drive and launch DVD Shrink
3. In DVDShrink main window, click the Open Disc button .
4. In the dialog box that opens, select the drive where the DVD is and click OK.
5. DVDShrink shall analyze the content of the DVD.
6. Once the analysis is completed, you can choose your compression option
7. Click the button Backup!
8. In the window that opens, select the target folder for the extracted video and click on Accept
The copying process shall start.

Note that the program will generate both the AUDIO_TS and VIDEO_TS files.

Part 2. More powerful/professional DVD to Hard Drive Ripper - Pavtube ByteCopy

As a powerful DVD Shrink, Pavtube ByteCopy can copy DVD to hard drive easily so that you can freely watch movies on Apple iOS devices, Android OS devices, Windows RT/Pro devices, HDTV, 3D TVs, PSP, PS4, PS3, Plex, WDTV Live, Roku 3 and more devices.

It is a powerful program with the ability of backing up Blu-ray/DVD collection to multi-track MKV without quality loss, ripping BD/DVD movies to MP4 and MOV with multiple audio streams, and converting BD/DVD from hard discs to virtually any popular video and audio format. In recent update, ByteCopy can support ripping Blu-ray/DVD movie to H.265/HEVC MP4 with better video quality compared to H.264 MP4 in same profile presets. At the meantime, this multi-track Blu-ray/DVD converter can be considered as a user-friendly movie editing tool with the professional functions to trim, crop, merge, insert subtitles, export srt/ass/ssa subtitles, add video effects in the destination movie.

Free download this excellent DVD copier, ripper for hard drive

Mac user can get - Pavtube ByteCopy for Mac

Guide of Putting DVD to Hard Drive Using Pavtube ByteCopy

Step 1: Load DVD movies

Insert a DVD disk and load the DVD content by clicking DVD Disc button. Or else you can choose load DVD folder, DVD ISO/IFO if you have such file or folder on the internal hard drive of the Windows PC.

Copy DVD to External Hard Drive - Add DVDs

Step 2: Different ways to convert DVD to External Hard Drive

Method 1:1 full copy DVD: You can keep all the information in DVD movies, including main title, advertisement, chapter markers, review and the whole audio/subtitle streams.

Click   on the top of the menu.

Method 2. Copy main title of DVD to hard drive: Just the main title of the original DVD disc will be preserved in this way. It will save many space on your hard drive.

Navigate to “Format” > “Copy” > “Directly Copy”

bytecopy directly copy

Method 3. Convert DVD to General Video: diversified choices, different video formats for different purposes and acceptances, convert DVD to AVI, MP4, MOV, WMV, MPEG, etc with smaller file size; just choose the format from "Common Video" and "HD Video". In this way, after you define the output format, you can open "Settings" window to choose video and audio codec, size, bitrate, etc. For example, you can keep AC3, AAC, DTS audio and stereo or 5.1, 7.1 sound.

Method 4. Convert DVD to lossless MKV to store on portable hard drive: this way can output MKV file to using and the quality will be lossless. Click "Format" > "Multi-track Video" > "lossless MKV".

Step 3: Start to copy DVD to external hard drive

Click “Convert” to get down to copying or converting your DVDs to portable hard drive. When the process ends, open output folder to locate the DVD rips. Then put the DVD backups on your any External Hard Drive even internal hard drive smoothly.

Summary:

You can choose DVD Shrink or Pavtube ByteCopy to copy DVD to Hard Drive according to your needs. We have to say Pavtube Bytecopy may be your smart choice for copying DVD to hard Drive, converting DVD to hard Drive, edit DVD etc. That’s powerful.

Related Articles:

Tuesday, February 14, 2017

Canon Video Editing Software: Media Magician

Have no ideas editing Canon recordings? Any program? Yes, here you can get an easy-to-use editing tool.

Pavtube Media Magician is a nice camcorder assistant manager, lossless camcorder video joiner, You can use it to edit Canon video in MOV/MP4/MXF/MTS/M2TS etc format converter and editor, and efficient camcorder video uploader for YouTube.

The smart camcorder wizard helps organize, backup and import camcorder videos with ease. And timeline-oriented editing tools help accurately trim and cut clips frame by frame. Format presets provide you the easiest way to output the right format with the best recommended settings. The output task manager also helps create multiple tasks in different formats for Andoid/iOS/Windows tablets and phones like Galaxy Tab/ Amazon Kindle Fire HD/ iPad/ AppleTV/ Microsoft Windows Surface RT, editing software such as Adobe Premiere/ Sony Vegas/ Cyberlink PowerDirector, or upload to YouTube at the same time.

It’s a useful and easy tool helping you make better use of either Canon camera or Canon camcorder videos, but also common videos including various video formats and various camera/camcorder like Sony,Panasonic etc. Mac version is Media Magician for Mac.

Key Features of Pavtube Media Magician
  • Camcorder Manager - Help connect camcorders with computer, and import, backup and manage the camcorder footage.
  • Timeline-oriented Editor - Make it easy to trim, cut, join clips with just a few clicks and drags. The clips can be seeked frame by frame right under preview window.
  • Video/Audio Optimizer - Help optimize original camcorder videos by adjusting brightness, contrast, saturation, enlarging volume, add 3D effect, and other special effects like Simple Gauss Blur, Aged Film, Gray, etc. to get better video & audio effect.
  • Lossless MKV/MTS Video Joiner - Importing MTS files with the same codecs, it’s easy to output lossless MTS or MKV video. The output videos can be trimmed and joined.
  • Preset Output Formats - It’s easy to output videos by clicks with the preset output format profiles like Final Cut Pro, iMovie and Final Cut Express, Avid Studio, Android phones and tablets, iPad, iPhone, Apple TV, etc.
  • Output Task Manager - Enable you to set and output several different files in list with different formats and settings from the same source files placed on timeline.
  • YouTube Video Uploader - Just insert YouTube Account information, and start the conversion task, files can be convert and upload to YouTube, no need to go to web browser and login the website.

Ok, then how to Edit Canon Video with Media Magician?

Firstly please free download Pavtube Media Magician

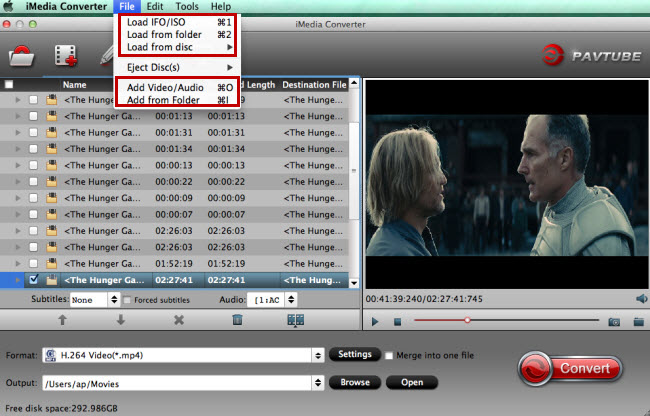
Part 1. Steps to import Canon source videos from Hard Drive

1. Launch Pavtube Media Magician from Application folder.

2. Click the Folder icon and choose a way to import. You can both import by selecting files or folder. The imported files will be listed in resource list.

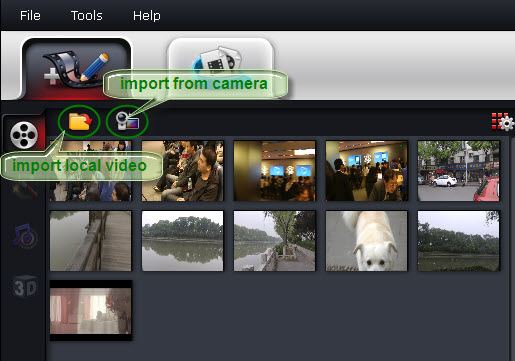
3. On the list, you can highlight one file and use right-click menu to Play, Find Target, Delete, Rename, Movie Up & Down, etc.

3. Clicking Options button on top-right of the resource list, you can sort the videos clips or choose a way to view the clips, such as view details, big icon, or small icon.

4. For output videos, you need to drag & drop one or more clips to timeline. You can press Command Key and click to select multiple files.

You can export the list as a media library file (*.mdat) so that the next time you want to import those files, you can just import the *.mdat file by clicking Options>> Import Media Library. Please refer to Export & Import Media Library for more help.

In this section, you can preview, trim, cut, delete, rearrange order, and merge & join.

Notes: Actions in this section can take effect if choosing lossless output formats.

Part 2. Quick Start Guide - Edit Canon video on Timeline

Option 1. Clip editing on timeline

In this section, you can preview, trim, cut, delete, rearrange order, and merge & join.

Notes: Actions in this section can take effect if choosing lossless output formats.

1. Drag & drop clips from resource list to timeline. (To select multiple clips on list, you can press Command Key and click.)

2. Zoom in & out: Drag the bar on top-right of timeline to Zoom in or out for better view.

3. Preview: Highlight a clip on timeline and click Play button, you can preview.

4. Trim: Put your cursor to the start or end point of a clip on timeline until it changes to trimmer. Drag the trimmer and you can trim off unwanted starting or ending.

5. Cut: Drag the pointer to the right place; Put your cursor to process bar under preview window and select the right frame; Click the Scissors button and you can cut the clip. And then you can rearrange order or delete.

6. Delete: Highlight the unwanted clip on timeline, and click Delete button. You can also delete it with right-click menu.

7. Rearrange order: Drag and hold a clip to the right place until the place line shows. Drop the clip and it will be placed right there.

8. Merge & join: All files placed on timeline will be output as one file. So if you want to merge and join several clips, just drag them to timeline with the right order.

Option 2. Effect and adjustment editing

In this section, you can add 3D and special effects to the video clips and adjust video and audio.

Note: Actions in this section will not take effect while choosing lossless output formats.

http://image.pavtube.com/img/media-magician-for-mac/2-special-effects.png

Add Effects

You can add special effects like Simple Gauss Blur, Simple Laplacla, Gray, Flip Color, Invert, and Aged Film; flip videos vertically, horizontally, clockwise, or counter-clockwise; And adjust video brightness, contrast, and saturation here.

1. Go to Special Effect tab, and highlight the clip you want to add special effect on.

2. Click on the special effects and preview it in real-time.

3. Click on right buttons, and you can flip videos vertically, horizontally, clockwise, or counter-clockwise.

4. Dragging the bars and you can adjust video brightness, contrast, and saturation.

5. You can also click on the buttons on bottom-right of this section to reset or apply the settings to all clips on timeline.

Volume Adjustment

1. Go to Volume Adjustment section, dragging the bar you can enlarge or reduce volume of the selected clip.

2. Clicking the buttons on bottom-right you can reset or apply the setting to all clips on timeline

3D Effect:

1. Go to 3D Effect tab and tick 3D Effect option.

2. You can click to choose the right style of 3D effect and drag the bar to set depth.

3. Clicking the buttons on bottom-right you can reset or apply the setting to all clips on timeline.

Option 3. Conversion Settings:

http://image.pavtube.com/img/media-magician-for-mac/1-interface.png

Go to the second tab on top of the application, you can set conversion tasks, formats, output path, YouTube account info, etc.

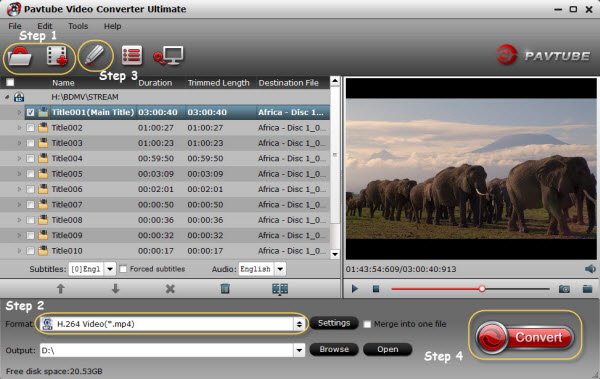
1. Add conversion tasks: Click on the “+” button on main task bar to add conversion tasks.
2. Set output format: Highlight a task on the task list, and choose the right format preset from relative tab on the right. You can set different formats to tasks on list.

3. Set format parameters: After selecting the right output format preset, you can also customize parameters if needed, such as video frame rate, video bitrate, audio bitrate, sample rate, etc.

4. Set output path: On bottom of the right column, you can find Output Path box where you can set the output destination for the converted video files.

5. Choose tasks for conversion: Before starting the conversion, you can tick to choose the right task for output. Clicking the triangle button on the main task bar, you can start the batch conversion.

Files placed on timeline will be output as one file to the formats you select.

6. In process of conversion, you can still add tasks, delete tasks, pause conversion tasks, etc. with the buttons on task bars or right-click menu.

7. After all conversion tasks, you can find the converted files with right-click menu on relative task bars.
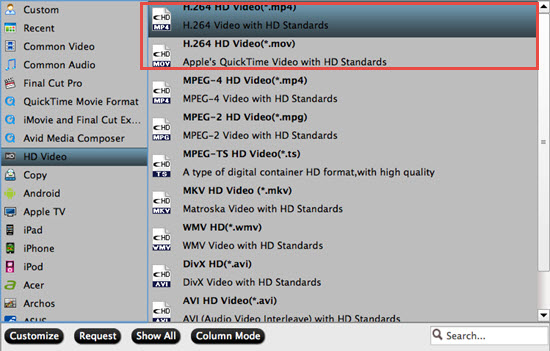
Output Formats:

Common Format: AVI, MPEG-2(*.mpg), MPEG-4 (*.mp4), WMV, MOV, MKV, M2TS

Device: Android (format presets for Android tablets and smart phones), Windows (format presets for Windows 8 RT tablets and smart phones), iPad, iPhone, Apple TV, HD Player, PSP/PS 3, HDV

Editor: iMovie and Final Cut Express (AIC MOV), Avid Studio (Avid DNxHD MOV. It’s not available in App Store version.), Adobe Premiere and Sony Vegas (WMV, MPG, or MOV), Adobe After Effect, Apple Aperture, Final Cut Pro (Apple ProRes MOV. It’s not available in App Store version.)

Lossless: Original (MTS), MKV (Please note that lossless output only works for MTS source files.)

Online: YouTube (MP4 and WebM. Here you can insert account info and set video descriptions.)

Ok, now you can edit your Canon video with Media Magician freely with above functions for sharing, playing,etc with family or friends. Have a try!

Related Articles: