Monday, February 6, 2017

Import Canon EOS M5 MP4 video to iMovie for editing

Canon's foray into the mirrorless world was fraught with missteps, with its first few efforts lagging well behind the competition in focus speed. The EOS M5 ($979, body only) represents a big change—its autofocus system is speedy, and it can fire off images at a quick 8.2fps burst rate. The EOS M5 records crisp 1080p video in MP4 format at 24, 30, or 60fps.

But the problem with MP4 is, when you plan to edit the MP4 file with iMovie, you may be able to do this, but may be unable to. So what's the matter? Well, this depends on. Some hybrid camcorders can capture video footage in both the MPEG-2 and MPEG-4 formats. If your camcorder has captured video footage in both formats, iMovie may only recognize the MPEG-2 movies when accessing the footage from the Camera Import window. MPEG-4 movies recorded with these devices may not be shown.

Don't worry. So if you are unable to locate your Canon EOS M5 MP4 video files into iMovie, you could adjust Canon EOS M5 MP4 video to iMovie file. The article would show you how to convert and import Canon EOS M5 MP4 video to iMovie on Mac step by step with a professional MP4 to iMovie Converter for Mac (macOS Sierra, El Capitan, Yosemite, Mavericks, Mountain Lion, Lion and Snow Leopard included), by running it, there's no need to set the codec by yourself: the Mac program has a optimized preset for iMovie (iMovie '11 included).

Make Preparation: Launch MP4 to iMovie Converter - Pavtube HD Video Converter for Mac

-Convert MP4 videos to various formats that supported by different editor, like iMovie, Final Cut Pro, QuickTime, Windows Movie Makers, etc.
-Convert MP4, MKV, AVI, H.265, MXF, MTS, M2TS, MOV etc to iMovie eidtable format and other formats.
-Support to convert MP4 to most HD and standard video formats, such as MOV, FLV, AVI, MKV, M4V, etc.
-Extract audio from MP4 videos to MP3, M4A, WAV, AAC, AIFF, WMA, etc.
-It has a perfect compatibility with macOS Sierra, Mac OS X 10.11 El Capitan, 10.10 Yosemite, 10.9 Mavericks, 10.8, 10.7, 10.6, 10.5.

Free download Canon EOS M5 MP4 to iMovie video converter for Mac:

Full guide to Convert Canon EOS M5 video to iMovie editable format on Mac

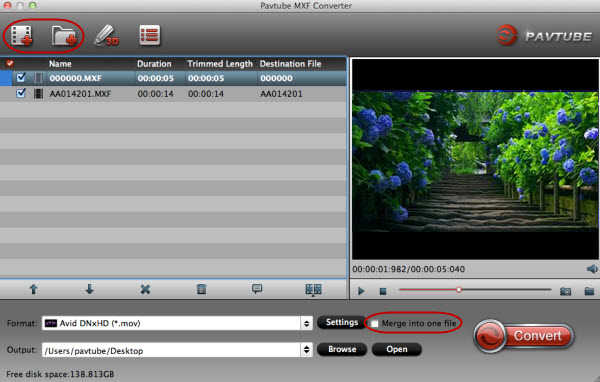
Step 1: Load Canon EOS M5 MP4 files to the program

Launch the MP4 to iMovie Converter and click "Add video" button to locate the .mp4 file(s) you want to add. Check the "Merge into one file" box, you can join several .mp4 clips together if necessary.

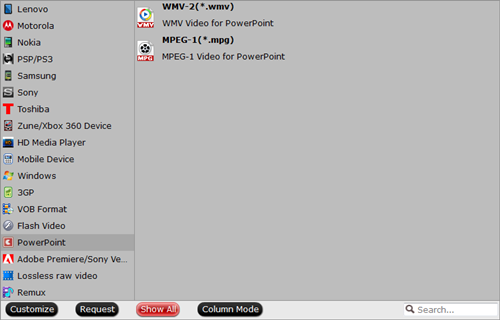
Step 2: Choose iMovie format

Click "Format" pull down list to select iMovie and Final Cut Express > Apple InterMediate Codec(AIC) (*.mov) as the best video format for iMovie (11).

Step 3: Edit the Canon EOS M5 MP4 videos (Optional)

By clicking "Edit selected task" button, you can trim, crop the video, or add watermark, adjust effect, attaching subtitles for pre-editing your video files so that you can simplify your iMovie editing.

Trim - Choose to reserve the part you need. Just choose the chapter which you need to trim, to set "start time" or "end time", type the portion which you want to save.

Crop - Remove black edges of your video or just get the scale of this video you want.

Effect - Adjust the effects by adjusting the parameters, such as:

1) Deinterlacing- If there are some stripes on the picture, you can check this option to make a better picture effect. (Checked by default)

2) Under Effect tab, you can add special effects like Simple Gauss Blur, Flip Color, Invert, Aged Film to your source video. In Color Control section, you can correct color by adjusting brightness, contrast, and saturation.

Audio Editor- You can replace/remove original audio, and set audio fade in/out effects.

Subtitle - You can add *.srt or *.ass/*.ssa subtitles to the video as hard subtitles.

Step 4: Adjust the video, audio settings (Optional)

Click "Settings" to fix the frame rate, bitrate, video size, etc to your needs. To have a smooth editing with iMovie, you need create the files with the appropriate resolution and frame rate that matches your source footage.

Step 4: Start MP4 to iMovie conversion

Click "Convert" button at the bottom right corner to finish endocing Canon EOS M5 MP4 to AIC .mov for iMovie (11) on Mac OS X. After the conversion, click "Open" to locate the encoded videos and then launch iMovie,choose File > Import > Movies..., to import the converted MP4 video into iMovie; prepare for editing. You will find that it's just a piece of cake to edit MP4 files in iMovie (11).

Related Articles:

Friday, February 3, 2017

Insert AVI video to PowerPoint 2016 smoothly

Audio Video Interleave (AVI) is a file format for storing synchronized video and audio data. Digital cameras commonly use AVI to record video. PowerPoint is a popular presentation software included in the Microsoft Office package. Converting an AVI clip into a PowerPoint file allows you to play the movie during the presentation. Use the PowerPoint program toolbar to insert the AVI file and then save it in the presentation format.

Any AVI to PowerPoint 2016 video converter?

To accomplish the task, you need to seek help from a AVI Video converter that supports the VOB video input and WMV, MPEG-1 output. Here Pavtube Video Converter is highly recommended to help you achieve your task.

The program can help you change almost any popular file format including AVI, VOB, MKV, MOV, MP4, WebM, etc. to PowerPoint compatible video format with fast encoding speed and excellent output quality. After the conversion, you can easily use your movie files in any version of PowerPoint Presentation including PowerPoint 2016, 2013, 2010, 2007, 2003, 2000, 2002, 2005 or even PowerPoint 95, 97. If you're using a Mac, please turn to Pavtube Video Converter for Mac Just get the right version and follow the guide below to convert AVI to PowerPoint supported video formats. Now just get the right version and follow the guide below to convert AVI to PowerPoint supported video formats.

Hot search: MKV video into PowerPointMP4 to PowerPointMP4 to PowerPoint 2016, MPG to PowerPoint

More features of Pavtube Video Converter
Powerful Video Converter: Converts almost every video format to or from H.265 video filess rapidly in high quality.
Wide Selection of Formats Supported: Converts any video files to MKV, AVI, MP4, MOV, 3GP, WMV, and a lot more.
Fast-Speed Video Converter: Converts videos faster than any other video convert software programs.
Lossless Conversion: Convers any video files without the risk of losing its original quality.
Compatible with Windows 10, Windows 8.1, Windows 8, Windows 7, Windows XP.

Free download the AVI to PowerPoint 2016 video converter for Windows

Free download the AVI to PowerPoint 2016 video converter for Mac (Mac version)

Step-by-step-guide to Convert AVI to PowerPoint supported video formats for Playing

Step 1. launch the AVI to PPT converter. Click the Add Files button on the main interface to import AVI files to the app. The AVI Video converter supports batch conversion, so you can add a pile of videos to enjoy the fast conversion speed.

load-files

Step 2. Click on “Format” bar, and Choose PowerPoint compatible format WMV or MPEG-1 from “PowerPoint”.

Tips: For some advances users, you can go to adjust video and audio parameters like bitrate, resolution, channels, etc. Click "Settings" button you can go to check and change them as you like.

Step 3. Press on “Convert” to start encoding AVI Videos to Microsoft PowerPoint Presentation compatible video. When conversion completes, press on “Open” to locate converted videos.

Before starting adding video to PowerPoint, you need to create a folder and put both your converted video and your PowerPoint presentation in this folder. Then open the PowerPoint in this folder to insert the converted video file which is just located in this folder.

Read More:

Tuesday, January 31, 2017

Convert YouTube video to MP4 on Windows or Mac

If you are a video/movie lover, you may like uploading videos from Youtube. YouTube format also develops good connections between different computers making it possible for people to track each other. Is there any need to convert YouTube to MP4? Yes, there is and top on the list is improved compatibility. With your YouTube files on MP4, you can playback on different platforms and enjoy to the fullest.

Simplest Way to Convert YouTube video Files to MP4

Never overlook Pavtube Video Converter when converting YouTube files to MP4 because it is well suited. To very many people, it's the best and only solution available for managing the conversion process. There are some unique features that make it standout and you should be on the lookout to enjoy their service. It also provide basic video editing functions: split, merge, trim, crop, add watermark, adjust video effect, edit audio and insert subtitles. Mac user can get Mac version - Pavtube Video Converter for Mac.

Best YouTube to MP4 Video Converter - Pavtube Video Converter

-It supports to convert videos to 150+ video/audio formats, including MP4, AVI, MOV, H.265, TOD, WMV, MKV, MOD, HD MOD, WMA, M4B, MP3, M4A, OGG, M4R, WAV, etc.
-With this video converter you can perform basic video editing such as trimming, rotating, splitting, merging, cropping, adjusting brightness, contrast and saturation.
-It is built to convert media files to support different devices like Gear VR, PSP, PS3, PS4, XBOX, Apple TV, TV, Samsung Phones, Android Generic phones, iPhone, iPad, Blackberry LG and other phones.
-It supports Windows XP, Vista, 7, 8, 10 and macOS 10.7 and above to the latest macOS 10.12 Sierra.
Free download the Youtube to MP4 Video Converter

Other Download:
- Pavtube old official address: http://www.pavtube.com/video_converter/
- Cnet Download: http://download.cnet.com/Pavtube-Video-Converter/3000-2194_4-75734821.html
- Softonic Download: http://pavtube-video-converter.en.softonic.com/

Step-by-step Guide on How to Convert YouTube to MP4

Step 1: Import YouTube Files

When you launch the program, click on “Files” and then choose “Add Video” from the menu bar and you will easily add the YouTube video files that you want to work on. With that option, it’s easy adding multiple files at the same time. There is the easier alternative of dragging and dropping the files.


Step 2: Choose ouput format
Set right output format. Click "Format" bar, and select .mp4 from "Common video" or "HD video" according to your needs.


Step 3: Start Converting YouTube to MP4
There is a button marked “Convert” which you should click to begin the conversion process. It might be very fast if the file is short but if it's long, you will have to wait for some time.

Free download the Youtube to MP4 Video Converter for Mac
Other Download:
- Pavtube old official address: http://www.pavtube.com/video-converter-mac/
- Cnet Download: http://download.cnet.com/Pavtube-Video-Converter/3000-2194_4-76179460.html
- Top4download.com: http://www.top4download.com/pavtube-video-converter-for-mac/iujpttsg.html

Read More:

Friday, January 27, 2017

Fix “MXF Read Error Premiere Pro CC 2017”

Adobe Premiere Pro CC 2017 makes sense for the application to come ready for a broad range of cameras that consist of many brands that are leading in the market such as Sony, Canon, Nikon, etc. to import video with an equirectangular projection, and allow you to stitch and edit it in a very professional approach, so that You can publish video directly to the web from Premiere Pro to sites such as YouTube or Facebook or Instagram. However, we found some users found some MXF videos like Canon C500 MXF video cannot be imported and edited smoothly:

“I've seen the Red Frame "Read Error" for MXF files in the past.  previously updates seem to have resolved.  HOWEVER I just installed CC 2017.0.1 and...

Yep, Getting the MXF read error in...

I have literally thousands of MXF files that I need to begin editing (whole year worth of footage).  It really is NOT practical to re-render or convert EVERY file. There has got to be an easier fix. Anyone else seeing this happen? Any suggestions are extremely appreciated.

Thanks”

This problem may causes of the Premiere limitation of video formats, resolution etc. Now worry, here we mainly discuss how to import MXF video files into Adobe Premiere Pro CC 2017.

To use MXF video in Adobe Premiere Pro CC 2017 smoothly, a good suggestion is to either change the MXF clips to something Adobe Premiere Pro CC 2017 could natively handle, and a mpeg2 codec was usually ideal.

Hot search: MOV to Premiere Pro CC 2017 ǀ MP4 to Premiere Pro CC 2017 ǀ iPhone video to Premiere Pro CC 2017

Luckily a powerful third party tool- Pavtube MXF Video Converter for Mac is able to do both of the above conversion: convert MXF into MPEG-2 or MP4 file type for Premiere Pro CC on Mac (macOS Sierra included) maintaining whole audio & video information. Besides, this software can help you turn more videos like MKV, AVI, MP4, FLV, VOB, MTS into other NLEs with professional codecs, like Apple ProRes for FCP, DNxHD for Avid, AIC for iMovie and more. Just download it and follow the tutorial below to convert MXF into MPEG-2 for working in Premiere Pro CC 2017.(Read Review)

Free Download or purchase Pavtube MXF Video Converter for Mac:

Workflow to convert and import MXF to Adobe Premiere Pro CC 2017

Step 1. After downloading, install and run this Mac MXF to Premiere Pro CC 2017 Converter, just import the MXF files to the software for converting.

Step 2. Click "Format" bar to choose the output format. Click and choose "Adobe Premiere/Sony Vegas" > "MEPG-2(*.mpg)". The setting seamlessly fits Premiere Pro CC 2017, CC 2015.3 and CS4/CS5/CS3/CS6.

Step 3. Finally, hit the "Convert" button at the bottom right corner and the conversion from MXF to Adobe Premiere Pro CC 2017 will begin immediately on your Mac.

Tips & Tricks:

1. Adjust audio and video settings (optional)

The Mac MXF converter for Adobe Premiere enables users to adjust audio and video settings before transcoding MXF files to MPEG-2. Click "Settings" button, then you will enter the following interface, on which you are allowed to customize size, bit rate, frame rate, sample rate, and audio channel to your required ones.

2. Basic video editing (optional)

This Mac video converter has some simple edit functions like cropping, splitting, adding effects etc. so you can touch up the video with basic video editing functions.

After the conversion is complete, get the resulted files via clicking the Open button and then you can import converted MXF files to Adobe Premiere Pro CS4/CS5/CS3/CS6/CC 2017 in Mac for further editing without any hassle. Wait no more, just have a try!

Related Posts: