Tuesday, January 23, 2018

Import Video_TS to iMovie

Simple introduction of Video_TS folder

When you insert a video DVD into your computer, you can open the DVD and view the contents just like a folder on your hard drive. Most video DVDs have two folders in the root directory - AUDIO_TS and VIDEO_TS. The VIDEO_TS folder contains all the DVD's video data and playback information. There are 3 different types of files under Video_TS folder. The VOB (video object) files contain the majority of the DVD data. The .IFO (information) files contain basic information about the DVD and the corresponding VOB files. While the .BUP (backup) files are exact copies of the IFO files.

How to copy Video_TS folder for iMovie?

When transferring Video_TS folder to iMovie, make sure to transfer all the contents of the Video_TS folder.

Rip Video_TS folder for iMovie editing

Obviously, Video_TS folder disk image formats that iMovie lacks the ability to handle, to fix the format incompatible issue, you will need to perform a Video_TS to iMovie supported file formats transcoding process.

Related article: Import XC10 MXF to iMovie | Convert XAVC MXF to iMovie | Export iMovie to WMV/AVI/FLV/MKV

Since the Video_TS folder are copied from DVD disc, here, you will need a DVD Ripper application. Sometimes, the VOB files in Video_TS folder are encrypted with CSS copy protection, therefore, a powerful DVD Ripper program that can assist you to bypass that protection. Here, we highly recommend you to download Pavtube ByteCopy for Mac. The program not only helps you to automatically bypass the CSS or also other copy protection from Video_TS folder in the background, but also assists you to directly rip Video_TS folder to iMovie most favorable high quality and high performance editing codec Apple Intermediate Codec (AIC) with perfect quality and super fast conversion speed.

Besides Video_TS folder, you can also use this application to Rip commercial DVD disc, DVD IFO/ISO image or Blu-ray disc, BDMV folder and Blu-ray ISO image file to iMovie most preferrable editing codec for best editing workflow.

Step by Step to Rip Video_TS folder for iMovie Editing

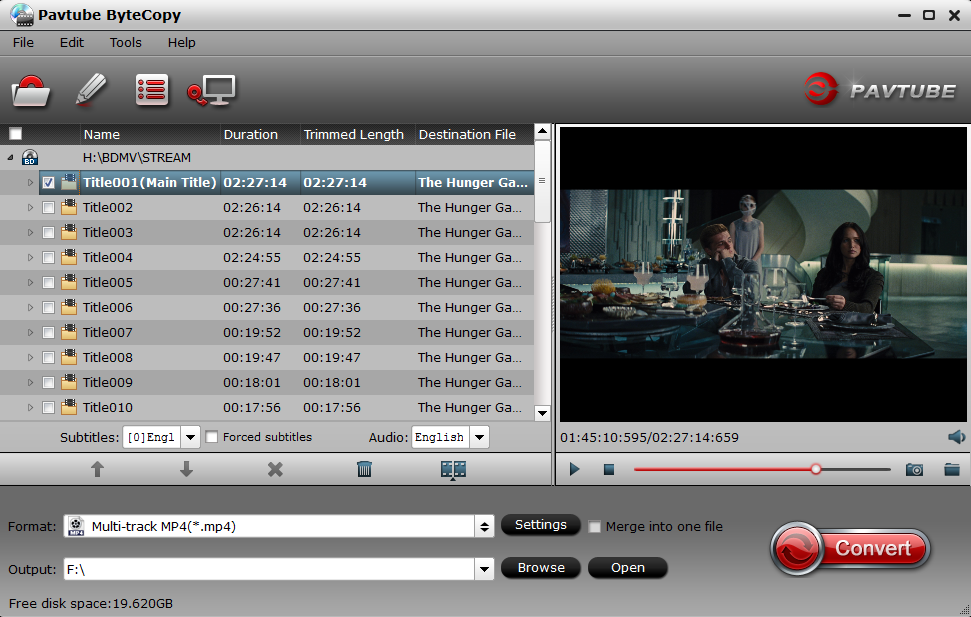
Step 1: Load Video_TS folder.

Run the Video_TS Converter Mac and you can load DVD Folder by clicking "File" > "Load from folder".

Load Video_TS folder

Step 2: Choose output file format.

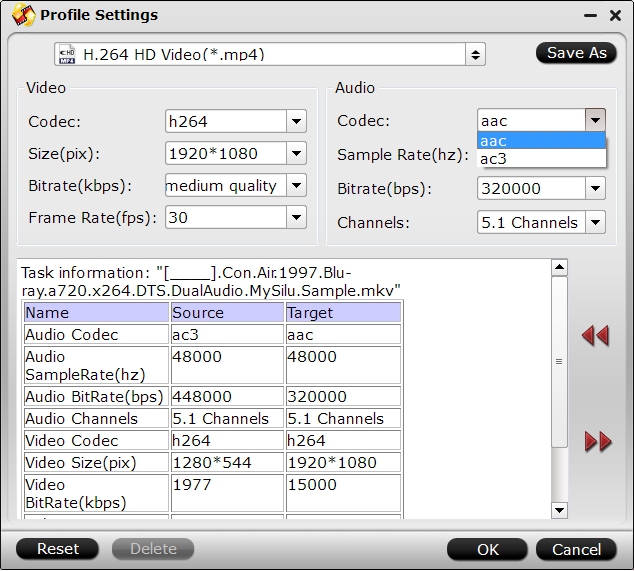
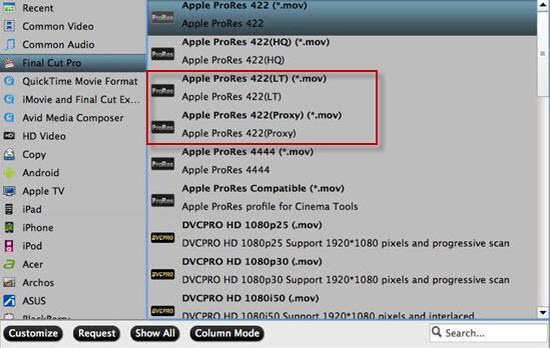
Here, you can select "iMovie and Final Cut Ex..." -> "Apple InterMediate Codec (AIC)(*.mov)"as the best output format to get videos with optimized settings for iMovie.

Output iMovie best supported AIC format

Tips: If you like, you can click"Settings" to change the video encoder, resolution, frame rate, etc. Remember bitrate higher results in big file size, and lower visible quality loss.

Step 3: Start Video-TS to iMovie conversion.

When all the settings are fine, click the "Convert" button to start converting your Video_TS folder to optimized AIC .mov video files for iMovie.

When then conversion completes, click the Open button to get the ripped video files. Launch iMovie and click File > Import > Movies to import converted videos to iMovie for further editing.

Tuesday, January 16, 2018

Play M2TS Files with Plex

Does Plex support m2ts streams natively?

"I have several m2ts files in my movie/video folder, but they are not recognized by Plex. Is it required to convert these to an mkv or other supported format before Plex will pick them up and add them to my library? Based on a quick google search, it doesn't seem so, but I can't figure out why mine don't show up."

Although Plex can play nearly any media file you throw at it except image formats such as ISO, IMG, Video_TS, BDMV or other "disk image" formats, however, it's very likely that the M2TS is not supported by the Plex app that you are connected to a Plex Media Server. In that condition, the Plex Media Server will convert it on-the-fly. As the video transcoding will use a lot of CPU power, if you have a weak CPU, then it would much ideal for you to convert your media into a compatible format with your Plex app in order to reduce transcoding with the Plex Media Server.

Best tool to Convert M2TS for Plex playing

Here, you can easily fix the format incompatible issue by downloading a third-party M2TS Converter - Pavtube Video Converter. The application has perfect importing support for M2TS files produce from both Blu-ray disc and Sony AVCHD cameras.

Related article: Plex Supported File Formats | Play MP4 on Plex | Play 4K on Plex

With this powerful yet simple to use application, you can efficiently convert multiple M2TS files to various Plex client compatible file formats and parameters listed below:
Container: mp4
Resolution: 1920x1080 or lower
Video codec: H.264 (level 4.0 or lower)
Video Framerate: 30fps
Audio codec: AAC
Audio channels: 2
Bitrate: 20Mbps or lower

To get the compatible parameters, just click "Settings" to open "Profile Settings" window, then flexibly adjust the output video codec, bit rate, frame rate, resolution and audio codec, bit rate, sample rate, channels, etc to let them adapt with your Plex client.

For Mac users, you can switch to download Pavtube Video Converter for Mac to complete the conversion on macOS High Sierra, macOS Sierra, Mac OS X El Capitan, Mac OS X Yosemite, Mac OS X Mavericks, etc.

Step by Step to Convert M2TS Files for Plex Direct Playing

Step 1: Load M2TS files into the application.

After the successful installation, click "Load file(s)" or "Add video"to load M2TS files into the program.

Load M2TS files

Step 2: Set output file format.

Clicking the Format bar, from its drop-down list, select most Plex clients best compatible "H.264 HD Video (*.mp4)"under "HD Video" main category.

Output Plex client most compatible file formats

Step 3: Adjust output profile parameters.

Click "Settings" on the main interface to open "Profile Settings" window, here, you can flexibly adjust the output profile parameters including video codec, resolution, bit rate, frame rate, audio codec, bit rate, sample rate, channels, etc as you like to let them adapt with your Plex clients.

Adjust output profile parameters

Step 4: Begin the final conversion process.

At the end, just go back to the main interface and press the "Convert" button to start M2TS files to Plex client conversion process.

Within a few minutes, you can get the converted video files you want by clicking the Open button. Then feel feel to add converted files to Plex library for streaming and playing on any devices as you like.

Monday, January 8, 2018

Top Free MP4 Download Sites

For those people who want to watch MP4 video on computer, portable devices anywhere or anytime, you may wish to find some free MP4 video download sites which offer a lot of MP4 video sources for free downloading. To save your time and energy, the following part has listed 5 best free MP4 download sites for you.

Best 5 Free MP4 video downloading sites

#1. YouTube.com

When it comes to MP4 video-sharing site, YouTube is the first one to recommend. Many users want to download or save their favorite YouTube videos in MP4 format to their computer so they can watch them without being connected to the Internet or on other devices. Below are the steps required for downloading YouTube videos on your computer.

#2. Dailymotion.com

Dailymotion is a video-sharing destination and technology platform on which more than 300 million unique monthly users can explore premium video content from top publishers. One of the biggest video platforms in the world, the Vivendi-owner company recently revamped its platform to prioritize premium videos from trusted publishers above user-generated content.

#3. Break.com

If you are looking for a free MP4 video download site offering a great number of funny videos, Break.com shouldn't be missed. Break.com, founded in 1998, is an entertainment and humor website, aiming to deliver funny videos, funny clips and funny pictures. What's more, it offers free full-length movies in different genres. If you find something you like on Break, just get them downloaded in MP4 with the downloader we recommended before.

#4. Veoh.com

Veoh is another top MP4 video site. It provides a wide range of MP4 videos, including movies, TV shows and videos in the categories of action & adventure, Sci-Fi & fantasy, anime, animals, comedy, horror, and also music in various styles. Veoh is different than other websites that let you stream free movies online because while you won't find newly released Hollywood films, there are old classics, documentaries, and other types of movies.

#5. Metacafe.com

Metacafe is a free MP4 video-sharing website that specializes in short-form video entertainment in the categories of movies, video games, sports, music and TV.

Convert online downloaded MP4 video

After downloading the MP4 video from above listed sites, you may encounter playback problems such as unsupported video/audio codec, bit rate, frame rate, resolution, sample rate, channels, etc when viewing MP4 video on your computer or with portable devices such as smartphones, tablets. Then you can download our best MP4 Video Converter - Pavtube Video Converter, which has full importing support for all 4K/2K/HD/SD MP4 video encoded with various different compression codec such as MPEG-4, H.264, H.265, MPEG-1, MPEG-2, VC-1/WMV, MVC, etc. Thanks to its batch conversion mode, you can batch load multiple MP4 video into the application at one time to save your precious time.

The program can assist you to convert MP4 video to any of your desired digital file formats with perfect quality and super fast conversion speed. If your original MP4 video is in 4K resolution, you can also use our application to compress 4K to 1080p for smooth playback experience on devices and applications that lacks the ability to handle 4K resolution video. The output profile customization function can also assist you to get better output video and audio quality by flexibly adjusting output video codec, bit rate, frame rate, resolution and audio codec, bit rate, sample rate, channels, etc to get the best output video and audio quality.

Edit download MP4 video

To get your desired output video before the conversion, you can make good advantage of the video editing function offered by the program. You can trim or cut video to remove the unwanted parts or segments, crop video to get off the unwanted black edges or size area, add video/image/transparent text watermark, apply special rendering effect, insert external srt/ass/ssa subtitle to video, etc.

For Mac users, you can switch to download Pavtube Video Converter for Mac to perform the converion on macOS High Sierra, macOS Sierra, Mac OS X El Capitan, Mac OS X Yosemite, Mac OS X Mavercicks, etc.

Tuesday, January 2, 2018

Import DJI Mavic Pro Platinum 4K to Windows Movie Maker

The Mavic Pro Platinum features a sleek design and compact body that is both powerful and alluring. The camera equipped on DJI Mavic Pro Platinum enables you to record both 4096x2160 4K video at 24p and also 3840X2160 UHD 4K video at 24/25/30p in either MP4 or MOV format compressed with MPEG-4 AVC/H.264 codec. For PC users who just want to complete some simple editing task with the DJI Mavic Pro Platinum footage, Windows Movie Maker is absolutely your best choice. How about native import Mavic Pro 4K video into Windows Movie Maker?

Can Windows Movie Maker support 4K video editing?

The answer is that as long as your PC computer meet the minimum requirements to edit 4K video, you will then have no problem to work 4K video with Windows Movie Maker. But make sure that Windows Movie Maker won't edit the 4K video as it is, instead, it will render the 4K files down and output a 1080p file.

Native import support of Mavic Pro Platinum H.264 MP4/MOV with WMM

After searching for Windows Movie Maker supported file formats, we can see that it offers no native support for the H.264 MP4/MOV file formats shot with Mavic Pro Platinum. To fix this format and codec incompatible issue, you can download our best 4K Video Converter - Pavtube Video Converter Ultimate. The program has perfect importing support for the 4K H.264 MP4/MOV video shot with DJI Mavic Pro Platinum camera. Thanks to its batch conversion mode, you can load multiple DJI Mavic Pro Platinum 4K video into the application for conversion at one time.

The application not only assists you to transcode Mavic Pro Platinum 4K H.264 MP4/MOV to Windows Movie Maker native editing WMV file formats, but also assists you to compress 4K to 1080p so that you can get a smooth and high performance editing workflow of 4K video with Windows Movie Maker on computer that can't deal with 4K resolution video.

Edit DJI Mavic Pro Platinum 4K video

Apart from assisting you to transcode and compress DJI Mavic Pro 4K video for Windows Movie Maker editing, the program can also act as a simple video editing tool to complete some simple video editing work. You can trim or cut video to remove unwanted parts or segments, merge separate video clips into one file, split large files into small parts by file size, length or count, crop the black bars around the video frame, add video/image/transparent text watermark to video, apply special rendering effects to video, etc.

Step by Step to Conver and Compress DJI Mavic Pro Platinum 4K for WMM Editing

Step 1: Load DJI Mavic Pro Platinum 4K files into the program.

Run the program on your computer and click "File" > "Add Video/Audio" or "Add from folder" to add DJI Mavic Pro Platinum 4K files into the program.

Load DJI Mavic Pro Platinum 4K files

Step 2: Select output format and set destination folder.

Click the pull down menu of "Format", then you will be able to select a Windows Movie Maker supported format from the output format profile, choose "HD Video">"WMV HD (*.wmv)" as your output format for editing HD video on Windows Movie Maker.

Output WMM supported editing formats

Step 3: Edit Mavic Pro Platinum 4K video(optional).

Check an item to active the "Video Editor" function, then click the pencil like icon on the top tool bar to open the "Video Editor" window, you can trim video length, crop video black bars, add watermark, apply sepcial rendering effect, remove/replace audio in video, etc.

Edit Mavic Pro Platinum 4K video

Step 4: Begin the final conversion process.

Click "Convert" button in the right-bottom to convert and compress DJI Mavic Pro Platinum 4K to Windows Movie Maker most favorable HD WMV file formats.

Once the conversion is finished, you can click "Open Output Folder" button to get the output files effortlessly, and now you will have no problem to import and edit converted files with Windows Movie Maker. Just import the converted files to Windows Movie Maker for editing via its "Import video" option.

Tuesday, December 26, 2017

Load iPhone Video to GoPro Studio

iPhone videos won't load properly into GoPro Studio

"I'm trying to make a video from some gopro videos I have, but I also want to include some videos from my iPhone too. However when I go to import the iPhone videos, the studio doesn't seem to load them properly. The video sound is nothing but a high pitched static noise, and the videos all play really slow, like they're being played at 1 frame a second. Has anyone had this issue before? This is my first time using the software, is it only able to process actual gopro videos?"

Video formats shot by all available iPhone models

iPhone Models

Video Format

Audio Format

iPhone 6S (Plus)

H.264 video up to 4K, 30 frames per second, High Profile level 4.2 with AAC LC audio up to 160 Kbps, 48kHz, stereo audio or Dolby Audio up to 1008 Kbps, 48kHz, stereo or multichannel audio, in .m4v, .mp4, and .mov file formats; MPEG 4 video up to 2.5 Mbps, 640 by 480 pixels, 30 frames per second, Simple Profile with AAC LC audio up to 160 Kbps per channel, 48kHz, stereo audio or Dolby Audio up to 1008 Kbps, 48kHz, stereo or multichannel audio, in .m4v, .mp4, and .mov file formats; Motion JPEG (M JPEG) up to 35 Mbps, 1280 by 720 pixels, 30 frames per second, audio in ulaw, PCM stereo audio in .avi file format

AAC (8 to 320 Kbps), Protected AAC (from iTunes Store), HE-AAC, MP3 (8 to 320 Kbps), MP3 VBR, Dolby Digital (AC-3), Dolby Digital Plus (E-AC-3), Audible (formats 2, 3, 4, Audible Enhanced Audio, AAX, and AAX+), Apple Lossless, AIFF, and WAV

iPhone SE

H.264 video up to 4K, 30 frames per second, High Profile level 4.2 with AAC LC audio up to 160 Kbps, 48kHz, stereo audio or Dolby Audio up to 1008 Kbps, 48kHz, stereo or multichannel audio, in .m4v, .mp4, and .mov file formats; MPEG 4 video up to 2.5 Mbps, 640 by 480 pixels, 30 frames per second, Simple Profile with AAC LC audio up to 160 Kbps per channel, 48kHz, stereo audio or Dolby Audio up to 1008 Kbps, 48kHz, stereo or multichannel audio, in .m4v, .mp4, and .mov file formats; Motion JPEG (M JPEG) up to 35 Mbps, 1280 by 720 pixels, 30 frames per second, audio in ulaw, PCM stereo audio in .avi file format

AAC (8 to 320 Kbps), Protected AAC (from iTunes Store), HE-AAC, MP3 (8 to 320 Kbps), MP3 VBR, Dolby Digital (AC-3), Dolby Digital Plus (E-AC-3), Audible (formats 2, 3, 4, Audible Enhanced Audio, AAX, and AAX+), Apple Lossless, AIFF, and WAV

iPhone 7 (Plus)

HEVC, H.264, MPEG-4 Part 2, and Motion JPEG

AAC-LC, HE-AAC, HE-AAC v2, Protected AAC, MP3, Linear PCM, Apple Lossless, FLAC, Dolby Digital (AC-3), Dolby Digital Plus (E-AC-3), and Audible (formats 2, 3, 4, Audible Enhanced Audio, AAX, and AAX+)

iPhone 8 (Plus)

HEVC, H.264, MPEG-4 Part 2, and Motion JPEG

AAC-LC, HE-AAC, HE-AAC v2, Protected AAC, MP3, Linear PCM, Apple Lossless, FLAC, Dolby Digital (AC-3), Dolby Digital Plus (E-AC-3), and Audible (formats 2, 3, 4, Audible Enhanced Audio, AAX, and AAX+)

iPhone X

HEVC, H.264, MPEG-4 Part 2, and Motion JPEG

AAC-LC, HE-AAC, HE-AAC v2, Protected AAC, MP3, Linear PCM, Apple Lossless, FLAC, Dolby Digital (AC-3), Dolby Digital Plus (E-AC-3), and Audible (formats 2, 3, 4, Audible Enhanced Audio, AAX, and AAX+)

Transcode iPhone video for GoPro Studio editing

The GoPro Hero supported editing formats is MOV or MP4, while the iPhone recorded video are mainly H.264 or H.265 formats. Therefore, to load iPhone video to GoPro Studio, you will need to perform a format or codec transcoding process. Here, you can easily fix the format incompatible issue by downloading our best iPhone Video Converter - Pavtube Video Converter.

Related article: Video Fails to Import to GoPro Studio | GoPro Studio Alternative for Windows 10 | GoPro Studio Supported Formats

The program has full support for both iPhone HD/4K H.264 or H.265 video. Thanks to its batch conversion mode, you can batch load multiple iPhone video into the application for conversion at time to save your precious time. This powerful yet simple to use application can assist you to efficiently transcode iPhone HD/4K H.264/H.265 video to GoPro Studio native supported MOV or MP4 with best quality and fast conversion speed.

To get better output file quality, you can flexibly adjust output profile parameters such as video codec, bit rate, frame rate, resolution and audio codec, bit rate, sample rate and channels, etc.

For Mac users, you can switch to download Pavtube Video Converter for Mac to perform the conversion on macOS High Sierra, macOS Sierra, Mac OS X El Capitan, Mac OS X Yosemite, Mac OS X Mavericks.

Step by Step to Transcode iPhone Video for GoPro Studio Editing

Step 1: Load iPhone video into the application.

Download the free trial version of the program. Launch it on your computer. Click "File" menu and select "Add Video/Audio" or click the "Add Video" button on the top tool bar to import iPhone video files into the program.

Load iPhone video

Step 2: Define the output format.

Clicking the Format bar, from its drop-down list, select GoPro Studio supported editing formats such as "H.264 HD Video(*.mp4)" under "HD Video" main category.

Output GoPro Studio supported editing formats

Step 3: Adjust output profile parameters.

Click "Settings" on the main interface to open "Profile Settings" window, here, you can flexibly choose or specify exactly the profile parameters including video codec, resolution, bit rate, frame rate, audio codec, bit rate, sample rate, channels, etc as you like to get better output video and audio quality.

Adjust output profile parameters

Step 4: Begin the conversion process.

After all setting is completed, hit the "Convert" button at the right bottom of the main interface to begin the conversion process from iPhone Video to GoPro Studio supported editing formats conversion process.

When the conversion is finished, click "Open Output Folder" icon on the main interface to open the folder with generated files. Then you will have no problem to import and edit iPhone video with GoPro Studio.

Tuesday, December 19, 2017

Edit Sony A7R III 4K XAVC S with Davinci Resolve

The Alpha A7R III Mirrorless Digital Camera from Sony is a versatile, high-performance camera characterized by not only its resolution, but by its multimedia versatility. With the camera, you can record up to 100 Mbps UHD 4K video in XAVC S format within an MP4 wrapper at a frame rate of 23.98, 25 and 29.97fps. Wish to import the A7R III 4K XAVC S footage into Davinci Resolve for professional post editing workflow, the following article will show you how to easily achieve a smooth editing workflow.

Media compatibility of 4K XAVC S with Davinci Resolve

From Davinci Resolve's media specification page, we can see that this world's leading NLE software has provided perfect compatibility with various post production file types, formats and post production software. The bad news is that 4K XAVC S is unfortunately excluded from its native importing support list.

Transcode A7R III 4K XAVC S to Davinci Resolve

To fix the format incompatible issue, you will need to perform a format transcoding process. Here, if you are looking for a powerful yet simple to use application to complete the job, we highly recommend you to download our best Mac XAVC S Converter - Pavtube Video Converter for Mac. The program supports batch conversion mode, so that you can load multiple Sony A7R III 4K XAVC S video into the application for conversion at one time to save your precious time. With this tool, you can easily and efficiently export Davinci Resolve supported editing formats such as QuickTime, Prores, DNxHD with remarkable file quality.

To get better output video and audio quality, you can flexibly tweak the output profile parameters including video codec, resolution, bit rate, frame rate, audio codec, bit rate, sample rate, channels, etc as you like to get better output video and audio quality.

The program has perfect compatibility with macOS High Sierra, macOS Sierra, Mac OS X El Capitan, Mac OS X Yosemite, Mac OS X Mavericks, etc. For your great convenience, it is also accompanied by an up-to-date Windows version Pavtube Video Converter for Windows 10/8.1/8/7.

How to Import and Edit Sony A7R III 4K XAVC S with Davinci Resolve?

Step 1: Import Sony A7R III 4K XAVC S video.

Download the free trial version of the program. Launch it on your computer. Click "File" menu and select "Add Video/Audio" or click the "Add Video" button on the top tool bar to import Sony A7R III 4K XAVC S video into the program.

Load Sony A7R III 4K XAVC S video

Step 2: Choose output file format.

Click the "Format" bar, from its drop-down list, select one of Davinci Resolve supported editing formats such as "Apple Prores 422(*.mov)" under "Final Cut Pro" main category.

Output Davinci Resolve supported editing formats

Step 3: Begin the conversion process.

After all setting is completed, hit the "Convert" button at the right bottom of the main interface to begin the conversion process from Sony A7R III 4K XAVC S to Davinci Resolve supported editing format conversion process.

When the conversion is finished, click "Open Output Folder" icon on the main interface to open the folder with generated files. Then feel free to load the Prores files into Davinci Resolve for post editing workflow.

Tuesday, December 12, 2017

Deinterlace All Kinds of Interlaced Files

What does deinterlacing videos mean?

Deinterlacing is the process of converting interlaced video, such as common analog television signals or 1080i format HDTV signals or recorded movie footages, into a non-interlaced form that can be playable on modern non interlaced display devices like LCD or Plasma screens.

Why we need to deinterlace video files?

Most cathode ray tube computer monitors, all LCD computer monitors and most HDTVs only work in deinterlace mode, because they are fixed-resolution displays and only support progressive scan. When you display an interlaced video on a progressive scan monitors, which scan lines of an image consecutively, the artifacts will become noticeable. To remove those annyoing artifacts, it would be much ideal for you to convert the interlace video into progressive form.

How to deinterlace interlaced videos?

There are many free programs such as VirtualDub, Handbrake, VLC, Avidemux, etc on the market can do the video deinterlacing work. However, if you are looking for a powerful yet simple to use application to complete the job, you can't miss Pavtube Video Converter Ultimate. The program not only assists you to deinterlace interlace digital video, but also commercial Blu-ray/DVD disc with complicated copy protection and region code limitation. The whole process can be easily done with just few clicks, just open the "Video Editor" window, navigate to the "Effect" tab, then check off "Deinterlacing" option to transform the interlaced video into a progressive form to keep good image quality.

Trim/Crop/Add watermark/apply effect to video

Besides deinterlacing interlaced video, the program also offer other beneficial video editing functions for you. You can trim or cut video to remove unwanted parts or segments in the beginning or end, split large video into small clips by file size, count or length, merge separate video into one file, crop video to remove the black borders or unwanted area, add video/image/transparent text watermark to video, flip or rotate video horizontally, vertically, clockwise or counterclockwise, apply special rendering effect to video, change video brightness, contrast, saturation, etc, remove/replace audio in video, insert external srt/ass/ssa subtitle to video.

For Mac users, you can fix Blu-ray/DVD/video interlaced issue by downloading Pavtube iMedia Converter for Mac on macOS High Sierra, macOS Sierra, Mac OS X El Capitan, Mac OS X Yosemite, Mac OS X Mavericks, etc.

Get Pavtube Video Converter Ultimate with 20% off discount, coupon codec: 45K2D47GJH

Step by Step to Deinterlace Interlace Video into Progressive Form

Step 1: Load interlaced digital video or Blu-ray/DVD disc into the program.

Download the install the program on your computer, click "File" > "Add Video/Audio" button to import interlaced digital video into the program. For loading Blu-ray or DVD disc, insert your interlaced Blu-ray/DVD disc into your computer's optical drive, then click "File" > "Load from disc" to load DVD disc into the program. For loading Blu-ray disc, there must be an external Blu-ray drive.

Load interlaced digital video or Blu-ray/DVD disc

Step 2: Define an output file format.

From "Format" drop-down list, select one of your desired file formats or device and program preset profile formats according to your own needs. If you do not want to re-encode the video, just select to output the same format as the original file format, also make sure do not change any profile settings for the output video.

Choose output file format

Step 3: Deinterlace interlaced video into progressive form.

Select an item on the main interface to activate the "Edit" menu, then click the "Edit" icon on the tool bar to open the "Video Editor" window, switch to the "Effect" tab, tick off "Deinterlacing" option to transform the interlaced video into a progressive form without any artifacts.

Deinterlace interlaced video into progressive form

Step 4: Complete the video deinterlacing process.

After all settings is over, hit right-bottom "Convert" button to start the interlace video deinterlacing process.

When the conversion is completed, you can get a deinterlaced video for better displaying on most new computers and HDTV.

Tuesday, December 5, 2017

Play DJI Phantom Pro 4K Video with 4K TV

The Phantom 4 Pro from DJI is capable of shooting H.264 4K videos at 60fps or H.265 4K at 30fps, both recorded in a 100 Mbps bit rate. For 4K TV owners, after transferring the 4K footage from the camera memory card to your computer hard drive, you can wonder how to play the DJI Phantom 4 Pro 4K on 4K TV. The following article will share you 3 solutions to get the job completed.

Solution 1: Play DJI Phantom 4 Pro 4K on 4K TV via USB

If the USB port on your 4K TV can be used for media playback, you can then be able to play any content saved on USB compatible storage device. To make the 4K video played on 4K TV, make sure that the 4K video are included in 4K TV supported file formats.

Related article: Import DJI Phantom 4 4K to FCP X | Downscale Phantom 4K Video to 1080p | Import Phantom 4K to Premiere Pro CC

Solution 2: Stream DJI Phantom 4 Pro 4K to 4K TV via Plex

If the Plex app is available on your 4K TV, you can download and install the Plex app on your 4K TV for streaming local 4K video to it. However, make sure that the DJI Phantom 4 Pro 4K video are supported by the Plex app of your 4K TV.

Solution 3: Stream DJI Phantom 4 Pro 4K to 4K TV via 4K Streaming Devices

If your 4K TV doesn't support the Plex app, it would be ideal for you to choose a 4K streaming devices such as Chromecast Ultra, Roku 4/Ultra/Premiere, Amazon Fire TV 2/3, etc.

Fix DJI Phantom 4 Pro format incompatible issue with 4K TV

No matter which solution you choose, it is pretty important that the DJI Phantom 4 Pro 4K video is supported by your 4K TV, Plex app on 4K TV or the 4K media streaming devices. If you fail to play the DJI Phantom 4 Pro 4K on 4K TV from USB, via Plex or through 4K media streaming devices or suffer other playback issues, then you can fix those playback issues by downloading our best 4K Video Converter - Pavtube Video Converter.

This program has full support for all 4K video encoded with various different compression codec such as H.264, H.265, Prores, etc and wrapped with different container file formats such as AVI, WMV, MP4, MOV, MXF, TS, XAVC, XAVC S, etc. The program supports batch conversion mode, so that you can batch load multiple 4K video into the application for conversion at one time to save your precious time.

With this application, you can easily convert the DJI Phantom 4 Pro 4K video to 4K TV, 4K TV plex app or 4K media streaming devices preset profile formats with perfect quality and super-fast encoding speed.

Adjust output profile parameters

To get better output video and audio quality, you can flexibly adjust output profile parameters such as video codec, resolution, bit rate, frame rate or audio codec, bit rate, sample rate and channels, etc as you like.

For Mac users, please switch to download Pavtube Video Converter for Mac to perform the conversion on macOS High Sierra, macOS Sierra, Mac OS X El Capitan, Mac OS X Yosemite, Mac OS X Mavericks, etc.

Step by Step to Transcode DJI Phantom 4 Pro 4K for 4K TV Playing or Streaming

Step 1: Load DJI Phantom 4 Pro 4K video.

Download the free trial version of the program. Launch it on your computer. Click "File" menu and select "Add Video/Audio" or click the "Add Video" button on the top tool bar to import DJI Phantom 4 Pro 4K video files into the program.

Load DJI Phantom 4 Pro 4K video

Step 2: Define the output format.

Clicking the Format bar, from its drop-down list, select 4K TV, 4K TV Plex app or 4K streaming devices supported 4K file formats such as 4K H.265 or 4K H.264 file formats.

Output 4K H.265

Output 4K H.265

Output 4K H.264

Output 4K H.264

Tips: Click "Settings" on the main interface to open "Profile Settings" window, here, you can flexibly choose or specify exactly the profile parameters including video codec, resolution, bit rate, frame rate, audio codec, bit rate, sample rate, channels, etc as you like to get better output video and audio quality.

Step 3: Begin the conversion process.

After all setting is completed, hit the "Convert" button at the right bottom of the main interface to begin the conversion process from DJI Phantom 4 Pro 4K to 4K TV, 4K TV via Plex, 4K streaming devices preset profile formats.

When the conversion is finished, click "Open Output Folder" icon on the main interface to open the folder with generated files.

Tuesday, November 28, 2017

Play DJI Mavic Pro 4K Video with VLC

The Mavic Pro camera from DJI can shoot 4K video (up to 4096 x 2160) at 30 frames per second in an MOV wrapper with MPEG-4 AVC/H.264 compression codec. After the shooting, for PC users who are looking for a powerful 4K Video Player to watch the DJI Mavic Pro 4K video, VLC can be your first choice. However, a lot of people complain the DJI Mavic Pro 4K video playback very choppy on VLC media player. The following article some workable solution to fix VLC DJI Mavic Pro 4K video playback choppy issues.

Solution 1: Enable GPU acceleration.

Open VLC Media Player and click on Tools > Preferences or press Ctrl-P to open the settings window of the program. If you are using the simple settings interface, click on Input & Codecs on the left sidebar and check the Use GPU accelerated decoding box there.

Check use GPU accelerated decoding box

If you are using the all interface select Input/Codecs > Video Codecs > FFmpeg > Hardware decoding instead to enable acceleration this way.

Enable hardware decoding

Click on the save button afterwards and restart the media player to work with the new setting. Try playing several video files to see if hardware acceleration makes a difference in terms of playback. If it does, keep the setting enabled. If it does not, just go back to the settings to uncheck the option again.

Tips: The VLC GPU decoding is only available for selected operating systems. While Windows Vista and newer versions of the Microsoft operating system are supported, Windows XP is not at this point in time. The majority of graphic cards should support hardware acceleration just fine. Make sure you have installed the latest drivers though.

Solution 2: Compress DJI Mavic Pro 4K to 1080p

For those people who try to play DJI Mavic Pro 4K Video with VLC on Mac or your Windows OS is not in the selected operating system. There is a more effective to fix the issue: Downscale DJI Mavic Pro 4K to 1080p. What you need is simply a 4K Video Compressor. Here comes Pavtube Video Converter. The program is available on both Windows and Mac platform (get Mac version). In addition, it also has perfect compatibility with the new Windows and Mac OS.

The program has perfect importing support for the 4K H.264 MOV video shot with DJI Mavic Pro, thanks to its batch conversion mode, you can load multiple video at one time for compression to save your precious time. The application can assist you to efficiently compress DJI Mavic Pro 4K to VLC best workable HD file formats such as H.264 HD or other HD file formats with perfect quality.

The program supports hardware encoding acceleration, so that you can get up to 6x faster H.264 codec encoding speed as long as you run your computer on Graphic cards that supports Nvidia CUDA or AMD App technology. Hardware encoding acceleration is not available on the Mac computer.

Step by Step to Transcode and Compress DJI Mavic Pro 4K to 1080p for VLC Smooth Playback

Step 1: Load DJI Mavic Pro 4K files.

Start the program on your computer, click File > Load Video/Audio or Load from folder button to import DJI Mavic Pro 4K H.264 MOV files into the program.

Load DJI Mavic Pro 4K files

Step 2: Choose VLC best supported playback formats.

As a powerful media player, VLC can handle many video formats. After checking VLC supported video formats, H.264 HD Video(*.mp4) under HD Video main category would be a good choice. You can also choose other VLC supported HD file formats according to your own needs.

Choose VLC best supported HD file formats

Step 3: Compress 4K video to 1080p.

Click Settings on the main interface to open Profile Settings window, click Size(pix) to select 1920*1080 as the final resolution for output video for smooth playback effect with VLC. You can also tweak other settings to make them more fit with VLC.

Compress 4K to 1080p

Step 4: Start DJI Mavic Pro 4K video to VLC conversion and compression process.

After all the settings is completed, hit right-bottom Convert button to start to convert and compress DJI Mavic Pro 4K video to VLC best compatible 1080p H.264 formats.

When the conversion is finished, click "Open Output Folder" icon on the main interface to open the folder with generated files. Now you will have no video lagging or stuttering issue when playback DJI video with VLC.

Monday, November 20, 2017

Work GoPro Hero 6 4K H.265 with Davinci Resolve

For Davinci Resolve users, if you're getting an error message when you try to open a video shot on the GoPro Hero 6 Black, it might because it isn't compatible with the HEVC (H.265) codec used in some of GoPro Hero 6 Black video modes. Following are the workarounds.

Transcode GoPro Hero 6 4K H.265 for Davinci Resolve editing

From Davinci Resolve supported file formats, we can see that Davinci Resolve can work with virtually every modern file type and media format available from ProRes and DNx to H.264, DPX, Cineon, EXR and more. The bad news is that the H.265 codec is unfortunately excluded from Davinci Resolve supported file formats list. To import GoPro Hero 6 4K H.265 to Davinci Resolve, you will need to perform a codec transcoding process.

The are number of paid apps that can do the conversion. If you are looking for a powerful yet simple to use application to get the job done, we highly recommend Pavtube Video Converter for Mac to you. The program has perfect importing support for the 4K H.265 files shot with GoPro Hero 6, thanks to its batch conversion mode, you can input multiple GoPro Hero 6 4K H.265 video into the application at one time for conversion.

The program can assist you to efficiently convert GoPro Hero 6 4K H.265 to Davinci Resolve workable editing codec such as Prores, DNxHD, QuickTime, etc with perfect quality. If your computer is not powerful enough to handle 4K video editing, you can also choose to compress 4K to 1080p by changing output file resolution as "1980*1020" in the "Profile Settings" window offered by the program.

Pavtube Video Converter for Mac is available on macOS High Sierra, macOS Sierra, Mac OS X El Capitan, Mac OS X Yosemite, Mac OS X Mavericks, etc, it is also accompanied by an up-to-date Windows version - Pavtube Video Converter for Windows 10/8.1/8/7.

Step by Step to Transcode and Compress GoPro Hero 6 4K H.265 for Davinci Resolve

Step 1: Load GoPro Hero 6 4K H.265 video.

Download the free trial version of the program. Launch it on your computer. Click "File" menu and select "Add Video/Audio" or click the "Add Video" button on the top tool bar to import GoPro Hero 6 4K H.265 video files into the program.

Load GoPro Hero 6 4K H.265

Step 2: Choose Resolve best compatible editing format.

As is mentioned above, Avid DNxHD is well supported by DaVinci Resolve. So just click the format bar to follow "Avid Media Compose" > "Avid DNxHD (*.mov)".

Output Davinci Resolve supported editing codec

Step 3: Compress 4K to 1080p.

Click "Settings" on the main interface to open "Profile Settings" window, from "Size(pix)" drop-down list, choose "1980*1020" to compress 4K to 1080p for smooth editing workflow on slow computer.

Step 4: Begin the final conversion process.

After all setting is completed, hit the "Convert" button at the right bottom of the main interface to begin the conversion process from GoPro Hero 6 4K H.265 to Davinci Resolve supported editing format DNxHD conversion process.

When the conversion is finished, click "Open Output Folder" icon on the main interface to open the folder with generated files. Then feel free to load the DNxHD files into Davinci Resolve for post editing workflow.

Tuesday, November 14, 2017

Work Canon EOS M100 MP4 Video with Davinci Resolve

The Canon EOS M100 is the company's entry-level mirrorless interchangeable lens camera. It features a 24MP APS-C CMOS sensor, DIGIC 7 processor and the company's impressive Dual Pixel AF system. With the camera, you can shot 1080p, 720p and 480p video in MP4 format with H.264 compression codec. For Davinci Resolve users, when the shooting is completed, you may come the idea to do some post editing workflow of the Canon EOS M100 MP4 video with Davinci Resolve. Wish to get a fast and smooth workflow, just read on...

How about native import EOS M100 MP4 video into Davinci Resolve?

The Canon EOS M100 records different resolution of MP4 video with H.264 compression codec, which is included in Davinci Resolve supported file formats. However, For those people who wish to do more effects editing with the EOS M100 MP4 video in Davinci Resolve, H.264 won't be good choice. The main reason is that H.264 is an 8-bit format, which means that you are potentially compromising your effects and, especially, color correction and compositing with gradients.

Best editing formats for Davinci Resolve with more effects editing

If you wish to get a high quality and high performance editing of Canon EOS MP4 video with Davinci Resovle, we highly recommended you to encode EOS M100 H.264 MP4 to another Davinci Resolve workable editing formats - Apple Prores. As a 10-bit container, Apple Prores can process a lot of more color data and make the color correction process easier.

Encode EOS M100 MP4 to Apple Prores codec

Here, a powerful and simple to use application called Pavtube Video Converter for Mac is highly recommended to you. The program supports batch conversion mode, so that you can load multiple video at one time into the application for conversion to save your precious time.

With the application, you can efficiently encode EOS M100 H.264 MP4 to Davinci Resolve best color correction editing format - Apple Prores codec with perfect quality and super fast encoding speed. The program can produce Apple Prores in various different types including "Apple Prores 422(*.mov)", "Apple Prores 422(HQ)(*.mov)", "Apple Prores Proxy)(*.mov)" and "Apple Prores (LT)(*.mov)", you can choose the suitable one by following the standards listed below:

If you computer is old or slow, or you just want to do some rough editing, you can select to output "Apple Prores Proxy)(*.mov)"or "Apple Prores (LT)(*.mov)"format to save more space and bandwidth. However, if your computer are powerful enough to handle multicam and high-resolution video and you are going to do many effects editing work with FCP X, you'd better choose to output "Apple Prores 422(*.mov)"or "Apple Prores 422(HQ)(*.mov)"for better performance.

Step by Step to Transcode Canon EOS M100 H.264 MP4 to Prores for Davinci Resolve

Step 1: Load Canon EOS M100 MP4 video.

Download the free trial version of the program. Launch it on your computer. Click "File" menu and select "Add Video/Audio" or click the "Add Video" button on the top tool bar to import Canon EOS M100 MP4 video files into the program.

Load Canon EOS M100 MP4 video

Step 2: Define the output format.

Clicking the Format bar, from its drop-down list, choose Davinci Resolve best favorable Apple color correction editing codec - Apple Prores.

If you try to do more effects editing of the Canon EOS M100 MP4 with Davinci Resolve on powerful computer, it would be much ideal for you to choose "Apple Prores 422(*.mov)" or ""Apple Prores 422(HQ)(*.mov)"for high quality performance.

Output Apple Prores 422 or 422 HQ

If you have a underpowered Mac computer, to get a smooth post editing workflow, it would be much ideal for you to choose"Apple Prores 422(Proxy)(*.mov)" or "Apple Prores 422(LT)(*.mov)" format.

Output Apple Prores 422 Proxy or LT format

Tips: Click "Settings" on the main interface to open "Profile Settings" window, here, you can flexibly adjust the output profile parameters including video codec, resolution, bit rate, frame rate, audio codec, bit rate, sample rate, channels, etc as you like to get better output video and audio quality.

Step 3: Edit Canon EOS M100 MP4 videos.

By default the Edit icon is grayed out. To activate the Edit menu, you have to select an item first. When a video or movie is selected, click the pencil like Edit icon on the left top tool bar to open the video editor window, here, you can play and preview the original video and output effects. Also you can flip or rotate video, trim, crop, add watermark, apply special effect, edit audio or insert external subtitle.

Edit Canon EOS M100 MP4 videos

Step 4: Start the conversion process.

After all setting is over, go back to the main interface and hit right-bottom "Convert" button to start to convert Canon EOS M100 MP4 to Davinci Resolve most compatible Apple Prores editing formats encoding process.

When the conversion is completed, launch Davinci Resolve on your Mac computer to import converted video to Davinci Resolve for smooth post editing workflow.