Nvidia Share (formerly Nvidia ShadowPlay) is a hardware-accelerated screen recording utility for Windows PCs using GeForce GPUs, made by Nvidia Corp as part of its GeForce Experience software. It can be configured to record continuously a time behind, allowing the user to save the video retroactively. You can capture screenshots up to 4K and upload them to Facebook, Google or Imgur with the click of a button. And it records up to 4K resolution at 130 Mbps.
If you've recorded some videos with Shadowplay, chances are you want to upload them to YouTube or posting on Faceboo, Instagram etck. When you try to do it, you might encounter some problems uploading ShadowPlay video to Vimeo/Instagram/Youtube. That’s because your ShadowPlay videos are not friendly with Vimeo/Instagram/Youtube. So you’d better convert your ShadowPlay recordings to Vimeo/Instagram/Youtube friendly videos.
Best Program to Convert ShadowPlay videos to Vimeo/Instagram/Youtube supported videos
That’s easy. In the following parts, I am going to introduce to you how to carry out the converting exactly. What you need is one professional video converter for YouTube/Instagram/Vimeo/Facebook etc. Pavtube Video Converter Ultimate is your smart choice. With it, you can fast convert ShadowPlay videos to YouTube/Instagram/Vimeo/Facebook compatible format like H.264 MP4 without quality loss. Besides, this program also can convert ShadowPlay videos to some NLEs for editing like Premeire Pro, Sony Vegas Pro etc for getting nice videos.
What's more, with the built-in video editor, it's freely for you to trim the ShadowPlay videos into multiple segments with short duration. The most important is that, it allows you to modify the video bitrate, frame rate, video size, audio channel, etc for your original ShadowPlay recordings for easier uploading.
Mac user can get its Mac version - Pavtube iMedia Converter for Mac
Free download this ShadowPlay video converter


How to Convert ShadowPlay recordings to Vimeo/Instagram/Youtube on Windows (10)
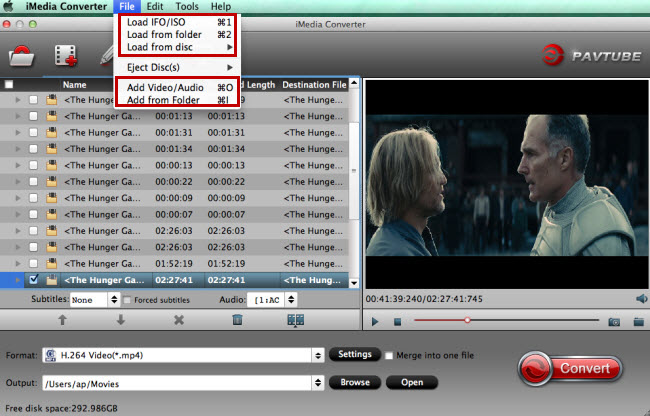
Step 1. Add ShadowPlay videos
Install and run the Video Converter on your computer, then click "Add Video" button to browse and load your videos which you've transferred to your Windows PC.
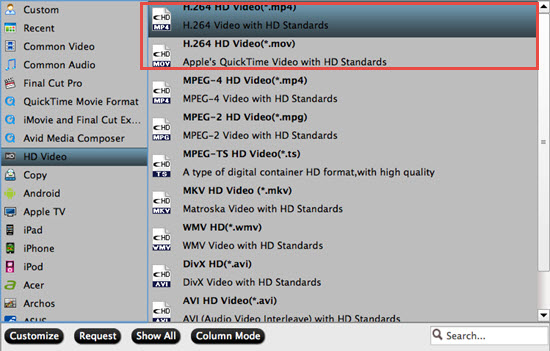
Step 2. Set right output format.
Click "Format" bar, and select .mp4 from "Common video" or "HD video" to fit Vimeo/Instagram/Youtube.

Tip: If you're skilled at advanced settings about video and audio parameters, you're able to customized settings, such as select bitrates, encoders, resolution, frame rate, audio channel, etc.
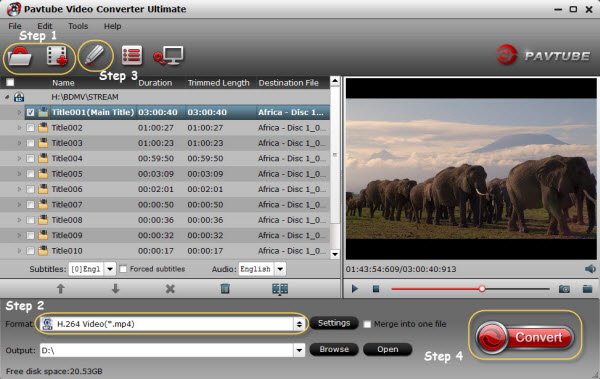
Step 3. Click the "Convert" button on the main interface and the software will start to convert ShadowPlay recordings to Vimeo/Instagram/Youtube friendly video formats immediately. When the conversion finishes, click "Open" to find the converted video files. Then you can effortless transfer the video files to Vimeo/Instagram/Youtube for playback on the go.
Read More:
- Can't Post MP4 video to Instagram? Solved!
- Upload DJI Mavic Pro 4K video to Youtube, Vimeo, Instagram on Mac
- The Best Instagram Video Converter Review
- How to Upload any 4K videos to Instagram?
- How to Upload Samsung NX1 H.265 Video to YouTube on Mac 10.10 Yosemite
- Publish a Video to Facebook, Twitter or Instagram on macOS Sierra
- How to Edit and Encode Videos for Instagram for smooth Uploading?
- How to Convert Video to YouTube Supported Video Formats on Mac
- http://www.video-pedia.com/2017/06/12/upload-quicktime-mov-to-youtube-mac/