Thursday, October 10, 2013

Workflow: Enable Avid MC/Premiere Pro Load AVCHD/MP4 from Canon Vixia HF G30

AVCHD/MP4 files Avid MC/Premiere Pro solution: step by step guide showing you how to importCanon Vixia HF G30 AVCHD/MP4 to Avid MC/Premiere Pro for further editing.
  
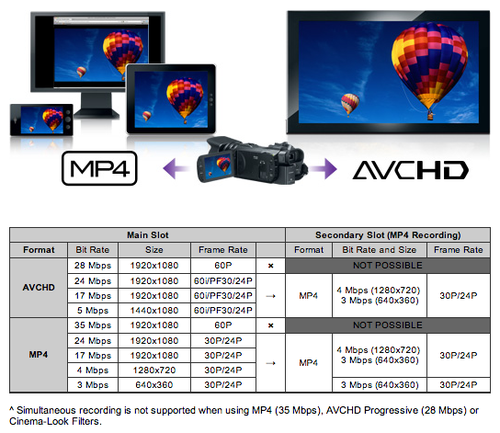
The Canon VIXIA HF G30 is a prosumer camera that shoots 1920 x 1080 Full HD video in either AVCHD or web-friendly MP4 format. It also supports Native 24p Progressive Mode recording, which will give your footage a more cinematic look. Videos are shot in AVCHD up to 35 Mbps and recorded in full HD 1080 60p, which is not supported by most editing programs. Hence it could be a problem when Mac users need to ingest the Canon Vixia HF G30 AVCHD/MP4 video in Adobe Premiere Pro, Avid Media Composer smoothly.


To edit Canon Vixia HF G30 AVCHD in Adobe Premiere Pro, Avid Media Composer on Mac, you are suggested to convert the AVCHD MTS to Adobe preferred H.264 MOV or DNxHD for Avid. To accomplish this, I recommend this Mac AVCHD to MOV Converter, a powerful and professional AVCHD converting program which support outputting various videos formats for different usage..

Now follow these steps to quick convert Canon Vixia HF G30 AVCHD into DNxHD or AVC MOV.

Free download Pavtube HD Video Converter for Mac, get it installed. 


(Tip: Download a dmg file for Mac OS X 10.5 users)


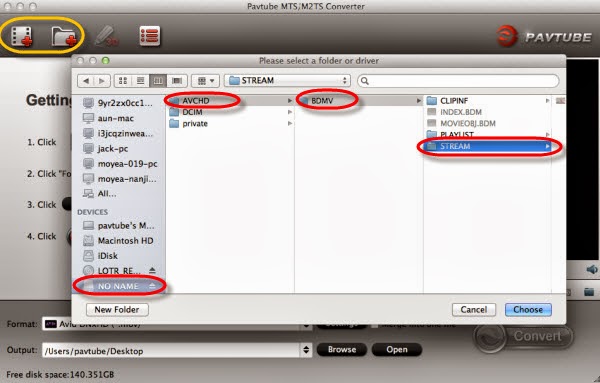
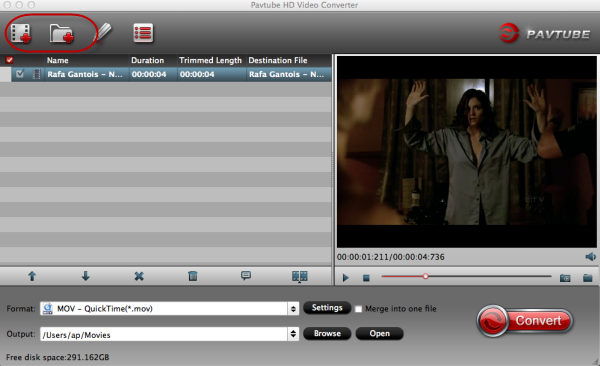
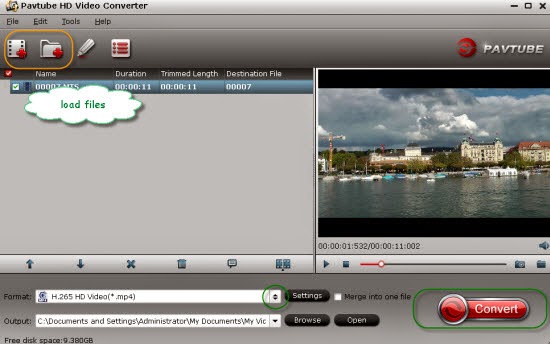
Step 1: Connect your camcorder to Mac and Load recorded files.

Connect your camcorder to Mac, and you can see all recorded AVCHD/MP4 files as soon as this program has detected the device. Now, you can untick the files you don't want, and then click the "Add" button to load the files you want to this AVCHD/MP4 to MOV Converter for Mac, or drag and drop your videos into it directly. Batch conversion is offered.


For Windows user: Connect an HD video camera/camcorders to your PC with a USB cable. Once connected and powered on, the camcorder should appear on the desktop as a new disk. It is desirable that you copy the videos to your PC's hard-drive before converting or editing them. 

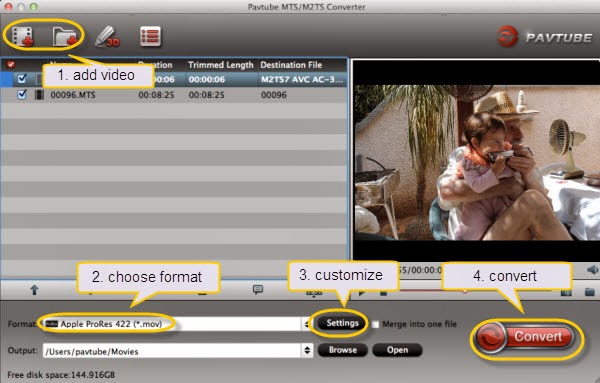
Step 2. Choose proper video format.

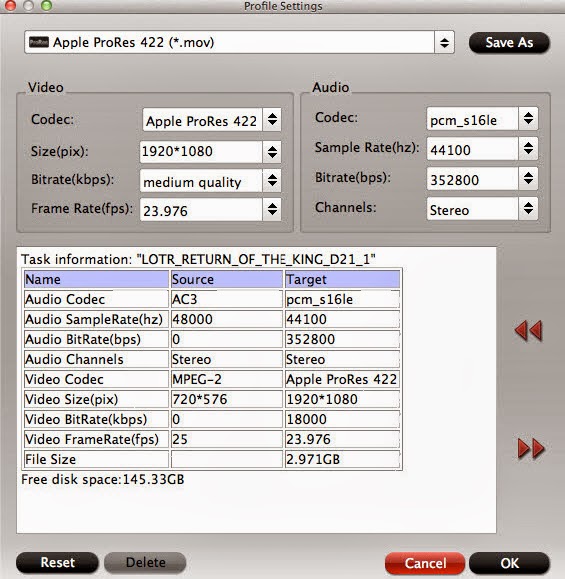
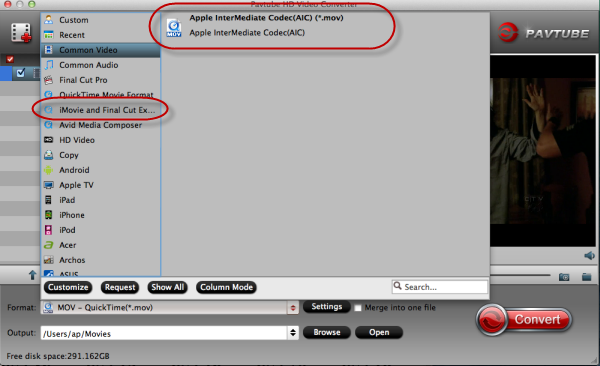
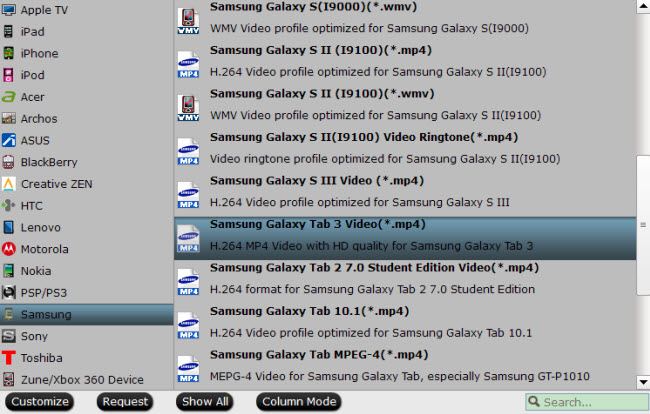
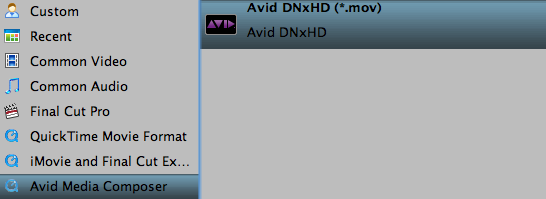
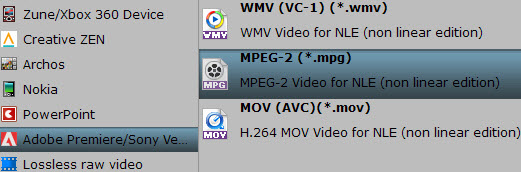
Open the “Format” list then choose "MOV" under "Avid Media Composer" section as output format for editing Canon Vixia HF G30 AVCHD/MP4 files in Avid Media Composer. 


choose "MOV"/”MPEG-2” under "Adobe Premiere/Sony Vegas" section or “Apple ProRes 422(*.mov)” under "Final Cut Pro" section as output format for editing Canon Vixia HF G30 AVCHD/MP4 files in Adobe Premiere Pro. 


In fact, if you are about to play the AVCHD/MP4 video files on iPhone, iPod, iPad, Android, Windows 8 devices or edit in iMovie, Final Cut Pro X, FCE etc., you can choose the optimized preset for the device or app offered.

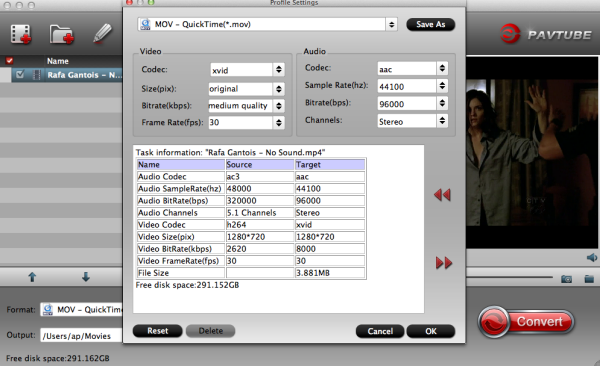
Step 3. Customize video size, bitrate, frame rate, and other settings.
  
Tips:
  • For 1080 50p AVCHD files, you can set the video size as 1920*1080, and set the video frame rate as 25fps.
  • For 1080 60p AVCHD videos, set the video size as 1920*1080; while, set the video frame rate as 30fps.

FYI: Tf you want to trim, crop the videos before transcoding, you can click Edit like this:


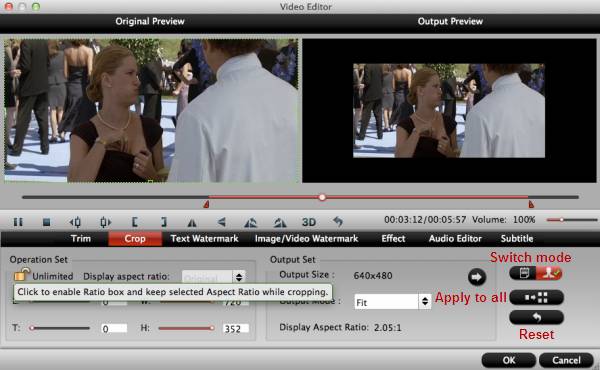
Pavtube AVCHD Converter for Mac also support deinterlacing, editing audio and adding sutitles.

(Note: If you want to add 3D effect (Side-by-Side, Top-Bottom, or Anaglyph 3D in MKV/MP4/MOV/WMV/AVI), you can try Video Converter Ultimate or Video Converter Ultimate for Mac.

Step 4. Start conversion.

Click the "Convert" button to start converting Canon Vixia HF G30 AVCHD/MP4 to MOV for Avid MC, converting to MOV/MP4G-2/Apple ProRes for Adobe Premiere Pro.

After this Top HD Video Converter for Mac finishes the conversion process, you can click "Open Folder" to find out where you saved the converted files.

Now let’s click the “Convert” to start this conversion easily. Wait for a while and you can click the “Open” to locate the converted video easily.

You may want to read:
  

Wednesday, October 9, 2013

Copy G.I. Joe: Retaliation Blu-ray/DVD Movie to Computer Hard Drive without quality lossless

G.I. Joe Retaliation is a good and popular film now. You may just purchase the Blu-ray version of this movie. If you want to copy G.I. Joe: Retaliation Blu-ray movies to computer hard drive, it may take a lot of energy. However, Magic Blu-ray copy can help you with its simple interface and powerful function. Here this article will do you a favour.

To be honest, it will take much space, if you want to backup the full Blu-ray disc on the computer. In general, about 25GB. In fact, we just need to backup the main movie. The fake title and other titles are useless and take much space. This article will give you a solution to easily copy G.I.JOE retaliation main title on computer with quality lossless. You can follow below steps to rip G.I. Joe: Retaliation Blu-ray to computer hard drive.

Pavtube BDMagic is an efficient and top Blu-ray Copying software. It can easily remove Blu-ray protection, and lossless copy G.I. Joe Retaliation Blu-ray movies to your hard drive.

Before copying G.I. Joe: Retaliation Blu-ray discs check what you need:
  1. An external Blu-ray drive.
  2. Top Blu-ray Ripper software - Pavtube Blu-ray Ripper (30% off now)
  3. Internet connection.
  4. G.I. Joe Retaliation Blu-ray disc.

You can also free download Pavtube Blu-ray Ripper and have a try. It is easy to use.


Step 1. Install and run the Top Blu-ray Ripper. Insert G.I. Joe: Retaliation Blu-ray disc into the Blu-ray drive, the Ripper will automatically load the disc information.

Make sure you have enough space on your drive (depending on the disc, this could be up to 50 GB).


Step 3. Choose the "Directly copy" option in "Copy". (The main movie is selected by default.)


Step 4. Hit the "Convert" button and your G.I. Joe: Retaliation Blu-ray movie should start copying.

When it's done, just double click on the resulting file and it will play in VLC or other media players.

Additional Tips

The Top BDMagic is designed for G.I. Joe: Retaliation Blu-ray/DVD users. It can help you remove Blu-ray protection and rip G.I. Joe Retaliation Blu-ray to common formats: MP4, AVI, MOV, MKV, WMV, SWF, FLV, F4V, etc. Most popular portable devices are also supported, so that you can enjoy G.I. Joe Retaliation Blu-ray movies on your iPhone 5S, iPhone 5C, iPad 4, iPad 3, Surface RT/Pro, Surface 2, Surface Pro 2, Sony Xperia Z1, Motorola Droid Mini, Moto X, Samsung Galaxy Tab 3 10.1/8.0, Galaxy Note 3, Google new Nexus 7, Kindle Fire HD...

Plus, Pavtube application takes advantage of the NVIDIA CUDA technology and AMD APP technology, and the conversion speed can be increased up to 6 times faster than ever before. Moreover, Pavtube programs support adding *.srt and *.ass subtitles into video and merge into one file for output.

Related Articles:

Tuesday, October 8, 2013

Amazon WMV Nexus 10: Play Amazon Instant Video on Nexus 10

If you have problems about playing Amazon Instant Video on your Nexus 10  tablet, you can check out the tutorial to Remove DRM from Amazon WMV and record Amazon Instant Video(.wmv) to your Nexus 10.
 
Have you purchased lots of WMV videos from Amazon store and want to put these Amazon Instant videos to your Google Nexus 10? As is known to everybody, the WMV videos purchased from Amazon store, including music, videos, movies, and TV show etc. are usually format type unsupported by the Google Nexus 10. The problem is, those WMV videos you downloaded from Amazon are protected (by DRM), and can't be played on any Android/Windows 8 tablet except for the Amazon Kindle Fire (HD). So if you would like to transfer Amazon WMV videos to Nexus 10 for playback, you have to remove DRM from Amazon Instant Video and convert/record it to Nexus 10 compatible formats.

Refer to Google Nexus 10 supported codecs
  • Video codec: H.263, MPEG-4 SP, H.264 AVC
  • Audio codec: AAC LC/LTP, HE-AACv1 (AAC+), HE-AACv2 (enhanced AAC+), AMR-NB, AMR-WB 9, MP3, MIDI SMF, Ogg Vorbis, WAV
 
To do it, Pavtube ChewTune is a great help. It is an all-in-one DRM Removal Program to help you convert/record Amazon WMV videos effortlessly to Nexus 10 supported MP4 format in high quality. After that, you can play your Amazon Instant Video(WMV) on Nexus 10 very smoothly. Now, let's start to convert and transfer Amazon WMV to Nexus 7. (Note: For the common WMV videos, Pavtube Video Converter is recommended to you).

The screen is undoubtedly one of the standout features of the Nexus 10. As the name suggests, it measures 10 inches on the diagonal but more importantly packs an astounding 2,560x1,600-pixel resolution. We were previously blown away by the pin-sharp display of the new iPad with its 2,048x1,536-pixel resolution. The Nexus 10 casually swans past that, to offer an even more refined viewing experience.

Now you want to put some Amazon Instant videos to the Google Nexus 10? Wait a minute. The Amazon Instant videos, though mainly .wmv format, are not supported by Google Nexus 10. The problem is, those WMV videos you downloaded from Amazon are protected (by DRM), and can't be played on any Android tablet except for the Amazon Kindle Fire. To get the Amazon WMV playable on Nexus 10, you'll have to remove the DRM protection first. 

The tools you need to transfer Amazon WMV movies to Nexus 10: A powerful Amazon WMV video DRM remove tool and a WMV to Nexus 10 converter. Pavtube ChewTune combines these two tools together and makes it possible to watch purchased DRM videos on Nexus 10.

Read more: Pavtube ChewTune Review - Free M4V/WMV videos from DRM protection

To convert videos to Google Nexus 10 with best settings, you can download profile patch for the software(Windows only).

Remove DRM protection off Amazon video and convert WMV to the Nexus 10 for playing

Step 1: Load Amazon WMV video files to Pavtube ChewTune.

Install and launch the Pavtube WMV to Nexus 10 Converter, then click the add button to load the WMV video files to the program.


Step 2: Choose H.264 codec format for the Google Nexus 10 playing.

Click "Format" and select an output format for the Google Nexus 10. Here I choose "Android -> Google Nexus 10 H.264 Video (*.mp4)".


Step 3: Optimize the settings for Amazon video to Nexus 10 conversion.

If you find the default settings may not satisfy your need, can click the "Settings" button to change the settings by yourself.

For Mac users, it is necessary to custom profile settings, since there's no profile patch for OS X. Similarly, you can choose Nexus 7 format and custom the profile for Nexus 10 by clicking "Settings" and set the recommended settings as it shows below:


Video
  • Codec: h264
  • Size (pix): 1920*1080
  • Bitrate (kbps): 2000
  • Frame Rate (fps): original

Audio
  • Codec: aac
  • Sample Rate (hz): 44100
  • Bitrate (bps): 128000
  • Channels: Stereo
 
Step 4: Convert Amazon video to Nexus 10 video format.

Having finished the settings? OK, just click the convert button and start to convert Amazon video to Google Nexus 10 format with ease.

When the conversion task is finished, you can click "Open" button to get the final output files for your Google Nexus 10 and transfer the converted videos to Google Nexus 10.

If you have music and videos to watch on the tablet, here's a guide for copying local videos to Google Nexus 10.

Transferring videos and music from PC to Nexus 10?

1. Use the USB cable that came with your 16 GB or 32 GB Nexus 10 to connect the tablet to your PC, and you'll receive a notification that the USB is connected.

2. Open the Notifications panel and touch USB connected. Then touch Turn on USB storage in the screen that opens to confirm that you want to transfer files. The Nexus 10 tablet is connected as USB storage, and the screen will indicate that USB storage is in use and you receive a notification. The Nexus 10 is mounted as a drive on your computer.

3. You can now copy videos from PC to the Google Nexus 10. During this time, you can't access the SD card from your Nexus 10 or share your tablet's data connection with your computer via USB.

4. When the videos are copied to the 16 GB/32 GB Nexus 10, you can disconnect your Nexus tablet from PC.

Like the Nexus 7, it does not include an SD card slot for additional storage, so you may need a Video Converter to compress very big file to smaller file size. (Learn more on Nexus 7 Column)

Tips: MKV, MOV, TS, MPG, Tivo, FLV, F4V and some AVI videos are not accepted formats and you have to convert them to Nexus 10 optimized H.264 .mp4 videos before downloading them to the device.

Good news! Pavtube is offering Money-saving Tips, Up to 35% Off, Saving Up to $35. such as:

Plus, Like Pavtube on Facebook and you would get Free DVD Ripper, DVD Ripper for Mac, Video DVD Converter Ultimate! 

If you have any problem to buy or use Pavtube, pls feel free to contact support@pavtube.com (for windows user), macsupport@pavtube.com (for Mac users).

Sunday, October 6, 2013

Convert Sony HVR-Z5U MTS to Apple ProRes 422 for editing in FCP

This article will show you how to easily transcode Sony HVR-Z5U MTS footage to Apple ProRes 422 for FCP editing; it also support to output compatible format for playback on Mac or portable devices all at your needs.
  
“I’m a videographer and editor. Recently I replace my camera with a new Sony Z5U and shoot some pretty good videos. The ultimate usage is to edit in FCP and use in a video contest in our town. So my question is, is there any easy, reliable work flow of file transferring process from my Sony Z5U to my Mac and Final Cut Pro?”

You may also encounter the problems above after shooting videos in summer vacation, festivals, holidays, or any special days for you and your family. Surely we shoot the most valuable moments that shinning in our memories, and we always want it to be flawless. In this case, it could become important to edit in NLE programs like Final Cut Pro 6/7/X, iMovie and so on; but the mts footage we shot are not supported by the editing programs or Mac natively.


So How to convert Sony HVR-Z5U MTS to Apple ProRes 422 for Final Cut Pro?

The Mac Sony MTS to ProRes Converter is such a powerful MTS/M2TS to Apple ProRes converter program which works well by allowing you to convert MTS files from Sony Z5U to Final Cut Pro editable format on Mac.

Simply follow this guide and learn how to accomplish this within a few clicks.

1. Connect your Sony Z5U to Mac and keep it on. Click the top left two icon to load the whole AVCHD folder, or load the mts videos inside.

Follow AVCHD>BDMV>STREAM to locate the mts videos; attached the screenshot:


2. Choose Apple ProRes as output format.

Click “Format” and choose “Final Cut Pro -> Apple ProRes 422(*.mov)” as the best video codec for FCP.

There are other four presets for ProRes: Apple ProRes 422 HQ, Apple ProRes 422 LT, Apple ProRes 422 Proxy and Apple ProRes 4444. Usually the ProRes 422 HQ has better video quality than ProRes 422 and could meet your needs.


3. Click Settings to customize video size, bitrate, frame rate and other specs.


4. Click the “Convert” button to start converting Sony HVR-Z5U MTS to Apple ProRes 422 for FCP on Mac OS X. There’s no need to wait in from of computer, the Mac Sony MTS to ProRes Converter will keep running and shut down computer for you automatically.

You may want to read:

Read more:

MP4 to FCP ǀ AVCHD to FCP ǀ MOV to FCP ǀ H.265 to FCP

Monday, September 30, 2013

Convert Sony Handycam HDR-PJ790V/PJ780 MTS to iMovie/FCE

Follow this article to quick learn how to convert and import Sony Handycam HDR-PJ790V/780 AVCHD MTS file to iMovie/FCE for editing on Mac.

Sony Handycam HDR-PJ790V/PJ780 are very popular models among Sony Handycam series and many people prefer to shoot vacation videos with them; for that they are not large in size and capable of shooting high quality AVCHD videos in MTS. Hereby many mac users would prefer to edit the Sony Handycam HDR-PJ790V/PJ780 MTS videos on Mac directly, in programs like iMovie 8/9/11, Final Cut Express 4, etc.

Here comes the problem: can I import Sony Handycam AVCHD footage to iMovie/FCE for editing?

Convert Sony Handycam AVCHD Footage to iMovie/FCE

The answer is yes! Follow these steps, you can easily import and editing Sony Handycam HDR-PJ790V/780 AVCHD MTS videos in iMovie 8/9/11 and Final Cut Express 4 with the help of  Pavtube MTS/M2TS Converter for Mac. With it you are able to fast convert Sony MTS videos to iMovie/FCE editable video easily. Also it provides a high conversion speed and supports bath conversion. What’s more, its built-in video editor enables you custom MTS files freely.
 
Step-by-step guide on converting Sony Handycam HDR-PJ790V/780 MTS videos to iMovie/FCE.

Step 1. Directly Download this mac-based program here to your Mac. Install and run it successfully.

Step 2. Add MTS file.

Use USB cable to hook your Sony Handycam to Mac and keep it on. Thus this camera will show as a hard drive icon on desktop.

Pavtube MTS/M2TS Converter for Mac

Pls note the top left icons; you can click the first one to load individual MTS (real video clips), or click the second one to load the entire AVCHD folder. Wait a moment,source files will be load soon.

Attached the AVCHD footage file structure:
  
AVCHD file structure

Step 3. Output Settings for iMovie and Final Cut Express.

Click “Format” and choose “iMovie and Final Cut Express -> Apple InterMediate Codec(AIC)(*.mov)“ as the best video codec for iMovie 8/9/11 and FCE 4.

Convert AVCHD to iMovie/FCE

Step 4. Click "Convert" to start converting Sony Handycam HDR-PJ790V/PJ780 MTS to AIC for iMovie/FCE. Wait for a few moments, click “Open” to locate the converted video.

After format conversion finished, you can launch iMovie and add the converted camera clips to your Even library through "File -> Import -> Movies..." like this:
Import Video File to iMovie

Read More:

How to Solve the freezes when importing MTS media to Premiere CC-2015.3?
How to Convert MTS/M2TS with Handbrake Easily?
Best Solution to Play Sony MTS/M2TS Files on MacBook Pro
Play MTS on Smart TV (Windows and Mac Solutions)
Top 5 MTS/M2TS Video Editors for Mac
Top 5 MTS/M2TS Video Editors for Windows (10, 8.1, 8, 7, XP, etc)
Fix Choppy Issues When Importing AVCHD Files to FCP
Join and Convert MTS/M2TS Files for playing with VLC Player
How to Convert 3D AVCHD MTS to 3D Tablet for Watching?

Saturday, September 28, 2013

Problem Importing M4V files into Final Cut Express

Having difficulty in importing M4V in Final Cut Express? This detailed guide will show you the reason and how to convert M4V files to Final Cut Express for smooth editing.

“I'm trying to edit together many .M4V files in Final Cut Express but it is saying they are not supported. Is there any software out there that can convert these to a supported file or anyway to update FCE to support this file type? Any info will be helpful, thanks”

Do you have difficulty in importing M4V in Final Cut Express? Many Apple users have downloaded a mass of videos from iTunes and they want to make their own funny videos with Final Cut Express for sharing with family and friends or uploading to their blogs. But when they try to put M4V files into FCE, the files are just grayed out and they cannot edit it. What’s wrong?

FCE is professional video editing software designed for advanced editing of digital video as well as high-definition video, which was used by many amateur and professional videographers. And it is very picky about video formats. M4V format is a standard video file format developed by Apple and uses MPEG-4 compression. Due to video codec issue, M4V file is not supported by FCE. In order to edit M4V files in FCE you need a professional M4V to FCE converter to transcode M4V to AIC MOV for FCE.

Pavtube HD Video Converter for Mac can meet your need completely. Various native codecs like ProRes, Apple Intermediate Codec and DNxHD etc are provided, and the optimized preset is also available for Final Cut Express. So you can convert M4V to the optimized formats for FCE with one click.

Now let me show you how to convert M4V files for editing in FCE. First of all, make sure that you have downloaded and installed it. 

1. Import M4V files.

Click “Add video” icon to browse your computer and import the M4V files, or click nearby “Add from folder” button to import the whole folder. And directly drag and drop the M4V files to the software is all right as well. Multiple tasks can be imported for conversion together. 


Note: If you want to combine several videos into one output file, “Merge into one file” on the interface will help you to get it done.

2. Choose video format for FCE.

Click “Format” menu to go through the dropdown list. There is a preset “iMovie and Final Cut Express”. Hit it to choose “Apple Intermediate Codec(AIC)(*.mov)” for output. 


Note: The video and audio parameters for output can be adjusted. If you want to do it, click “Settings” button to check and change parameters like bitrate, channels, size, etc.

3. (Optional) Edit the video.

Some simple edit can be done to the videos before conversion. You can trim video for your needed length, crop video to get rid of annoying black edges, add text/image/video watermark or add subtitles, etc. If you need it, click “Edit” icon to simply edit the videos.


4. Convert M4V to FCE.

It’s time to convert M4V to AIC MOV for FCE on Mac OS X. Click “Convert” button to get started. Then press “Open” button to get the generated files for FCE.

Lifetime license will provide you lifetime free upgrade and service support. Easy-to-sue workflow and output high quality videos will give you a pleasing experience. Just go to try it.

Read More Topics:

Can Final Cut Pro X Edit DJI Phantom 4K video?
Import and Edit Sony A6300 4K XAVC S to Avid Media Composer
Tapeless MTS Workflow with Final Cut Pro 7
Premiere Pro CC 2015 cant import MPEG2 files
Importing Typhoon-H 4K videos to FCP X for editing
Tips for Importing and Editing Canon 5D Mark IV 4K MOV with Avid MC
Top 5 best MXF video converter for Mac

Thursday, September 26, 2013

Enable Galaxy Tab 3 to play MKV/AVI/VOB/Tivo/MPG/WMV/FLV/F4V video without any limitation

This guide helps you to easily transfer SD/HD videos (MKV, AVI, VOB, Tivo, MPG, WMV, MOV, M4V, VRO, FLV, F4V Videos) to Samsung Galaxy Tab 3 in best video quality.

Samsung Galaxy Tab 3 become one of the most remarkable multimedia devices again Apple iPad this year. It comes with a 1280*800 TFT LCD display and a powerful 1.6GHz dual-core CPU for effective graphics processing. With such a portable device in hand, watching videos could be a great enjoyment especially when you want to share videos with family anywhere without device limitation.

But as most other Android tablets, Galaxy Tab 3 is still not able to support most video formats such as MKV/AVI/VOB/Tivo/MPG/WMV/MOV/M4V/VRO/FLV/F4V unless you convert them to Galaxy Tab 3 preferred MP4 format.
put and play hd videos on galaxy tab 3
How to convert MKV/AVI/VOB/Tivo/MPG/WMV/FLV/F4V to Galaxy Tab 3?

Preparation:
  1. Your Galaxy Tab 3 10.1 or Tab 8.0
  2. Your favorite Videos or Movies
  3. A Professional Galaxy Tab 3 Video Converter  is a professional video to Galaxy Tab 3 conversion program which support most mainstream video formats, and convert them to perfect video size and format for playback on Galaxy Tab 3 10.1/8.0. (Mac users: Mac Video Converter for Galaxy Tab 3)
Step 1. Import source videos to the Video to Galaxy Tab 3 Converter.

Install and run the best Video to Galaxy Tab 3 converter on your computer. Add videos in the 
following two ways:

1. Click “Add video” button to choose video files from your hard drive for converting. 2. Directly drag the videos to the Galaxy Tab 3 Video Converter.

Tips: To save your time, you can add multiple video files for converting at a time since batch conversion is well supported.

Step 2. Choose presets for Galaxy Tab 3.

Click the “Format” list to check all the profiles. This Video to Galaxy Tab 3 Converter integrates various presets for different devices; click “Samsung” on the left column to find MP4 presets for Galaxy Tab 3. Or you can key in “galaxy tab” in the little search box to get all the presets specific for Galaxy Tab 10.1, Galaxy Tab 2 7.0, Galaxy Tab 3 and more:


Step 3. Edit video and customize specs before conversion. (Optional)

You can edit these videos before conversion by clicking the pencil-like icon on the top. Some of the source video such as MXF/MTS/MKV could be interlaced which is not good for playback; in this case you can check “Deinterlacing” in Effect tab to get perfect progressive HD MP4 videos. Trim, crop, edit audio, add srt/ass/ssa subtitles and 3D effect are all supported in this edit window.

Back to main interface, you can click Settings to free customize video size, bitrate(quality), frame rate, sample rate and other specs.

Step 4. Start converting all Videos for Galaxy Tab 3.

Click the red “Convert” to start converting MKV/AVI/VOB/Tivo/MPG/WMV/FLV/F4V to Galaxy Tab 3 MP4.
Wait for a few moments, and you can click “Open output folder” to locate the converted video quickly. Now you can transfer videos to your Galaxy Tab 3 for entertainment. (Learn more: How to transfer videos from PC to Galaxy Tab with Kies?)

You may also like: