Showing posts sorted by date for query mxf to imovie. Sort by relevance Show all posts

Monday, June 11, 2018

Premiere Pro CC 2018 Supported Video Formats

The new features coming to Premiere Pro CC take new aim at collaborative editing and motion graphics workflows. In Premiere Pro CC 2018, video creators will find new ways of sharing projects, new ways of VR/360 video storytelling, and new ways to adapt motion graphics to fit project requirements. We all know to the first thing to edit the video in Premiere Pro CC 2018 is to import the videos to it smoothly, at the first step, most editors will meet the trouble, how to import the videos to Premiere Pro CC 2018 and do the happy video editing? You can get the effective solutions in this post.

5 MUST-KNOW NEW FEATURES IN PREMIERE PRO CC 2018

After exploring Premiere Pro CC 2018, here are the 5 new features we're most excited about:

  1. Multiple Open Projects
  2. Shared Projects
  3. Immersive Video Effects and Transitions
  4. Responsive Design tools (Timing and Position)
  5. 8 New Label Colors

Premiere Pro CC 2018 Supported Video and Audio Formats

Formats 3GP, 3G2 (.3gp) AAC  Advanced Audio Coding Apple ProRes M2T
Details Multimedia container format Advanced Audio Coding Audio Interchange File Format Apple video compression format  Sony HDV
Formats ASF   ASND AVC-Infra AVI (.avi) M2TS
Details NetShow (Windows only) Adobe Sound Document Panasonic codec DV-AVI, Microsoft AVI Type 1 and Type 2 Blu-ray BDAV MPEG-2 Transport Stream, AVCHD
Formats BWF DNxHD DNxHR DV  VOB
Details Broadcast WAVE format Supported in native MXF and QuickTime wrappers DNxHR LB, DNxHR SQ, DNxHR TR, DNxHR HQ, and DNxHR HQX Raw DV stream, a QuickTime format Container format in DVD media
Formats GIF H.264 AVC HEVC (H.265) M1V WAV
Details Animated GIF Various media that use H.264 encoding H.265 media with resolutions up to 8192x4320 MPEG-1 Video File Windows Waveform
Formats WMV OMF OpenEXR MXF
Details Windows Media, Windows only Audio Project Format Files in .EXR, .MXR, and .SXR formats Media eXchange Format. MXF is a container format that supports
  • ARRIRAW 
  • P2 Movie: Panasonic OP1b variant of MXF video in AVC-Intra LT and AVC-LongG, Panasonic Op-Atom variant of MXF video in DV, DVCPRO, DVCPRO 50, DVCPRO HD, AVC-Intra
  • Sony XDCAM HD 18/25/35 (4:2:0)
  • Sony XDCAM HD 50 (4:2:2)
  • AVC-LongGOP
  • XAVC Intra
  • XAVC LongGOP
  • JPEG2000
  • IMX 30/40/50
  • XDCAM EX

Premiere Pro CC 2018 Supported Native Camera Formats

Usually we take the video with camera, Premiere Pro CC 2018 can support the following native camera formats

Camera ARRI AMIRA camera Canon XF, Canon RAW Phantom Cine media Sony cameras
Details Premiere Pro provides built-in support for the ARRI AMIRA camera, with appropriate color LUTs applied as master clips on import. Canon XF and Canon RAW footage, including footage from Canon Cinema EOS C300 and C500 cameras. Import and edit Phantom Cine media shot on Vision Research Phantom cameras.
  • Sony XDCAM
  • Sony XDCAM 50
  • Sony XAVC
  • Sony XAVC LongGOP (Group of Pictures)
  • Sony XAVC-S
  • Sony SStP
  • Sony RAW (F65, F55, F5, FS700 cameras)  
Camera CinemaDNG Panasonic AVC, P2 cameras RED support
Details
  • Blackmagic Cinema Camera
  • Blackmagic Pocket Cinema Camera
  • Convergent Design Odyssey7Q
  • Panasonic AVC Ultra
  • Panasonic AVCi 200
  • Panasonic AVC Ultra Long GOP (Group of Pictures)
  • Panasonic P2 cameras and across multiple P2 cards
  • Color Science like REDcolor2, REDgamma2, and REDlogFilm
  • RED ONE
  • RED EPIC
  • RED Scarlet-X cameras with support for RED Rocket
  • Red Dragon including RED Dragon 6K

How to Import Any Videos into Premiere Pro CC 2018 for Editing

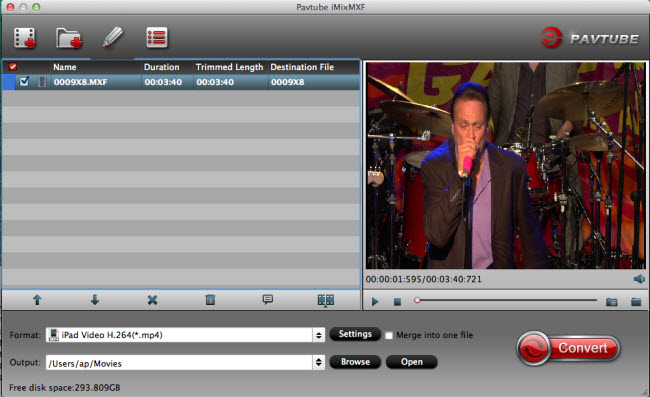
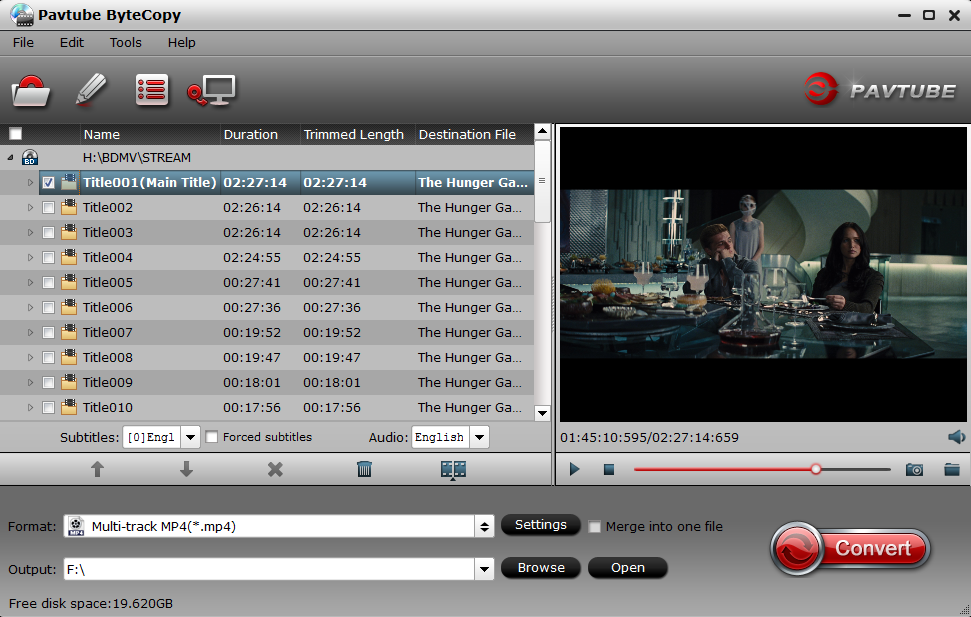
You may met this situation: fail to import some video to Premiere Pro CC, how to do? Most reasons are the video format incompatibility issue, you just need one video converter and convert the video to Premiere Pro CC 2018 friendly video formats, that's all. I highly recommend you  Pavtube Video Converter Ultimate (to get Mac version) which is an excellent video converter with the high stability and fast video conversion speed, you can import the multiple videos with different video formats and video size, for example: You can load the MP4, AVI, FLV, VOB, even including the DVD and Blu-ray disc, disc images and folder, you also can load the 4K , 8K videos to it, and output the Premiere most compatible video format - "MPEG-2".

Apart from ouput the Premiere presets with the best settings, this software also supplies massive optimized device presets for Apple devices, Android devices, non-linear editing software, game console, and others. This software also allows you to adjust the video parameters, like the video codec, audio codec, you can solve the codec incompatibility issue. For better video compatibility, you also can adjust the video frame, video resolution, video bitrate, audio sample rate, etc.

Even though this video converter is not a professional video editor, you still can so some simple video editing with the built-in video editor, you can add the funny subtitles to video which can support the SRT, ASS, SSA subtitles, you also can replace the music in video, trim the videos to clips, etc. More features, you can download it and have a try.

pc try pc buy

mac try mac buy

Quick Guide: Convert video to Premiere Pro CC 2018 supported videos

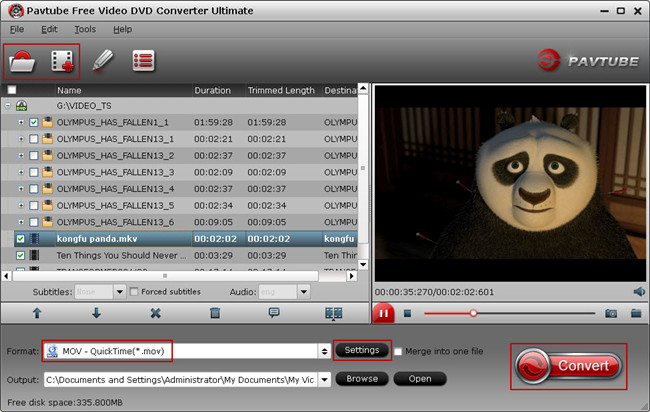
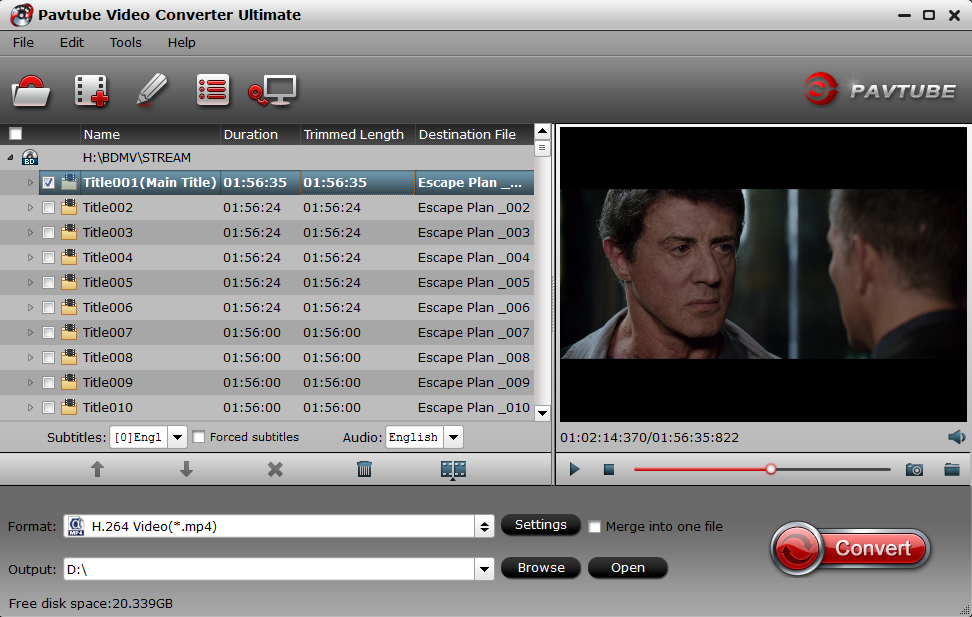
Step 1. Load the videos

You can open this software and load the videos by clicking File, you also can drag the videos to it directly. If you want to save much time and energy, you can add the folder which holds multiple videos and do batch video conversion, you only can output the same video formats when you choose the batch video conversion.

Load the videos

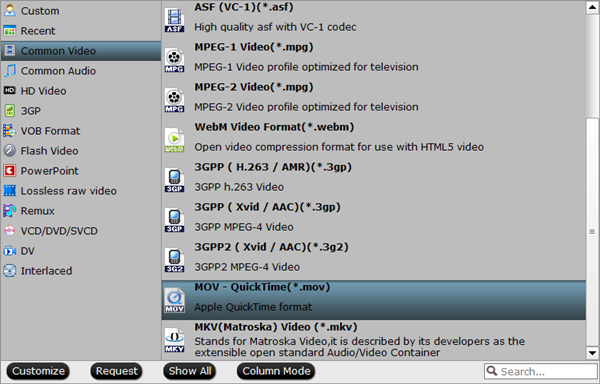
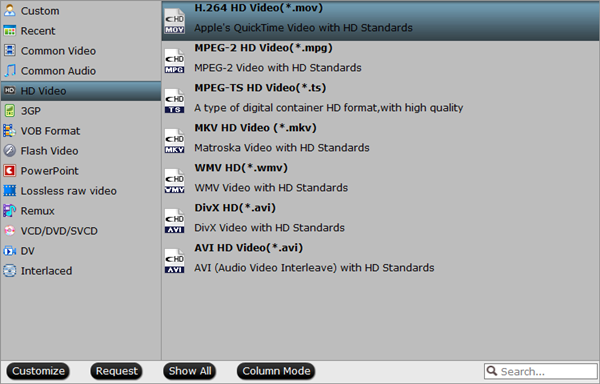
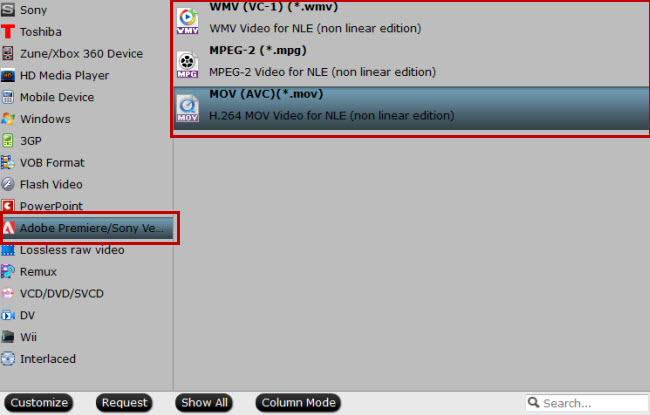
Step 2. Choose output videos

Click Format button to start the output video list, you can choose one videos from different category, like the Common Video, HD Video, 3D Video, or the NLE preset.

Output Youtube best uploading format

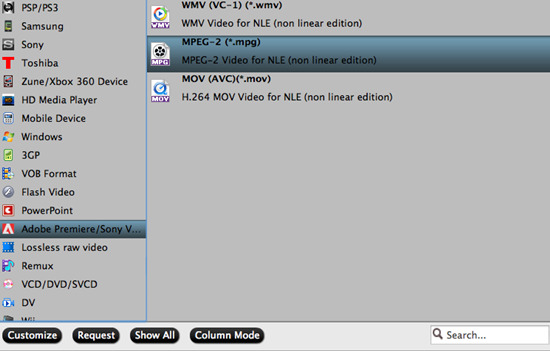
To output the best video format for Premiere, you can navigate your cursor to "Adobe Premiere/Sony Ve..." and select "MPEG-2 (*.mpg)".

for premiere

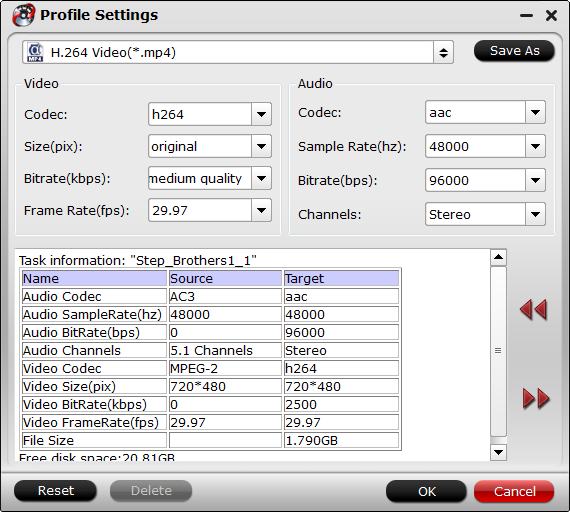
If necessary, you can enter the video setting window and adjust the video related parameters, you also can compress the videos by adjusting the video resolution, for example: You can compress the 4K to HD video by adjusting the video resolution from the 3840p to 1080p, or compress the HD video to SD videos, you also can adjust the video frame and bitrate for uploading to YouTube, Facebook, Vimeo, etc.

H.264 MP4

Step 3. Start the video conversion

Final step is coming, you just need to press the Convert button to start the video conversion. This software will finish this task with lighting fast speed.

When you get the perfect videos, you can import it to Premiere Pro CC 2018 and have a happy video editing.

Tuesday, February 13, 2018

Edit MXF in HitFilm Pro

Have shot some MXF files with your Sony XDCAM, Panasonic P2 or Canon XF camera and wish to load them into the fastest video effects software - HitFilm Pro for some professional post editing workflow. However, although HitFilm Pro has included native import support for MXF files, however, a lot of people still complain that they encounter many problems when editing MXF file with HitFilm Pro.

"I am trying to import some video files in the .mxf format but when imported they are just showing a green screen in hitfilm. The original shots are in 180fps 1080P HD but I believe the codec is the main problem with the files (AVC/H.264)."

"I can't import MXF X-AVC recorded by Sony Z100. Same for 4k CineForm AVIs. HitFilm Pro 2017 just ignores these files when trying to import."

Why HitFilm Pro not fail to read MXF files?

From HitFilm Pro supported import formats, we can see that HitFilm Pro is only able to handle DVCPro HD MXF files. It also means that you will fail to load other MXF file types such as P2 MXF, XDCAM/XDCAM HD MXF into HitFilm Pro.

Transcode unsupported MXF for HitFilm Pro editing

To load P2 MXF or XDCAM/XDCAM MXF into HitFilm Pro for editing, you will need to perform a format transcoding process. Here, you can easily turn to our best Mac MXF Converter - Pavtube iMXF. The program has full importing support for both 4K and HD MXF files shot with Sony XDCAM/XDCAM HD, Canon XF, Panasonic P2 and also Panasonic DVCPro HD. The application can assist you to transcode MXF to HitFilm Pro supported editing formats listed below:

Video

Audio

AVCHD (M2T, MTS, M2TS)
AVI (including 10-bit and 12-bit GoPro Cineform (Windows only)
DV & HDV
MP4 (AVC/H264 & AAC)
MPEG-1 & MPEG-2 (TS, PS, MPE, MPG, MPEG, M2V)
MXF (DVCPro HD)
QuickTime MOV (including 10-bit and 12-bit Pro-Res (requires that an up to date version of QuickTime is installed on your computer)
WMV

AAC
MP3
M4A
MPA
WAV
WMA

Apart from HitFilm Pro, this beneficial application also assists you to convert MXF to other editing software such as Final Cut Pro X, iMovie, Premiere Pro CC, Avid Media Composer, Davinci Resolve, etc specially optimized editing codec such as Apple Prores, DNxHD, Apple Intermediate Codec, etc.

Related article: Edit MP4 with HitFilm Pro | Import H.265 to HitFilm Pro | Import Video to HitFilm Ultimate

For those people who wish to preserve the multiple audio tracks or channels, you can use this application to directly export MXF to multi-track MKV/MP4/MOV formats. If you try to load the MXF files to Final Cut Pro X, you can also output Multi-track Apple Prores foramt with multiple tracks and channels, etc.

For Windows users, please switch to download Pavtube MXF MultiMixer to convert MXF for HitFilm Pro 2017 editing on Windows 10/8.1/8/7.

Step by Step to Convert MXF for HitFilm Pro Editing

Step 1: Load MXF files.

Download the free trial version of the program. Launch it on your computer. Click "File"menu and select "Add Video/Audio"or click the "Add Video"button on the top tool bar to import sourceMXF video files into the program.

Load source MXF files

Step 2: Define output file format.

Clicking the Format bar, from its drop-down list, select one of HitFilm Pro supported editing formats "H.264 HD Video(*.mp4)" under "HD Video" main category. You can also choose other editing formats according to your own needs.

Output HitFilm Pro supported editing formats

Adjust output profile settings

In the Settings window, you can choose or specify exactly the parameters you like. And in the Task information section, you can compare information from the original video and output video.

Adjust output profile settings

Step 3: Begin the conversion process.

After all setting is completed, hit the"Convert" button at the right bottom of themain interface to begin the conversion process from MXF to HitFilm Pro supported editing formats.

When the conversion is finished, click "Open Output Folder"icon on the main interface to open the folder with generated files. Then you will have no problem to edit MXF files with HitFilm Pro.

Tuesday, January 23, 2018

Import Video_TS to iMovie

Simple introduction of Video_TS folder

When you insert a video DVD into your computer, you can open the DVD and view the contents just like a folder on your hard drive. Most video DVDs have two folders in the root directory - AUDIO_TS and VIDEO_TS. The VIDEO_TS folder contains all the DVD's video data and playback information. There are 3 different types of files under Video_TS folder. The VOB (video object) files contain the majority of the DVD data. The .IFO (information) files contain basic information about the DVD and the corresponding VOB files. While the .BUP (backup) files are exact copies of the IFO files.

How to copy Video_TS folder for iMovie?

When transferring Video_TS folder to iMovie, make sure to transfer all the contents of the Video_TS folder.

Rip Video_TS folder for iMovie editing

Obviously, Video_TS folder disk image formats that iMovie lacks the ability to handle, to fix the format incompatible issue, you will need to perform a Video_TS to iMovie supported file formats transcoding process.

Related article: Import XC10 MXF to iMovie | Convert XAVC MXF to iMovie | Export iMovie to WMV/AVI/FLV/MKV

Since the Video_TS folder are copied from DVD disc, here, you will need a DVD Ripper application. Sometimes, the VOB files in Video_TS folder are encrypted with CSS copy protection, therefore, a powerful DVD Ripper program that can assist you to bypass that protection. Here, we highly recommend you to download Pavtube ByteCopy for Mac. The program not only helps you to automatically bypass the CSS or also other copy protection from Video_TS folder in the background, but also assists you to directly rip Video_TS folder to iMovie most favorable high quality and high performance editing codec Apple Intermediate Codec (AIC) with perfect quality and super fast conversion speed.

Besides Video_TS folder, you can also use this application to Rip commercial DVD disc, DVD IFO/ISO image or Blu-ray disc, BDMV folder and Blu-ray ISO image file to iMovie most preferrable editing codec for best editing workflow.

Step by Step to Rip Video_TS folder for iMovie Editing

Step 1: Load Video_TS folder.

Run the Video_TS Converter Mac and you can load DVD Folder by clicking "File" > "Load from folder".

Load Video_TS folder

Step 2: Choose output file format.

Here, you can select "iMovie and Final Cut Ex..." -> "Apple InterMediate Codec (AIC)(*.mov)"as the best output format to get videos with optimized settings for iMovie.

Output iMovie best supported AIC format

Tips: If you like, you can click"Settings" to change the video encoder, resolution, frame rate, etc. Remember bitrate higher results in big file size, and lower visible quality loss.

Step 3: Start Video-TS to iMovie conversion.

When all the settings are fine, click the "Convert" button to start converting your Video_TS folder to optimized AIC .mov video files for iMovie.

When then conversion completes, click the Open button to get the ripped video files. Launch iMovie and click File > Import > Movies to import converted videos to iMovie for further editing.

Tuesday, May 30, 2017

How to Import Canon MOV to Premiere Pro on Windows?

You know that you can make your movies differently by editing them in Adobe Premiere Pro. However, every time when you import some Canon MOV videos to Premiere Pro (Premiere Pro CC included), it stops working. Your Premiere Pro even can't recognize your MOV files. These are the common problems encountered by many Adobe Premiere users. Although Premiere Pro supports a wide variety of video and audio file formats and codecs, MO is not supported well by Adobe Premiere. If you wish to use Canon MOV footage with Premiere Pro, you have to convert Canon MOV to Premiere Pro friendly format first.

Hot search H.264 to Premiere Pro MKV to Premiere Pro
M4V to Premiere Pro H.265 to Premiere Pro iPhone video to Premiere Pro

Why cant import Canon MOV video to Premiere Pro

Reason 1. You are currently using an older version of the Adobe (for instance prior to Adobe version CS5), maybe an upgrade of the Adobe version could help.

Reason 2. There is some required codec of the Canon MOV video missing or it is an incompatible video file format.

Reason 3. Other reasons like Canon MOV video are damaged.

Get a Canon MOV to Premiere Pro Converter

If you are unable to locate your Canon MOV into Premiere Pro, you could adjust Canon MOV to Premiere Pro file for editing immediately with professional video converting software at one go. Here Pavtube Video Converter is an easy-to-use yet professional Canon MOV to Premiere Pro Converter for Mac (macOS Sierra, El Capitan, Yosemite, Mavericks, Mountain Lion and Lion included).

This full-featured MOV video converter will enable both novice users and advanced users to convert any Canon MOV video including HD MOV, 4K MOV to Premiere Pro supported format and import Canon MOV to Premiere Pro with only a few mouse clicks, while retaining excellent video and audio quality for editing in iMovie. After the fast video conversion ends, you can import the video to PP directly and edit MOV in PP to create your own video clip. By running it, there's no need to set the codec by yourself: the powerful program has a optimized preset for Premiere.

Other Download:
- Pavtube old official address: http://www.pavtube.com/video_converter/
- Cnet Download: http://download.cnet.com/Pavtube-Video-Converter/3000-2194_4-75734821.html
- Softonic Download: http://pavtube-video-converter.en.softonic.com/

Besides, if you want to convert Canon MOV to Premiere Pro or various formats that supported by different editor, like Final Cut Pro, QuickTime, Avid MC, iMovie, etc on Mac. You can free download the - Pavtube Video Converter for Mac.

3 Steps to Convert Canon MOV to Premiere Pro Editable formats on Windows

Step 1. Load Canon MOV files

Here you can directly drag & drop the Canon MOV files to the converter, or click “Add Video” or “Add from folder” button on the top menu to browse and choose Canon MOV files.

Step 2. Choose the preset output format

If you have an old computer, you can directly use the program to output Premiere Pro CC specially optimized editing format "MPEG-2(*.mpg)" under "Adobe Premiere/Sony Vegas..." main category.

Output PPC optimized editing format

Tips: Click "Settings" to open "Profile Settings" window to to compress Canon MOV 4K to 1080p for smooth editing workflow by choose the output file resolution as 1920*1080 from "Size(pix)" drop-down option.

Step 3. Start converting Canon MOV files.

Click the big “Convert” button in the main UI to begin the Canon MOV to MPEG-2 or ProRes conversion. You can see your converted videos by clicking “Open” button.

Monday, May 1, 2017

Import DJI Mavic Pro 4K to Final Cut Pro for editing

DJI Mavic Pro’s camera has a 1.23” CMOS sensor offering 12MP stills, and in video mode shoots everything from HD through to Cinema 4K (4096×2160 at 24fps). For slo-mo work, it can shoot 96fps in 1080p HD. It’s supported by a 3-axis gimbal with - 90º(straight down) to + 30ºpitch, and 90º of roll. This is a serious camera setup - and it will beam live 720p HD footage back to your smartphone. DJI Mavic Pro is on the supported 4K camera list but users still encounter 'can not import DJI Mavic Pro 4K videos into Final Cut Pro' issue. Why and how to solve it? In this article, you can learn the reason and an easy solution.

Why We have issues editing DJI Mavic Pro 4K video in FCP?

DJI Mavic Pro records 4K video in MP4 or MOV with MPEG-4 AVC /H.264 codec, which is not a native editing codec for most NLEs including FCP. FCP best editing format is Apple ProRes MOV video format. So if you try to import and edit DJI Mavic Pro 4K footage into FCP, you're likely to run across various issues: screen freezes, program crashes, no audio, etc.

Best video formats and resolution for editing in FCP

Supported video formats:

  • Apple Animation Codec
  • Apple Intermediate Codec
  • Apple ProRes(all versions)
  • AVCHD(including AVCCAM、AVCHD Lite &NXCAM)
  • AVC-ULTRA(including AVC-LongG、AVC-Intra Class 50/100/200/4:4:4 & AVC-Intra LT)
  • DV(including DVCAM、DVCPRO & DVCPRO50)
  • DVCPRO HD
  • H.264
  • HDV
  • iFrame
  • Motion JPEG(only OpenDML)
  • MPEG IMX (D-10)
  • QuickTime format
  • REDCODE RAW (R3D)
  • XAVC(including XAVC-S)
  • XDCAM HD/EX/HD422
  • XF-AVC

Audio formats:

  • AAC
  • AIFF
  • BWF
  • CAF
  • MP3
  • MP4
  • WAV

Container format

  • 3GP
  • AVI
  • MOV (QuickTime)
  • MP4
  • MTS/M2TS
  • MXF

Get a Professional DJI Mavic Pro 4K to FCP Converter for Mac

In converting DJI Mavic Pro 4K video, we have to recommend you - Pavtube Video Converter for Mac. It has helped many users “can’t edit DJI Mavic Pro 4K video in FCP” issues. With it, you are able to wrap DJI Mavic Pro 4K video to FCP native supported Prores. mov format for importing to Final Cut Pro without any thinking. It supports all 4K recordings shot by DJI drones (DJI Phantom 4, DJI Mavic Pro etc), Panasonic camcorders, Sony camcorders, Canon camcorders, JVC camcorders to formats compatible with your video editing software like Final Cut Pro (X), FCE, iMovie, Avid Studio, Adobe Premiere, After Effects, DaVinci Resolve, iPhoto, Kdenlive, Keynote, etc.

Related search:
DJI Mavic Pro 4K to iMovie
DJI Mavic Pro 4k to Avid MC/Resolve
DJI Phantom 4 4K to FCP X
DJI Inspire 1 Pro 4K to FCP
DJI Mavic Pro 4K to iPad

Free downlaod this DJI Mavic Pro 4K to FCP video converter

Start Converting DJI Mavic Pro 4K video to FCP supported best video on Mac

1. Click "Add video" button to add your video files to the program. Or directly drag the video you want to convert to the left item bar.

2. Click "Format"bar, from its drop-down list, select your desired Prores format such as "Final Cut Pro" > "Apple Prores 422(*.mov)", you can also choose other prores formats on your own needs.

TIP:By clicking "Edit selected task" button, you can trim, crop the video, or add watermark, adjust effect, attaching subtitles for pre-editing your video files so that you can simplify your FCP editing.

3. Click the "Convert" button on the main interface and the software will start to convert Mavic Pro 4K video to friendly video formats immediately. When the conversion finishes, click "Open" to find the converted video files. Then you can effortless transfer the video files to FCP X, FCP 7, FCP 6 etc for playback on the go.

Monday, April 17, 2017

Free MOV Converter for Windows (10)- Free Convert Videos to MOV

MOV is an MPEG 4 video container file format used in Apple's Quicktime program. On Windows systems, programs that open MOV files include Quicktime Player, Roxio Creator, Cyberlink PowerDirector and PowerDVD, and Adobe Flash. What's worse, some video files are practically unaccepted by iPad, iPhone etc. In order to fix this, we need to convert videos to MOV which is supported by QuickTime, iTunes, iPhone, iPad, iPod or NLEs. In this article you can learn how to free convert videos to MOV with several free ways.

Best Free MOV Video Converter - Convert Videos to MOV

Equipped with 120+ video codecs and 50+ audio codecs, Free Video DVD Converter Ultimate is not only made for converting any videos including DVD, MKV, MP4, AVI, FLV, MXF, MTS etc to MOV format, but also born with the purpose of converting videos to AVI, MKV, WMV, MPG, MOV, MKV, MP3, M4A, AC3, WMA, AAC, …etc. Meanwhile, it provides large amounts of DIY features including trimming, cropping, splitting, adding subtitle file, adding video effect, etc. to extend your own movie enjoyment. Now free download it and run in Windows (10).

Guide to Convert videos to MOV on Windows (10, 8.1, 8, 7, XP, etc)

Step 1. Click "Add video" button to add your video files to the program. Or directly drag the video you want to convert to the left item bar.

Step 2. Set right output format. Click "Format" bar, and select MOV from "Common video" or "HD video" according to your needs.

Step 3. Click the "Convert" button on the main interface and the software will start to convert  videos to MOV immediately. When the conversion finishes, click "Open" to find the converted video files. Then you can effortless transfer the video files to iPhone, iPad, QuickTime, FCP etc  for playback/editing on the go.

Other Online MOV Video Converter

If you want to convert videos to MOV without installing a desktop software program, just try this free online MOV converter - Zamar. You can upload your video and select file type or device type you want to convert to. Then input your email address and the converted email will be sent to you.

Best Mac MOV Video Converter Recommended

For Mac user, we have to say the professional Pavtube Video Converter for Mac is designed for Mac users. With it, you can convert various videos to MOV on Mac.

Key features of Mac MOV Video Converter:

  • Convert AVI, MKV, MP4, MTS, MXF, FLV, WMV, XAVC, MPEG etc to MOV formats.
  • Convert AVI, MKV, MP4, MTS, MXF, FLV, WMV, XAVC, MPEG etc to iTunes, iPhone, iPad, QuickTime, Apple TV etc supported video.
  • Convert AVI, MKV, MP4, MTS, MXF, FLV, WMV, XAVC, MPEG etc to MP3, AAC, WMA etc.
  • Convert videos o NLEs like FCP, iMovie, Premiere Pro, Avid Media Composer, Resolve etc.
  • Basic video editing functions: split, merge, trim, crop, add watermark, adjust video effect, edit audio and insert subtitles.
  • Allow you to complete the video to MOV conversion process with three simple clicks.
  • Compatible with macOS Sierra, El Capitan Yosemite, Mavericks, Lion.

Read More:

Tuesday, April 4, 2017

Load AVI to iTunes on macOS Sierra

Some users try to add AVI video files to iTunes library and then sync them to iDevices. But when they click "add file to library" or drag the files to iTunes, nothing showed. Why? How to solve “iTunes won't accept AVI files?” Read on to get it.

We all know AVI is a common video format widely used on Windows platform, but it cannot be supported by Apple iTunes (Mac applications only accept avi files format with Motion JPEG (M-JPEG) up to 35 Mbps, 1280 by 720 pixels, 30 frames per second, audio in ulaw, PCM stereo audio). This not only happened on the latest iTunes 12, but iTunes 11. So if you want to add AVI video files to iTunes, you can convert AVI to iTunes supported MOV, MP4, and M4V format.

Best Program to Add AVI to iTunes

In order to perform this conversion task, you'll need the solid and AVI Video Converter - Pavtube Video Converter for Mac. This program is popular for its simplicity, efficiency and quality. With it, you can do conversion from not only AVI to iTunes, but also MKV to iTunes, MP4 to iTunes, MTS to iTunes, VOB to iTunes, MOV to iTunes highly compatible MOV, MP4, M4V files without quality loss.

With it, you don't need to know what is the audio codec in the AVI format that'll be best for your iTunes. You just need to choose the mov, mp4, m4v with one click. A while later, the video conversion will be finished and you'll be able to watch the awesome media content on iTunes without having to compromise on the quality. Plus, it offers kinds of preset profiles for media players including iPhone, iPad, QuickTime, Apple TV etc to meet your different needs. The following guide will show you how to convert AVI to iTunes compatible format for perfect playing.

Highlights of Pavtube Video Converter for Mac

  • Convert AVI, MKV, MP4, MTS, MXF, FLV, WMV, XAVC, MPEG etc to iTunes supported video
  • Convert AVI, MKV, MP4, MTS, MXF, FLV, WMV, XAVC, MPEG etc to iTunes, iPhone, iPad, QuickTime, Apple TV etc supported video
  • Convert AVI, MKV, MP4, MTS, MXF, FLV, WMV, XAVC, MPEG etc to MP3, AAC, WMA etc
  • Convert AVI to NLEs like FCP, iMovie, Premiere Pro, Avid Media Composer, Resolve etc
  • Basic (AVI) video editing functions: split, merge, trim, crop, add watermark, adjust video effect, edit audio and insert subtitles.
  • Allow you to complete the AVI to iTunes conversion process with three simple clicks.
  • Compatible with macOS Sierra, El Capitan Yosemite, Mavericks, Lion.

Free download this AVI to iTunes video converter for Mac

Get AVI into iTunes for smooth playing with Pavtube Video Converter for Mac

Step 1: Import AVI videos

Drag & drop the AVI files to the converter, or click the "Add File" button to open the file browser window and locate the AVI files you want to add.

Step 2: Select iTunes supported files as the output format

Now select a format to which you want to convert the AVI video. Click "Format" drop-down menu to open the format list, and then choose a format (mp4, mov, m4v) from "Common Video" or "HD Video"category.

Step 3: Start the AVI to iTunes conversion

Click the "Convert" button on the main interface and the software will start to convert AVI to iTunes friendly video formats immediately. When the conversion finishes, click "Open" to find the converted video files. Then you can effortless transfer the video files to iTunes for playback on the go.

Free download this AVI to iTunes video converter for Windows

Read More:

Monday, March 27, 2017

Convert MKV to QuickTime on macOS Sierra

It is common for Mac users to get some movies/videos in MKV format, either from the internet, digital cameras or shared from friends who use Windows. However, disappointingly, these MKV videos can't be recognized by our QuickTime. As we known, QuickTime supports MOV well. I An MOV file type is natively supported by al of the Mac OS X including of macOS Sierra as well as iOS-based devices. If you want to play and edit MKVI videos on QuickTime, just convert MKV to MOV.

Best MKV to MOV Video Converter for QuickTime

If you're choosing the most useful and simplest MKV to MOV Converter for Mac/Windows, Pavtube Video Converter for Mac is the right one for you. The output video quality and the converting speed must be the key factors that you should be looking out for. It provides Mac users the easiest and smartest way to convert MKV to MOV on Mac (El Capitan) and play MKV files on QuickTime, iPhone (7), iPad (Pro), the new Apple TV. Equipped with high quality engine and hyper threading technology, even support Multi-core CPU and hardware encoding technology.

Hot search MXF to QuickTime XAVC to QuickTime
MP4 to QuickTime DVD to QuickTime Blu-ray to QuickTime

Free download this MKV to QuickTime Video Converter for Mac:

Note: If your are a Windows user, you can free download this free software - Free Video DVD Converter Ultimate to convert MKV to MOV on Windows including Windows 10.

Step-by-step Guide to Convert MKV to QuickTime playable format on Mac

Step 1. Load MKV Files

After free download this professional MKV converter to MOV on Mac, launch it and click "Add File" to load the MKV files you want to convert.

Step 2. Select "MOV" as the Output Format

Select MOV format from the format list as the output format. What's more, the default optimized video settings make the output QuickTime MOV video looks great on your player.

Step 3. Start MKV to MOV Conversion

After finish the above steps, click the "Convert" button to start converting MKV to MOV format on Mac OS X (El Capitan included), you could view the conversion progress and are able to cancel the converting process at anytime.

Other Two Ways to Play MKV on Quicktime

1. Get Perian QuickTime Component

The QuickTime player is mostly used in Mac OS, if you don’t want to use the first solution to convert the MKV files to QuickTime compatible formats, you can try this solution, but no 100% work guarantee.

Perian, is a great open-source QuickTime component that allows playback of different video formats that cannot be played natively on your Mac computer. If you want to use QuickTime as your main video player, you may choose to download Perian because it provides the necessary codecs or components that will allow you to play MKV on Mac. If you have QuickTime 7, you may be glad to discover that it can actually play MKV files without needing any additional plug-ins and codecs.

2. Using VLC Player

The VLC media player, is an excellent open-source media player that is known for supporting a wide range of audio and video files. Unlike other media players which have limited format-support, you will be surprised that VLC can play a video or audio file that you didn’t even know existed. If your OS is Snow Leopard or higher, installing VLC is definitely a good choice especially if you only plan on watching MKV files on your computer.

Read More:


Monday, March 6, 2017

Downscale Yuneec Breeze 4K video to 1080p on Mac

Yuneec Breeze flying camera designed with you in mind. Both convenient and compact, Breeze is controlled by your iOS or Android device with the Breeze Cam app and weighs just under 1 pound. Now capture aerial photos and video of your daily adventures effortlessly– and do it in stunning 4K Ultra High Definition. So have recorded some 4K videos by uneec Breeze? Have problems playing, editing, sharing Yuneec Breeze 4K videos? Read on to find the solution here.

It has also confused many Yuneec Breeze users in playback 4K files on such like tablets or edit in NLEs like Adobe or iMovie, etc. So for easily work the Inspire 4K files well on Mac and PC, we suggest you to resize theYuneec Breeze 4K to 1080P, which could be nicely accepted.

Hot search: DJI Mavic Pro 4K to 1080p I DJI Inspire 1 4K to 1080p I DJI Phantom 4 4K to 1080P

Best Video Converter for Comporessing Yuneec Breeze 4K to 1080p

Just find the Pavtube HD Video Converter for Mac, which we can choose to achieve the goal so easily. In general, you can effortlessly encode Yuneec Breeze 4K footage for smoothly importing and editing in various non-linear editing systems (NLEs). Besides, Yuneec Breeze 4K clips, it also can deal with other video formats such as MKV, MTS, MXF, FLV .etc. If you are a PC user and willing to transfer Yuneec Breeze 4K files to any other media players. Now, let’s follow the guide to know how to resize Yuneec Breeze 4K videos to 1080P below:

Free download this Yuneec Breeze 4K to 1080p Compressor for Mac

User guide on Compressing Yuneec Breeze 4K video to 1080p video

Step 1. Load Yuneec Breeze 4K Video

Launch the 4K to 1080p Converter; click “Add Video” and load your 4K files from Yuneec Breeze 4K or hard drive.

Step 2. Decide Output Format

Click the “Format” drop down list to select MP4, MOV, MPG, AVI, etc format from “Common Video” as you want. Since this video converter also provides optimal profiles for kinds of editing programs and media devices, you can also select a proper format that best meets your needs.

Step 3. Downsize original 4K resolution at 1080p

Click “Settings” button; you can adjust video and audio settings, including codec, aspect ratio, bit rate, frame rate, sample rate, and audio channel. To down-convert Yuneec Breeze to 1080p, do remember adjusting video size to 1920*1080. That is the exact 1080p.

Step 4. Start 4K to 1080p Conversion

Hit “Convert” button to let the Yuneec Breeze 4K to 1080p conversion begin. When the conversion finished, check the generated 1080p video, you will certainly be satisfied with its final video quality. It would be much easier for you to playback and edit.

Read More:

Tuesday, February 14, 2017

Canon Video Editing Software: Media Magician

Have no ideas editing Canon recordings? Any program? Yes, here you can get an easy-to-use editing tool.

Pavtube Media Magician is a nice camcorder assistant manager, lossless camcorder video joiner, You can use it to edit Canon video in MOV/MP4/MXF/MTS/M2TS etc format converter and editor, and efficient camcorder video uploader for YouTube.

The smart camcorder wizard helps organize, backup and import camcorder videos with ease. And timeline-oriented editing tools help accurately trim and cut clips frame by frame. Format presets provide you the easiest way to output the right format with the best recommended settings. The output task manager also helps create multiple tasks in different formats for Andoid/iOS/Windows tablets and phones like Galaxy Tab/ Amazon Kindle Fire HD/ iPad/ AppleTV/ Microsoft Windows Surface RT, editing software such as Adobe Premiere/ Sony Vegas/ Cyberlink PowerDirector, or upload to YouTube at the same time.

It’s a useful and easy tool helping you make better use of either Canon camera or Canon camcorder videos, but also common videos including various video formats and various camera/camcorder like Sony,Panasonic etc. Mac version is Media Magician for Mac.

Key Features of Pavtube Media Magician
  • Camcorder Manager - Help connect camcorders with computer, and import, backup and manage the camcorder footage.
  • Timeline-oriented Editor - Make it easy to trim, cut, join clips with just a few clicks and drags. The clips can be seeked frame by frame right under preview window.
  • Video/Audio Optimizer - Help optimize original camcorder videos by adjusting brightness, contrast, saturation, enlarging volume, add 3D effect, and other special effects like Simple Gauss Blur, Aged Film, Gray, etc. to get better video & audio effect.
  • Lossless MKV/MTS Video Joiner - Importing MTS files with the same codecs, it’s easy to output lossless MTS or MKV video. The output videos can be trimmed and joined.
  • Preset Output Formats - It’s easy to output videos by clicks with the preset output format profiles like Final Cut Pro, iMovie and Final Cut Express, Avid Studio, Android phones and tablets, iPad, iPhone, Apple TV, etc.
  • Output Task Manager - Enable you to set and output several different files in list with different formats and settings from the same source files placed on timeline.
  • YouTube Video Uploader - Just insert YouTube Account information, and start the conversion task, files can be convert and upload to YouTube, no need to go to web browser and login the website.

Ok, then how to Edit Canon Video with Media Magician?

Firstly please free download Pavtube Media Magician

Part 1. Steps to import Canon source videos from Hard Drive

1. Launch Pavtube Media Magician from Application folder.

2. Click the Folder icon and choose a way to import. You can both import by selecting files or folder. The imported files will be listed in resource list.

3. On the list, you can highlight one file and use right-click menu to Play, Find Target, Delete, Rename, Movie Up & Down, etc.

3. Clicking Options button on top-right of the resource list, you can sort the videos clips or choose a way to view the clips, such as view details, big icon, or small icon.

4. For output videos, you need to drag & drop one or more clips to timeline. You can press Command Key and click to select multiple files.

You can export the list as a media library file (*.mdat) so that the next time you want to import those files, you can just import the *.mdat file by clicking Options>> Import Media Library. Please refer to Export & Import Media Library for more help.

In this section, you can preview, trim, cut, delete, rearrange order, and merge & join.

Notes: Actions in this section can take effect if choosing lossless output formats.

Part 2. Quick Start Guide - Edit Canon video on Timeline

Option 1. Clip editing on timeline

In this section, you can preview, trim, cut, delete, rearrange order, and merge & join.

Notes: Actions in this section can take effect if choosing lossless output formats.

1. Drag & drop clips from resource list to timeline. (To select multiple clips on list, you can press Command Key and click.)

2. Zoom in & out: Drag the bar on top-right of timeline to Zoom in or out for better view.

3. Preview: Highlight a clip on timeline and click Play button, you can preview.

4. Trim: Put your cursor to the start or end point of a clip on timeline until it changes to trimmer. Drag the trimmer and you can trim off unwanted starting or ending.

5. Cut: Drag the pointer to the right place; Put your cursor to process bar under preview window and select the right frame; Click the Scissors button and you can cut the clip. And then you can rearrange order or delete.

6. Delete: Highlight the unwanted clip on timeline, and click Delete button. You can also delete it with right-click menu.

7. Rearrange order: Drag and hold a clip to the right place until the place line shows. Drop the clip and it will be placed right there.

8. Merge & join: All files placed on timeline will be output as one file. So if you want to merge and join several clips, just drag them to timeline with the right order.

Option 2. Effect and adjustment editing

In this section, you can add 3D and special effects to the video clips and adjust video and audio.

Note: Actions in this section will not take effect while choosing lossless output formats.

http://image.pavtube.com/img/media-magician-for-mac/2-special-effects.png

Add Effects

You can add special effects like Simple Gauss Blur, Simple Laplacla, Gray, Flip Color, Invert, and Aged Film; flip videos vertically, horizontally, clockwise, or counter-clockwise; And adjust video brightness, contrast, and saturation here.

1. Go to Special Effect tab, and highlight the clip you want to add special effect on.

2. Click on the special effects and preview it in real-time.

3. Click on right buttons, and you can flip videos vertically, horizontally, clockwise, or counter-clockwise.

4. Dragging the bars and you can adjust video brightness, contrast, and saturation.

5. You can also click on the buttons on bottom-right of this section to reset or apply the settings to all clips on timeline.

Volume Adjustment

1. Go to Volume Adjustment section, dragging the bar you can enlarge or reduce volume of the selected clip.

2. Clicking the buttons on bottom-right you can reset or apply the setting to all clips on timeline

3D Effect:

1. Go to 3D Effect tab and tick 3D Effect option.

2. You can click to choose the right style of 3D effect and drag the bar to set depth.

3. Clicking the buttons on bottom-right you can reset or apply the setting to all clips on timeline.

Option 3. Conversion Settings:

http://image.pavtube.com/img/media-magician-for-mac/1-interface.png

Go to the second tab on top of the application, you can set conversion tasks, formats, output path, YouTube account info, etc.

1. Add conversion tasks: Click on the “+” button on main task bar to add conversion tasks.
2. Set output format: Highlight a task on the task list, and choose the right format preset from relative tab on the right. You can set different formats to tasks on list.

3. Set format parameters: After selecting the right output format preset, you can also customize parameters if needed, such as video frame rate, video bitrate, audio bitrate, sample rate, etc.

4. Set output path: On bottom of the right column, you can find Output Path box where you can set the output destination for the converted video files.

5. Choose tasks for conversion: Before starting the conversion, you can tick to choose the right task for output. Clicking the triangle button on the main task bar, you can start the batch conversion.

Files placed on timeline will be output as one file to the formats you select.

6. In process of conversion, you can still add tasks, delete tasks, pause conversion tasks, etc. with the buttons on task bars or right-click menu.

7. After all conversion tasks, you can find the converted files with right-click menu on relative task bars.

Output Formats:

Common Format: AVI, MPEG-2(*.mpg), MPEG-4 (*.mp4), WMV, MOV, MKV, M2TS

Device: Android (format presets for Android tablets and smart phones), Windows (format presets for Windows 8 RT tablets and smart phones), iPad, iPhone, Apple TV, HD Player, PSP/PS 3, HDV

Editor: iMovie and Final Cut Express (AIC MOV), Avid Studio (Avid DNxHD MOV. It’s not available in App Store version.), Adobe Premiere and Sony Vegas (WMV, MPG, or MOV), Adobe After Effect, Apple Aperture, Final Cut Pro (Apple ProRes MOV. It’s not available in App Store version.)

Lossless: Original (MTS), MKV (Please note that lossless output only works for MTS source files.)

Online: YouTube (MP4 and WebM. Here you can insert account info and set video descriptions.)

Ok, now you can edit your Canon video with Media Magician freely with above functions for sharing, playing,etc with family or friends. Have a try!

Related Articles: