Showing posts sorted by relevance for query mxf to imovie. Sort by date Show all posts

Thursday, July 11, 2013

Converting Canon C300 MXF footage to ProRes/AIC for smootly editing on FCP, iMovie, FCE

In this tutorial, you will learn how to import MXF footage from Canon C300 to Final Cut Pro (X), iMovie, FCE for further editing on Mac without problems.

With every new camera, comes many new questions about workflow. The Canon C300 can help us record vivid high-definition videos in MXF format which is often used in Sony, Panasonic and Canon high-end cameras and camcorders. The MXF format is good to record videos, but MXF files are not easy to use because many editing software and devices can't read MXF format videos, such as Apple's Final Cut Pro 6/7, Final Cut Express and iMovie. So how to solve the program when importing C300 MXF footage into FCP 6/7 or other non-linear editing systems. Below, I will throw a quick guide up on how to ingest Canon C300 MXF footage into Final Cut Pro (X), iMovie and FCE for editing smoothly.

convert canon c300 mxf for editing
Here is the easy way to fix it, namely, converting MXF to ProRes or AIC mov on Mac. If you are interested doing likewise, check out Pavtube Canon MXF Converter for Mac. The program is an easy-to-use and intuitive Mac tool for camcorder users. It is good at batch converting MXF recordings shot by Panasonic P2 camcorders, Sony XDCAM camcorders, Canon XF series cameras to ProRes/AIC MOV formats compatible with your Mac Video editing software like iMovie, Final Cut Pro (X), Final Cut Express.

Tips: If you have the same problems about editing Canon C500, XF100, XF105, XF300, XF305 MXF footage on Mac, you may view the following articles:
Just free download or buy Pavtube Mac MXF Converter for Canon C300:


Step-by-step: Converting Canon C300 MXF to ProRes/AIC MOV on Mac

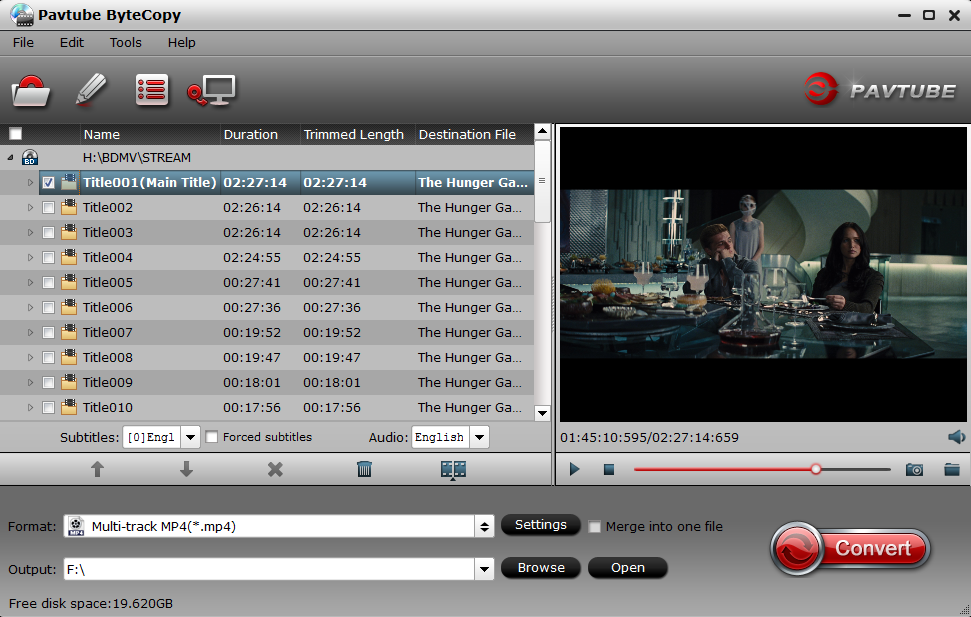
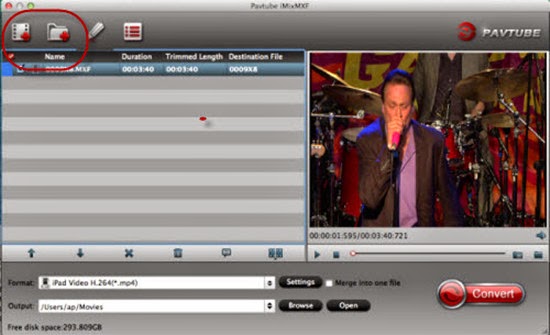
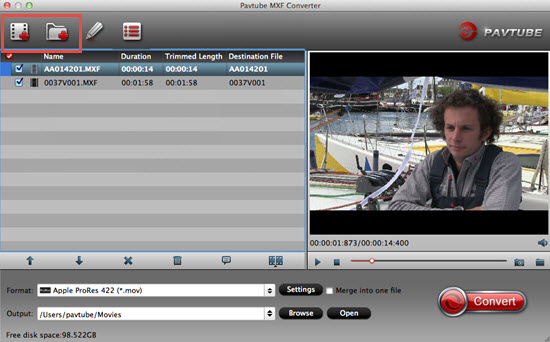
Step 1. Free download and run the best C300 MXF Converter for Mac, add MXF captured videos to the program. You can not only click "Add video" button to import Canon C300 MXF files.


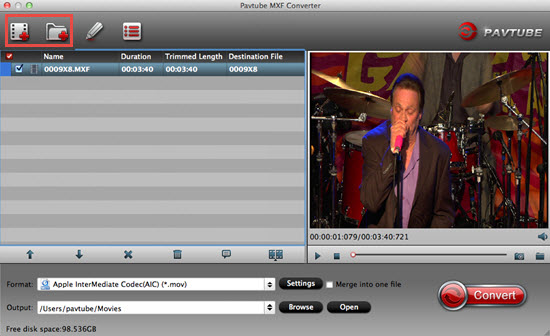
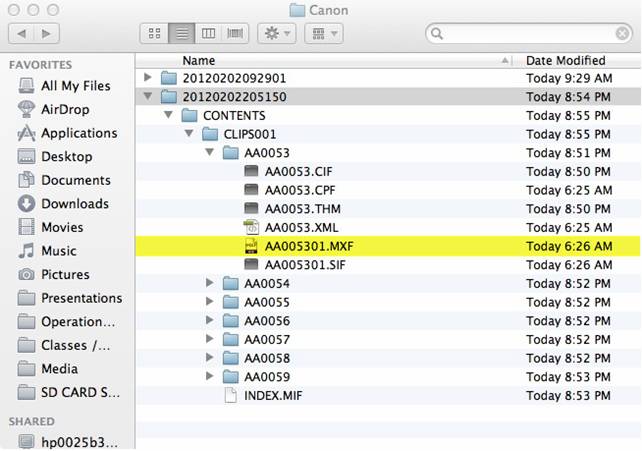
You are allowed to load .MXF clips to Pavtube MXF Converter for Mac directly from your camera folder or a folder archived on your computer's HDD. If you want to load multiple .mxf files to convert for FCP X at a time, just drag and drop the entire folder into the Mac MXF Converter software. 


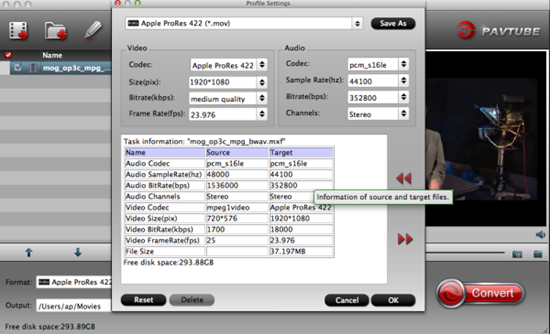
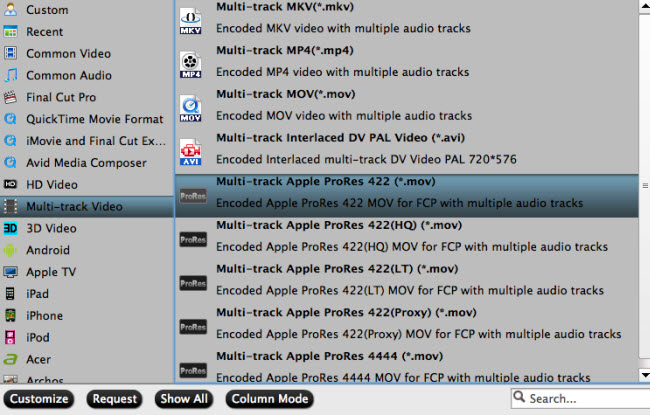
Step 2. Click the "Format" option, select the "Final Cut Pro > Apple ProRes 422 (*.mov) as target format. And navigate to the Final Cut Pro group, you will notice that there are profiles with Apple ProRes 422(HQ) (*.mov), Apple ProRes 422(LT) (*.mov), Apple ProRes 422(Proxy) (*.mov), Apple ProRes 4444 (*.mov). 

Apple ProRes 422 (*.mov) format is specially designed for using in Final Cut Pro X (include FCP 6/7). (The Apple ProRes 422 (Proxy) (*.mov) codec is intended for offline editing and contains 30 percent of the data rate of Apple ProRes 422)


And for editing Canon C300 MXF in iMovie/FCE, you can choose iMovie and Final Cut Express > Apple InterMediate Codec(AIC)(*mov).


Some more helpful features of the batch MXF to MOV Converter for Mac:

1. Adjust video and audio parameters. (Optional)

Click "Settings" button to customize the output video and audio settings by yourself. But if you are not good at it, you'd better use the default parameters, they will ensure you a good balance between file size and image quality basically. You can change the resolution, bitrate, frame rate as you need.

2. Editor (next to "Add" icon)- click to set deinterlace, denoise, mute, volume up, trim, crop, etc.


Step 3. When above steps finished, you can click "Convert" button to start converting Canon C300 MXF to ProRes/AIC MOV for FCP/FCE/iMovie with a super fast speed. with the excellent C300 MXF to MOV Converter, you can deal Canon C300 MXF footage on Mac with best video and audio quality as you want.

After converting Canon C300 MXF files, just according to the following tutorial import the output Apple PreRes 422 .mov files to Final Cut Pro 6/7/X for editing the video. Optimize your workflow and save time with the Apple ProRes compression for Final Cut Pro X. You can also import the output AIC MOV videos to iMovie/FCE for editing in full HD.

Additional tips:

1. This Mac version can run on Yosemite smoothly and users don't have to worry about any conversion lagging off.

2. How to transfer files into FCP or iMovie may be very helpful for newbie who just walk into Mac world.

3. If you intend to merge multiple MXF clips into one file, simply check "Merge into one file" box.

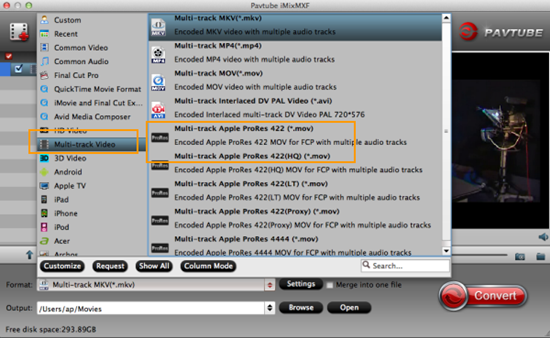
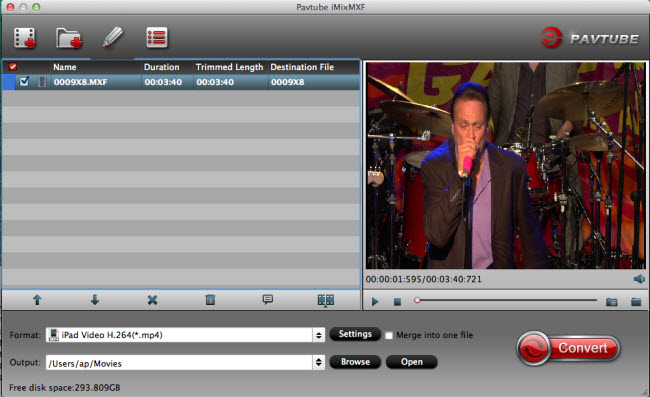
4.  If you would like to export Apple ProRes with multiple audio tracks kept, you may change to Pavtube iMixMXFprogram. You're advised to take the article.


5. To learn more conversion solutions for Canon MXF clips captured, please refer to Pavtube's Canon Column page.  

6. For Win users, Pavtube MXF Converter added new features like H.265/HEVC will allow you to maintain even improve the original videos while only half file size compared to original ones.

I hope can help you learn more. A happy work. Have a nice day!
   

Read More:

Tuesday, January 23, 2018

Import Video_TS to iMovie

Simple introduction of Video_TS folder

When you insert a video DVD into your computer, you can open the DVD and view the contents just like a folder on your hard drive. Most video DVDs have two folders in the root directory - AUDIO_TS and VIDEO_TS. The VIDEO_TS folder contains all the DVD's video data and playback information. There are 3 different types of files under Video_TS folder. The VOB (video object) files contain the majority of the DVD data. The .IFO (information) files contain basic information about the DVD and the corresponding VOB files. While the .BUP (backup) files are exact copies of the IFO files.

How to copy Video_TS folder for iMovie?

When transferring Video_TS folder to iMovie, make sure to transfer all the contents of the Video_TS folder.

Rip Video_TS folder for iMovie editing

Obviously, Video_TS folder disk image formats that iMovie lacks the ability to handle, to fix the format incompatible issue, you will need to perform a Video_TS to iMovie supported file formats transcoding process.

Related article: Import XC10 MXF to iMovie | Convert XAVC MXF to iMovie | Export iMovie to WMV/AVI/FLV/MKV

Since the Video_TS folder are copied from DVD disc, here, you will need a DVD Ripper application. Sometimes, the VOB files in Video_TS folder are encrypted with CSS copy protection, therefore, a powerful DVD Ripper program that can assist you to bypass that protection. Here, we highly recommend you to download Pavtube ByteCopy for Mac. The program not only helps you to automatically bypass the CSS or also other copy protection from Video_TS folder in the background, but also assists you to directly rip Video_TS folder to iMovie most favorable high quality and high performance editing codec Apple Intermediate Codec (AIC) with perfect quality and super fast conversion speed.

Besides Video_TS folder, you can also use this application to Rip commercial DVD disc, DVD IFO/ISO image or Blu-ray disc, BDMV folder and Blu-ray ISO image file to iMovie most preferrable editing codec for best editing workflow.

Step by Step to Rip Video_TS folder for iMovie Editing

Step 1: Load Video_TS folder.

Run the Video_TS Converter Mac and you can load DVD Folder by clicking "File" > "Load from folder".

Load Video_TS folder

Step 2: Choose output file format.

Here, you can select "iMovie and Final Cut Ex..." -> "Apple InterMediate Codec (AIC)(*.mov)"as the best output format to get videos with optimized settings for iMovie.

Output iMovie best supported AIC format

Tips: If you like, you can click"Settings" to change the video encoder, resolution, frame rate, etc. Remember bitrate higher results in big file size, and lower visible quality loss.

Step 3: Start Video-TS to iMovie conversion.

When all the settings are fine, click the "Convert" button to start converting your Video_TS folder to optimized AIC .mov video files for iMovie.

When then conversion completes, click the Open button to get the ripped video files. Launch iMovie and click File > Import > Movies to import converted videos to iMovie for further editing.

Sunday, June 12, 2016

How to Import UEFA Euro 2016 recordings to FCP/iMovie?

The UEFA European Championship will kick off on June 10th and run for a month. The tournament will be held in France and will feature the continent's top 24 national teams. Spain have won the last two Euros - in 2008 when Austria and Switzerland co-hosted and four years later when Poland and Ukraine shared the event. Can they make it a hat-trick? The games are so wonderful. You can record the unforgetable videos by your camera for watching anytime anywhere. For more nice watching, you can edit them with popular NLEs like FCP or iMovie firstly.


But not all UEFA Euro 2016 recordings are supported by FCP/iMovie due to the complicated formats/codecs. Let us have a look at the following FCP/iMovie supported formats

FCP supported format:

File Formats Supported by Final Cut Pro (Reference)

  • Video Formats: Apple Animation codec, Apple Intermediate codec, Apple ProRes(all versions), AVC-intra, AVCHD (including AVCCAM, AVCHD Lite, and NXCAM), DV (including DVCAM, DVCPRO, and DVCPRO50), DVCPRO HD, H.264, HDV, iFrame, Motion JPEG(OpenDML only), MPEG IMX(D-10), REDCODE RAW (R3D), Uncompressed 10-bit 4:2:2, Uncompressed 8-bit 4:2:2, XAVC, XDCAM HD/EX/HD422, QuickTime formats. 
  • Audio Formats: AAC, AIFF, BWF, CAF, MP3, MP4, WAV 
  • Container format: 3GP, AVI, MP4, MXF, QuickTime 
  • Still-image formats: BMP, GIF, JPEG, PNG, PSD, RAW, TGA, TIFF 

Best Video/Audio Settings for Final Cut Pro


  • Aspect Ratio: Native aspect ratio without letterboxing (examples: 4:3, 16:9)
  • Resolution: You can choose different resolutions, all the way to 5K. The lowest resolution supported is 640 x 480. You cannot choose custom resolutions or aspect ratios. This is a huge negative.
  • Frame Rate: The lowest frame rate possible is 23.976p, and the maximum is 60p. No 12 or 18 fps options.
  • Audio Settings: Generally, audio only has 'Surround' or 'Stereo', and the maximum audio bit depth isn’t specified. Squence audio is always mixed using 32-bit floating-point values. Tips: Final Cut Pro allows you to directly import any audio file format compatible with QuickTime. However, only uncompressed file formats should be used for editing.

iMovie supported format: 


Video -


Audio - AIFF, WAV, AAC, MP3, CAF

Note: iMovie'11 (Version 9.0), as part of the iLife'11 package, now supports the AVCHD Lite format (a subset of AVCHD format limited to 720p60, 720p50 and 720p24 ).


With this best FCP/iMovie video converter, you can convert almost any about UEFA Euro 2016 videos to best video format for FCP/iMovie with the greatest quality. With 200+ video and audio codecs supported, this video converter for Mac (Windows 10/El Capitan) can convert any video to the best video format for editing, so that you can import your camcorder recordings, YouTube videos, or TV shows to your Non-linear editing software without any problem.

Hot search: H.265 to FCP ǀ Sony PXW-X70 MXF to FCP X ǀ MXF TO FCP ǀ Samsung NX500 H.265 to FCP X ǀ DJI Phantom 4 4K  to iMovie ǀ MTS to iMovie 

If you think video compatibility issue is too troublesome, this tool can be taken as a much easier video editing tool which allows you to compress video files with intact video quality, split video to small parts, merge video into one, trim video to remove unwanted areas, add SRT subtitle, add watermark to personalize footage, and many more. (read review)

Now free downlaod the best video converter for FCP/iMovie:


Other Download:

3 Steps to Convert UEFA Euro 2016 recordings to FCP/iMovie for nice editing

Step 1: Add UEFA Euro 2016 footages files to the program

Click the “Add File” button to select the UEFA Euro videos from your hard drive to this program. To save your time, this program supports batch conversion so you can add multiple files at a time.


Step 2: Choose output format and specify output folder

1. Choose output format for your specific usage. For example in this case, from "Format" drop-down option, choose iMovie best editing codec by selecting "iMovie and Final Cut Ex..." > "Apple Intermediate Codec (AIC)(*.mov). If you select all files and click Merge, you can join all imported mts files to one output video.


2.  Click "Format" bar, from its drop-down options, move your mouse to "Final Cut Pro > Apple ProRes 422 (*.mov)" to select it as the output file format.


Step 3: Convert UEFA Euro 2016 Video to FCP/iMovie.

Hit the convert button under the preview windows, the program will start UEFA Euro 2016 footage to iMovie or Final Cut Pro. When the conversion is completed, run FCP or iMovie and import the converted footage to FCP or iMovie for post production workflow.

Read More: 

Monday, February 6, 2017

Import Canon EOS M5 MP4 video to iMovie for editing

Canon's foray into the mirrorless world was fraught with missteps, with its first few efforts lagging well behind the competition in focus speed. The EOS M5 ($979, body only) represents a big change—its autofocus system is speedy, and it can fire off images at a quick 8.2fps burst rate. The EOS M5 records crisp 1080p video in MP4 format at 24, 30, or 60fps.

But the problem with MP4 is, when you plan to edit the MP4 file with iMovie, you may be able to do this, but may be unable to. So what's the matter? Well, this depends on. Some hybrid camcorders can capture video footage in both the MPEG-2 and MPEG-4 formats. If your camcorder has captured video footage in both formats, iMovie may only recognize the MPEG-2 movies when accessing the footage from the Camera Import window. MPEG-4 movies recorded with these devices may not be shown.

Don't worry. So if you are unable to locate your Canon EOS M5 MP4 video files into iMovie, you could adjust Canon EOS M5 MP4 video to iMovie file. The article would show you how to convert and import Canon EOS M5 MP4 video to iMovie on Mac step by step with a professional MP4 to iMovie Converter for Mac (macOS Sierra, El Capitan, Yosemite, Mavericks, Mountain Lion, Lion and Snow Leopard included), by running it, there's no need to set the codec by yourself: the Mac program has a optimized preset for iMovie (iMovie '11 included).

Make Preparation: Launch MP4 to iMovie Converter - Pavtube HD Video Converter for Mac

-Convert MP4 videos to various formats that supported by different editor, like iMovie, Final Cut Pro, QuickTime, Windows Movie Makers, etc.
-Convert MP4, MKV, AVI, H.265, MXF, MTS, M2TS, MOV etc to iMovie eidtable format and other formats.
-Support to convert MP4 to most HD and standard video formats, such as MOV, FLV, AVI, MKV, M4V, etc.
-Extract audio from MP4 videos to MP3, M4A, WAV, AAC, AIFF, WMA, etc.
-It has a perfect compatibility with macOS Sierra, Mac OS X 10.11 El Capitan, 10.10 Yosemite, 10.9 Mavericks, 10.8, 10.7, 10.6, 10.5.

Free download Canon EOS M5 MP4 to iMovie video converter for Mac:

Full guide to Convert Canon EOS M5 video to iMovie editable format on Mac

Step 1: Load Canon EOS M5 MP4 files to the program

Launch the MP4 to iMovie Converter and click "Add video" button to locate the .mp4 file(s) you want to add. Check the "Merge into one file" box, you can join several .mp4 clips together if necessary.

Step 2: Choose iMovie format

Click "Format" pull down list to select iMovie and Final Cut Express > Apple InterMediate Codec(AIC) (*.mov) as the best video format for iMovie (11).

Step 3: Edit the Canon EOS M5 MP4 videos (Optional)

By clicking "Edit selected task" button, you can trim, crop the video, or add watermark, adjust effect, attaching subtitles for pre-editing your video files so that you can simplify your iMovie editing.

Trim - Choose to reserve the part you need. Just choose the chapter which you need to trim, to set "start time" or "end time", type the portion which you want to save.

Crop - Remove black edges of your video or just get the scale of this video you want.

Effect - Adjust the effects by adjusting the parameters, such as:

1) Deinterlacing- If there are some stripes on the picture, you can check this option to make a better picture effect. (Checked by default)

2) Under Effect tab, you can add special effects like Simple Gauss Blur, Flip Color, Invert, Aged Film to your source video. In Color Control section, you can correct color by adjusting brightness, contrast, and saturation.

Audio Editor- You can replace/remove original audio, and set audio fade in/out effects.

Subtitle - You can add *.srt or *.ass/*.ssa subtitles to the video as hard subtitles.

Step 4: Adjust the video, audio settings (Optional)

Click "Settings" to fix the frame rate, bitrate, video size, etc to your needs. To have a smooth editing with iMovie, you need create the files with the appropriate resolution and frame rate that matches your source footage.

Step 4: Start MP4 to iMovie conversion

Click "Convert" button at the bottom right corner to finish endocing Canon EOS M5 MP4 to AIC .mov for iMovie (11) on Mac OS X. After the conversion, click "Open" to locate the encoded videos and then launch iMovie,choose File > Import > Movies..., to import the converted MP4 video into iMovie; prepare for editing. You will find that it's just a piece of cake to edit MP4 files in iMovie (11).

Related Articles:

Friday, September 25, 2015

How to Convert WMV Files to iMovie 11, 10.0 Editable Format on Mac OS X?

iMovie is a video editing software application for the Mac and iOS (iPhone, iPad, iPad Mini and iPod Touch). iMovie imports video footage to the Mac using either the FireWire interface on most MiniDV digital video cameras or the computer's USB port. It can also import video and photos files from a hard drive. With iMovie, users can edit photos and video clips by adding titles, themes, music and effects.


Like other Mac video editing tools, iMovie has limited itself to import only few file formats, below are the list of iMovie supported video formats:
DV-Standard file formats
HDV (High Definition Video) 1080i, HDV 720p
MPEG-4 simple profile
iSight
Camcorder (AVCHD)
Part of QuickTime supported MOV

If you happen to own great amount of WMV files on your computer, you are out of luck to import WMV files to iMovie for editing since WMV is not compatible with iMovie. Never mind, there are many apps can assist you to achieve the goal of converting WMV to iMovie editable format.

To perform the conversion, you can adopt Pavtube HD Video Converter for Mac, a professional yet simple to use application which help you to convert WMV to iMovie imported MPEG-4, MOV, DV, HDV etc formats in just one click. For fast and smooth workflow of WMV files with iMovie, you are recommended to to encode WMV to Apple Intermediate Codec(AIC)(*.mov) codec. More over, the program also enables you to convert other incompatible file formats such as MXF, MP4, Video_TS or camcorder files to iMovie for convenient editing.


Other Download:
- Pavtube old official address: http://www.pavtube.com/hd-video-converter-mac/
- Amazon Store Download: http://www.amazon.com/Pavtube-Video-Converter-Mac-Download/dp/B00QI9GNZS
- AppStore Download: https://itunes.apple.com/de/app/pavtube-hd-video-converter/id502792488?mt=12
- Cnet Download: http://download.cnet.com/Pavtube-HD-Video-Converter/3000-2194_4-76177786.html

Step by step to convert WMV to iMovie accepted file formats

Step 1: Import WMV files.
Start up the program on your computer, on the top menu bar, click "File" > "Add Video/Audio" or "Add from folder" to import source WMV files from your local drive to the computer.

Import source WMV files

Step 2: Output iMovie supported format to output.
Go to "Format" bar, from its drop-down list, select "iMovie and Final Cut Ex..." > "Apple Intermediate Codec(AIC)(*.mov) format. You can also choose to output other iMovie editable "MOV" or "MPEG-4" from "Common Video" extended lists.

Output iMovie AIC format

Step 3: Start WMV to iMovie conversion process.
After all the settings is completed, hit right-bottom "Convert" button to start to convert WMV to iMovie compatible format.
When the conversion is done, click "Open output folder" button to get converted WMV files imported to iMovie.

Further Reading:

Tuesday, April 14, 2015

MXF to MOV---Convert Canon XC10 XF-AVC 4K MXF to MOV with Multi-tracks

To make Canon XC10 XF-AVC MXF footage edited or played well on PC and Mac, we need to convert the 4K MXF to common MOV or with multi-tracks preserved. Do you have any related issues with that? This post will show you an quick guide on rewrapping Canon XC10 4K MXF files for Windows and Mac in common MOV.


What videos can Canon XC10 4K camcorder shoot and bring to us?
Canon has recently announced the development of XF-AVC, a new proprietary video format for the efficient recording of high-image-quality 4K, 2K and HD video footage. On the other hand, Canon XC10 uses XF-AVC movie recording format, employs the MPEG-4 AVC/H.264 video compression format, and stores shootings in an MXF wrapper, which seems not so compatible for Windows and Mac. What’s the useful MXF tips? s examples below.

‘Hey it’s so cool I got the latest Canon 4K camcorder---XC10 XF-AVC as soon as it released out. You know it is indeed can shoot the videos with higher resolutions and flexible personal settings, I love it so much. But it always tells me the ‘errors’ when I import them on Mac. Why these MXF recordings cannot be added to PC? I’m now seeking a professional video transcoder to convert the files nicely.’

Hot Search: MXF to VLC | MXF to WMP | MXF to Sony Vegas | MXF to QuickTime | MXF to iMovie

How to rewrap Canon XC10 XF-AVC MXF footage to MOV for PC/Mac?
Pavtube iMixMXF/MXF MultiMixer can convert all the original MXF videos to any others formats with multi-track audios for both Windows/Mac users. As the professional MXF importer, transcoder or editor, it can do all work well for MXF files. Of course including the workflow of converting Canon XC10 XF-AVC MXF files to common MOV or multi-track MOV on PC/Mac. What’s more, so many output media players and editing tools are also listed there for other choices. More converting details are listed below.

Easiest guide on converting Canon XC10 XF-AVC MXF to MOV on PC/Mac:
Step 1: Start up multi-track MXF Video Converter as a professional Canon XC10 MXF Converter for Windows/Mac. When its main interface pops up, click ‘Add File’ to input your source media. Directly drag files in is also available.


Step 2. Select suitable MOV as you need for Windows/Mac. If you are seeking the common ones, just go to the ‘HD Video’ to find the MOV as the output. While for those advanced users who wanna trancode the MXF files with multi-tracks preserved, we suggest you to choose the ‘Multi-track Video’>>’Multi-track MOV (*.mov)’ as the best one.


Step 3: Custom video and audio settings
If necessary, you can click ‘Settings’ button and go to ‘Profiles Settings’ panel to modify video and audio settings like video encoder, resolution, video bit rate, frame rate, aspect ratio, audio encoder, sample rate, audio bit rate, and audio channels. 


When you get ready for all preparation work, click ‘Convert’ to start format conversion. As soon as the conversion is complete, you can click ‘Open Folder’ button to get the exported MOV files for Window/Mac. No matter for editing or playing your Canon XC10 XF-AVC MXF recordings, this program will not make us disappointed.

Read More:

Wednesday, March 30, 2016

Quickly Import DJI Phantom 4 4K video files to iMovie for Smoothly Editing

Q1: “Just got a Macbook Pro today and was pleased to see that iMovie has a video stabilisation feature. However every time I import one of my DJI Phantom 4 videos to iMovie, the stabilisation tab is greyed out. I can't even crop the videos”.

Q2: “I am having a problem getting my DJI Phantom 4 video into iMovie for editing. Been using iMovie, however, importing takes FOREVER.”

This is what I found for stabilisation tab is greyed out issue:

1. Right click on the clip, and select Reveal in Finder
2. Ignore the clip, but open the folder iMovie Stabilization
3. Delete the contents
4. Restart iMovie (unfortunately, this is necessary)
5. Right click the clip again and choose Analyze video -> Stabilization

As for DJI Phantom 4, stabilized 4K video capture (up to 4096×2160 24 / 25p, 60 Mbps, in MP4 / MOV container with MPEG-4 AVC / H.264 codec ).

Importing DJI Phantom 4 videos to iMovie takes FOREVER is that common personal computer doesn’t have the ability to process the Phantom 4 4K video editing work, even if you can import Phantom 4 4K footage into iMovie on MacBook Pro. The quality of Phantom 4 4K videos is ultra high definition, so it requires very powerful computer hardware for smoothly editing.

In order to import and edit DJI Phantom 4 video QUICKLY in iMovie, other solution can be take into consideration. The quick workaround is to convert DJI Phantom 4 4K MP4/MOV to iMovie native-format Apple InterMediate Codec in 2K(more smoothly) resolution.

Pavtube HD Video Converter for Mac (review) is now providing the most reliable and professional 4K solutions to all format issues including 4K XAVC/XAVC S4K MP44K MTS4K MXF and more.

With this professional 4K video converter, you an import Phantom 4 4K footage into iMovie with the preset native-format Apple InterMediate Codec, compress the resolution of DJI Phantom 4 4K footage from 4096*2160P to 1920*1080P so that you the video clips easier for iMovie to render.

The trail-before-purchase is supported, just feel free to try it:


If you are a Windows user, and in need of edit the DJI Phantom 4 4K footage in Windows Movie Maker, Sony Vegas, Adobe After Effects, etc. Please turn to Pavtube HD Video Converter

How to Convert DJI Phantom 4 4K MP4/MOV to AIC for iMovie

Download the Pavtube HD Video Converter and install it on your Mac(compatible with Mac OS X 10.11 El Capitan, 10.10 Yosemite, 10.9 Mavericks, 10.8 Mountain Lion, 10.7 Lion, 10.6 Snow Leopard, 10.5 Leopard and lower versions).

Step 1. Add DJI Phantom 4 4K MP4/MOV files

Click "Add Video" button to load DJI Phantom 4 4K MP4/MOV files to the program. You can also directly drag the video files into the program directly.


Step 2. Select output format

From "Format" drop-down option, choose iMovie best video editing codec from "iMovie and Final Cut Ex..." > "Apple Intermediate Codec (AIC)(*.mov) to output.


Step 3. Compress Phantom 4 4K video to 1080P

Open "Profile Settings" window, click "Size(pix)" to select 1920*1080 as the final resolution for output video. You can also adjust video and audio settings, including codec, aspect ratio, bit rate, frame rate, sample rate, and audio channel.


Step 4. Start the conversion

Finally, simply hig the big Convert button to start converting DJI Phantom 4 4K MP4/MOV to Apple InterMediate Codec for iMovie. 

Within several minutes, you can find the converted file on your computer by clicking the "Open" button. And then you can import the converted files to iMovie for editing smoothly.

Related program:

Pavtube Media Magician / Mac Version: A nice camcorder assistant manager, lossless camcorder video joiner, MTS/ M2TS/ MXF/ P2 MXF/ MOV/ MKV/ TiVo/ WMV/ AVI/ MPG converter and editor. Meamwhile it supported upload edited video to YouTube directly.
Read More:

Monday, February 29, 2016

MXF & After Effects CS6 Workflow: Can After Effects CS6 Support MXF Files?

Can After Effects CS6 Support MXF Files?

Since After Effects CS4, MXF is supported by AE. However, MXF is a container format, After Effects can only import some kinds of data contained within MXF files. Many users still have troubles when importing MXF to After Effects (including After Effects CS6). What’s available workaround to successfully edit MXF files in After Effects without any issue?


MXF (Material Exchange Format) is a container format for professional digital video and audio media defined by a set of SMPTE standards. As MXF container is not so widely accepted as MP4, AVI, and WMV format, it is unacceptable to many editing software. HD digital camcorders’ video like Canon C300, Canon XF100, Canon XF105, Sony XDCAM series and Panasonic P2 series still can not natively or directly imported to Adobe After Effects CS6.

How to Make After Effects CS6 Support MXF Files?

In that case, MXF is not a proper format for editing. You can definitely convert MXF files to Adobe After Effects CS6 codec with the native quality before importing. And video formats supported by After Effects CS6 include MPEG-2, WMV (VC-1), etc.

Here I highly recommend Pavtube MXF Converter. It is the most professional and easy-to-use MXF to FCP X Converter, which can convert your MXF files to FCP X compatible formats with the 6X faster conversion speed and best output quality on Mac. Also it offers you other functions like convert MXF to 3D video, define video/audio parameters, add video watermark, etc. 

Below is a detailed guide on how to convert MXF to After Effects CS6 more compatible video format like convert MXF to MPEG-2.

The trail-before-purchase is supported, just feel free to try it, it is 100% clean and safe:


Key Feature of Pavtube MXF Converter:

1. Convert MXF to other videos

Powerful video converting software can help you convert MXF to MP4, AVI, MOV, WMV, HD videos, MP3.

2. Support professional video editing software

Transcode MXF files to Sony Vegas, Adobe Premiere, Windows Movie Maker, Avid, etc.

3. Merge source MXF files

Join different source MXF videos together and output a single video. Then you can enjoy a long output movie.

4. Adjust output video effect

To customize the output profile, users can adjust the output Resolution, Bitrate, Frame Rate, Encoder, Channels, and Sample Rate.

Tips: The conversion speed is very fast because it supports batch conversion and NVIDIA CUDA & ATI Stream (AMD APP) acceleration technologies. It converts multiple video clips at the same time, moreover it can shut down computer after the process is complete, so run the app overnight and you could enjoy the created videos next morning when you are up.

If you are a Mac user, and in need of edit the MXF videos in Final Cut Pro 7 / XiMovie,Avid Media Composer, etc. Please turn to Pavtube MXF Converter for Mac

How to Convert MXF Files to MPEG-2 for After Effects CS6

Download and install Pavtube MXF Converter on your PC (compatible with Windows 10, Windows 8, Windows 7, Windows XP, Windows Vista, and Windows 2000). Run this program, you will find the interface is very brief, this program is very easy to use.

Step 1: Now please click add files button to import the MXF video files from your camera or from a folder stored on your HDD that you want to convert, you can add batch files at one time.


Note: MXF systems produce split A/V which means the video and audio are stored in separate files. Some careless editors may only import the video files into an MXF converter. The result is that there will be no audio in the output video. Make sure that the whole MXF file structure is transferred before converting.

Step 2: Go to the format list and pick “MPEG-2 (*.mpg)” under “Adobe Premiere/Sony Ve…” option.


Step 3: If you would like to customize the video and audio parameters, you can click "Settings", adjust the parameters as you want, like Video Codec, aspect ratio, bit rate, frame rate, Audio codec, sampling rate, bit rate, channels.


Step 4: Click "Convert" to start to convert MXF to After Effects CS6 MPEG-2 for native editing.

Once the conversion completes, simply click “Open” button to get the converted MPEG-2 files. And now you can bring the output MPEG-2 files into After Effects CS6 to create your own masterpieces.

Related program:

If you have multiple-track videos requirements,  Pavtube MXF MultiMixer / Pavtube iMixMXF would be your best-choice: It is able to import and export MXF video files with multiple audio tracks/channels as well as mixing the multiple audio tracks/channels into one. Convert MXF video files from popular devices such as Apple, Samsung, Sony, Canon, JVC, Panasonic, etc. to various video format supported by any media player and NLEs.

Read More:

Wednesday, June 5, 2013

Import Sony PDZ-VX10 XDCAM MXF to FCP 6/7 without rendering on Mac Mountain Lion

Sony PDZ-VX10 is one of Sony XDCAM series, the high-end professional camcorders which cam capture stunning-quality HD images; it can offer very high HD footages at a data rate of up to 50 Mbps at MXF format. But it becomes a pain if you want to edit the video recorded, because the high quality MXF files do not work with traditional nonlinear editing program natively on mac. You may really not feel good if you cannot edit the raw Sony XACAM MXF files in iMovie/FCP/Avid/Adobe Premiere Pro directly. Is there any way to import Sony PDZ-VX10 XDCAM MXF to FCP 6/7 efficiently without Log and Transfer?


Rejoice, Mac users, rejoice. For that finally there's a program can handle this within a few clicks, it does exactly as it claim for. Come and meet this Sony XDCAM MXF to FCP Converter for Mac which would be a vital part of your workflow.

No rendering, no stuttering, you just need to load your Sony PDZ-VX10 XDCAM MXF videos to the professional Pavtube Sony XDCAM MXF Converter for Mac software, choose FCP friendly format and click big red circle to get the fresh hot videos that can work in FCP 6/7 smoothly.

Now get this Sony XDCAM MXF Converter for Mac installed and let's go ahead to this fantastic workflow.

How to Convert Sony PDZ-VX10 XDCAM MXF to Apple ProRes for importing to FCP 6/7 without L&T?

At first, you should get your MXF video backup on your Mac. Connect your Sony PDZ-VX10 Camcorder to Mac with USB cable or use card reader to transfer the MXF files to Apple hard drive disk; do not forget to keep your camcorder on.

Run the Pavtube Mac Sony XDCAM MXF Converter for Mac. Then you can click "Add video" to load the MXF file into it, or click "Add from folder" to load the entire folder.

After that, you can select FCP 6 or 7 compatible codec. Click the "Format" bar, you will find various video formats sorted by different programs / devices. For FCP 6/7 users, the "Final Cut Pro > Apple ProRes 422 (*.mov)" preset can work well for you. If you want to get better video quality, it's recommended to choose "Apple ProRes 422 HQ".


If you want to do some editing like trim a certain MXF segment file to smaller ones, get rid of black edges of source file, add video effects, etc. this Sony XDCAM MXF Converter for Mac will be do these. 

When the setting is finished, you can click the big red button to start converting Sony PDZ-VX10 XDCAM MXF to ProRes 422 for FCP 6/7. Wait for a while to get the converted Apple ProRes 422 MOV video.

After conversion you can click the "Open" button to locate the converted files and load the ProRes MOV files to FCP X. Now you are able to import/edit Sony XDCAM MXF in FCP 6/7 freely without any rendering.

Open up Final Cut Pro 6/7, choose "File > Import > Files…" to select and load the generated ProRes 422 MOV files to FCP for editing use.


Tip:

Pavtube XDCAM MXF Converter for Mac is a converter that allow you to convert Canon MXF/Sony XDCAM MXF/Panasonic P2 MXF footage to other format like ProRes MOV, AIC MOV, Avid DNxHD MOV, MP4, AVI, MPG, WMV, MKV, DV, etc. You can select the output format as you like, after converted, you can play them on Android, iOS, Windows 8 tablets/phones etc., or import the converted MXF to iMovie, FCE, Premiere Pro, etc. Mac Editing Software for editing will be easy.

Read more:

MP4 to FCP ǀ AVCHD to FCP ǀ MOV to FCP ǀ H.265 to FCP