Monday, November 20, 2017

Work GoPro Hero 6 4K H.265 with Davinci Resolve

For Davinci Resolve users, if you're getting an error message when you try to open a video shot on the GoPro Hero 6 Black, it might because it isn't compatible with the HEVC (H.265) codec used in some of GoPro Hero 6 Black video modes. Following are the workarounds.

Transcode GoPro Hero 6 4K H.265 for Davinci Resolve editing

From Davinci Resolve supported file formats, we can see that Davinci Resolve can work with virtually every modern file type and media format available from ProRes and DNx to H.264, DPX, Cineon, EXR and more. The bad news is that the H.265 codec is unfortunately excluded from Davinci Resolve supported file formats list. To import GoPro Hero 6 4K H.265 to Davinci Resolve, you will need to perform a codec transcoding process.

The are number of paid apps that can do the conversion. If you are looking for a powerful yet simple to use application to get the job done, we highly recommend Pavtube Video Converter for Mac to you. The program has perfect importing support for the 4K H.265 files shot with GoPro Hero 6, thanks to its batch conversion mode, you can input multiple GoPro Hero 6 4K H.265 video into the application at one time for conversion.

The program can assist you to efficiently convert GoPro Hero 6 4K H.265 to Davinci Resolve workable editing codec such as Prores, DNxHD, QuickTime, etc with perfect quality. If your computer is not powerful enough to handle 4K video editing, you can also choose to compress 4K to 1080p by changing output file resolution as "1980*1020" in the "Profile Settings" window offered by the program.

Pavtube Video Converter for Mac is available on macOS High Sierra, macOS Sierra, Mac OS X El Capitan, Mac OS X Yosemite, Mac OS X Mavericks, etc, it is also accompanied by an up-to-date Windows version - Pavtube Video Converter for Windows 10/8.1/8/7.

Step by Step to Transcode and Compress GoPro Hero 6 4K H.265 for Davinci Resolve

Step 1: Load GoPro Hero 6 4K H.265 video.

Download the free trial version of the program. Launch it on your computer. Click "File" menu and select "Add Video/Audio" or click the "Add Video" button on the top tool bar to import GoPro Hero 6 4K H.265 video files into the program.

Load GoPro Hero 6 4K H.265

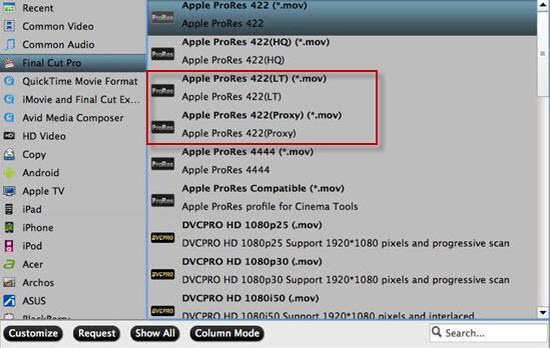
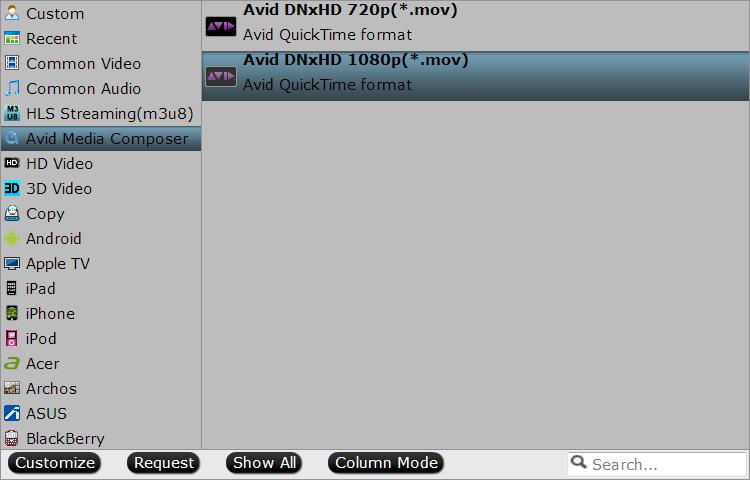
Step 2: Choose Resolve best compatible editing format.

As is mentioned above, Avid DNxHD is well supported by DaVinci Resolve. So just click the format bar to follow "Avid Media Compose" > "Avid DNxHD (*.mov)".

Output Davinci Resolve supported editing codec

Step 3: Compress 4K to 1080p.

Click "Settings" on the main interface to open "Profile Settings" window, from "Size(pix)" drop-down list, choose "1980*1020" to compress 4K to 1080p for smooth editing workflow on slow computer.

Step 4: Begin the final conversion process.

After all setting is completed, hit the "Convert" button at the right bottom of the main interface to begin the conversion process from GoPro Hero 6 4K H.265 to Davinci Resolve supported editing format DNxHD conversion process.

When the conversion is finished, click "Open Output Folder" icon on the main interface to open the folder with generated files. Then feel free to load the DNxHD files into Davinci Resolve for post editing workflow.

Tuesday, November 14, 2017

Work Canon EOS M100 MP4 Video with Davinci Resolve

The Canon EOS M100 is the company's entry-level mirrorless interchangeable lens camera. It features a 24MP APS-C CMOS sensor, DIGIC 7 processor and the company's impressive Dual Pixel AF system. With the camera, you can shot 1080p, 720p and 480p video in MP4 format with H.264 compression codec. For Davinci Resolve users, when the shooting is completed, you may come the idea to do some post editing workflow of the Canon EOS M100 MP4 video with Davinci Resolve. Wish to get a fast and smooth workflow, just read on...

How about native import EOS M100 MP4 video into Davinci Resolve?

The Canon EOS M100 records different resolution of MP4 video with H.264 compression codec, which is included in Davinci Resolve supported file formats. However, For those people who wish to do more effects editing with the EOS M100 MP4 video in Davinci Resolve, H.264 won't be good choice. The main reason is that H.264 is an 8-bit format, which means that you are potentially compromising your effects and, especially, color correction and compositing with gradients.

Best editing formats for Davinci Resolve with more effects editing

If you wish to get a high quality and high performance editing of Canon EOS MP4 video with Davinci Resovle, we highly recommended you to encode EOS M100 H.264 MP4 to another Davinci Resolve workable editing formats - Apple Prores. As a 10-bit container, Apple Prores can process a lot of more color data and make the color correction process easier.

Encode EOS M100 MP4 to Apple Prores codec

Here, a powerful and simple to use application called Pavtube Video Converter for Mac is highly recommended to you. The program supports batch conversion mode, so that you can load multiple video at one time into the application for conversion to save your precious time.

With the application, you can efficiently encode EOS M100 H.264 MP4 to Davinci Resolve best color correction editing format - Apple Prores codec with perfect quality and super fast encoding speed. The program can produce Apple Prores in various different types including "Apple Prores 422(*.mov)", "Apple Prores 422(HQ)(*.mov)", "Apple Prores Proxy)(*.mov)" and "Apple Prores (LT)(*.mov)", you can choose the suitable one by following the standards listed below:

If you computer is old or slow, or you just want to do some rough editing, you can select to output "Apple Prores Proxy)(*.mov)"or "Apple Prores (LT)(*.mov)"format to save more space and bandwidth. However, if your computer are powerful enough to handle multicam and high-resolution video and you are going to do many effects editing work with FCP X, you'd better choose to output "Apple Prores 422(*.mov)"or "Apple Prores 422(HQ)(*.mov)"for better performance.

Step by Step to Transcode Canon EOS M100 H.264 MP4 to Prores for Davinci Resolve

Step 1: Load Canon EOS M100 MP4 video.

Download the free trial version of the program. Launch it on your computer. Click "File" menu and select "Add Video/Audio" or click the "Add Video" button on the top tool bar to import Canon EOS M100 MP4 video files into the program.

Load Canon EOS M100 MP4 video

Step 2: Define the output format.

Clicking the Format bar, from its drop-down list, choose Davinci Resolve best favorable Apple color correction editing codec - Apple Prores.

If you try to do more effects editing of the Canon EOS M100 MP4 with Davinci Resolve on powerful computer, it would be much ideal for you to choose "Apple Prores 422(*.mov)" or ""Apple Prores 422(HQ)(*.mov)"for high quality performance.

Output Apple Prores 422 or 422 HQ

If you have a underpowered Mac computer, to get a smooth post editing workflow, it would be much ideal for you to choose"Apple Prores 422(Proxy)(*.mov)" or "Apple Prores 422(LT)(*.mov)" format.

Output Apple Prores 422 Proxy or LT format

Tips: Click "Settings" on the main interface to open "Profile Settings" window, here, you can flexibly adjust the output profile parameters including video codec, resolution, bit rate, frame rate, audio codec, bit rate, sample rate, channels, etc as you like to get better output video and audio quality.

Step 3: Edit Canon EOS M100 MP4 videos.

By default the Edit icon is grayed out. To activate the Edit menu, you have to select an item first. When a video or movie is selected, click the pencil like Edit icon on the left top tool bar to open the video editor window, here, you can play and preview the original video and output effects. Also you can flip or rotate video, trim, crop, add watermark, apply special effect, edit audio or insert external subtitle.

Edit Canon EOS M100 MP4 videos

Step 4: Start the conversion process.

After all setting is over, go back to the main interface and hit right-bottom "Convert" button to start to convert Canon EOS M100 MP4 to Davinci Resolve most compatible Apple Prores editing formats encoding process.

When the conversion is completed, launch Davinci Resolve on your Mac computer to import converted video to Davinci Resolve for smooth post editing workflow.

Monday, November 6, 2017

Edit Sony FDR-AX700 4K XAVC S with Davinci Resolve

Designed for professional performance and ease of use, the FDR-AX700 captures every subject with the realism of 4K HDR (HLG) video, thanks to Faster Hybrid AF and other pro-class capabilities. The Sony FDR-AX700 record 4K video in XAVC S format with a bitrate up to 100Mbps. After the shooting stage, if you are looking for a professional editing tool to do color correction and professional audio post production, Davinci Resolve can be your best choice. How about the workflow of Sony FDR-AX700 4K XAVC S with Davinci Resolve?

Can Davinci Resolve native import FDR-AX700 4K XAVC S video?

The Sony FDR-AX700 records 4K XAVC S format wrapped in an MP4 container and compressed with H.264 High Profile levels 5.1 and 5.2. From Davinci Resolve supported file formats, we can see that Davinci Resolve can native handle the H.264 compression codec used by FDR-AX700, however, it is well known that the H.264 is an extremely processor intensive codec, it is so compressed that your computer's cpu is having to decode it on the fly, which is a big burden.

Transcode FDR-AX700 4K XAVC S to Prores

To process the editing more quickly, it would be much ideal for you to transcode the 4K XAVC S to a finishing format such as Apple Prores. An intermediate codec which is intended for use during video editing. The Apple Prores codec can helps to retain high quality and while still require much less expensive disk system compared to uncompressed video.

Here, you can do the conversion by downloading our best Prores Converter - Pavtube Video Converter for Mac. The program has full importing support the 4K XAVC S video shot with FDR-AX700. Thanks to its batch conversion mode, you can load multiple video at one time for conversion to save your precious time.

The program assists you to transcode FDR-AX700 4K XAVC S to Davinci Resolve native compatible Apple Prores format in various different file types including "Apple Prores 422(*.mov)", "Apple Prores 422(HQ)(*.mov)", "Apple Prores Proxy)(*.mov)" and "Apple Prores (LT)(*.mov). Here, you can choose the suitable ones according to your own situatin or needs.

If you computer is old or slow, or you just want to do some rough editing, you can select to output "Apple Prores Proxy)(*.mov)"or "Apple Prores (LT)(*.mov)"format to save more space and bandwidth. However, if your computer are powerful enough to handle multicam and high-resolution video and you are going to do many effects editing work with Davinci Resolve, you'd better choose to output "Apple Prores 422(*.mov)"or "Apple Prores 422(HQ)(*.mov)"for better performance.

For Windows users, please switch to download Pavtube Video Converter to perform the same codec transcoding on Windows 10/8.1/8/7.

Step by Step to Transcode Sony FDR-AX700 4K XAVC S for Davinci Resolve Editing

Step 1: Load Sony FDR-AX700 4K XAVC S footage.

Download the free trial version of the program. Launch it on your computer. Click "File" menu and select "Add Video/Audio" or click the "Add Video" button on the top tool bar to import Sony FDR-AX700 4K XAVC S into the program.

Load Sony FDR-AX700 4K XAVC S video

Step 2: Choose output file format.

Clicking the Format bar, from its drop-down list, choose Davinci Resolve best favorable Apple Prores editing codec.

If you try to do more effects editing of the H.264 video with Davinci Resolve on powerful computer, it would be much ideal for you to choose "Apple Prores 422(*.mov)" or ""Apple Prores 422(HQ)(*.mov)"for high quality performance.

Output Prores 422 or 422 HQ

If you have a underpowered Mac computer, to get a smooth post editing workflow, it would be much ideal for you to choose"Apple Prores 422(Proxy)(*.mov)" or "Apple Prores 422(LT)(*.mov)" format.

Output Prores 422 Proxy or LT format

Step 3: Start the conversion process.

After all setting is over, go back to the main interface and hit right-bottom "Convert" button to start to convert FDR-AX700 4K XAVC S to Davinci Resolve most compatible Apple Prores editing formats encoding process.

When the conversion is completed, launch Davinci Resolve on your Mac computer to import converted video to Davinci Resolve for smooth post editing workflow.

Tuesday, October 31, 2017

Import DJI Zenmuse X7 4K Video to Davinci Resolve

DJI has just release Zenmuse X7, the world's first super 35 digital film camera optimized for professional aerial cinematography. This camera system offers multiple recording options, you can record DCI 4K at 30 fps, UHD 4K at 60 fps in Cinema-DNG format and also DCI and UHD 4K in ProRes and H.265/H.264. For Davinci Resolve users, you may be a little confusing how to import and edit all those 4K formats with Davinci Resolve. The following article will show you a detailed guide to get a high quality and high performance editing workflow of DJI Zenmuse X7 4K video with Davinci Resolve.

Media Compatibility of Davinci Resolve with Zenmuse 4K formats

From Davinci Resolve supported file formats, we can see that you can native import the 4K H.264, 4K Prores and 4K Cinema-DNG formats into Davinci Resolve, however, as for the 4K H.265 video, even the latest Davinci Resolve 14 still lacks the ability to handle it.

Transcode DJI Zenmuse X7 4K for Davinci Resolve

To successfully load DJI Zenmuse X7 4K H.265 video to Davinci Resolve, you will need to perform a codec transcoding process. Here, you can get the job easily done by downloading our best H.265 Decoder Software - Pavtube Video Converter. The program supports batch conversion mode, so that you can load multiple video at one time into the application for conversion to save your precious time.

With the application, you can efficiently transcode DJI Zenmuse X7 4K H.265 video to Davinci Resolve editable DNxHD, Apple Prores, QuickTime formats with perfect quality and super fast encoding speed. If your computer is not powerful enough, you can also choose to compress 4K to 1080p to produce a smaller file for smooth post editing workflow.

Edit DJI Zenmuse X7 4K video

Before loading DJI Zenmuse X7 4K into FCP X, you can do some basic video editing task with the built-in versatile editing tools offered by our application. If you don't want to convert the entire video footage, you can use the trimming tool to remove unwanted parts, if there are black edges around your video frame, you can use the cropping tool to remove them off. You can also merge separate video into single one with the correct order, split large video files into small ones by file size, count or file length. Or add transparent text watermark to video footage.

For Mac users, please go to download the Mac version - Pavtube Video Converter for Mac to perform the conversion on macOS High Sierra, macOS Sierra, Mac OS X El Capitan, Mac OS X Yosemite and Mac OS X Mavericks, etc.

Step by Step to Downscale and Decode DJI Zenmuse X7 4K to Davinci Resolve

Step 1: Import DJI Zenmuse X7 4K videos.

From "File" drop-down option, select "add Video/Audio"to add DJI Zenmuse X7 4K Prores/H.264/H.265/Cinema-DNG 4K files into the program.

Import DJI Zenmuse X7 4K videos

Step 2: Specify output file format.

Click the "Format" bar, from its drop-down list, select one of Davinci Resolve supported editing formats such as DNxHD codec.

Output Davinci Resolve supported editing formats

Tips: Click "Settings" on the main interface to open "Profile Settings" window, here, you can flexibly adjust the output profile parameters including video codec, resolution, bit rate, frame rate, audio codec, bit rate, sample rate, channels, etc as you like to get better output video and audio quality.

Step 3: Edit DJI Zenmuse X7 4K video.

By default the Edit icon is grayed out. To activate the Edit menu, you have to select an item first. When a video or movie is selected, click the pencil like Edit icon on the left top tool bar to open the video editor window, here, you can play and preview the original video and output effects. Also you can flip or rotate video, trim, crop, add watermark, apply special effect, edit audio or insert external subtitle.

Edit DJI Zenmuse X7 4K video

Step 4: Begin the conversion process.

After all setting is completed, hit the "Convert" button at the right bottom of the main interface to begin the conversion process from DJI Zenmuse X7 4K to Davinci Resolve supported DNxHD codec.

When the conversion is finished, click "Open Output Folder" icon on the main interface to open the folder with generated files. Then you can get a high quality and high performance workflow of DJI Zenmuse X7 4K video with Davinci Resolve.