With great power comes great responsibility and with fast development of media technologies comes a wide variety of media formats. Each audio format has its own significant features. To enjoy music that is stored in exotic formats that you don’t deal with on a regular basis, you can either install dozens of audio players that promise to open this file’s extension or simply convert your audio track to a more commonly used format.

So for some compatibility reasons, sometimes it’s necessary to convert a music file into other audio formats. Below, we have tested and reviewed the best free audio converters that can flawlessly work with all sorts of audio files and formats.
1. Switch Sound File Converter (Win/Mac)
Another free audio converter is called Switch Sound File Converter. It supports batch conversions and whole folder imports, as well as drag and drop and lots of advanced settings.
Input Formats: 3GA, AAC, ACT, AIF, AIFC, AIFF, AMR, APE, ASF, AU, CAF, CDA, DART, DCT, DS2, DSS, DVF, FLAC, GSM, M4A, M4R, MID, MOH, MP2 ,MP3, MPC, MPGA, MSV, OGA, OGG, QCP, RA, RAM, RAW, RCD, REC, RM, RMJ, SHN, SMF, SPX, VOC, VOX, WAV, WMA, and WV
Output Formats: AAC, AC3, AIFC, AIF, AIFF, AMR, APE, AU, CAF, CDA, FLAC, GSM, M3U, M4A, M4R, MP3, MPC, OGG, PLS, RAW, SPX, VOX, WAV, WMA, and WPL
Note: This program is listed as "Trial" but the non-pro features remain free for personal use after the 14-day trial is over.
Support : Mac OS X (10.4 and above) and Windows (XP and newer) users can install Switch Sound File Converter
2. Free Studio (Win)
Free Studio is actually a group of several programs. Just click Convert from the main menu, and then choose the Free Audio Converter option to open the audio converter tool.
Input Formats: AAC, AC3, AIF, AIFF, ALAC, AMR, APE, ASF, AU, CAF, CUE, FLAC, M4B, MKA, MP2, MP3, MPC, OGG, RA, RAM, RM, RMM, RMVB, SHN, SPX, TTA, WAV, and WMA
Output Formats: AAC, ALAC, AMR, FLAC, OGG, M4B, M4R, MP3, WAV, and WMA
Free Studio also lets you extract audio from YouTube, audio CDs, and most video formats.
Free Studio works with Windows 10, 8, 7, Vista, and XP
3. SUPER (Win)
SUPER is very much a superior free audio converter. The best thing about SUPER is the long list of audio formats it supports.
If you have a rare audio file you want to convert to something more common (or vice versa), you should try the SUPER audio converter.
Input Formats: AAC, AC3, AMR, APE, FLAC, MMF, M4A, MP2, MP3, MPC, MPP, OGG, RA, RAM, RM, TTA, WV, WAV, and WMA
Output Formats: AAC, AC3, AMR, APE, FLAC, MMF, MP2, MP3, MPC, OGG, TTA, WV, WAV, and WMA
You can also extract the audio from most common video formats with SUPER and save as any of the above Output Formats.
Support Windows.
4. FileZigZag (Mac)
FileZigZag is an online audio converter service that will convert most common audio formats.
All you do is upload the original audio file, choose the desired output format, and then wait for an email with a link to the converted file.
Input Formats: 3GA, AAC, AC3, AIF, AIFC, AIFF, AMR, AU, CAF, FLAC, M4A, M4P, M4R, MID, MIDI, MMF, MP2, MP3, MPGA, OGA, OGG, OMA, OPUS, QCP, RA, RAM, WAV, and WMA
Output Formats: AAC, AC3, AIF, AIFF, AIFC, AU, FLAC, M4A, M4R, MP3, MMF, OPUS, OGG, RA, WAV, and WMA
FileZigZag should work with all operating systems that support a web browser, like Mac OS X, Windows, and Linux.
5. Zamzar (Win/mac)
Zamzar is another online audio converter service that supports most common music and audio formats.
Input Formats: 3GA, AAC, AC3, AIFF, AIFC, CAF, FLAC, M4A, M4B, M4R, MIDI, MP3, OGA, OGG, RA, RAM, WAV, and WMA
Output Formats: AAC, AC3, FLAC, M4A, M4R, MP3, OGG, WAV, and WMA
Zamzar Review and Link
The biggest disadvantage with Zamzar is their 50 MB limit for source files. While many audio files are smaller than this, some low compression formats can exceed this small limit.
Zamzar can be used with pretty much any modern web browser on any OS, such as Windows, Mac, and Linux.
Other Recommend: Best Professional Audio/Video Converter
1. Pavtube Video Converter (only $35)
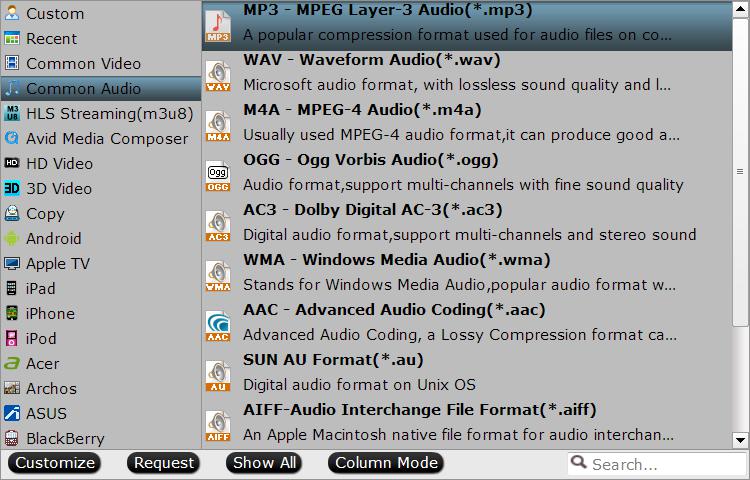
Support converting all audio formats: AAC, AC3, AIF, AIFF, ALAC, AMR, APE, ASF, AU, CAF, CUE, FLAC, M4B, MKA, MP2, MP3, MPC, OGG, RA, RAM, RM, RMM, RMVB, SHN, SPX, TTA, WAV, and WMA etc
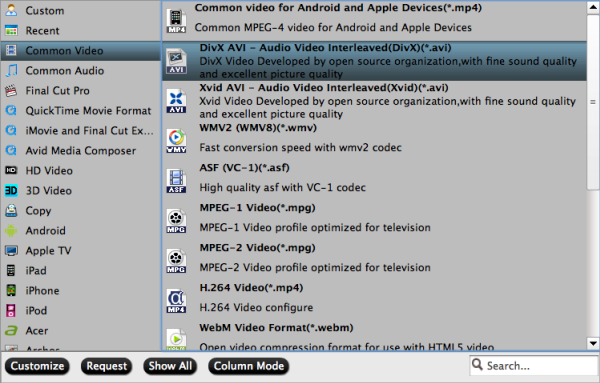
Support converting all videoformats: H.265/HEVC, XAVC, H.264, MP4, MOV, MKV, VOB, WMV, MPG, Tivo, AVI, Divx, M4V, QT, FLV, F4V, ASF, 3GP, TS, MTS, M2TS, FLV, F4V, SWF, M3U8, TP, TRP, MOV, MOD, TOD, MXF(partial), DV, M2V, 3G2, RM, RMVB, DAT, NUT, NSV, etc.
Operating System: Windows XP/2003/Vista/Windows 7/Windows 8/Windows 8.1/Windows 10


2. Pavtube Video Converter for Mac (only $35)
Support converting all audio formats: AAC, AC3, AIF, AIFF, ALAC, AMR, APE, ASF, AU, CAF, CUE, FLAC, M4B, MKA, MP2, MP3, MPC, OGG, RA, RAM, RM, RMM, RMVB, SHN, SPX, TTA, WAV, and WMA etc
Support converting all videoformats: H.265/HEVC, XAVC, H.264, MP4, MOV, MKV, VOB, WMV, MPG, Tivo, AVI, Divx, M4V, QT, FLV, F4V, ASF, 3GP, TS, MTS, M2TS, FLV, F4V, SWF, M3U8, TP, TRP, MOV, MOD, TOD, MXF(partial), DV, M2V, 3G2, RM, RMVB, DAT, NUT, NSV, etc.
Operating System: Mac macOS Sierra, Mac OS X 10.11 El Capitan, 10.10 Yosemite, OS X 10.9 Mavericks, OS X 10.8 Mountain Lion, OS X 10.7 Lion, OS X 10.6 Snow Leopard, OS X 10.5 Leopard on Mac, MacBook, MacBook Air, MacBook Pro


Why Choose Pavtube Video Converter?
And it also can ouput formats for suitable formats for popular editing softwares:
Output Video Editing Programs:
FCP X, FCP 6/7, FCE, iMovie, Apple Aperture 3, Avid Media Composer, Adobe Premiere Pro CC, Premiere Pro CS6/5/4/3, Adobe After Effects CC, After Effects CS6, Adobe Premiere Elements 13/12, Adobe Creative Suite, DaVinci Resolve, iPhoto, Kdenlive, Keynote, Avid Media Composer, Adobe Premiere Pro CC, Adobe After Effects CC, After Effects CS6, Pinnacle Studio 17/16/15/14, Windows Movie Maker, Sony Vegas Pro 13 Edit, Sony Vegas Pro, Sony Movie Studio 13, Cyberlink PowerDirector etc.
.............................
Read Guides:
So for some compatibility reasons, sometimes it’s necessary to convert a music file into other audio formats. Below, we have tested and reviewed the best free audio converters that can flawlessly work with all sorts of audio files and formats.
1. Switch Sound File Converter (Win/Mac)
Another free audio converter is called Switch Sound File Converter. It supports batch conversions and whole folder imports, as well as drag and drop and lots of advanced settings.
Input Formats: 3GA, AAC, ACT, AIF, AIFC, AIFF, AMR, APE, ASF, AU, CAF, CDA, DART, DCT, DS2, DSS, DVF, FLAC, GSM, M4A, M4R, MID, MOH, MP2 ,MP3, MPC, MPGA, MSV, OGA, OGG, QCP, RA, RAM, RAW, RCD, REC, RM, RMJ, SHN, SMF, SPX, VOC, VOX, WAV, WMA, and WV
Output Formats: AAC, AC3, AIFC, AIF, AIFF, AMR, APE, AU, CAF, CDA, FLAC, GSM, M3U, M4A, M4R, MP3, MPC, OGG, PLS, RAW, SPX, VOX, WAV, WMA, and WPL
Note: This program is listed as "Trial" but the non-pro features remain free for personal use after the 14-day trial is over.
Support : Mac OS X (10.4 and above) and Windows (XP and newer) users can install Switch Sound File Converter
2. Free Studio (Win)
Free Studio is actually a group of several programs. Just click Convert from the main menu, and then choose the Free Audio Converter option to open the audio converter tool.
Input Formats: AAC, AC3, AIF, AIFF, ALAC, AMR, APE, ASF, AU, CAF, CUE, FLAC, M4B, MKA, MP2, MP3, MPC, OGG, RA, RAM, RM, RMM, RMVB, SHN, SPX, TTA, WAV, and WMA
Output Formats: AAC, ALAC, AMR, FLAC, OGG, M4B, M4R, MP3, WAV, and WMA
Free Studio also lets you extract audio from YouTube, audio CDs, and most video formats.
Free Studio works with Windows 10, 8, 7, Vista, and XP
3. SUPER (Win)
SUPER is very much a superior free audio converter. The best thing about SUPER is the long list of audio formats it supports.
If you have a rare audio file you want to convert to something more common (or vice versa), you should try the SUPER audio converter.
Input Formats: AAC, AC3, AMR, APE, FLAC, MMF, M4A, MP2, MP3, MPC, MPP, OGG, RA, RAM, RM, TTA, WV, WAV, and WMA
Output Formats: AAC, AC3, AMR, APE, FLAC, MMF, MP2, MP3, MPC, OGG, TTA, WV, WAV, and WMA
You can also extract the audio from most common video formats with SUPER and save as any of the above Output Formats.
Support Windows.
4. FileZigZag (Mac)
FileZigZag is an online audio converter service that will convert most common audio formats.
All you do is upload the original audio file, choose the desired output format, and then wait for an email with a link to the converted file.
Input Formats: 3GA, AAC, AC3, AIF, AIFC, AIFF, AMR, AU, CAF, FLAC, M4A, M4P, M4R, MID, MIDI, MMF, MP2, MP3, MPGA, OGA, OGG, OMA, OPUS, QCP, RA, RAM, WAV, and WMA
Output Formats: AAC, AC3, AIF, AIFF, AIFC, AU, FLAC, M4A, M4R, MP3, MMF, OPUS, OGG, RA, WAV, and WMA
FileZigZag should work with all operating systems that support a web browser, like Mac OS X, Windows, and Linux.
5. Zamzar (Win/mac)
Zamzar is another online audio converter service that supports most common music and audio formats.
Input Formats: 3GA, AAC, AC3, AIFF, AIFC, CAF, FLAC, M4A, M4B, M4R, MIDI, MP3, OGA, OGG, RA, RAM, WAV, and WMA
Output Formats: AAC, AC3, FLAC, M4A, M4R, MP3, OGG, WAV, and WMA
Zamzar Review and Link
The biggest disadvantage with Zamzar is their 50 MB limit for source files. While many audio files are smaller than this, some low compression formats can exceed this small limit.
Zamzar can be used with pretty much any modern web browser on any OS, such as Windows, Mac, and Linux.
Other Recommend: Best Professional Audio/Video Converter
1. Pavtube Video Converter (only $35)
Support converting all audio formats: AAC, AC3, AIF, AIFF, ALAC, AMR, APE, ASF, AU, CAF, CUE, FLAC, M4B, MKA, MP2, MP3, MPC, OGG, RA, RAM, RM, RMM, RMVB, SHN, SPX, TTA, WAV, and WMA etc
Support converting all videoformats: H.265/HEVC, XAVC, H.264, MP4, MOV, MKV, VOB, WMV, MPG, Tivo, AVI, Divx, M4V, QT, FLV, F4V, ASF, 3GP, TS, MTS, M2TS, FLV, F4V, SWF, M3U8, TP, TRP, MOV, MOD, TOD, MXF(partial), DV, M2V, 3G2, RM, RMVB, DAT, NUT, NSV, etc.
Operating System: Windows XP/2003/Vista/Windows 7/Windows 8/Windows 8.1/Windows 10
2. Pavtube Video Converter for Mac (only $35)
Support converting all audio formats: AAC, AC3, AIF, AIFF, ALAC, AMR, APE, ASF, AU, CAF, CUE, FLAC, M4B, MKA, MP2, MP3, MPC, OGG, RA, RAM, RM, RMM, RMVB, SHN, SPX, TTA, WAV, and WMA etc
Support converting all videoformats: H.265/HEVC, XAVC, H.264, MP4, MOV, MKV, VOB, WMV, MPG, Tivo, AVI, Divx, M4V, QT, FLV, F4V, ASF, 3GP, TS, MTS, M2TS, FLV, F4V, SWF, M3U8, TP, TRP, MOV, MOD, TOD, MXF(partial), DV, M2V, 3G2, RM, RMVB, DAT, NUT, NSV, etc.
Operating System: Mac macOS Sierra, Mac OS X 10.11 El Capitan, 10.10 Yosemite, OS X 10.9 Mavericks, OS X 10.8 Mountain Lion, OS X 10.7 Lion, OS X 10.6 Snow Leopard, OS X 10.5 Leopard on Mac, MacBook, MacBook Air, MacBook Pro
Why Choose Pavtube Video Converter?
And it also can ouput formats for suitable formats for popular editing softwares:
Output Video Editing Programs:
FCP X, FCP 6/7, FCE, iMovie, Apple Aperture 3, Avid Media Composer, Adobe Premiere Pro CC, Premiere Pro CS6/5/4/3, Adobe After Effects CC, After Effects CS6, Adobe Premiere Elements 13/12, Adobe Creative Suite, DaVinci Resolve, iPhoto, Kdenlive, Keynote, Avid Media Composer, Adobe Premiere Pro CC, Adobe After Effects CC, After Effects CS6, Pinnacle Studio 17/16/15/14, Windows Movie Maker, Sony Vegas Pro 13 Edit, Sony Vegas Pro, Sony Movie Studio 13, Cyberlink PowerDirector etc.
.............................
Read Guides:
- Free YouTube to MP3 Converters on Mac OS X (El Capitan)
- How to Extract and Convert MKV FLAC 5.1 to AC3/AAC 5.1 in MKV for playing?
- How to Play, Convert, and Edit FLAC Files on Mac OS X (El Capitan included)
- How to Play FLAC /M4A/WAV/DTS/AAC/WMA/audio files on PS4?
- How to Convert MP4 to MP3 on Mac?
- Top 5 MTS/M2TS video converter fo Mac review
- Top 5 Mac video converter review
- 2016 Top 5 Best Mac HD Video Converter Review for Camcorder Lovers(updated)
- 2016 Top 5 DVD ripper review
- Best 10 Prores Converter to Decode/Encode Prores on Windows and Mac
- Best H.265 Encoder Review
- Top 5 MTS/M2TS Video Editors for Windows (10, 8.1, 8, 7, XP, etc)
- Best 5 Windows 10 Video Converter Review
- Best 3 Video Converter for macOS Sierra