Monday, March 9, 2015

Edit 4K XAVC Footage with No Rendering in NLEs

Editing or playing with 4K videos is no longer a pie in the sky. With the output recordings encoded by 4K XAVC for Sony FDR-AX1, we are glad to enjoy the 4K videos after edited in NLEs without rendering. In this article, we can get some XAVC tips on editing our 4K XAVC footage nicely.

The FDR-AX1 records 150Mb/s and for 1920x1080 at 60p you'll get 50Mb/s. But the editing workflow on Mac with AX1 4K XAVC S files is not so fluent. You may encounter problems when you want to import Sony AX1 XAVC S files to some hot editing tools or transcode XAVC to common formats on Windows/Mac, such as AVI, MOV, MP4, WMV, etc. or due to the high definition we can enjoy, someone would like to watch 4K XAVC on HDTV, right? Frankly speaking, that’s the main point we are talking in the following article.


How to edit our 4K XAVC recordings in NLEs with no rendering?
In order to edit Sony AX1 or other output 4K XAVC S clips in NLEs without crashing problem and avoid rendering, we here strongly introduce you the Pavtube Video Converter for Windows/Mac, which we also called a professional XAVC video converter to solving some XAVC incompatible issues. The reason why it has a good reputation among our users is it has the various output items for NLEs such as FCP, Avid MC, Premiere Pro, iMovie, etc. Do you wanna a try?

Show you how to transcod 4K XAVC files without rendering here:
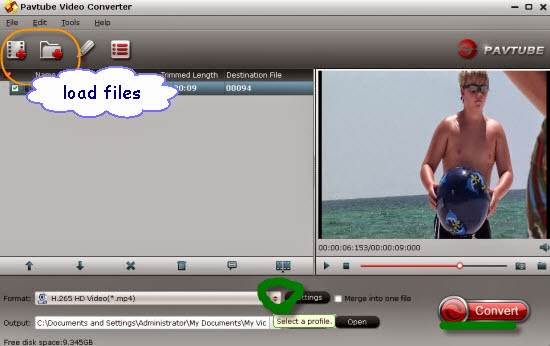
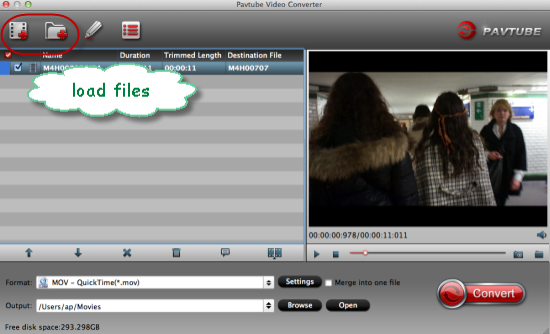
Step 1. Free download and install 4K video converter Mac version, you can run this program on Mac OS operation systems. Open the main interface and tap the ‘Add videos’ and ‘Add from folder’ to let them in.


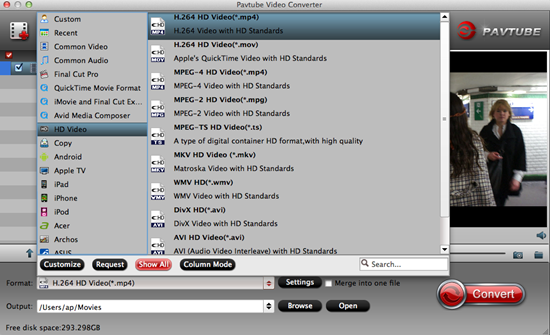
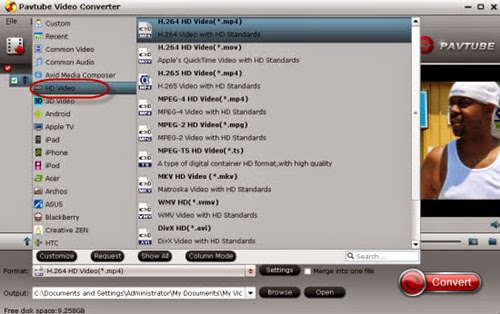
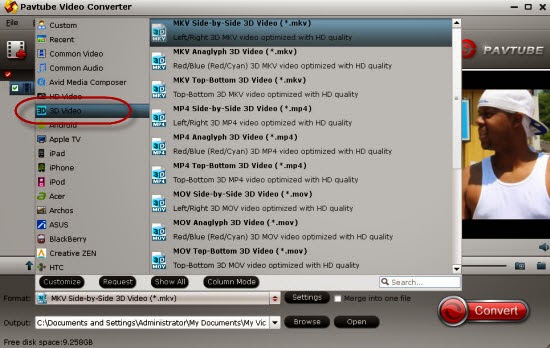
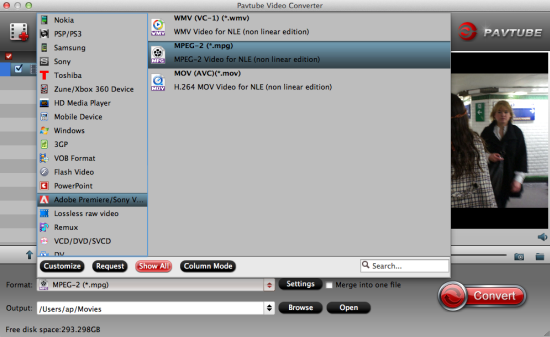
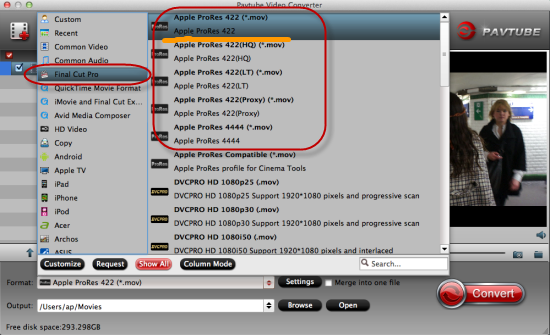
Step 2.  After you imported the 4K files, please click format column to choose output video format you need, such as MP4, MOV, AVI, MKV, etc. just choose according to your need. Especially for those hot NLEs, we suggest you to drop down the output list to find the individual ones. For example: ‘Final Cut Pro”>>’Apple ProRes codec 422 (*.mov)’.(FCP supported video formats) Others you can easily find them there.


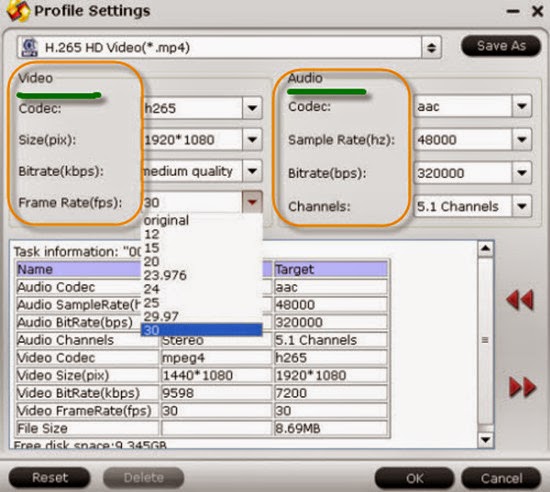
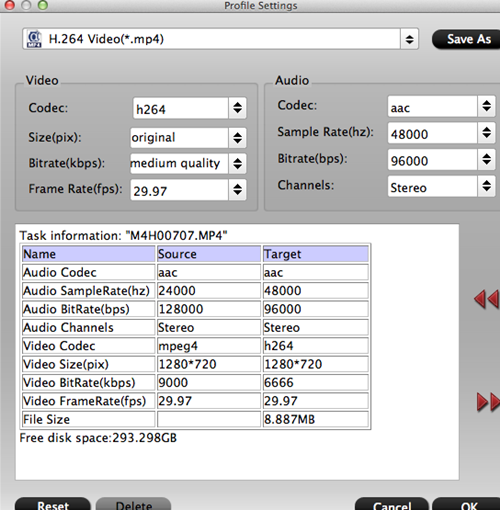
Step 3. To preserve the high quality after conversion? After you selected the video format, you can click settings button to adjust the output parameters, such as adjust the resolution to 1920*1080, or choose original 4K resolution for output; adjust the bitrates can control the output video’s quality, you can adjust it to 2000-5000 kbps.


Conclusion: When your 4K files are converted, you can open the output folder and get the videos that you need. After transferring files into NLEs, such as FCP, it’s your time to edit the files with your own style. Just enjoy it! 

Related:

Friday, March 6, 2015

Play Sony AX100 4K XAVC Movies on HDTV

‘I purchased the Sony AX100 4K camcorder and shot some 4K recordings there several days ago. In order to check the high definition of the recordings, my friends suggested me to add them into HDTV as a try. However, errors like ‘unsupported’ always appeared there on the screen. Now I am finding some efficient ways to watch the 4K XAVC movies on HDTV smoothly’


In recent years, more and more video loves would like to enjoy the 4K high definition movies as it is becoming hotter and hotter in our daily life. Do you have some 4K videos recorded by camcorders or downloaded from online websites? Maybe you have, after got the 4K videos, you may want to watch 4K videos on HDTVs right? While with the HDTV best video formats limited, we cannot add 4K XAVC to HDTV so easily. Such problems may also happen when editing 4K XAVC in NLES, like FCP or playing on media players like VLC, etc. How could we solve the issues when enjoying 4K XAVC movies on HDTV?

Best 4X XAVC to HDTV converter to solve the issues well
To make the 4K XAVC videos more suitable with HDTV, we here would like to introduce you the professional 4K XAVC to HDTV converter---Pavtube Video Converter, which we can take to work with smoothly. We can look it as the professional HDTV assistant to help us a lot in watching 4K XAVC files, such as Samsung 4K TV, Sony 4K TV, Panasonic 4K TV, LG 4K TV, etc.

How to work this 4K XAVC to HDTV convert on Windows well?
1. Free download and install 4K video converter Windows version, you can run this program on Windows 10/8.1/7/XP, etc Open the main interface and tap the ‘Add videos’ and ‘Add from folder’ to let them in.


2. After you imported the 4K files, please click format column to choose output video format you need, such as MP4, MOV, AVI, MKV, etc. just choose according to your need. If you want to play videos on 4K TV, we recommend you to choose HD Video -> HD MP4 (*.mp4), this format is well supported by most HDTVs.


3. After you selected the video format, you can click settings button to adjust the output parameters, such as adjust the resolution to 1920*1080, or choose original 4K resolution for output; adjust the bitrates can control the output video’s quality, you can adjust it to 2000-5000 kbps.


Conclusion: When your 4K files are converted, you can open the output folder and get the videos that you need, now you can copy the files to USB Flash Drive, and then you can play 4K files on 4K HD TV with compatible format, and you can copy videos to other playable devices for watching as you want.

More related:

Wednesday, March 4, 2015

Can't Add MP4/MPEG Files to iTunes? Solved!

Can't add mp4 to iTunes or import MP4 files to iTunes successfully? I think most people who use iTunes encounter the following similar issues if they wanna enjoy movies on iPhone, iPad or other Apple devices. MP4, as a container format, differs in video codec. If your MP4 files are rejected by iTunes, it's most likely the codecs in MP4 files are unaccepted by iTunes. Thus we may need a professional MP4 to iTunes video converter.


Explanation on why MP4/MPEG files refused by iTunes sometimes:
Due to the iTunes best supported video formats, we can surely import those suitable videos to iTunes for transferring to Apple devices. While for MP4 media container format, it is encoded by many different video and audio codecs like DivX, Xvid, H.264, H.263, MPEG-4, AC3, WMA, AAC, etc. If the MP4 video is encode with iTunes unsupported video or audio codec, iTunes will not add and play it.

Pavtube Video Converter for Mac/Windows---Best MP4 to iTunes converter for adding files.
In order to solve the issue of "can't add MP4 to iTunes" or "can't transfer MP4 to iPhone, iPod, etc via iTunes", we strongly recommend converting MP4 to iTunes supported formats. To do this, you need a powerful yet easy-to-use MP4 to iTunes Converter. It has the feature of converting various kinds of MP4 files to iTunes recognized MP4 format, no matter the MP4 files are encoded with video codecs like DivX, Xvid, H.264, H.263, MPEG-4, etc or audio codecs like AC3, WMA, AAC, etc.

How to convert MP4/MPEG to iTunes with simple steps?
Step 1 Add MP4 to the program
Just drag and drop your MP4 file to the main interface of Pavtube MP4 to iTunes Converter to load file soon. Or click "Add File" button of the program to open your source MP4 file.


Step 2. Set MP4 as output format
Click the drop-down button if you have come to the output list. Here we should choose the right formats for iTunes. ‘HD Video’>>’H.264 HD Video(*.mp4)’ as the most typical suitable output for iTunes.


Step 3. Custom your MP4 videos to make them fit your player better
You can adjust your Bit rate and Frame rate in this "Settings" UI by clicking the "Settings" bottom beside the format bar. Take the following screen as a reference.


Conclusion: Hit the ‘Convert’ icon and if all seems to have gone well, open iTunes and transfer the converted movies to your iTunes library and then sync them to your iPhone/iPad/iPod. Just enjoying them by yourselves!

Read More:

Saturday, February 28, 2015

How to Play Xvid Movies with XviD Video Player?

Xvid is an open-source video codec based on the MPEG-4 container format. As an open-source format, it can be used on any operating system. The codec must be installed on the Windows and Mac OS X operating systems. Once it is installed, Xvid files can be viewed in the Windows Media Player and Quicktime video players. Or someone there may wanna watch Xvid files on Apple devices via iTunes, right?


So in order to nicely enjoy our Xvid movies, we usually need the professional Xvid video players. Cause the common video players as we all know has no ability of playing this Xvid codec movies, also including some popular media devices. However, the Pavtube Video Converter for Windows/Mac can be our best choice. With the multiple choices of various output items, we are glad to tell. It supports any video and audio format, application and even device.

How to convert Xvid files to suitable ones for different Xvid Players?
Step 1. Download and install this Xvid program on your computer, when the main interface pops up, click the ‘Add video’ or ‘Add from folder’ to load the files in.

Step 2. Come to the output list to choose the suitable format for different video players. Here you can look for those common acceptable ones in ‘HD Video’ item. Or directly select one for specific editing tools or media devices if you drop down the list.


Step 3. Go back to the main interface to hit the ending button ‘Convert’ to get started! 
Note: Before we start the conversion, we can also adjust the output vide parameters in our own style, including the video size, bitrates, frame rates or even the audi channels.

Additional hot Xvid video player are introduced below:
A: Windows Media Player v11.0 - Windows Media Player (WMP) is one of the most commonly used XviD players, primarily because it's the default media player in Windows and it's capable of playing pretty much any video format with the right codec installed.


B: BSPlayer v1.37 - BSPlayer is yet another XviD player or an alternative that's capable of playing back most media files (i.e. AVI, MPG, ASF, WMV, WAV and MP3) and subtitle formats (i.e. MicroDVD, Subviewer and SubRip). The player also supports custom subtitle positioning, colors, fonts and transparency. If you want to change how the interface look or feel, you can easily download new skins online.


In a word, with the professional Xvid video converter, you have no worries on how to play Xvid movies on various video players anymore! Oh, I forget to tell you that we can also preview our Xvid files in this converting program in the preview window. Come on!

You may also need:

Thursday, February 26, 2015

Import DivX/Xvid Files to Your iTunes Library without Trouble

Wanna enjoy our Divx or Xvid movies on Apple devices via iTunes? I have to admit that’s a cool idea but according to the iTunes best supported video formats, have you ever got any issues when importing Divx/Xvid files to iTunes? If you did meet such problems, how did you get rid of the trouble well? Whether or not, in the following article we can take a further learning of Divx/Xvid codec and know how to smoothly make Divx/Xvid supported by iTunes.


Further knowledge of Divx and Xvid codec:
If you are fond of playing videos on Apple devices, no matter for tablets or phones, you must know the MP4, MOV and M4V could be the typical ones that supported by iTunes, right? So in this way, DivX and Xvid files are usually compressed long video files that retain a high level of detail, but the problem is that they often aren't compatible for playing on other media software programs like iTunes, or Android New Kindle Fire. On the other way, they may not available for FCP, etc.

What should we need for importing Divx/Xvid files to iTunes?
In order to enjoy those nice movies with DivX or Xvid encoded on iTunes library and play them well on Apple devices, we have to ask some third-party tools to help us a lot. Pavtube Video Converter for Mac is such an easy to use assistant to convert all different videos to the supported ones for iTunes such as MP4, MOV or M4V etc. Some tips are also allowed below:

Step 1. Load our Divx or Vixd files in. In the main interface of this app, there are the ‘Add videos’ or ‘Add from folder’ buttons available for you to import your DivX files or Xvid. If your DivX or Xvid files are at hand, directly drag and drop the target files to this program. At once, you'll see all your wanted files are added to the left pane of this app.


Step 2. Choose the supported output formats for iTunes. Click the format image on the right side of the interface to pop up the "Format" window. Here we suggest you to choose the ‘HD Video’>>’H.264 HD Video (*.mp4)’ as the best one.


Optional Step 3. Come to the ‘Settings’ button to adjust your output videos with your own style? Such as the ‘Video size’, ‘Bitrates’ or ‘Frame rates’, etc. In order to enjoy the movies on Apple devices with a better effect, you won’t miss this step.


When everything is ok, on the bottom-right corner of the Divx/Xvid to iTunes Video Converter's interface, you can hit the "Convert" button to start video conversion. Now, you can see the conversion progress bar with the Percent Complete and remaining time showing. Then after transferring the files to iTunes as go to "File">"Add File to Library" to navigate to the output folder to import all the output file, it’s time to enjoy ourselves!

See Also:

Monday, February 23, 2015

3D AVI Converter: Easily Create 3D AVI Files with 2D Videos

“Is there a way to convert a 2D AVI file into a 3D AVI? I would like to convert my 2d AVI to 3D. How can I do this please ? I searched on the Internet and I found nothing.” How to convert 2D AVI to 3D AVI? Focus on this guide to help you easily to convert 2D AVI to 3D AVI for playing on various media players.


Have you ever dreamed of watching 3D AVI movies at home? Now 3D video converter makes your dream come true. Fast and easy to use, this 3D AVI video converter is an excellent tool which enables you to convert 2D videos to 3D videos, switch the modes among 3D videos as well as converting 3D videos to 2D videos for editing, or playing 3D movies on VLC, etc.

Preparation of converting 2D AVI movies to 3D AVI for a nice playback: Pavtube Video Converter for Windows/Mac, which in fact has the strong ability of handling all 3D videos there. To avhieve the goal of enjoying 3D movies just at home, it is the best assistant.

Step by step guide on showing you how to create 3D AVI movies with 2D video files quickly:
You can directly drag & drop your normal 2D video in any format to the 3D AVI converter or select "Add Videos’ or ‘Add from folder’ buttons.


To get your own overwhelming 3D experience, you here need to choose the output format according to your 3D media player. While in this 3D converter, we can choose any other form the ‘3D Video’ item.


Press the "Convert" button then leave the software to accomplish the rest of 2D to 3D AVI conversion automatically. Once the conversion is done, you then can import the files to your player and go ahead to enjoy your 3D enjoyment!

Notes: Wanna output videos with higher quality and smaller size? This professional 3D converter can support the latest H.265/HEVC codec movies well. So in this way, it is deserved to have a try!

More:

Friday, February 20, 2015

Does Adobe Premier Pro CC Support XAVC S Codec?

Got the XAVC S recordings but failed in importing your Sony XAVC S files to Premiere Pro CC? Such similar questions often asked on some hot forums by most video lovers, right? Fortunately, today here let’s have a specific talking on the XAVC S workflow, would you like to join us?


‘I've seen this asked in various places however nobody from Adobe has addressed the issue so the result is a bunch of speculation from other users.  Could someone from Adobe PLEASE tell us if there are plans to support Sony's XACV S codec in Premiere Pro CC and if so when we can expect to see this support added.’ That’s the emergency question asked by those Sony fans. Have you ever got the problems of working your XAVC S codec videos with popular NLEs, such as iMovie or Avid MC etc.? 

While for the Adobe Premiere Pro CC, any good suggestions of working XVAC S codec movies with it? Here is the good news! In order to be able to transcode XAVC-S footage for editing in Premiere Pro CC with lossless quality, we here highly recommend you guys the Pavtube Video Converter for Mac, which we could also see as the prefessional XAVC S converting assistant that can help us a lot. It comes with very easy to use menus and produces very good quality conversions as well as bulk processing so you could load it with files and leave it alone to do the job.

More tips of converting XAVC S codec to MPEG-2 we can learn on this XAVC S assistant below:

Step 1. Start up XAVC S Video Converter as a professional XVAC-S to MPEG Converter. When its main interface pops up, click ‘Add File’ to input your source media.


Step 2. Choose output format. This video converter offers optimized format preset for Adobe Premiere. Just click “Format” menu firstly and then follow “Adobe Premiere/Sony Vegas” to set ‘MPEG-2 (*.mpg)’ as the best output one.


Optional tips: If the default settings do not fit you requirement, you can click “Settings” icon to and enter the interface panel to adjust video size, bit rate, frame rate, sample rate and audio channels. 

After the conversion, click this “Open output folder” to see your converted files. Then you can open your Premiere Pro CC and load them without any problem as the ordinary steps, ‘add files’… to make the work well. Just enjoy your XAVC S recordings after editing XAVC S videos in Premiere Pro CC.

More: