Monday, January 20, 2014

Backup BD contents (mostly additional contents) with subtitles to Tablet for watching on the subway

This is a thorough hands-on review on the best Blu-ray Ripper for Mac of how to backup BD contents to external hard drive, or watch on tablets on the subway with subtitles.
Q: I needed a sw to backup mu BR collection and to transfer some contents on my tablet, mostly BR additional contents that i transfer to my tablet to watch it on the subway while i'm going to work. I was wondering whether there is a program could allow me do this? I'd prefer to convert these BRDs to h.264 for ipad or Xvid for Kindle Fire (HD) for enjoying. Any insights?"

I'd love to share my experience with you guys. After googling to search the word: transfer video from blu ray, convert blu ray to ipad, extract video with subtitles (Subtitle was in my search because was one of my first needs), I met this BDMagic for Mac.

I downloaded a trial version some months ago and liked it, after some time of tryouts to see if it was right for my needs i purchased it. i am able to transfer contents with subtitles, which was a features i did not found in anther sw, or i did not find simply in other software UI, it is simple to use.

This best Blu-ray Ripper for Mac can rolls off Blu-ray/DVD disc protection, supports loseless 1:1 Blu-ray backup and keeps all the disc titles and chapter structure perfectly.

Don't you like to have a try?

They provide free trial (no time limitation) before purchase; and you can reach the Windows version here (Also 30% off now).

Here is a guide for Mac users: How do I Back up and Burn a Blu-ray with Mac?

How to BD contents (mostly additional contents) with subtitles to Tablet for watching on the subway

At first, keep your Mac networked to insure the software will handle Blu-ray copy-protections.

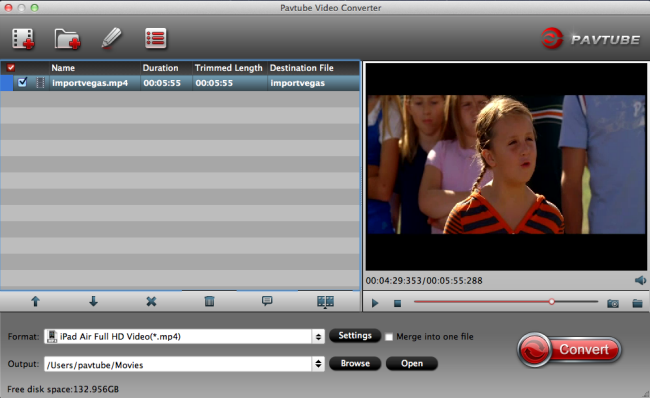
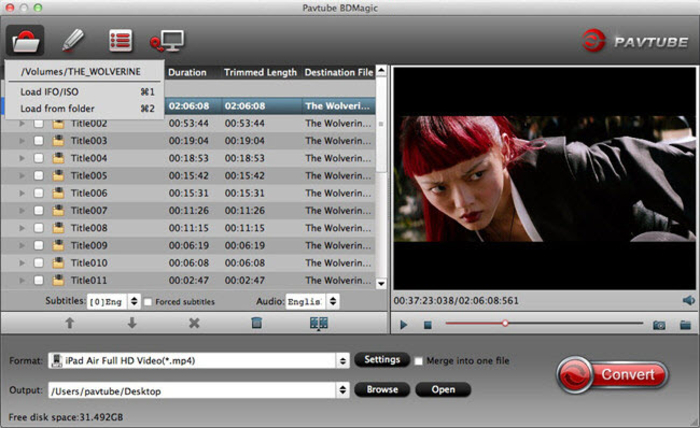
Step 1. Run Best Blu-ray Ripper for Mac and import disc.

Click this icon to load disc from ROM, IFO/ISO or folder. I also noticed if you have a ISO file to import, it will recognize the ISO file automatically with no need to run virtual driver and mount ISO files firstly. Good design.


Notes:
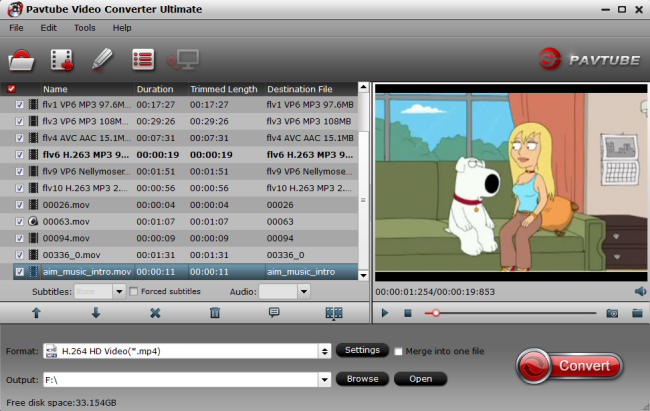
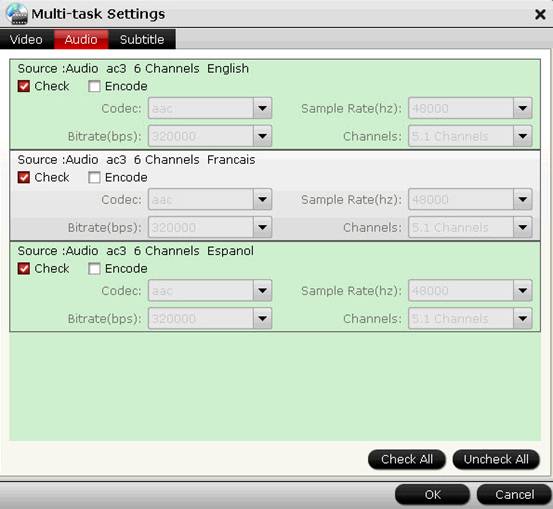
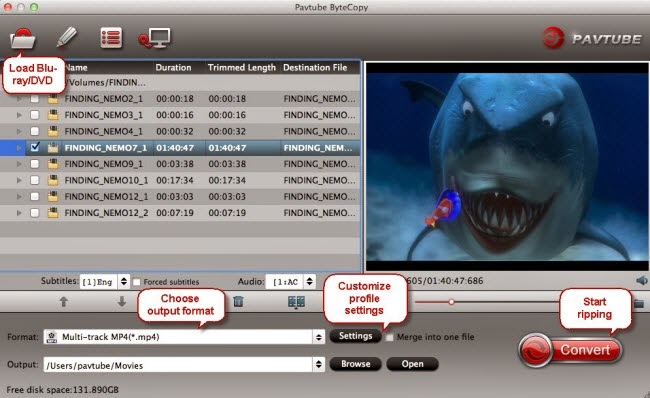
  • Select the movie title you want to convert, and preview the file you just selected from the BD movie in the preview window if you want.
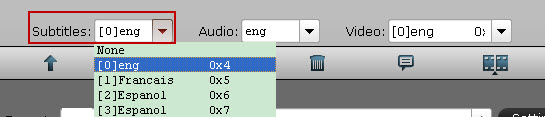
  • Select wanted subtitles and audio track if necessary. 

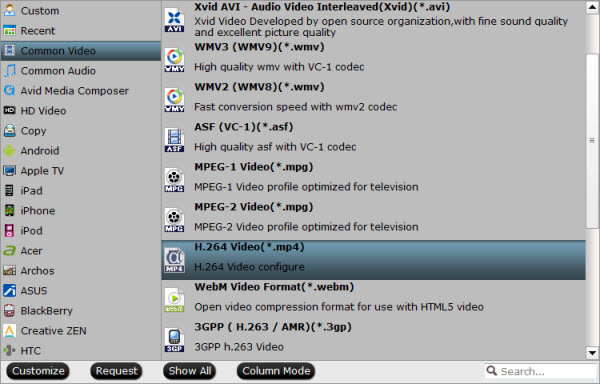
Step 2.
Choose format.

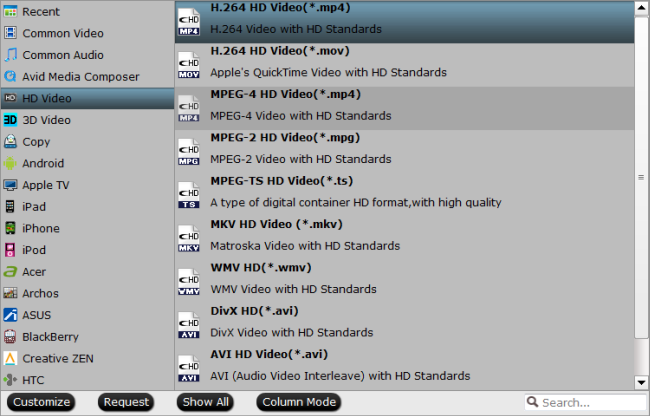
Click "Format" drop-down list and choose proper format for different using.

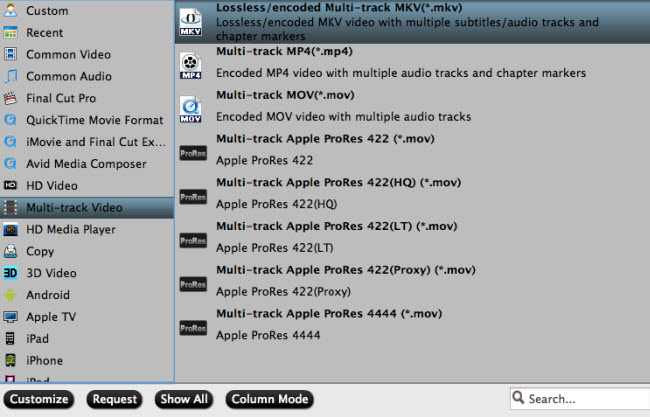
For instance, if you simply want to back up Blu-ray to external hard drive, here are two solutions:

1. Click the "computer" icon on the top to output 1:1 Blu-ray file exactly the same as original.

2. Select "Copy>Directly Copy" in format list to output an intact m2ts file of the main title.

directly copy

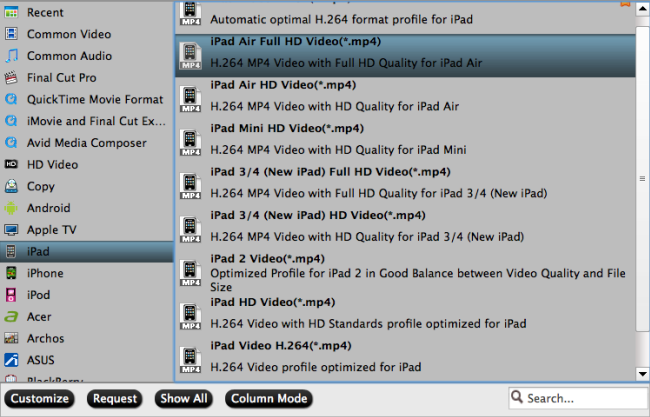
For people who want to watch Blu-ray movies on Tablet, you can choose "Common Video> H.264 Video(*.mp4)", it's well compatible with most Apple/Android/Windows devices.

Step 3. Change video specs. (Optional)

If you are not satisfied with default specs, then click "Settings" to enter Profiles Settings windows. You can customize video frame rate, bitrate, size and other settings freely.

(It does not work for directly copy)

Step 4. Add External Subtitles (srt/ass/ssa) 

If you want to trim, crop, edit audio/subtitles of the source video, just click the pencil-like icon on the top to enter video editor.

Click "Edit" button on the interface to find "Subtitle" option, check "Enable" then go to "Browse" to find your download subtitles in srt format. Click "OK" button to load the subtitles. Please note that subtitle in SRT/ASS/SSA format can be supported.


Step 5.  Start conversion.

Click the big red "Convert" to start backing up or converting your Blu-rays. Usually backup will be quicker because it does not need to do trancoding.

After the conversion, click "Open output folder" to quick locate converted files. Connect your tablet to computer and transfer them into it. Now the subtitle has become a part of converted mp4 movies, you can totally enjoy the movies on your tablet with subtitles on the subway. Just download the program to have a try. You will love it.


See also:

Ripping Blu-Ray on iMac and Stream 1080p on Apple TV 3 with Dolby 5.1 Sound 
Watch Blu-ray/DVD on Mac Mini HTPC via XBMC With Lossless Quality & All Audio Tracks 
Make DVD Movies Stored in External Hard Drive/Thumb Drive on Mac 
Edit Recorded ALS Ice Bucket Challenge Videos on Mac

Tuesday, January 14, 2014

iPad Air MKV Playback- Make 1080p/720p MKV playable iPad Air with subtitles on Mac

How to play 1080p/720p mkv movies on iPad Air? Please follow below simple steps to easily & quickly convert MKV to  iPad Air support video formats for smoothly playback on Mac. 
The new iPad Air is a new model tablet released by Apple Inc. in 2013. It is only 0.29 in depth and about 1 pound in weight, very thin and light. Especially, it comes with Retina Display and 2048-by-1536 resolution at 264 ppi. What an amazing experence to carry with iPad Air for a commute and travel to watch 1080p/720p videos and movies!


According to Apple, however, iPad Air supported video formats are limited to .mp4, mov and m4v, which means there will be many videos in different file format can’t be played with this device. Then many movie fans may have the question: How can we watch MKV files on iPad Air with subtitles when we are out?

To accomplish this goal, the most effective way is to convert MKV to MP4 with best video settings for iPad Air. Now follow this article; you will learn how to change MKV to iPad Air with subtitles easily within a few clicks on Mac OS X system. For Windows users, the workflow is almost the same.

Preparation:

Here I'd like to introduce Pavtube iPad Air Video Converter for Mac, a very easy-to-use video to iPad Air converting program which comes with flawless video quality and quick conversion speed on Mac.  Reach the Windows version here: iPad Air Video Converter.

(Both are 20% off now at Pavtube Christmas & New Year Huge Discount).

Tip 1:

If you have any requirements of outputting 3D (Side-by-Side, Top-Bottom, Anaglyph) in MKV/MP4/AVI/MOV/WMV formats, you are suggested to try this 20% off Video Converter Ultimate (Mac Verison: iMedia Converter for Mac)

Tutorials: Converting MKV to iPad Air friendly format on Mac

Step 1: Load video files to this Mac Video to iPad Air Converter

Download the Pavtube Video Converter for Mac on your computer, install and run the program, add videos. You can choose to import videos or the entire folder by clicking the top left two icons.


Tip 2:

From the drop-down list of Subtitles tab, choose the desired language you want to show in converted movie. You are allowed to choose audio track as well. (Read more: Subtitle FAQs)


Step 2. Choose a proper format for iPad Air.

Click the "Format" drop-down list and select "iPad >iPad Air Full HD Video(*.MP4)" for iPad Air. Or you can choose other presets if you don't need full size videos. You can submit "iPad Air" in the search box at the bottom right corner. 


Step 3. Customize video specs for iPad Air (Optional).

You could also click the "Settings" to adjust the video and audio parameters of output files.

In the Video Settings, you can select Encoder, Frame Rate, Resolution (you could define it yourself according to your iPad Air tablet) and Bitrate for your movie.

In the Audio Settings, you can select Encoder, Channels, Bitrate and Sample Rate for your movie.

Step 4. Start 1080p/720p MKV Videos to iPad Air Conversion.

You can hit the big red "Convert" to start converting MKV to MP4 with best video settings for iPad Air on Mac. After the conversion, click "Open output folder" in the conversion window, or "Open" in main interface to quick locate the converted video. Now, you can transfer these MKV to iPad Air on Mac for smooth playback without any problem. Enjoy your digital life!
Related Articles:

Put Blu-ray movies to iPad Air
Play DVD movies on iPad Air
Transfer Blu-ray ISO files on iPad Air
Rip DVD IFO Files to iPad Air for watching
  • Watch DVD Movies on New iPad 2017
  • Play 4K UHD Movies on Videos on New iPad 2017
  • Watch Blu-ray Movies on New iPad 2017
  • Monday, January 13, 2014

    How to perfect home video editing workflow with 5D mark III mov files

    Does some Video Editor support ALL-I .mov video files from Canon 5D Mark III? If you want to edit or play 5D3 H.264 mov files, you have to convert mov to compatible MP4 format.
    I have been an amateur photographer for 30 years and recently retired so am now able to spend more time on my main hobby of photography. I recently purchased a Canon 5D Mark III and while my main interest is photography and travelling, I am now starting to also use the video functionality with this DSLR camera.

    I am taking some family and holiday videos at 1920 x 1080 at 24fps with compression ALL-I. When I exported the .mov files from my camera to AVS Video Editor, while the software would play the files, it could not convert or edit them. (As for me, AVS Video Editor is my preferrable editing software to help me trim out of focus portions or other unwanted footage and add transitions or text. After editing my mov videos from Canon 5D Mark III, I can give copies to family members and retain as a personal archive.)


    After searching, I get these info: ALL-I stands for "Intra-coded Frame, the Intraframe (ALL-I) compression format is designed for users working in high-end editing systems or those looking for the highest quality possible. And 5D Mark III cameras record movies using the H.264 codec in the .mov container.

    Maybe the ALL-I compression type within this codec is too high for some Editors to support. Then I'm looking for the best software to convert Canon 5D Mark iii mov files to mp4 for editing. I did some reading in forums and a number of people recommended Pavtube HD Converter from first-hand experience. I didn’t realise at the time that you also have another product Video Converter Ultimate which may have suited me better. (As it can deal with Blu-ray and DVD disc as well)

    Previously I have been using AVS Video Converter and Video Editor for a number of years but when I purchased my camera recently I found AVS could not convert Canon mov files to mp4 or edit them. I like the availability of Pavtube Video Converter Ultimate to convert and merge all files into one to expedite editing. The conversion speed is excellent. With it, I can effortlessly transcode Canon 5D Mark III mov files to MP4 format for editing.

    Overall, it is an all-in-all converter that can help all Windows users losslessly convert the HD footages and Blu-ray/DVD files to most popular video formats as well as importing MOV files from 5D Mark III to Pinnacle, Cyberlink, Sorenson Squeeze, Windows Movie Maker, AVS Video Editor etc. for editing. Besides, this smart converting program also provides users with useful editing functions and new features such as converting 2D videos to 3D, etc.

    Guide: Transcoding Canon 5D Mark III to MP4 for editing and sharing 

    Step 1: Add mp4 footage from MP4 file folder to ALL-I H.264 MOV converter. You can directly drag and drop video files to this software.


    Step 2: Choose best editing and playback format.

    Select HD Video -->H.264 HD Video(*.mp4) or MPEG-4 HD Video(*.mp4) on the dropdown menu as output format. Besides, you can also choose Divx HD(*.avi) or WMV HD(*.wmv) is also fit for importing or watching.


    Tips:
    1. Video Settings:

    You can adjust video and audio parameters, including the Bitrate of Video and Audio, the Codec of Video and Audio, Video Size, Sample Rate, Frame Rate, Audio Channels, etc., in the Profile Settings.

    2. Edit videos as you like

    Find “Edit” icon and then click it, you will find video editor. There you can Trim, Crop, Add watermark and Effect. Above all, Subtitle can be added here.

    For creating customized subtitle, you can count on free software for subtitle editing: Subtitle Edit. Go to write the subtitle content there and it will be saved as SRT files, which is supported by Video Converter Ultimate. Then load it to the software for output videos and you will get a characteristic video.
    3. Convert videos to different formats

    Step 3: Hit "Convert" button to carry out the conversion process. When the conversion ends, you can import the resulted .mp4 files for playing or sharing easily.

    Other useful guides for you:

    Transcode Nikon D7100 H.264 MOV to Quicktime MOV for playing and editing on Mac 
    Best way to Edit/Import Canon T3i/600D MOV video into iMovie 
    Edit Recorded ALS Ice Bucket Challenge Videos on Mac 

    Wednesday, January 8, 2014

    Blu-ray to Galaxy - Convert/Transfer Blu-ray movies to Samsung Galaxy Tab 3

    Do you have a new Samsung Galaxy Tab 3 10.1/8.0? And do you have tried to play 1080p Blu-ray Movies on new Tab 3? This article is mainly talking about how to rip Blu-ray movie files to Galaxy Tab 3 support format for freely enjoying.
    Samsung Galaxy Tab 3 provides consumers watch, listen, creativity and close friends to share unforgettable moments with family and friends and especially the content of a variety of ways. Whether at home, or on the way to work, the Samsung Galaxy Tab 3 is the perfect choice to capture moments of life.

    Overall, the Galaxy Tab 3 (10.1 inch or 8.0 inch) is a great portable media player for watching movies. There are many choices to enjoy movies with your gadget. If you want to watch Blu-ray/DVD disc/ISO/folder on Galaxy Tab 3 10.1/8.0, you will need a tool to convert Blu-ray to Galaxy Tab 3 supported video formats first.

    There are many programs out there that allow you to make copies of your Blu-rays and let you watch them the way you want to view them. You may be confused about choosing a most suitable tool. If so, I recommend you try this Top Blu-ray Ripper from Pavtube Studio. It is easy to use for conversion and makes great quality copies of my Blu-ray disc.

    If you are a Mac user, you can use its equivalent Mac version – Pavtube BDMagic for Mac for transferring Blu-ray to Galaxy Tab 3 on Mac.


    How to rip Blu-ray Disc/ISO/folder to Samsung Galaxy Tab 3 10.1/8.0 

    FYI: Note: BD drive is required for ripping Blu-ray disc.

    Step 1. Import Blu-ray disc/ISO/folder.

    Click "Load files" to choose import from ROM, BD ISO/IFO or BD folder. It will detect and check the main title automatically; so keep it as default unless you want to include tidbits.


    Step 2. Chose "Samsung Galaxy Tab 3 Video(*.mp4)" as target format.

    Click the drop-down list besides Format, you can find many presets for different devices, editing programs and media player. Let’s choose "Samsung" in left area and select "Samsung Galaxy Tab 3 Video(*.mp4)" as target video format.

    Step 3. Customize video specs. (Optional)

    Pavtube Blu-ray to Galaxy Tab 3 Ripper also offers a editor window to let you free set eo specs; click "Settings" to customize output file size, bitrate, frame rate and sample rate.

    Step 4. Start Conversion.

    Click the "Convert" button to start converting Blu-ray to MP4 so you can watch them in Galaxy Tab 3 10.1/8.0 smoothly. Wait for moments, then click "Open output folder" to locate the converted file quickly.


    You may want to read:

    Convert DVD movie for watch on Samsung Galaxy Tab 3 10.1
    Can Galaxy Tab 3 play MKV, AVI, WMV, M4V, Tivo, VOB, FLV video
    Convert ISO/IFO image to MP4 for Galaxy Tab 3 10.1

    Easy way to Enable kids to watch downloaded DVD movies on Nabi 2 Tablet

    Simplest and most reliable guide to show you how to transfer and watch DVD movies on Nabi 2 with Pavtube DVDAid.

    The Nabi 2 is the successor to Fuhu's popular Nabi tablet, which designed especially for Kids. And it is convenient and easy to carry out for watching movie or playing game with your children. If you have purchased some Cartoon or Disney DVD movies, you must can't wait to transfer those videos to Nabi 2 so that your children can enjoy them anywhere he likes.


    However, as Nabi 2 Tablet can't play DVD movies directly for the lack of DVD drive. To watch DVD movies on Nabi 2, you need to convert DVD to Nabi 2 compatible format, to get this target, a professional DVD to Nabi 2 ripper is necessary.

    There are varies of DVD Ripper software, Pavtube DVDAid is regarded as the best DVD to Nabi 2 converter software on the market, which is a most effective program to rip DVD to Nabi 2 with retina display supported format like MP4 with fast ripping speed and high output video quality.

    Besides ripping DVD to Nabi 2, this DVD Ripper can also output a wide range video format including MKV, VOB, AVI, MOV, MPG, MP4, SWF, FLV, WMV, MP3, AAC, etc. for iPhone 5S/5C, iPad Air, Nexus 5, Kindle Fire HDX, Surface 2, Surface Pro 2, new Nexus 7, Sony Xperia Z1, HTC One Mini, Moto X, Apple TV 3, iPod 5, PSP/PS3 and many other devices. It is easy to use for editing and conversion and makes great quality copies of your DVDs. If you're not already installed this great utility, download it from PavtubeAid.

    Follow the steps below to download and put DVD movies to Nabi 2 for smoothly playing!

    For Windows / For Mac

    Note that the trial version will create videos with Partube logo standing in the center of the outputting image, to bypass the watermark; you should purchase the full version.

    How to rip DVD to Nabi 2 supported video format?

    Step 1. Load DVD file to the DVD to Nabi 2 converter.

    Insert DVD diso into your DVD-rom and then the software will detect it automatically, click the DVD diso icon to add DVD file, You can also add DVD folder or ISO file directly.


    Step 2. Set output format for Nabi 2.

    Select the output format for Nabi 2. Here H 2.64 MP4 is highly recommend. Click the Format option, and choose H.264 Video(*.mp4) from "Common Video" option, meanwhile don't forget select the destination folder to saved the converted video.


    Tip:

    a. How to rip DVD to Nabi 2 with wanted subtitle and audio track?


    Click the dropdown triangle button near subtitle list and audio list to select you wanted subs and audio tracks to be preserved in the resulted mp4 file for watch on Nabi 2.

    In addition Pavtube DVDAid also offers an option called "forced subtitle", which enable you to see subtitle only when actors are speaking a different language, for instance if you specify English (your mother tongue) as your subtitle, and meanwhile tick off "forced subtitle" option, then when actor are speaking English, no subtitle will show up, but when they are speaking in French, the subtitle will appear accompanying with the French.

    b. How to make a copy of DVD movies?

    If you want to make 1:1 copy of original DVD disc without quality loss with all audio streams, subtitle tracks, extras, etc, you can click the "Copy the entire disc" icon to meet your needs. 

    c. How to speed up converting process?

    If you have Nvidia CUDA/ATI AMD ready graphics card, you can have GPU encoding. Check the status of the CUDA/AMD button on the main interface and you'll learn if CUDA/AMD encoding is in use. 

    Step 3. Start converting DVD to Nabi 2.

    Click "Convert" button to start the conversion. You can view the conversion progress and are able to cancel the converting process anytime. As soon as the convertion is done, you can click open button to get the generated mp4 file and transfer it to your Nabi 2 for playing back.

    There, now you know how to get DVD movies onto your Nabi 2 so you can watch them on that gorgeous screen! Keep in mind that some of the settings can be tweaked to improve the video quality but it's a balance between quality and size.

    For watch Blu-ray on Nabi 2, you need download Blu-ray to Nabi 2 Converter to rip Blu-ray to Nabi 2 support format.

    Don't want to loss Blu-ray & DVD movie quality? Need to keep all the audio-tracks so that you can free switch languages while playback? Try this Pavtube ByteCopy. (Mac users can try this ByteCopy for Mac).

    Read More:

    Tuesday, January 7, 2014

    Rip DVD to lossless MKV with multiple audio tracks and subtitle

    How to convert DVD to MKV with keeping multiple audio channesl? Pavtube ByteCopy can be you ideal tool to rip DVD to lossless MKV with chapter markers with fast speed and fabulous output quality.

    What to do if you happen to have a large DVD collection and wish to enjoy them on your media player or TV? Don't want to loss video quality? Need to keep all the audio-tracks so that you can free switch languages while playback?


    To transfer DVD to play on players and TV, the first step is to remove commercial Blu-ray discs and DVDs protection from film studio, and then do the conversion. After several trials, we recommended this Pavtube ByteCopy (Review) which does a great job in quick decrypting the protected discs within a few clicks.

    Best of all, it can handle the latest DVD and is capable of backup DVD to lossless MKV preserving all the multiple audio and subtitle tracks as well as chapter markers. Also, I can convert DVD movie on Android/Apple/Windows Device with it.

    Note: Pavtube ByteCopy for Mac (Review) is for Mac users, here is the DVD to Lossless MKV on Mac Guide).


    Other Download:
    - Pavtube old official address: http://www.pavtube.cn/bytecopy/
    - Cnet Download: http://download.cnet.com/Pavtube-ByteCopy/3000-7970_4-76158512.html


    Now let me show you how to backup DVD to lossless MKV with chapter markers no recoding in 3 steps.

    Rip DVD to lossless MKV with multiple audio tracks and subtitle

    1. Import DVD to Pavtube ByteCopy.

    Click "Load file" icon on the top left to load the DVD disc.


    2. Choose Lossless MKV with chapter markers.

    Under "Format" menu, there are lots of video formats. Go to find "Multi-track Video" option and choose "Lossless/encoded multi-track MKV (* mkv)" because it will contain chapter markers in output MKV.


    Tips:

    1. If you want to convert DVD to other video formats or portable devices, just choose the video format you need or select portable devices in the dropdown list.

    2. Click "Settings" to enter Multi-track video profile window; switch to "Video" and find the "Encode" box which is unchecked by default, so if you want a lossless MKV copy, do not touch it. The switch to "Audio", check wanted audio track; so does the "Subtitles".


    3. Start conversion.

    Click big "Convert" button to start conversion. It won't take much time for conversion and then you will get lossless MKV once completed. Hit "Open" button you will go to location of generated files.

    Learn more details about how to rip DVD disc to MKV and keep chapter markers and then go to fully enjoy your favorite DVD whenever you wanna.

    More features in ByteCopy:

     * Full Disc Copy can 1:1 backup the whole Blu-ray/DVD disc with original structure including chapter markers.
    * Directly Copy will backup 100% intact Blu-ray main movie with all the multiple tracks excluding menu.
    * Contain all the features of Blu-ray Ripper: rip and convert latest Blu-ray/DVD to various video formats for playback or editing, edit the video before conversion including trim, crop, effect, etc, add *sst and *ass subtitle into video part and so on.

    Good news for you: To save your money, Pavtube Special Offer offers various product bundles, such as:

    Read more:

    Saturday, January 4, 2014

    Convert DVD to MP4 with multi-tracks on Mac (Mountain Lion and Mavericks 10.9 included)

    This guide will leads you to easily get your DVD contens to MP4 format in multi-track on Mac so you can switch to the desired language during playback.
    Digital Versatile Disc, referred to DVD, is an optical disk memory, which is usually used to play the standard TV-definition movies, high-quality music for storing mass data. DVD has five formats including DVD-VIDEO, DVD-ROM, DVD-R, DVD-RAM and DVD-AUDIO.

    However, many portable devices such as iPod, iPhone and iPad doesn’t have a built-in DVD-ROM or DVD player, they can't play DVD movies directly and even not to speak of keeping multiple audio channels. To get DVD playable on Mac in multi-trackyou should convert DVD to multi-track MP4 format first.  

    Good news now what you need is only a professional Blu-ray/DVD Ripper Pro for Mac- Pavtube ByteCopy for Mac that can help you convert DVD movies to MP4 format with multi-track easily. (Windows version: ByteCopy) It's an ideal app for you to remove the strict DVD protection and region restrictions and DVD contents to Multi-track MP4 video very quickly with great video quality.

    How to rip DVD contents to MP4 with multi-track on Mac

    Step1: Load DVD movies.

    Launch the best DVD to multi-track MP4 converter; import DVD movies into the program. Loaded DVDs can be previewed in the right preview window.


    Step 2: Choose output format

    To rip DVD with multiple tracks, click the drop down box of "Format", and choose the "Multi-track MP4 (*.mp4)" profile under "Multi-track Video". This profile is designed to output videos with multiple audio tracks.

    You can check the audios you want to keep and uncheck the audios you don't need. It all depends on your own choices.

    Step 3: The last step you need to do is hit the "Convert" button to start the conversion of DVD content to Multi-track MP4.

    When the conversion is over, just find the folder of your output videos. Then you can play and organize your DVD contents on your portable devices.

    Related articles: