Tuesday, January 7, 2014

Rip DVD to lossless MKV with multiple audio tracks and subtitle

How to convert DVD to MKV with keeping multiple audio channesl? Pavtube ByteCopy can be you ideal tool to rip DVD to lossless MKV with chapter markers with fast speed and fabulous output quality.

What to do if you happen to have a large DVD collection and wish to enjoy them on your media player or TV? Don't want to loss video quality? Need to keep all the audio-tracks so that you can free switch languages while playback?


To transfer DVD to play on players and TV, the first step is to remove commercial Blu-ray discs and DVDs protection from film studio, and then do the conversion. After several trials, we recommended this Pavtube ByteCopy (Review) which does a great job in quick decrypting the protected discs within a few clicks.

Best of all, it can handle the latest DVD and is capable of backup DVD to lossless MKV preserving all the multiple audio and subtitle tracks as well as chapter markers. Also, I can convert DVD movie on Android/Apple/Windows Device with it.

Note: Pavtube ByteCopy for Mac (Review) is for Mac users, here is the DVD to Lossless MKV on Mac Guide).


Other Download:
- Pavtube old official address: http://www.pavtube.cn/bytecopy/
- Cnet Download: http://download.cnet.com/Pavtube-ByteCopy/3000-7970_4-76158512.html


Now let me show you how to backup DVD to lossless MKV with chapter markers no recoding in 3 steps.

Rip DVD to lossless MKV with multiple audio tracks and subtitle

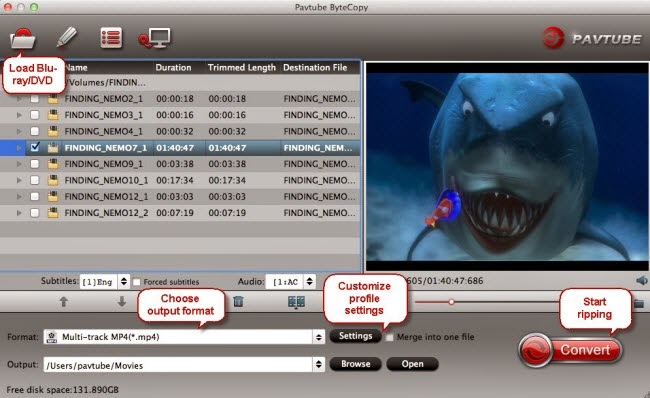
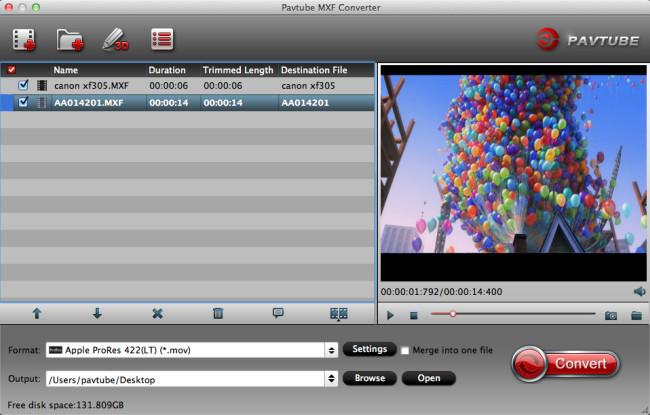
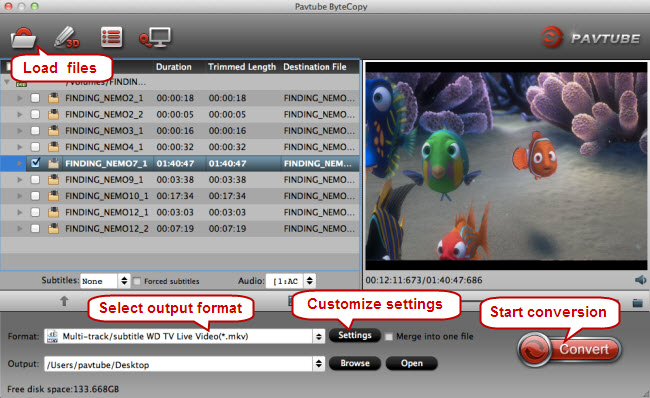
1. Import DVD to Pavtube ByteCopy.

Click "Load file" icon on the top left to load the DVD disc.


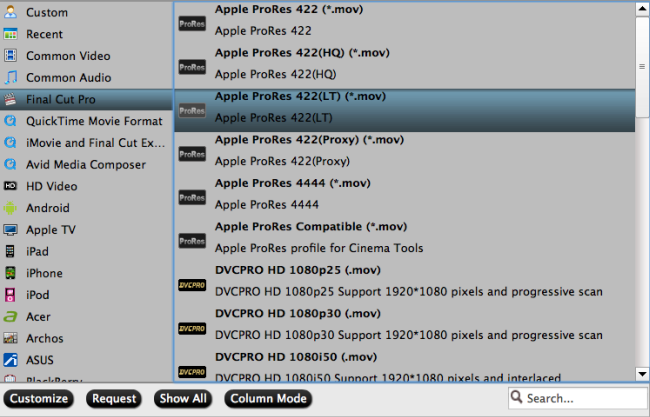
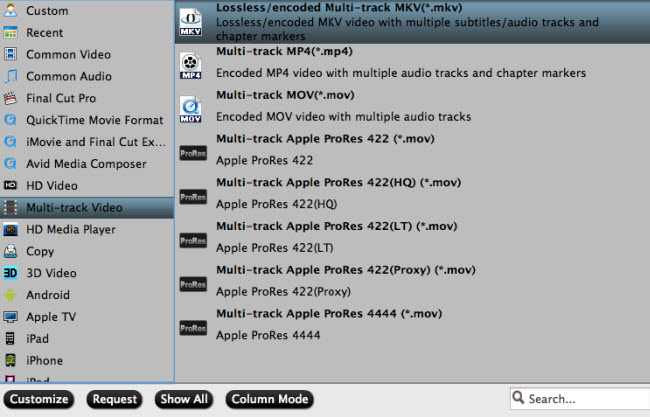
2. Choose Lossless MKV with chapter markers.

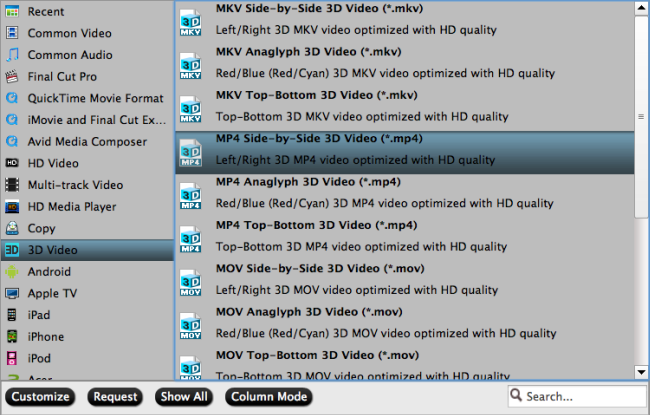
Under "Format" menu, there are lots of video formats. Go to find "Multi-track Video" option and choose "Lossless/encoded multi-track MKV (* mkv)" because it will contain chapter markers in output MKV.


Tips:

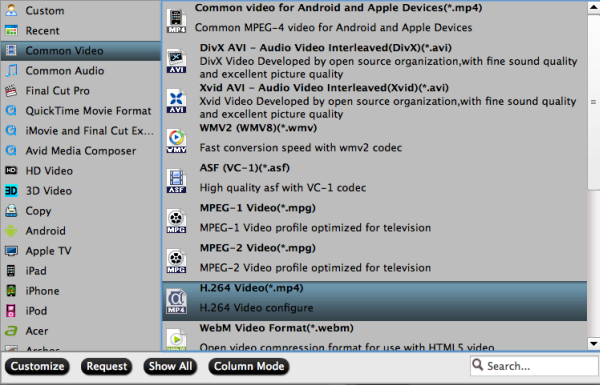
1. If you want to convert DVD to other video formats or portable devices, just choose the video format you need or select portable devices in the dropdown list.

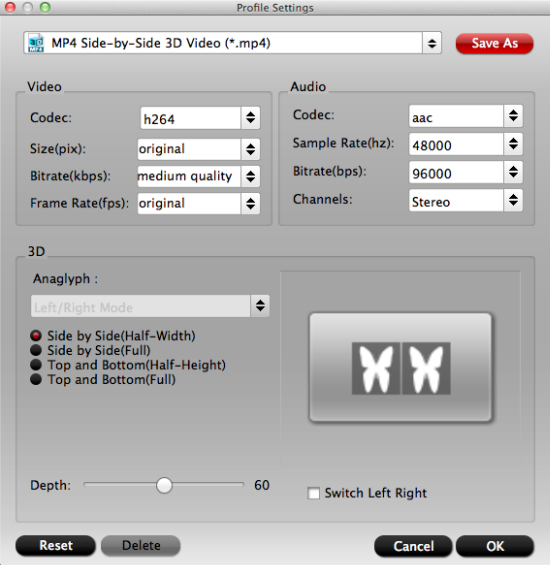
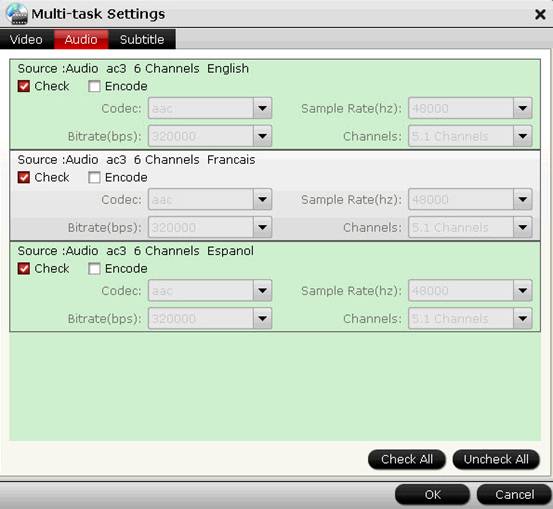
2. Click "Settings" to enter Multi-track video profile window; switch to "Video" and find the "Encode" box which is unchecked by default, so if you want a lossless MKV copy, do not touch it. The switch to "Audio", check wanted audio track; so does the "Subtitles".


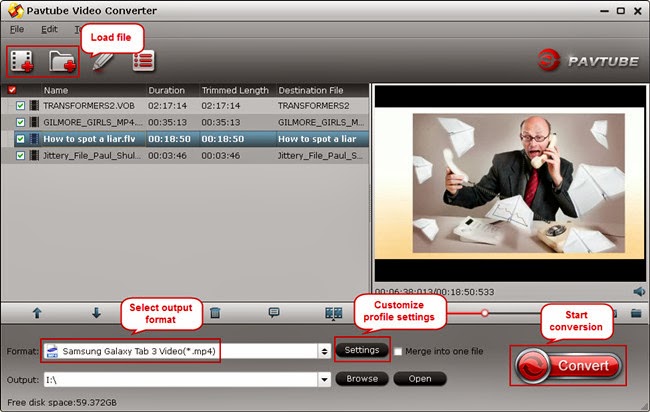
3. Start conversion.

Click big "Convert" button to start conversion. It won't take much time for conversion and then you will get lossless MKV once completed. Hit "Open" button you will go to location of generated files.

Learn more details about how to rip DVD disc to MKV and keep chapter markers and then go to fully enjoy your favorite DVD whenever you wanna.

More features in ByteCopy:

 * Full Disc Copy can 1:1 backup the whole Blu-ray/DVD disc with original structure including chapter markers.
* Directly Copy will backup 100% intact Blu-ray main movie with all the multiple tracks excluding menu.
* Contain all the features of Blu-ray Ripper: rip and convert latest Blu-ray/DVD to various video formats for playback or editing, edit the video before conversion including trim, crop, effect, etc, add *sst and *ass subtitle into video part and so on.

Good news for you: To save your money, Pavtube Special Offer offers various product bundles, such as:

Read more:

Saturday, January 4, 2014

Convert DVD to MP4 with multi-tracks on Mac (Mountain Lion and Mavericks 10.9 included)

This guide will leads you to easily get your DVD contens to MP4 format in multi-track on Mac so you can switch to the desired language during playback.
Digital Versatile Disc, referred to DVD, is an optical disk memory, which is usually used to play the standard TV-definition movies, high-quality music for storing mass data. DVD has five formats including DVD-VIDEO, DVD-ROM, DVD-R, DVD-RAM and DVD-AUDIO.

However, many portable devices such as iPod, iPhone and iPad doesn’t have a built-in DVD-ROM or DVD player, they can't play DVD movies directly and even not to speak of keeping multiple audio channels. To get DVD playable on Mac in multi-trackyou should convert DVD to multi-track MP4 format first.  

Good news now what you need is only a professional Blu-ray/DVD Ripper Pro for Mac- Pavtube ByteCopy for Mac that can help you convert DVD movies to MP4 format with multi-track easily. (Windows version: ByteCopy) It's an ideal app for you to remove the strict DVD protection and region restrictions and DVD contents to Multi-track MP4 video very quickly with great video quality.

How to rip DVD contents to MP4 with multi-track on Mac

Step1: Load DVD movies.

Launch the best DVD to multi-track MP4 converter; import DVD movies into the program. Loaded DVDs can be previewed in the right preview window.


Step 2: Choose output format

To rip DVD with multiple tracks, click the drop down box of "Format", and choose the "Multi-track MP4 (*.mp4)" profile under "Multi-track Video". This profile is designed to output videos with multiple audio tracks.

You can check the audios you want to keep and uncheck the audios you don't need. It all depends on your own choices.

Step 3: The last step you need to do is hit the "Convert" button to start the conversion of DVD content to Multi-track MP4.

When the conversion is over, just find the folder of your output videos. Then you can play and organize your DVD contents on your portable devices.

Related articles:

Thursday, January 2, 2014

Convert MKV movie to 3D MKV format on Windows 8.1/8

Want to get a 2D MKV video for playback on your TV with 3D effect? Now read the following article, you will get the best solution for converting MKV to 3D MKV on Windows 8.1/8.
Now it is a world of 2D video files, but when 3D videos came into our digital life, the world you see becomes real and stereoscopic. Instead of experiencing the new-rising 3D movies in cinema, you can enjoy 3D video at home now.

Then how to make it, while most MKV videos in 2D effect and if you wanna get 3D effect when playback on your 3D devices, you need the a 2D to 3D MKV Converter to help convert your 2D MKV movies to MKV SBS 3D video and you could watch your favorite movies on TV with 3D effect. Here is a full guide of turning 2D MKV to 3D MKV format on Windows 8.1/8.

Tools needed: 

* The best 2D to 3D MKV converter – Pavtube Video Converter Ultimate
* A PC Computer (Windows 8.1/8)
* 3D device – TV
* Pairs of 3D glasses (don't forget to turn the glasses on)

Step 1: Free download and install the Pavtube Video Converter Ultimate.

For Windows / For Mac

Step 2: Load your source MKV movie by clicking "Add video" or "Load from folder" to this 2D to 3D MKV Converter.

3D MKV format


Step 3: Choose "MKV Side-by-Side 3D Video(*.mkv)" under "3D Video" category for your 3D TV since the reader of the TV handles SBS 3D MKV as supported format. You can also "MKV Anaglyph 3D Video (*.mkv)" or "MKV Top-Bottom 3D Video (*.mkv)" for outputing.

3D MKV format

Step 4: If you like, you could adjust video codec, bitrate, frame rate, etc to get better video quality in saved 3D MKV video. Meanwhile, you could choose 3D anaglyph and Depth in Profile Settings to avoid images misaligned.

Tip 1: When you have trouble getting aligned images in saved 3D SBS MKV video, adjust "Depth" in Profile Settings helps make the film images aligned?perfectly.

Step 5: Hit the "Convert" button to copy your 2D MKV movie to MKV Side-by-Side 3D video. When if finishes, click the "Open" option to locate the created 3D SBS MKV video and you are ready to transfer your 2D MKV movies to 3D TV for entertainment.

Tip 2: It is much complicated for encoding MKV to SBS 3D video because of data analyzing and processing, so the process of copying SBS 3D video takes more than regular disc ripping.

Related Article:

Convert DVD to Side-by-Side 3D MP4 for playing with TV on Mac

Here is the best solution to convert DVD to SBS 3D MP4 for enjoying the 3D video with the assistant of the 3D DVD Ripper.
Maybe most 3D movie fans would ask the same question to either backup their 3D movies free from physical disks or prepare for future usage such as watching copied 3D movies on 3D player. But how to get them playable on these 3D device and if doing converting, is it will surely leaded to the loss of 3D effect?


"I'm trying to find out if I can rip my 3D DVD's to my HDD and still get 3D playback on them to my TV via my HDMI connection. If so, how exactly would I go about burning them (if there is a certain way), and is there any special software or anything I'll need to play the DVD's back through to do this? I am using Mac OS X 10.9 Mavericks."

To rip DVD to side-by-side 3D MP4 video, Pavtube ByteCopy for Mac is the best 3D/2D DVD to Side-by-Side ripper to assist you with ripping Blu-ray and DVD to side-by-side 3D MP4 format. It can also output the format with multiple audio tracks and subtitles preserving. Windows users could use ByteCopy which is specially designed for Windows users to create 3D SBS MP4 video out of 3D/2D Blu-ray/DVD movies.


Hot Search: ByteCopy for Mac Review | 3D Blu-ray Ripper Review | DVD Ripper Review

How to rip 2D/3D DVDs to SBS 3D MP4 on Mac Mavericks

1. Add 3D DVD source file to the program.

Download and install the latest Mac 3D DVD Ripper onto your computer. Launch it and click "Add Video" icon to load 3D DVD files.


2. Set 3D MP4 format as output

Click "Format" bar and move mouse to "3D Video" column, you can choose "MP4 Side-by-Side 3D Video (*.mp4)" as output format. If you want to output Anaglyph 3D or Top-Bottom 3D, you could choose it according to your specific need.


Tip: You can adjust target video settings and 3D effect.

Click “Settings” which is next to “Format”, free change your target video size, bitrate, frame rate and 3D depth. If you want to get best video quality, pls switch them to “original”.


3. Start rip 3D DVD to SBS MP4 3D

When everything is OK, just press the "Convert" button to start the conversion. It will not take much time. Just wait for the conversion process to get done. Once the conversion finished, you are able to get 3D MP4/MKV/MOV files via clicking "Open" button.

The image below is the Side-by-Side effect when viewing without putting on glass.


When play the 3D MP4 on your TV, You may find it comes up in two screen, just hit the 3D button on your TV, and it will pop up a window saying put on your glasses, choose "OK". Another window appears showing your 3D choice: Side-by-Side. Put on your 3D glasses, and then just enjoy 3D Movies!


Read More:

Tuesday, December 31, 2013

Quick and Easy way to convert JVC GY-HM650 MXF to Prores LT for FCP 6/7

Summary: To smoothly import JVC GY-HM650U MXF to Final Cut Pro 6/7, you can follow it to solving the problem by transcoding ProHD MXF to Prores 422 LT for FCP editing.

ProHD is a JVC's term describing a suite of professional high definition camcorders. JVC's GY-HM650 is the perfect camcorder for next generation newsgathering. With dual codec recording, clips can be transferred to the station immediately with built in FTP. Light, versatile and extremely easy to use, this camera offers superb low light performance, a long (23x) wide angle zoom lens, and MXF file interoperability from acquisition to air.


The MXF video is excellent, however, it cannot be directly edit on Apple software such as FCP 6 or FCP 7, for example:

“I record some video clips with the JVC GY-HM650U Camcorder and want to edit the MXF files in FCP 7, however, the FCP just could not accept the HM650U MXF video clips, so how can I solve this problem? Thanks.”

First, you should know FCP native format is the Apple ProRes 422 codec. This is a common format developed by Apple. ProRes 422 is intended for non-linear editing with Apple Final Cut Pro. It retains higher quality when you convert MXF to ProRes for FCP. Below are some useful tips for you and you will know how to import and edit JVC GY-HM650U MXF to Final Cut Pro 6/7 on Mac.

1. Download Pavtube MXF Converter for Mac here. This is excellent software which can help you convert MXF video to ProRes 422, ProRes 4444, ProRes 422 LT for FCP 6/7 and FCP X. Besides, it supports many other formats for output.

2. Install and launch the Professional MXF to FCP Converter for Mac, import the MXF video from JVC GY-HM650U.


3. Choose the best output format for Final Cut Pro. Click on "Format" and choose "Final Cut Pro >>Apple ProRes 422(LT) (*.mov)" format.


The Apple ProRes 422 (LT) codec provides the following:

Roughly 70 percent of the data rate of Apple ProRes 422 (thus, smaller file sizes than Apple ProRes 422)
Tips:

a. You can click settings to adjust the output parameters, such as resolution, bitrate and frame rate.

b. You can click edit button to edit MXF video, such as deinterlace, denoise, mute, volume up and crop.

4. Click convert button to start JVC GY-HM650U ProHD MXF to ProRes 422 LT conversion.

After converting, you can import converted MXF footage to FCP 6/7 instantly without rendering.


What's more:

1. This MXF Converter for Mac from Pavtube will retain the timecode for Final Cut Pro after converting. And refer to the picture below to see how this cool mac mxf converting tool keep the timecode for FCP.

2. If you need more powerful converter that can transcode 1080p HD Video, DVD and Blu-ray, you can try iMedia Converter for Mac

3. Futhermore, if your MXF files have 2 audio tracks or more, here is a new program named iMixMXF with multi-track preserving and mixing features. You can download the trial version for evaluation!

In a word, hope you to enjoy your JVC GY-HM650U MXF footage workflow in Final Cut Pro 6/7 with ease.

See also:


From: http://1080p-video-tool.blogspot.com/2013/12/jvc-gy-hm650u-mxf-workflow-in-fcp-6-7.html

Monday, December 30, 2013

Play M4V on Android Tablet with M4V Player or M4V Converter


This article gives you two ways to play M4V on Android OS-based tablet with the best visual and audio effect: M4V Player for Android and M4V Converter for Android.

Nowadays, with the development of android, more and more people are using Android phone or tablet. But these devices aren't compatible with many format videos such as M4V. M4V is a format that created by Apple and protected by DRM. Due to the protection, this file format is not compatible with Android system. When I surf on the Internet, I have found that many people asked many problems about playing M4V files; here is one of the questions lifted on Android Forums:

"I am searching for a video player app that can play m4v files. I am an apple product fan and use an iPhone for this currently and have wanted to switch over to android. But as far as I can tell there are no video player apps that do this. Dose anyone know of an app that can do this?"

Many people reply to the thread, and according to these replies, I sort out two ways for you to solve the problem.
The First Way: M4V Player for Android 

One person recommended the MX Player. He said that the MX video player can play everything. I Google it and find MX Video Player is a free app for Android device that allows you to play videos on your phone.

This app enables you to play most video files and subtitle files with multi-core decoding capability. MX Video Player is the first Android video player performs multi-core decoding. It supports multiple movie files like 3GP, Divx, F4V, MP4, MPEG, MOV, M4V(have removed DRM protection) and VOB.

The Second Way: M4V Converter for Android
  
The second way is convert M4V to Android tablet supported format. If you want to play M4V format videos on Android tablets and avoid some unnecessary troubles, the M4V to Android tablet converter can aim your goal. It can meet all your needs with its powerful function; it can convert all videos like AVI, MKV, MP4, WMV, MOV, M4V. Let's begin with the detailed introduction about converting M4V files to Android OS-based tablet supported format.


First, free download Pavtube M4V to Android tablet converter and install in your computer. It only take up a little space in your computer.

Then, add the M4V files or videos in the M4V to android converter. Do this by clicking the "Add File" icon.

compress-1080p-to-720p-for-android

The following, this is an important step that you need choose a right output format. It is the key to solve playback problem, you can choose MP4, it is the best compatible format for Android.


In the "Edit" you can edit your videos by trimming, cropping, adding Watermarket and subtitle.

The last step is clicking the convert button to start this conversion. Then a little time later, you can copy to Android devices for playback.

Note: The precondition of these two ways of playing M4V video is that you've removed the DRM protection of iTunes videos. If you want to convert the M4V videos protected by DRM, ChewTune (Review) is such a DRM removal tool legally strips DRM copy protection from Digital Copy, WMV, and M4V.


If you are interested in this M4V to Android tablet convert, you can have a try.

Related Posts:

Add Blu-ray/DVD to iTunes 11 with multi-tracks for Apple TV, iPad, iPhone, iPod on Mac

Want to add your Blu-ray/DVD contents in iTunes Library 11? Or want to put your Blu-ray/DVD contents to your Apple devices through iTunes 11? In this article, you can find the easy way to do this.

iTunes, a name closely contact with Apple devices like iPhone, iPad, iPod, etc. When first use Apple device, most people may not familiar with how to put music and videos to the device. The key is iTunes. So, first let’s know something about it.

What is iTunes?

iTunes is not only a media player app to play audios and videos, but also a media library to download and manage digital music and videos on PC, as well as on iPhone, iPad and iPod touch. It is a bridge to transfer sources between PC and Apple devices. The latest version of iTunes is iTunes 11 which has “dramatically simplified new interface” and better “iCloud features”

The OS that supported iTunes
  • Mac OS: Mac OS X 10.9 Mavericks, 10.8 Mountain Lion, 10.7 Lion, Snow Leopard10.6, Leopard 10.5
  • Windows OS: (Windows 32 bit or Windows 64 bit) Windows XP Service Pack 2 or later, Windows Vista, Windows 7, Windows 8 and Windows 8.1

Then, let’s know how to enable iTunes play the role of transmitter. Most of you are not about to pay iTunes’ ridiculous prices to watch movies and TV shows you already own on Blu-ray. As we know, videos upon Blu-ray disc have been in high definition format, many are usually in .m2ts file extension that is not based on apple iTunes, while iTunes could only recognize video files in MP4, MOV, M4V that you can’t play Blu-ray on iTunes directly and even not to speak of keeping multi-tracks. Good news now what you need is only a professional Blu-ray ripper that can help you convert Blu-ray movies to iTunes supported MP4 format with multi-track.

To transfer Blu-ray contents to iTunes 11 library, the best program I can recommend is Pavtube ByteCopy for Mac(Windows version: ByteCopy), which you can use to remove the strict Blu-ray protection and region restrictions and Blu-ray/DVD contents to iTunes video very quickly with great video quality. It’s an ideal app for you to copy Blu-ray/DVD to iTunes 11 library and any Apple devices.

How to rip Blu-ray/DVD contents to iTunes 11 library with multi-track?

Step1: Load Blu-ray/DVD movies.

Launch the best Blu-ray/DVD to iTunes with multi-track converter; import Blu-ray/DVD movies into the program. Loaded Blu-ray/DVD can be previewed in the right preview window.


Step 2: Choose output format

To rip Blu-ray/DVD to iTunes 11 library with multiple tracks, click the drop down box of “Format”, and choose the “Multi-track MP4 (*.mp4)” profile under “Multi-track Video”. This profile is designed to output videos with multiple audio tracks.


You can check the audios you want to keep and uncheck the audios you don’t need. It all depends on your own choices.

If you want to add the Blu-ray/DVD contents to iTunes 11 library for play on iPhone, iPad, iPod, etc, you can also directly select iPhone, iPad, iPod as the output format to get videos with optimized settings for your Apple devices. Read How to rip Blu-ray to iTunes for iPad, iPhone4, iPod and Apple TV? to get the detail information.

If you need, you can also click “Settings” to modify parameters of your output profile to meet your professional needs: bitrate, frame rate, aspect ratio, etc. Just remember the file size and video quality is mainly depends on bitrate than resolution which means higher bitrate results in big file size, lower visible quality loss and vice versa.

Step 3: The last step you need to do is hit the “Convert” button to start the conversion of Blu-ray/DVD content to iTunes 11 library supported format.

When the conversion is over, just find the folder of your output videos and add to your iTunes 11 library. Then you can play organize your Blu-ray/DVD contents on iTunes and put them on your Apple devices.

Related articles:
  
Ripping Blu-Ray on iMac and Stream 1080p on Apple TV 3 with Dolby 5.1 Sound 
How to Watch Instructional DVDs on iPhone/iPad/iPod? 
Is It Possible to Add FLV Videos to iTunes? 
How to Sync Local Contents to iTunes on PC/Mac?
  • Watch DVD Movies on New iPad 2017
  • Play 4K UHD Movies on Videos on New iPad 2017