Friday, October 25, 2013

How to Put and Play MKV files to iPhone 5S, iPhone 5C on Windows/Mac?

iPhone 5S/5C has been so hot since its release since last month; with the eye-catching iOS 7, many of us may be curious about how the video play feature works with frosted glass effect. 

Have you got a new iPhone 5S or iPhone 5C? Having lots of MKV videos in hand but couldn’t play MKV files on your iPhone 5S/5C? Why? Wondering what we can do to make it working? 

What is MKV?

MKV, short for Matroska Video, unlike MP3, MP4 and things like those, is not a media format but an extensible open standard Audio/Video container. We can definite it as a multimedia container. MKV can't be played in Mac by default. However, by converting MKV to iPhone 5S/5C friendly formats (MP4, M4V, MOV), you can enjoy MKV movies on iPhone 5S/5C designed with 4-inch widescreen multi-touch display would be a cool thing.

So you should first convert it with a third party MKV to iPhone 5S/5C Video Converter - Pavtube iPhone 5S/5C Video Converter (iPhone 5S/5C Video Converter for Mac). This tutorial is going to show you how to convert MKV files to iPhone 5S/5C support formats.
  
Note: The best iPhone 5S/5C Video Converter handles not only MKV files, but AVI, VOB, Tivo, WMV, MPG, EVO, VRO, MXF, MTS, M2TS, M2T, TS, FLV, F4V, 3GP and more to the most suitable profile for iPhone 5S/5C with simplest workflow and reliable video quality.

How to Convert MKV to iPhone 5S/5C on Windows/Mac?

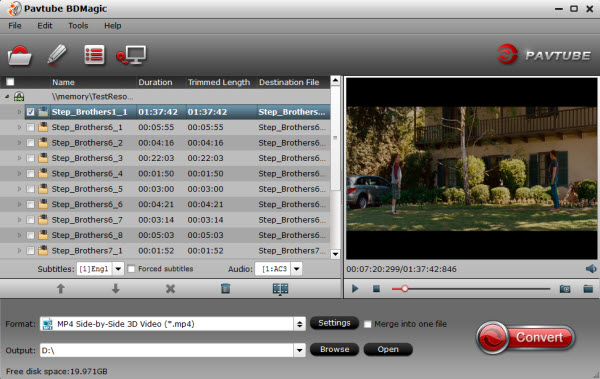
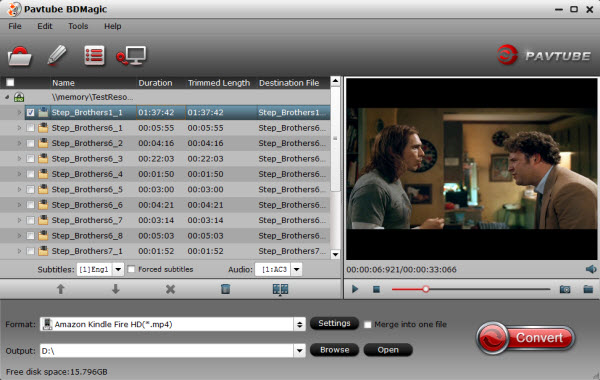
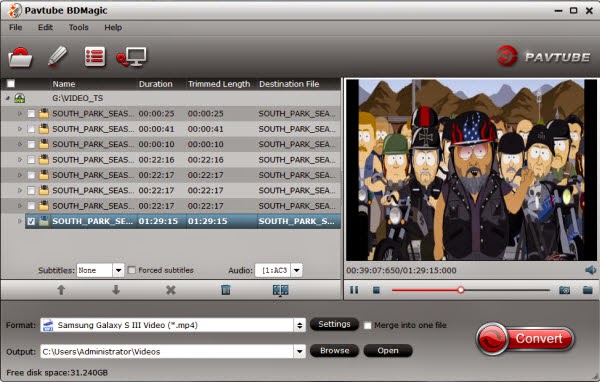
Step 1. Download it, Load MKV files to this MKV to iPhone 5S/5C converter

Run this Pavtube Video Converter as the iPhone 5S/5C Video Converter. Click “Add video” or “Add from folder” to import MKV videos, or you can directly drag and drop MKV from computer to this app.

mkv to iphone 5s 5c video converter

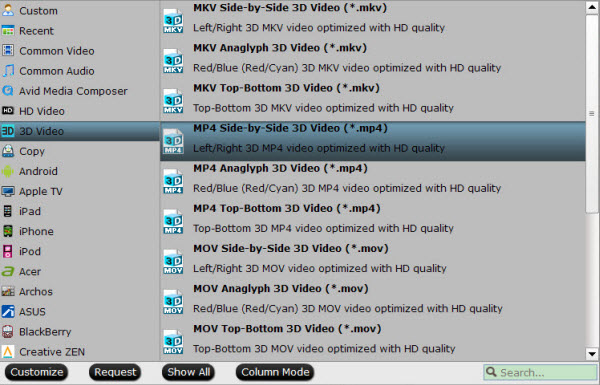
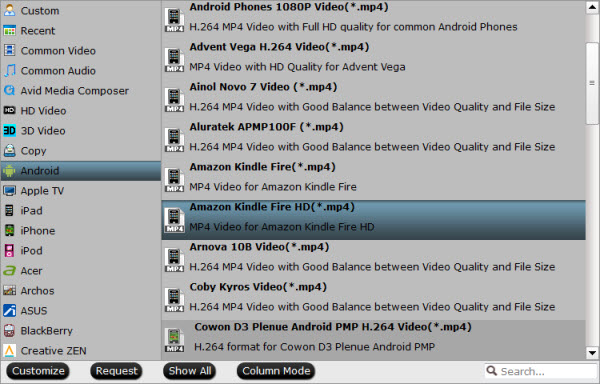
Step 2. Choose video format for iPhone 5S/5C.

Note: To get best video quality, please download a patch before run the best iPhone 5S/5C Video Converter.

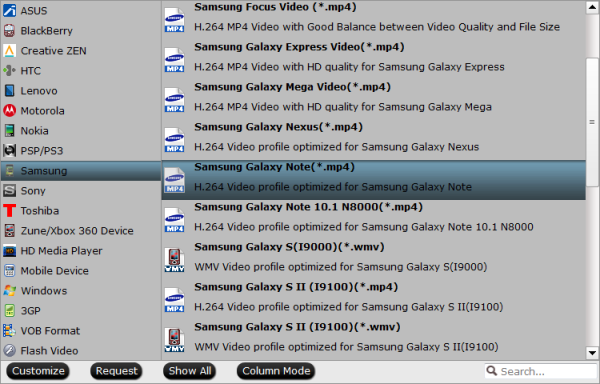
Click the drop-down list besides “Format”, select iPhone -> iPhone 5S/5C H.264 Full Screen 1136*640(*.mp4)” as the best profile for playing MKV movies on iPhone 5S/5C with full screen.

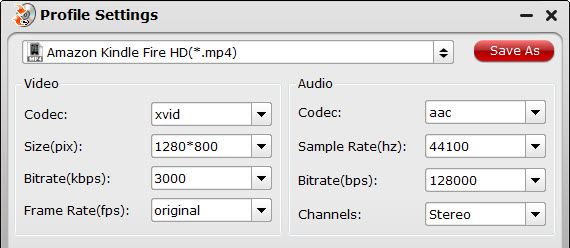
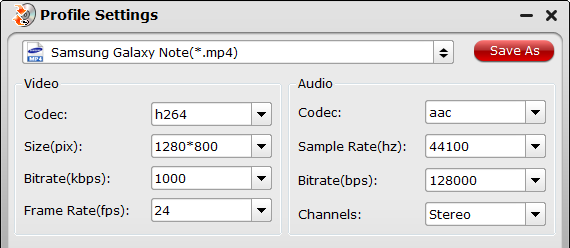
Tips: You can click “Settings” button to set the output video resolution for iPhone 5S/5C. (Optional)

best video quality for iphone 5s/5c

Step 3. Edit video before MKV to iPhone 5S/5C conversion. (Optional)

Click the pencil-like icon on top to enter Video Editor interface. You can choose to trim, crop, watermark, effect, audio or add srt/ass/ssa subtitles before conversion.

Back to main interface, click “Settings” to customize video size, frame rate, bitrate and other settings.

Step 4. Start MKV to iPhone 5S/5C conversion.

Just start to convert MKV to iPhone 5S/5C by pressing the "Convert" button in the bottom-right corner of this MKV to iPhone 5S/5C Converter. Do you see this app is converting MKV files? Yeah, you do. And you can also clearly see the conversion progress bar. When it reaches 100%, just hit the “Open” or “Open output folder” button at the bottom to quick find these converted video files.

Now, it’s time for you to import these output files to iTunes library. When you try to do it, you’ll find these originally-unsupported MKV files can be loaded without any trouble. After that, you need to sync them to your iPhone 5S or iPhone 5C.

More articles:

Monday, October 21, 2013

How to Rip 3D Blu-ray movie to SBS 3D MP4 video for playback on your 3D devices?

The best 3D Blu-ray Ripper here assists you to rip and convert your Blu-ray to side-by-side 3D MP4 video and you can enjoy the 3D video with 3D player.

“I cannot find any instructions on how to rip a 3D Blu-ray disc to side-by-side form. I’d like to make Blu-ray 3D to MP4 SBS backups. Is there a tutorial somewhere on your website?”

Maybe most 3D movie fans would ask the same question to either backup their 3D movies free from physical disks or prepare for future usage such as watching copied 3D movies on 3D player. 

To rip Blu-ray to side-by-side 3D MP4 videoPavtube 3D Blu-ray Ripper- BDMagic is the best 3D/2D Blu-ray to Side-by-Side 3D ripper to assist you with ripping Blu-ray to side-by-side 3D MP4. Mac users could use 3D Blu-ray Ripper for Mac which is specially designed for Mac users to create 3D SBS MP4 video out of 3D/2D Blu-ray movies.


Full Guide: How to rip 3D Blu-ray movie to SBS 3D MP4 video for playback on your 3D devices?


Step 1: Load 3D/2D Blu-ray Disc.

Open Pavtube Blu-ray to Side-by-Side 3D converter and load your source Blu-ray movie.


Step 2: Choose suitable profile.

From the “Format” drop-down list, you are suggested to follow the path “3D Video > MP4 Side-by-Side 3D Video(*.mp4)” for ripping Blu-ray to side-by-side 3D MP4 video.


Step 3: Adjust profile presets (Optional)

If you like, you could set profile parameters to get better video quality, such as video codec, file size, video bitrate, frame rate, etc.

Step 4: Start ripping Blu-ray to side-by-side 3D MP4 video.

Double check above steps and you could click the “Convert” button on program interface to start ripping Blu-ray to side-by-side 3D MP4 video. After it finished, open output file destination, locate the created SBS 3D MP4 video and you could watch it on your 3D player.

Read more: 

Friday, October 18, 2013

Weekend special for 30% discount for ByteCopy on Facebook

Wellcome to Pavtube Facebook Weekend Special Offer!

Get 30% discount for Pavtube Bytecopy for Windows or Mac users:

ByteCopy for Windows 30% off: https://usd.swreg.org/cgi-bin/s.cgi?s=48737&p=48737-78&q=1&v=0&d=0&rc=45K2D47VD6&a=fb-weekend-bc30%

ByteCopy for Mac 30% off: https://usd.swreg.org/cgi-bin/s.cgi?s=48737&p=48737-81&q=1&v=0&d=0&rc=45K2D477GK&a=fb-weekend-bc30%


What's use to buy it?

- Backup BD/DVD with subtitle and multi audio tracks in lossless MKV
- Watch 3D movies in various 3D effect.
Side by side(left/right), top-bottom and anaglyph(red/blue) effect
- Rip Blu-ray/DVD movies retaining multiple audio and subtitle tracks in .mkv/.mp4/.mov. output format
- Retain chapter marker in lossless .mkv&.mp4
- Rip Blu-ray and DVD movies to a proper format for playing on your Android/Apple/Windows 8 tablets & smartphones, HD Media Players, etc.
- Extract subtitle files in separate .srt

Learn more:
http://www.multipelife.com/bytecopy
http://www.multipelife.com/bytecopy-mac

Sounds great?

Come on and tell you friends as well!

Only 2 days left and to be expired on Oct 12, 2013

If you have any problem to buy or use Pavtube, pls feel free to contact support@pavtube.com (for Windows user), macsupport@pavtube.com (for Mac users).

Thursday, October 17, 2013

Record Blu-ray/DVD Digital Copy to Asus MeMo Pad HD 7 on Windows/Mac

Description: The simplest solution of removing DRM protection and recording Blu-ray/DVD Digital Copy to Asus MeMo Pad HD 7, Kindle Fire HDX 7, Kindle Fire HDX 8.9, Galaxy Tab 3, Galaxy Note 3, Galaxy S4/S3, Xperia Z1, HTC One Mini, etc. Android tablets and smartphones.

Q. What is Digital Copy?

A. Digital Copy is a standard definition digital version of your purchased DVD/Blu-ray; it’s usually located on a stand-alone disc which bundled with your sets and in your choice of iTunes or Windows Media formats. It’s Mac & PC compatible.

Q: Can I play Digital Copy on MeMo Pad or any other portable devices?

I want my Monsters Inc Digital copy to play on my MeMo Pad 7-inch with at least youtube quality. It is playable in windows media player but because of DRM I cannot install it normally on my pad. What is the most reliable program to help me and any tips?

A: Digital Copy is Windows/Mac compatible (which is usually in WMV or MOV format); it also works on IOS devices but not on Android tablets. 

Digital Copy is more and more popular because people can get an authorized standard definition digital version of their Blu-ray/DVD, which is much worthy. We may simply make a copy on this computer (Windows/Mac) and play them in authorized IOS devices like iPhone, iPad, iPod. However, Digital Copies are DRM protected so that you cannot play them on Android deices. Asus MeMo Pad HD 7 is no exception.

So, if you really want to play Digital Copy with Asus MeMo Pad HD 7, here are two steps you need to walk though:
  1. Roll off the DRM;
  2. Convert to other formats MeMo Pad supports, for instance, H.264 MP4.

Get Pavtube ChewTune - A Top Digital Copy to MeMO Pad HD 7 Recorder

Digital Copy to MeMO Pad HD 7 Converter is a professional removal tool for rolling off DRM from Digital Copy files, and transfer to MeMO Pad HD 7 and various other android devices like Galaxy S4, Galaxy Tab 3, Galaxy Note 3, HTC One Mini, Kindle Fire HDX 7/8.9, Sony Xperia Z1, Nexus 7 2, etc. In addition, with ChewTune, you can also record and transfer iTunes movies/Amazon videos/BBC iPlayer videos to all Android/Windows 8 device for watching.
Download a free trial here:


(Note: download a dmg file for Mac OS X 10.5 Leopard users)

Tutorials: Remove DRM-protection and Record Digital Copy movies to Asus MeMo Pad HD 7

Step 1. Run this Pavtube Chewtune as DRM Video Recorder, and add videos.
Drag and drop your videos to it directly, or you can click icon to import them as below.


Step 2. Choose format.

Click the drop-down-list besides “Format” and choose “Common Video -> H.264 Video(*.mp4)” as the most compatible format with MeMo Pad HD 7. 


Step 3. Change video specs.

Click “Settings” to change the video encoder, resolution, bitrate, frame rate, etc. as you wish. According to video testing result, for watching videos on the Android tablet, 720p with 1500~2500kbps is just all right.


Step 4. Start recording.

Now click the “Convert” icon to start removing DRM protection from Digital Copy movies and the top DRM Video Recorder will automatically start to record Digital Copy movies for playing on your MeMo Pad HD 7 tablet. (Note: this windows cannot be removed or closed.)

In the meanwhile, it will start to record this video in MP4 real-time. The conversion time is equal to the video length itself; you can do other tasks during the converting the process.

Note: the system volume could turn off temporally during this period; no worries, do not touch it to get perfect DRM removed video.

After the conversion, click “Open output folder” to quick locate the converted video. Connect your Android tablet to computer. Transfer Digital Copy to  Asus MeMo Pad HD 7 via USB cable.


How to transfer the converted Digital Copy contents to Asus MeMo Pad HD 7?

Windows transfer

  1. Connect your device to the USB port on your computer. Its USB storage is mounted as a drive and appears on your computer screen.
  2. Copy files back and forth as you would using any other external device.
  3. When you finish, eject the device from within Windows before unplugging the USB cable.

 
Mac OS transfer
  1. Install Android File Transfer from www.android.com/filetransfer, and follow the instructions there. (If you are using Android File Transfer for the first time, double-click it to open it. After the first connection, it opens automatically whenever you connect.)
  2. Connect your device to your computer with a USB cable. Android File Transfer starts, if it’s not already running, and opens a window that displays the contents of your device, along with storage space details at the bottom of the window.
  3. Work with this window much as you do in the Finder window: open and close folders, create new folders, and drag files to or from it and other Finder windows.
  4. Disconnect the USB cable when you finish.

Related settings: To change your device's USB connection options, touch Settings > Device > Storage > Menu > USB computer connection.

Good news for you: To save your money, Pavtube Special Offer offers various product bundles, save up o $35, such as:


Rip Blu-ray and DVD movies to Kindle Fire HD 8.9 for watching with best video quality

Have you ever thought of copying some of your Blu-ray titles onto the 8.9-inch Kindle Fire to make full use of 1920x1200 8.9" HD display? Like many other tablets, Kindle Fire HD 8.9 does not deliver native support for Blu-ray/DVD movies, so if you have the intension to watch Blu-ray or DVD movies on it, you need to convert the Blu-ray movie into a format compatible with your Kindle Fire HD 8.9 in advance.

Q1: How to convert DVD movies to Kindle Fire HD 8.9?

"I am taking a chance that perhaps someone can give me some feedback I am having with. When I convert my favorites Blu-ray and DVD movies to Kindle Fire HD compatible video format, here is my confusion, which one should I save to? Could you give me some advice?"

A1: From Kindle Fire HD official website we know that Kindle Fire HD video format supported are: MP4, 3GP, VP8(.webm), and my suggestion is H.264 MP4 since this is popular video type that you could play on many other portable devices and your local computer. If you have trouble with detailed operation, check this webpage, it tells you exactly how to convert DVD movies to your Kindle Fire HD 8.9.

Q2: How to put Blu Ray Dvds to Kindle Fire HD?

"I'd like to transfer my Blu Ray Dvds to my Kindle Fire HD 8.9. However, while I have had no problems with the original disks, the files play fine on my device, but everything I converted has the same error message: "video cannot be played". What is the problem?"

A2: First of all, check the transferred file location, you need put them to Gallery app directory and your tablet can find them and play well; and remember Android systems compatible Memory cards have a limit of 4GB per file because of the FAT32 file system, including Kindle Fire HD. 720p and 1080p movies today can be up to 10GB, and that's definitely will not transfer to the MircroSd card. So you need re-encode and downsize the file;
or if don't wanna re-encode and lose video quality, use Pavtube Blu-ray Ripper to rip your BD/DVD disks again, but this time, use its Split feature. Don't how-to? 

Don't worry, I find a guide page can help. 

The best way to get over 4GB file size limitation for Android Devices

According my experience, H.264 MP4 format is the best format for Kindle Fire HD 8.9. You'd better get a Top Blu-ray DVD Ripper software. After convert the movies to h.264 mp4, just transfer the generated videos to your Fire HD 8.9. 

Guide: How to Rip Blu-ray and DVD Movies to MP4 for Kindle Fire HD 8.9?

Step 1. Load Blu-ray/DVD movies.

Install and launch the best Blu-ray/DVD to Kindle Fire HD converter.

Note: An external Blu-ray drive is required for ripping Blu-ray/DVD disc.

Load Blu-ray Disc, DVD or ISO image to the Kindle Fire HD 8.9 movie Converter with one click.


Step 2. Select preferred language from drop-down list of "Subtitles" and "Audio" box.

Step 3. Click "Format" bar and select a MP4 format for Kindle Fire HD 8.9 playback. "Android -> Amazon Kindle Fire HD H.264 (*.mp4)" format is recommended for faster conversion and best movie effect.


Step 5. Click "Convert" to start ripping 1080p Blu-ray to Kindle Fire HD 7/8.9 compatible video.

Click the "Open" button to find the converted files when conversion completes and then you can transfer movies to Kindle Fire HD 8.9 easily, and bring your favorite Blu-ray and DVD movies when traveling.

Custom Settings

If you'd like to customize profile settings for better quality or higher resolution, proceed as follows before you start converting Blu-ray to Kindle Fire HD 8.9 video:

Click on "Settings" button. The pop-up Profile Settings window shows you a/v settings you're using.


To take advantage of your screen, set the video size exactly as the display resolution- i.e. 1920 x 1080 for Kindle Fire HD 8.9.

For better quality, set higher bitrate. We find the best balance between 2500kbps to 3000kbps on 8.9-inch screen. To shorten conversion time, set lower quality. Note that when you lower file size, you lower video quality.

Save your preference for future use

One thing good in Pavtube is that you can create new preset for use. For instance, I've decided the best settings work for converting videos to play on the 10.1-inch Kindle Fire HD, and wanna save it for future use, now all I need is save it as a custom preset. This is easy. Just proceed as follows.

1. In the settings window, press "Save As" button.
2. Give the custom preset a name, say "Kindle Fire HD Video 1920 x 1080 (*.mp4)".
3. Click "OK".

The next time you open up the Blu-ray ripper for converting movies to Kindle Fire HD, just press on "Format" bar and find the new preset under "Custom" group.

View Kindle Fire HD column to learn more related articles.

Read More:
  

Tuesday, October 15, 2013

View DVD movies on Sony Xperia Z1/Xperia Z Ultra/Xperia Z with best quality

Description: Get the best DVD to Sony Xperia Z ripper to convert your DVD collection to the best video format for Sony Xperia Z1, Xperia Z Ultra and Xperia Z.
Have you gathered boxes of DVD movies at home? Have you had the thought of moving them to your Sony Xperia series smartphones including Sony Xperia Z1, Xperia Z Ultra and Xperia Z so that you can watch your favorite movies anytime and anywhere you like? With this DVD to Sony Xperia Converter you can convert DVD movies to Sony Xperia playable MP4 files and play the created movies on your Sony Xperia Z1, Xperia Z Ultra and Xperia Z smoothly. Read Review

First of all, you need download and install a free copy of the best DVD to Sony Xperia Converter – Pavtube DVD Ripper on your computer.

Then let’s go through the whole process of ripping DVD movies to Sony Xperia Z1/Xperia Z Ultra/Xperia Z with best quality.

1. Click this “Load Disc” button to browser to your disc drive and import your source disc.

dvd to song xperia converter

2. Choose the wanted audio track from “Audio” drop-down list and desired subtitles from “Subtitle” tab.

3. Hit the “Format” menu you could choose the suitable profile for Sony Xperia Z1/Xperia Z Ultra/Xperia Z. When you cannot find the particular profile for your device from Pavtube DVD Ripper, don’t worry, it includes several general presets which are compatible for most Android phones and tablets.

rip dvd to sony xperia z

4. Click the “Settings” icon on program interface, you are allowed to set presets to get better video and audio performance on your Sony Xperia Z1/Xperia Z Ultra/Xperia Z.

best video format for sony xperia z1

Note: Higher Bitrate leads to better video quality in saved file, but it also creates larger video size. Don’t forget the balance between video quality and size.

5. Hit the “Convert” icon and start ripping DVD to Sony Xperia Z1/Xperia Z Ultra/Xperia Z. After it finishes, you would get a created MP4 file in output destination. Now you are ready to transfer your DVD movies to Sony Xperia Z1/Xperia Z Ultra/Xperia Z and enjoy your DVD collection there.

Related Articles:

Monday, October 14, 2013

Best solution to make Galaxy Note 3 play Blu-ray and DVD movies (Mac/Windows)

Description: Find the easiest way to convert the latest Blu-ray and DVD movies to Samsung Galaxy Note 3 highly supported video formats with subtitles. Then you can watch Blu-ray/DVD movies on your new Note 3 anytime with perfect audio and video synchronization.

With the releasing of Samsung Galaxy Note 3, more and more folks are talking about how to play Blu-ray and DVD movies on new Galaxy Note 3 phone. Yeah sure, can anything be more fun than watching HD Blu-ray and DVD movies on this remarkable Android phone that carrying a 1920×1080 pixels display?

We all the Galaxy Note 3 does not support an external Blu-ray or DVD drive, besides, most commercial Blu-ray/DVDs are encrypted by film studio which makes it much more difficult to play Blu-ray/DVD on Galaxy Note 3 everywhere.

But it’s not big deal; finally we find this Best Blu-ray/DVD Ripper (Blu-ray/DVD Ripper for Mac), a professional Blu-ray/DVD to Galaxy Note 3 Converter software to help remove disc encryption and transfer Blu-ray/DVD to Galaxy Note 3 compatible format for playing. (Note: The Mac Version opertaion steps are similar above, I'm not repeat here.)

This Galaxy Movie Converter fully supports all Samsung Galaxy devices including: Galaxy Note 3, Galaxy Note 2, Galaxy Note 10.1, Galaxy Note, Galaxy Tab 3, Galaxy Tab 2, Galaxy Tab, Galaxy S4, Galaxy S3, Galaxy S 2, Galaxy S, Galaxy Gear, Galaxy Nexus, Galaxy Fit, Galaxy Mini, Galaxy Gio, Galaxy ACE, Galaxy ACE Plu, Galaxy S Plu, Galaxy Pro, Galaxy W, Galaxy Beam, Galaxy S Advance, Galaxy Y, Galaxy Beam, Galaxy Chat, Galaxy R Style, Galaxy Player.

Big surprise: this Top Blu-ray/DVD to Galaxy Note 3 Converter is also able to rip commercial DVD/Blu-rays and put it on many other Android/Apple/Windows 8 tablets & smartphones, now is 30% off, you can save $15. 

Tips: Another choice for users who want to keep multi audio track and several soft subtitles, see this: ByteCopy.

Now, let’s start on how to put Blu-ray or DVD movie on Galaxy Note 3, this tutorial is also work for other Galaxy devices.

Step 1. Run the best Blu-ray/DVD to Galaxy Note 3 Converter and import disc.

Click “Load files” to import Blu-ray, DVD, Blu-ray ISO, DVD IFO/ISO or Blu-ray/DVD folder. Choose subtitles, languages or forced subtitles in the main interface.


Step 2. Choose proper video format for Galaxy Note 3.

Click “Format” drop-down list, choose “Samsung>Samsung Galaxy Note(*.mp4)” as the best profile for Galaxy Note 3.


Step 3. Customize specs.

Click “Settings” to customize output video size, frame rate, bitrate, and other settings, all according to your needs. Usually bitrate is directly related with video quality; for Galaxy Note 3, it’s all fine to set it to 1500~2500kbps.


Step 4. Start the Blu-ray/DVD to Galaxy Note 3 MP4 conversion.

Now back to main interface, click “Convert” to start converting Blu-ray/DVD to MP4 for Galaxy Note 3. After the conversion, you can click “Open output folder” to quick locate the output MP4 video on your hard drive.

Step 5. Connect your Galaxy Note 3 to computer through the USB cable. Your computer shoulde detect it as a mobile drive. Copy the MP4 video to the “Movies” folder. That’s all, now you can enjoy the Blu-ray/DVD Movies on your new Galaxy Note 3 smartphone anytime and anywhere. (Learn more about 

Samsung Galaxy Note Media(Music, Video, Movie, Photo) Files Transfer.)
  
Related Articles: