Friday, October 9, 2015

Convert QuickTime MOV Files to WMV on Mac OS X

QuickTime file format is a computer file format used by the QuickTime framework. The format specifies a multimedia container file that contains one or more tracks, each of which stores a particular type of data: audio, video, or text (e.g. for subtitles). QuickTime native file format is QuickTime MOV, which are widely used in some digital cameras.


Since QuickTime is not convenient for sharing via email or on the web, it is ideal for us to convert QuickTime to WMV format, which is higher in compression rate than other formats and therefore can achieve a very small file size when processing, editing, playing and sharing. The following article will show you a pretty simple solution to convert QuickTime to WMV on Mac OS X.

There are many third party application on the market that can perform the conversion from QuickTime MOV to WMV Mac.Pavtube Video Converter for Mac can be your first choice since it not only provides a simple QuickTime MOV to WMV conversion process with perfect output video quality, but also cost you less money than other professional, expensive but complex to operate programs.

In addition, the program also delivers some basic video editing functions as trimming video clips, cropping video file size, applying special effects, adding text/image watermark, replacing/removing audio in video, inserting subtitles, etc. You can make a great editing work with all the beneficial editing features mentioned above.


Other Download:
- Pavtube old official address: http://www.pavtube.com/video-converter-mac/
- Amazon Store Download: http://www.amazon.com/Pavtube-Video-Converter-Mac-Download/dp/B00QIBK0TQ
- Cnet Download: http://download.cnet.com/Pavtube-Video-Converter/3000-2194_4-76179460.html

Step by step to convert QuickTime MOV to WMV on Mac OS X

Step 1: Load QuickTime Video Files

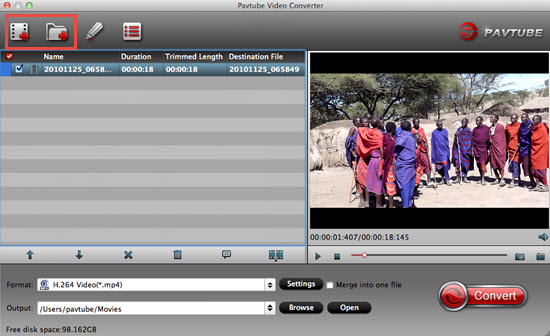
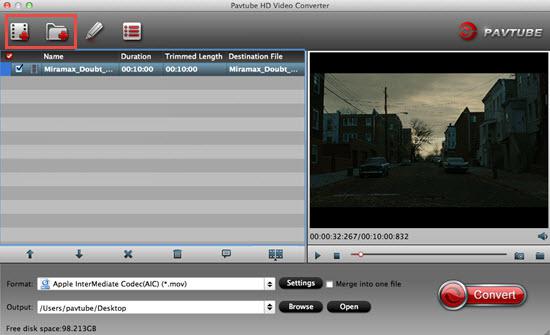
Download the free trial version of program on your Mac, and double click to launch it. Click “File” > “Add video/audio” or “Add from folder” to import QuickTime mov files to the program.


Step 2: Select output file format.
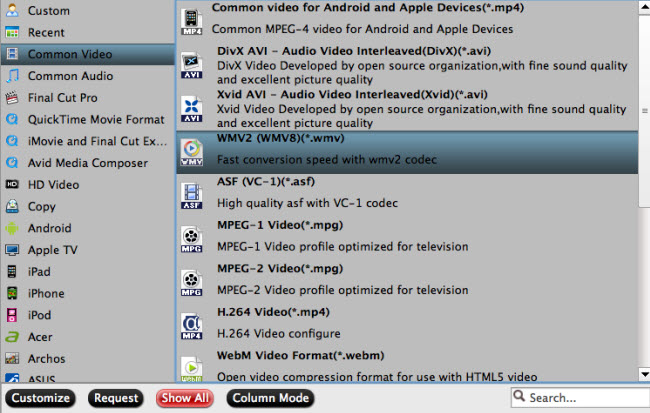
From “Format” drop-down list, select “Common Video” > “WMV 2(WMV 8) (*.wmv)” or “WMV 3 (WMV 9) (*.wmv)” as the output file format.
Tips: To output better quality video, you can do some output parameters settings, like video's quality, bit rate, codec, resolution, and frame rate, etc in the program’s “Profile Settings” window.


Step 3 Edit QuickTime MOV files.
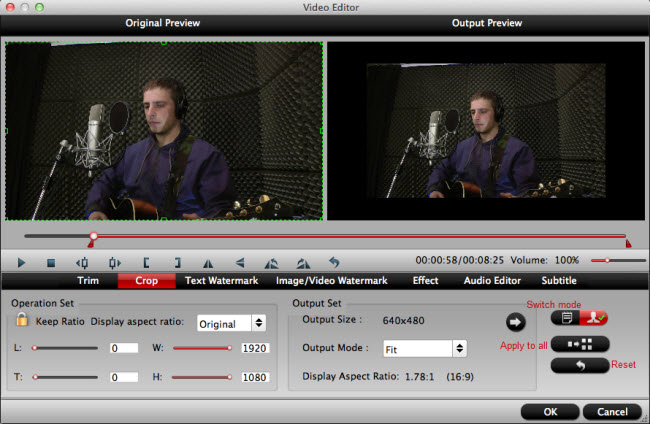
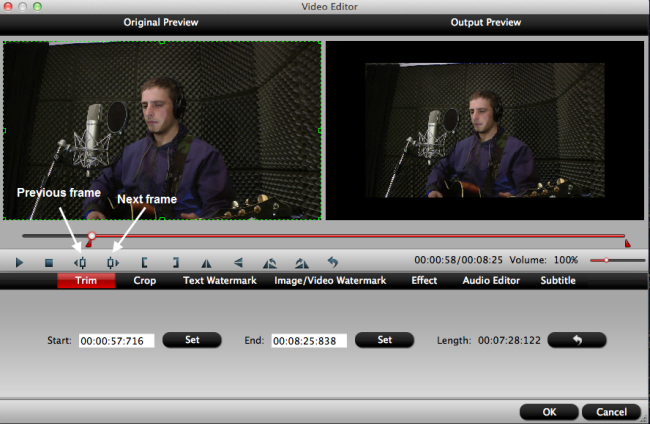
Hit the video editor icon on the top toolbar to open video editor window, you can start to editing the QuikTime MOV files by trimming, croppping, applying effect, adding watermark, inserting subtitle, etc.


Step 4 Convert QuickTime to WMV
Go back to the main interface, then click the right-bottom conversion icon to convert Quicktime MOV video to WMV.

Further Reading:
How to Play QuickTime MOV in Windows Media Player?
How to Play QuickTime MOV Files on TV(Samsung/Sony/LG/Philips TV)?
Top 10 Free Tools to Convert QuickTime MOV to WMV/AVI/MP4/FLV
QuickTime MOV to Grass Valley Edius Pro 7 Workflow

Thursday, October 8, 2015

Play MKV, AVI, VOB, FLV, Tivo, WMV on Amazon Fire Edition with 7" Display


The Fire Kids Edition is a full-featured Fire tablet with a 7" IPS display, 1024 x 600 resolution at 171ppi. It adds a MicroSD card for up to 128GB of additional storage. Once purchased this Fire Kids Edition tablets, you will get unlimited and free access to 10, 000 kid-friendly books, movies, educational apps and games with 1 year of Amazon FreeTime Unlimited included. In addition, the best-in-class parental controls allow you to manage usage limits, content access, and educational goals.


Besides the 1 year FreeTime unlimited movies provided by Amazon, you can also enrich your Kids tablets with movies or videos downloaded from online websites. However, like other Kids Tablets, Fire Kids Edition can only play certain file formats listed below:
video formats: non-DRM AAC, MP3, MIDI, PCM/WAVE, OGG, WAV, 
audio formats: M4V, MP4, AAC LC/LTP, HE-AACv1, HE-AACv2, MKV, AMR-NB, AMR-WB, HTML5, CSS3, 3GP, VP8 (WEBM)

To make it convenient for your kids to watch movies or videos on Fire Kids Edition, a third-party video conversion program will be indispensable. Here, you are recommended to download Pavtube Video Converter for Windows/Mac, which enables to convert virtual any file formats such as AVI, WMV, MP4, MOV, FLV, MKV, Tivo, MXF, VOB, etc to Fire Kids Edition 7" display playable formats listed above.

To let the output video fit perfectly on Fire Kids Edition 7” display screen, it is ideal for you to adjust the output file resolution as 1024 x 600 in the “Profile Settings” window of the program, so that you will get a full resolution video playback quality on the Kids tablet.


Other Download:
- Pavtube old official address: http://www.pavtube.com/video_converter/
- Amazon Download: http://download.cnet.com/Pavtube-Video-Converter/3000-2194_4-75734821.html
- Cnet Download: http://download.cnet.com/Pavtube-Video-Converter/3000-2194_4-75734821.html


Other Download:
- Pavtube old official address: http://www.pavtube.com/video-converter-mac/
- Amazon Store Download: http://www.amazon.com/Pavtube-Video-Converter-Mac-Download/dp/B00QIBK0TQ
- Cnet Download: http://download.cnet.com/Pavtube-Video-Converter/3000-2194_4-76179460.html

How to Play MKV, AVI, VOB, FLV, Tivo, WMV on Amazon Fire Edition with 7" Display?

Step 1: Import video files to the video converter.
Run the software on your computer, either hit on the button "Add video/audio" or directly drag & drop your source videos from computer to the app. You can import a folder that is filled with videos to add more than one video into this video converter at the same time.


Step 2: Select output Format.
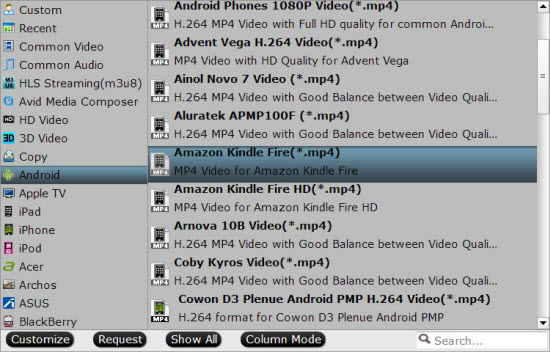
Click the"Format" bar and select "Android > “Amazon Kindle Fire (*.mp4 )" as target format. The output videos could fit on Fire Kids Edition perfectly.


Step 3: Adjust output file resolution.
Click “Settings” to open “Profile Settings” window, under video settings panel, choose “1024*600” as the final output file resolution.


Step 4: Start video conversion.
On the main interface of this Video Converter, you hit the "Convert" icon to start converting your HD videos for Fire Kids Edition. When the conversion is done, get the converted video in output folder location, now you can transfer and watch MKV, AVI, MPG Videos on your Fire Kids Edition with 7” display on the move.

Further Reading:
Make Disney DVD Movies Playable on Amazon New Fire Kids Edition
Play Blu-ray Movies on Amazon Fire HD 6 Kids Edition
How to Add Movies to Your Kids Tablet?
Effective Solutions for Playing YouTube Videos on New Kindle Fire

Monday, September 28, 2015

Problem of Importing Sony PXW-FS5 XAVC/AVCHD to After Effects CC on Mac

Sony PXW-FS5 Super 35 Camera System captures UHD video using a super 35mm-sized sensor, which features approximately 14 stops of latitude and a wide color gamut. It offers a choice of XAVC or AVCHD codecs. The XAVC codec can be used for 4K and HD recording, while MPEG-2 is limited to HD recording. The XAVC Long allows you to encode from HD to UHD using Intra-Frame or Long GoP compression with 10-bit 422 for HD and the choice of 10-bit 422 or 8-bit 420 for UHD.


For Mac users, after shooting some great videos with this great digital cinema camera, you will definitely look for a way to import the video footage to your professional editing application like After Effects CC for some cinematic post-production workflow. The only problem is that XAVC and AVCHD format captured with Sony PXW-FS5 is not well supported by After Effects even the latest After Effects CC. How to smoothly import Sony PXW-FS5 XAVC/AVCHD to After Effects CC for professional editing?

Since the XAVC and AVCHD codec that Sony PXW-FS5 adopts is not an ideal editing format, you can achieve a fast and fluid workflow by converting XAVC/AVCHD to After Effects native editing formats such as MPEG-2, WMV(VC-1) or H.264 MOV, etc.
Pavtube HD Video Converter for Mac does a good job in transcoding Sony PXW-FS5 XAVC/AVCHD to After Effects CC compatible file formats other also to those formats that are preferable by other Mac video editing applications like iMovie, Final Cut Pro, Premiere Elements, Aperture 3, etc.


Other Download:
- Pavtube old official address: http://www.pavtube.com/video-converter-mac/
- Amazon Store Download: http://www.amazon.com/Pavtube-Video-Converter-Mac-Download/dp/B00QIBK0TQ
- Cnet Download: http://download.cnet.com/Pavtube-Video-Converter/3000-2194_4-76179460.html

How to get Sony PXW-FS5 XAVC/AVCHD imported to After Effects CC on Mac?

Step 1: Add Sony PXW-FS5 video footage to the program.
Run the program on your computer, click "File" > "Add Video/Audio" to import Sony PXW-FS5 XAVC/AVCHD video footage to the program.

Load Sony XW-FS5 XAVC/AVCHD video files

Step 2: Define output file format.
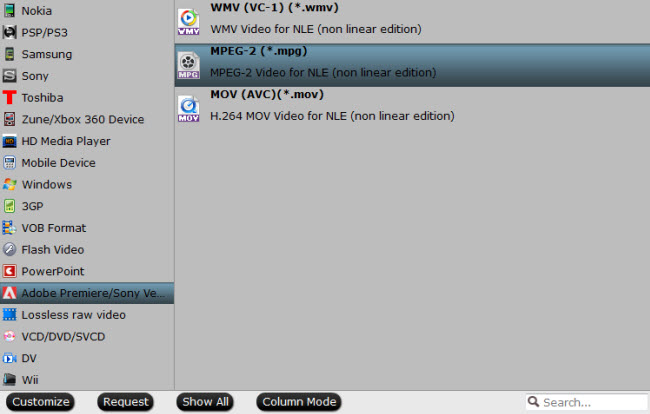
You can output Sony PXW-FS5 XAVC/AVCHD to After Effects CC optimized file format by following "Format" > "Adobe Premiere/Sony Ve..." > "MPEG-2(*.mpg)" format.

Define output file format

Step 3: Edit Sony PXW-FS5 video files.
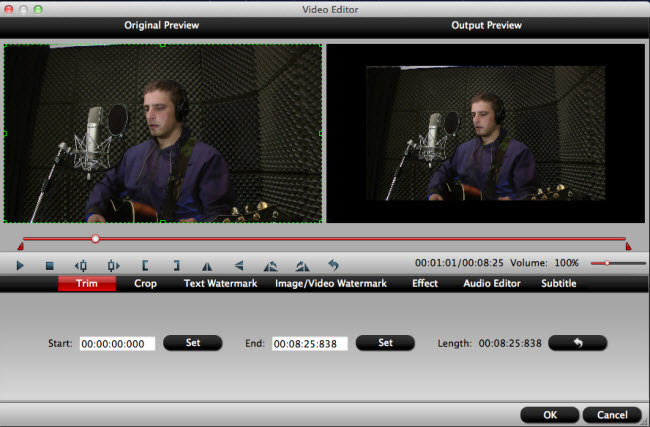
The program offers some basic video editing functions to allow you trim video length, crop video file size, add text/image watermark, insert subtitle, apply special effect, replace/remove audio, etc.

Edit Sony PXW-FS5 XAVC/AVCHD video

Step 4: Convert Sony PXW-FS5 XAVC/AVCHD to After Effects CC.
Go back to the main interface and hit right-bottom "Convert" button to start the conversion process.

After the conversion is completed, you will get no difficulty to import Sony PXW-FS5 XAVC/AVCHD to After Effects CC on Mac for cinematic post workflow.

Further Reading:


Friday, September 25, 2015

How to drag and drop MKV files into Sony Vegas Pro 13 Timeline for Edting?

Sony Vegas Pro importing MKV file problems
"I have some video files in Matroska format (MKV). They don't seem to drag/drop onto the Vegas 13 timeline. Any workaround or will I have to convert them to another format first? Which one/how?"


"I tried converting mkv to mp4 with handbrake, but I found the output video quality was lowered quite a lot. The I read that MKVExtractGUI might be good, so I used that and I get the file that ends in H.264 that can't be used with Vegas Pro or any video players I have. I have no idea where to go from here."

Sony Vegas Pro 13 can work with a variety of file types and formats, however, MKV is unfortunately excluded by it. To open MKV in Sony Vegas Pro 13, the most common and effective solution is converting MKV to Sony Vegas Pro supported formats. Many program on the market can completed the conversion work, however, people often complain the lowered output video quality or video is unusable due to the inappropriate output profile settings.

To guide you out of all those troubles, Pavtube Studio has debuted a program called Pavtube Video Converter, different from other video conversion tools, this application helps to beneficially convert MKV to Sony Vegas specially optimized file format with all the suitable profile parameters well set up. Besides that, other unsupported formats such as MXF, M2TS or camcorder video like GoPro Hero 4K video are also well supported by the program for Sony Vegas conversion.


Other Download:
- Pavtube old official address: http://www.pavtube.com/video_converter/
- Amazon Download: http://download.cnet.com/Pavtube-Video-Converter/3000-2194_4-75734821.html
- Cnet Download: http://download.cnet.com/Pavtube-Video-Converter/3000-2194_4-75734821.html

How to drag and drop MKV files into Sony Vegas Pro 13 Timeline for Edting?

Step 1: Input MKV source files.
Launch and start the program on the computer, import your source MKV video files to the program by clicking "File"> "Add Video/Audio".


Step 2: Specify output file format.
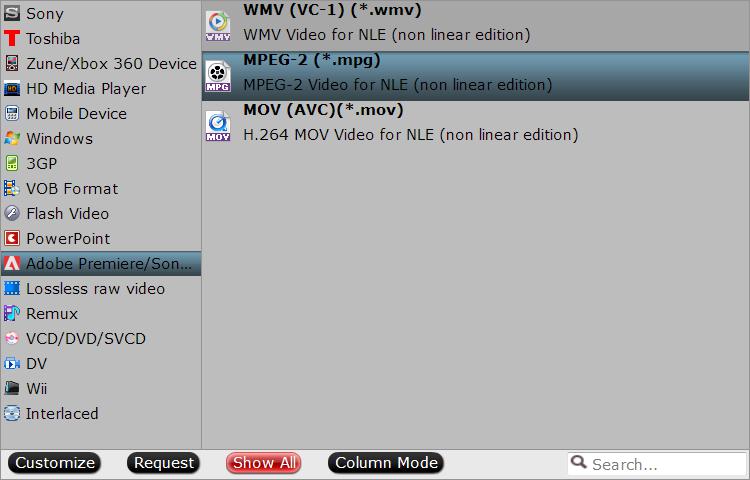
From "Format" drop-down list, select to out "Adobe Premiere/Sony... "> "MPEG-2 (*.mpg)" format for editing with Sony Vegas.

Specify output file format

Step 3: Merge into one file.
On the main interface of the program, check "Merge into one file" option to combine all the separate video footage into single one.

Step 4: Carry out the conversion process.
Press right-bottom conversion button to start MKV files to Sony Vegas Pro 13 conversion process.

When the conversion is complete, you can easily import MKV videos to Sony Vegas Pro 13 for professional editing.

Further Reading:

How to Convert WMV Files to iMovie 11, 10.0 Editable Format on Mac OS X?

iMovie is a video editing software application for the Mac and iOS (iPhone, iPad, iPad Mini and iPod Touch). iMovie imports video footage to the Mac using either the FireWire interface on most MiniDV digital video cameras or the computer's USB port. It can also import video and photos files from a hard drive. With iMovie, users can edit photos and video clips by adding titles, themes, music and effects.


Like other Mac video editing tools, iMovie has limited itself to import only few file formats, below are the list of iMovie supported video formats:
DV-Standard file formats
HDV (High Definition Video) 1080i, HDV 720p
MPEG-4 simple profile
iSight
Camcorder (AVCHD)
Part of QuickTime supported MOV

If you happen to own great amount of WMV files on your computer, you are out of luck to import WMV files to iMovie for editing since WMV is not compatible with iMovie. Never mind, there are many apps can assist you to achieve the goal of converting WMV to iMovie editable format.

To perform the conversion, you can adopt Pavtube HD Video Converter for Mac, a professional yet simple to use application which help you to convert WMV to iMovie imported MPEG-4, MOV, DV, HDV etc formats in just one click. For fast and smooth workflow of WMV files with iMovie, you are recommended to to encode WMV to Apple Intermediate Codec(AIC)(*.mov) codec. More over, the program also enables you to convert other incompatible file formats such as MXF, MP4, Video_TS or camcorder files to iMovie for convenient editing.


Other Download:
- Pavtube old official address: http://www.pavtube.com/hd-video-converter-mac/
- Amazon Store Download: http://www.amazon.com/Pavtube-Video-Converter-Mac-Download/dp/B00QI9GNZS
- AppStore Download: https://itunes.apple.com/de/app/pavtube-hd-video-converter/id502792488?mt=12
- Cnet Download: http://download.cnet.com/Pavtube-HD-Video-Converter/3000-2194_4-76177786.html

Step by step to convert WMV to iMovie accepted file formats

Step 1: Import WMV files.
Start up the program on your computer, on the top menu bar, click "File" > "Add Video/Audio" or "Add from folder" to import source WMV files from your local drive to the computer.

Import source WMV files

Step 2: Output iMovie supported format to output.
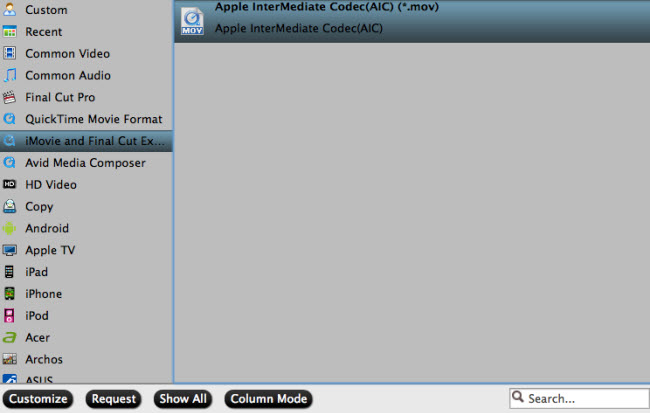
Go to "Format" bar, from its drop-down list, select "iMovie and Final Cut Ex..." > "Apple Intermediate Codec(AIC)(*.mov) format. You can also choose to output other iMovie editable "MOV" or "MPEG-4" from "Common Video" extended lists.

Output iMovie AIC format

Step 3: Start WMV to iMovie conversion process.
After all the settings is completed, hit right-bottom "Convert" button to start to convert WMV to iMovie compatible format.
When the conversion is done, click "Open output folder" button to get converted WMV files imported to iMovie.

Further Reading:

Tuesday, September 22, 2015

How to Transcode and Edit Zenmuse X5/X5R 4K Video with FCP X Mac OS X?

DJI has launched the Zenmuse X5 and the Zenmuse X5R aerial cameras, designed
for use with the Inspire 1 professional aerial camera platform. With a micro four thirds (M4/3) camera capable of 16 megapixel photos as well as 4K, 24fps and 30fps video, its clear to see why DJI are describing the X5 series as the "next evolution of aerial camera technology".


Both Zenmuse X5 and X5R are capable of recording 4K UHD video with a resolution of 3840x2160 and 4K Cinema video with a resolution of 4096x2160 in MP4 or MOV format compressed with MPEG-4/AVC/H.264F codec.

After recording some 4K video footage with those two aerial camera, you will definitely wish to polish the video with some NLE editing program such as Final Cut Pro, Avid Media Composer, iMovie, Premiere Pro CC, etc. This article will mainly talking about the workflow of Zenmuse X5/X5R with FCP X.

Although Final Cut Pro has official claimed its powerful processing capability of 4K video, however, 4K video compressed with MPEG-4/AVC/H.264F will be very data-intensive. To have a fast and fluid workflow, it is much ideal for you to transcode Zenmuse X5/X5R 4K video to Apple Prores codec, which is specially designed for high quality and high performance editing in FCP X.

Pavtube HD Video Converter for Mac, a reliable Apple Prores codec producer, is capable of encoding Zenmuse X5/X5R 4K video to FCP X most favorable editing codec Apple Prores in various different file types. Besides that, you can also utilize the program to do some basic editing functions for you such as video trimming, cropping, applying special effects, adding watermark, etc.


Other Download:
- Pavtube old official address: http://www.pavtube.com/video-converter-mac/
- Amazon Store Download: http://www.amazon.com/Pavtube-Video-Converter-Mac-Download/dp/B00QIBK0TQ
- Cnet Download: http://download.cnet.com/Pavtube-Video-Converter/3000-2194_4-76179460.html

Tips:
1. When converting video to Final Cut Pro oriented format templates (e.g. Apple Prores), please ensure that your computer has Final Cut Pro installed, otherwise the converted files will have audio only without image.
2. If you are using FCP X, please make sure you have installed ProApps QuickTime Codecs, or you may get files with sound only without video.

How to transcode Zenmuse X5/X5R 4K video to FCP X Mac OS X El Capitan?

Step 1: Add Zenmuse X5/X5R 4K video files.
Click the "Add Video" button or "Add from folder" button to import source Zenmuse X5/X5R 4K video files to the program. You can add multiple video clips at one time.

Import source video files

Step 2: Choose output file format.
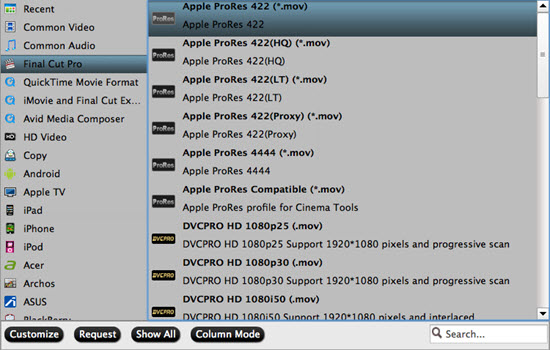
Click the "Format" bar and select "Final Cut Pro" > "Apple Prores 422 (*.mov)" as output format. If your Mac is a little old or slow, you can choose to select "Apple Prores 422 (LT) (*.mov)" or "Apple Prores 422 (Proxy)" to save your bandwidth, if your computer is fast enough or you wish to do some high performance editing work, "Apple Prores 422 (HQ) (*.mov)" or "Apple Prores 422 (*.mov)" is more preferable.

Set output file format

Step 3. Edit Zenmuse X5/X5R 4K video.
Open "Video Editor" window, here you can trim video length, crop video file size, apply special effect, add image or transparent text watermark, add subtitles, replace or remove original audio, etc.

Edit Zenmuse X5/X5R 4K video

Step 4. Convert Zenmuse X5/X5R 4K to Apple Prores.
Click the "Convert" icon under the preview window, it will start to convert Zenmuse X5/X5R 4K video to FCP X supported Apple Prores format.
After the conversion, launch Final Cut Pro, choose File > Import > Files..., locate and find the folder where you save the converted video clips. Then start Zenmuse X5/X5R 4K video to FCP X professional post workflow with no difficulty.

Further Reading:
Is It Possible to Edit DJI Inspire 1 4K Video in FCP X?
Convert DJI Inspire 4K Files to 1080p for Editing on Mac/PC
Work DJI Inspire 1 4K Videos with Adobe Premiere Pro
4K to iMovie: Import DJI Inspire 1 4K Footage to iMovie for Editing
Transcode DJI Phantom 2 Vision+ Video to Avid Media Composer
Get Phantom 3 4K MP4/MOV Files Work Well with After Effects
DJI Phantom 3 Video Converter -- Transfer 4K Video to YouTube


Wednesday, September 16, 2015

How to Convert and Edit VRO with FCP X?

Summary: Maybe you have a Panasonic or Sony camcorder or Samsung DVD recorder and record some videos. If you want to edit them in Final Cut Pro X on Mac, there must be some issues because VRO files aren’t supported by FCP X.


VRO has been a very hot video format all the time since it was created by DVD video recorders. Its full name is Variable Ratio Oiler and is a special format used for DVD recording to shoot video and audio data onto the DVD in real time. It features in supporting very high quality videos. There are countless camcorders in the market supporting VRO shooting, for example, Canon DC100. The problem is how we should do to free convert VRO to ProRes for Final Cut Pro 6/7/X.

Apple ProRes 422 is a standard-definition and high-definition lossy video compression format developed by Apple Inc. for use in post production. It was introduced in 2007 with Final Cut Studio 2 and is comparable to Avid’s DNxHD codec which has the same purpose and uses similar bit rates. Both are DCT basedintra-frame-only codecs, and are therefore simpler to decode than distribution oriented formats like H.264. FCP 6/7, FCP X is Mac based editing software which supports transcoding VRO videos to Apple ProRes for further editing.
Tips: FCP supported video formats

So the program you need is a great Pavtube Video Converter for Mac which will convert VRO to Apple ProRes 422/4444 for editing with Final Cut Pro X/7/6 on Mac with best video and audio quality, perfect video and audio synchronization, and nearly all the video formats are supported, including MKV, MVI, VOB, F4V, SWF, AVIWMVMOV, M4V, FLV, AVCHD, MTS, M2TSMXF, Canon camcorder recordings, Sony/Panasonic recordings, etc.


Other Download:
- Pavtube old official address: http://www.pavtube.com/video-converter-mac/
- Amazon Store Download: http://www.amazon.com/Pavtube-Video-Converter-Mac-Download/dp/B00QIBK0TQ
- Cnet Download: http://download.cnet.com/Pavtube-Video-Converter/3000-2194_4-76179460.html

Some specific steps of converting and editing VRO recordings with FCP X are allowed here:

Step 1: After downloading and installing, launch the project. Open the main interface and choose the “Add video” to load your VRO files in. For the multiple video clips we can hit the “Add from folder” button.


Step 2: Click the “Format” bar to get the drop-down menu and you can get “Final Cut Pro>>Apple ProRes codec”, including ProRes 422, ProRes 422 (HQ), ProRes 422 (LT), ProRes 422 (Proxy) and ProRes 4444. Choose the proper one you want. Here, we suggest you to choose “Apple ProRes 422 (*.mov)” as the best output format.


Step 3: Most of you guys must have the desire of a further editing with your output videos, right? On the maininterface, “Edit” is waiting for you. “Trim” to decide where to start and where to end, “Crop” to cut some unwanted clips, “Subtitles” to add some explanations to your audience.

Step 4: Before converting, you can watch the video in the preview window. If you are satisfied with the result, it’s not too late to hit the “Convert” button.

Conclusion: After converting, you can get the generated files by clicking “Open” button. Now, you can edit VRO files in FCP X flawlessly. It’s easy and it’s indeed of great convenience, right?

Further Reading: