Tuesday, November 26, 2013

How to convert and sync AVI to iPad Air with subtitles?

Summary: A details guide to show how to transfer SD/HD AVI videos to MP4 for iPad Air, you can also add srt/ass/ssa subtitles to AVI video for playback.

Q1: "I have a very long bus trip coming up and a lot of good .avi format movies (mostly xvid) is there any way i can get them to play on my iPad Air. Anything that can help me out?"

Q2: "I am on a bit of a time limit so I am hoping to get this done soon. I am shipping a parcel out to my brother later this afternoon and I would like to include the movie. I have researched online and keep running into dead ends. 
So, I have the Movie Deathnote L-Change the world, and I downloaded with it a .srt file for the subs, they are in the same folder but I do not have the option it seems to add the .srt file permanently?"

iPad Air has just been shipped about a week and it's so light comparing with other full size tablets. Most of you may much prefer taking it out than any other iPad before. It's really an enjoyment to watch movies videos everywhere with such a super light full size tablet with Retina display.

However, iPad Air is still a tablet and it could not deal with all video formats as a real computer. MOV and MP4 are still the most compatible formats with iPad. So what if we have many videos in other formats like AVI? (Yes, the native player does play AVI files, but note that AVI is just a container format which can contain different video codecs; only a small subset of these codecs can be recognized by iPad Air.)

How to play videos on iPad Air without format limitation?

iPad Air supported format:
  • Video Format: .m4v, .mp4, .mov, MPEG-4, H.264, M-JPEG
  • Audio Format: AAC, Protected AAC, HE-AAC, MP3, AAX, AAX+m, Apple Lossless AIFF, WAV
With iPad Air Video Converter Ultimate, you can easily encode HD/SD AVI including some Blu-ray and DVD discs to iPad Air supported format with best settings that give you best effect when watching all kinds of movies on iPad Air. How to play AVI movies on iPad Air? How to hard-burn subtitles to AVI for playback on iPad Air? Follow below simple steps and you can do it within a few clicks.

Required tool: 
Pavtube AVI to iPad Air Converter
, an easy-to-use Windows/Mac tool to help you transfer AVI to most compatible MP4 for iPad Air.
Mac version here: AVI to iPad Air Converter for Mac.

Tutorials: how to transgfer AVI to MP4 for playback on iPad Air?

Step 1: Run this Pavtube Video Converter as AVI to iPad Air Converter; add videos.

You can choose to import videos or the entire folder by clicking the top left two icons. Or you can try drag and drop directly. 

watch world cup matches on ipad iphone.jpg

Step 2. Choose format.

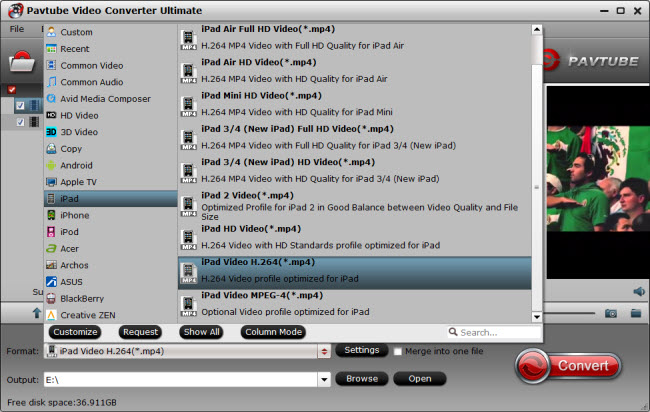
Click "Format" drop-down list and choose "iPad>iPad Air Full HD Video(*.mp4)" as the compatible MP4 preset with best video quality. Or you can choose other presets if you don't need full size videos.(Note: You need to download a patch file for getting best video format for iPad Air)
watch world cup matches on ipad iphone profile chosen.jpg

Step 3. Customize video specs (Optional).

Click "Settings" to free change video resolution, bitrate(quality), frame rate and other settings. Note that if you need to get videos in smaller size (especially when you own a 16GB model), you are suggested to turn down bitrate settings; the generated video size could also be found in this window. 

For those who want to burn subtitles to it permanently, click "Edit" on top to enter video editor windows; switch to "Subtitles" tab and you can browse to load your *.srt/*.ass/*.ssa subtitles manually.

Step 4. Start Conversion.

You can hit the big red "Convert" to start converting HD AVI to MP4 with best video settings for iPad Air. After the conversion, click "Open output folder" in the conversion window, or "Open" in main interface to quick locate the converted video.

If you don't know how to put and play movie onto new iPad Air , just follow the steps to realize it:
  
Here I take movie files transfer as an example. Similar operation for streaming music, photos, and iBook to iPad Air using iTunes.

Note: Make sure you have install iTunes. If not, you can free download iTunes here at first. And launch the iTunes.

Step 1. Open iTunes, and connect your iPad Air to your Windows computer. 

Step 2. Switch to "Movie" category, click "File" tab in the left navigation bar, and add local file or folder to iTunes library.
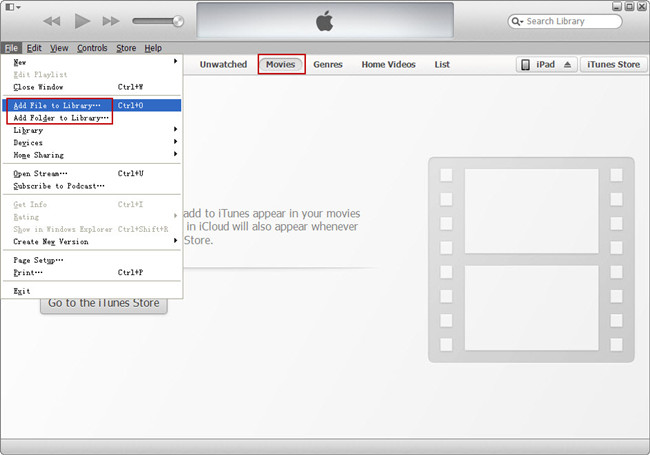


When the files are added, you would see "New" tab at the top right corner.
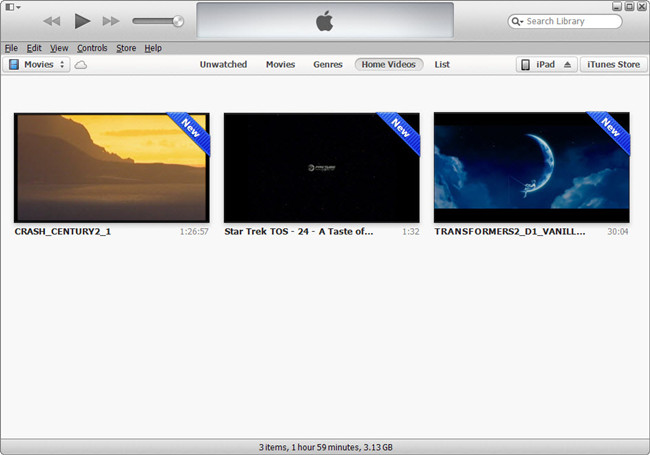


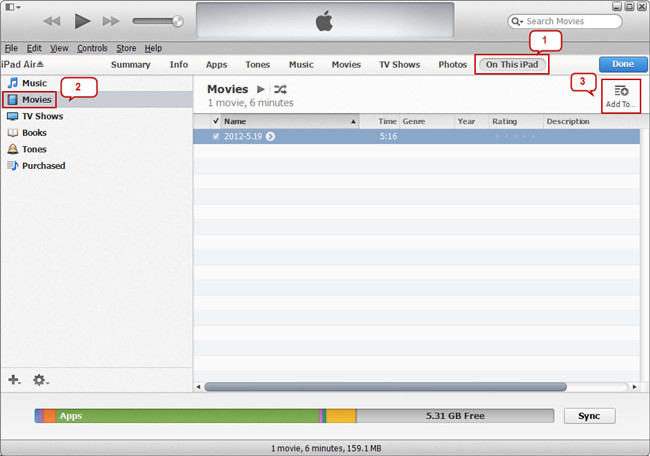
Step 3. Click on iPad Air in the right navigation bar, then follow the path "On This iPad > Movies > Add To" to stream videos from local computer to iPad Air.


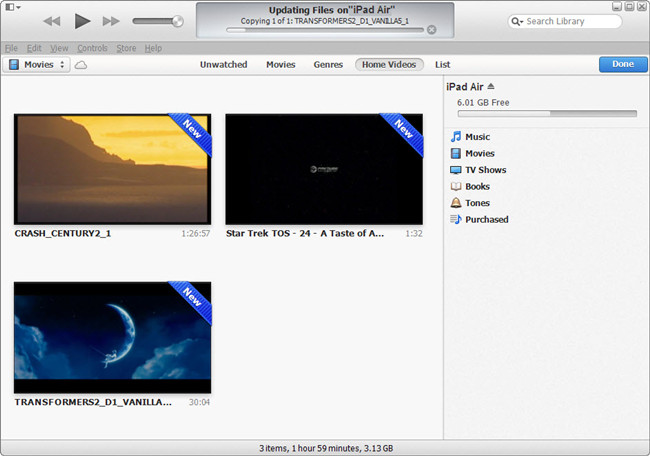
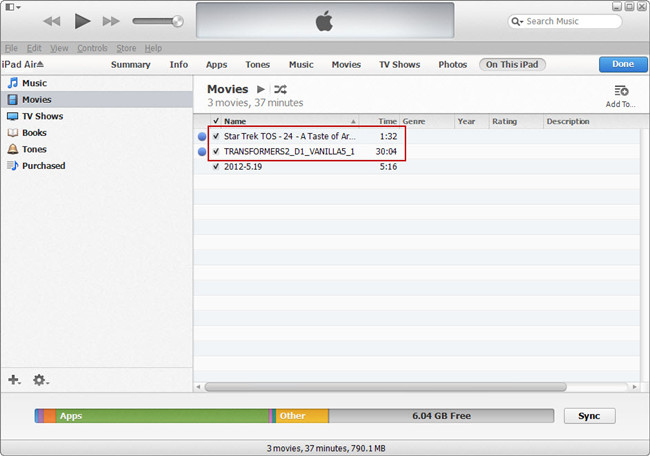
Wait for the uploading file process complete and all files would be successfully transferred to your iPad Air.


Read this article to get more detailed steps: How to sync video, music, photo files to iPad Air with iTunes on Windows/Mac?

Related Articles:

Friday, November 22, 2013

Watch Blu-ray movies on iPad Mini 2 with Forced Subtitle on Windows 8.1/8/7

Apple’s iPad series including iPad Air, iPad Mini 2, iPad Mini, iPad 4, iPad 3, iPad 2 and the original iPad are great portable media player.

ipad mini 2

With more and more movies released in Blu-ray version, many people own a large collection of Blu-ray disc; or you may prefer to rent latest Blu-ray movies or exchange them with friends. Are you annoying that you have to take these blu-ray discs on your heavy luggage when you are in travel or on business?

Don’t worry, I’ve had success using Pavtube Blu-ray Ripper software to rip my favourite Blu-ray discs and some DVDs to a proper format playable for syncing to my iPad Mini 2 via iTunes 11. I’ve found the quality to be excellent, and see no differece when compared to playing the discs themselves. This is the Top 5 Blu-ray Ripper Review on 2014. If you enjoy having everything organized and save memory space while keeping the original quality of your HD movies and videos then this is what you are looking for.
  
This article will give you a step-by-step guide to teach how to rip and convert Blu-ray movies to iPad Mini 2 on Windows 8.1/8/7. With this you can enjoy all of your Blu-ray movies anywhere and anytime.

Required tools:
  • PC running Windows 8.1 Blue, Windows 8, Windows 7, Windows Vista, Windows XP
  • Blu-ray Disc
  • Blu-ray to iPad Mini 2 Converter tool - Pavtube BDMagic (For Mac users: BDMagic for Mac)
  • BD-ROM for ripping Blu-ray movie to iPad Mini

How to Rip and Sync Blu-ray to iPad Mini 2 on Windows 8.1/8/7?

Step 1: Getting started.

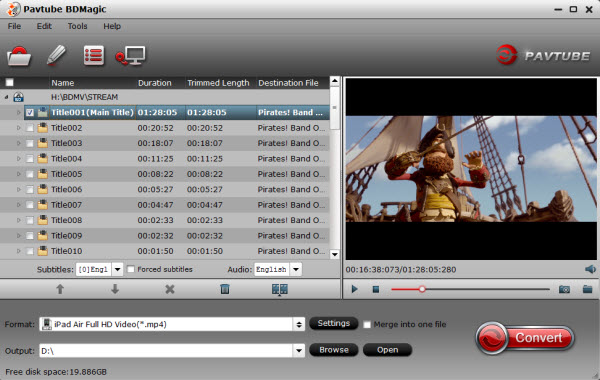
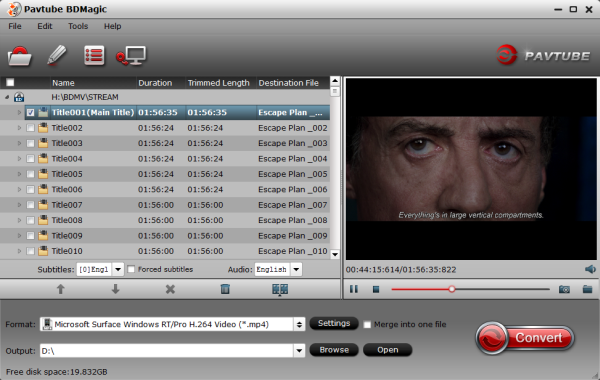
Free download the best Blu-ray to iPad Mini 2 Ripper, install and launch it. Hit the “Load disc” button to browser to disc drive and import source Blu-ray.

The Blu-ray to iPad Mini 2 Ripper can do with all kinds of BD/DVD sources: protected and unprotected Blu-ray Disc, BDMV folder, BD ISO, physical DVD, VIDEO_TS folder, DVD ISO and IFO file.


Tip 1: The main title is checked by default and no need to re-select correct Blu-ray main movie. Don’t forget to choose one wanted audio track and subtitles from the drop-down list of “Audio” and “Subtitles” for your output Blu-ray movies.

Tip 2: If you would like to show subtitles only when actors are speaking a different language, Pavtube offers an option called “Forced subtitles” to enable you to do that. Just choose one main subtitle track from Subtitles menu e.g. English and click the “Forced subtitles”, you would find subtitles only show when a foreign language is speaking.

Step 2: Choose iPad Mini compatible output format

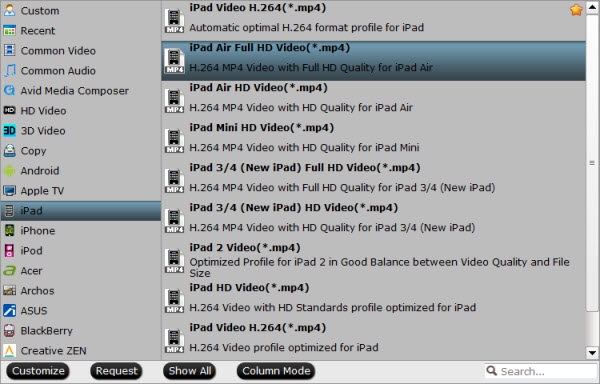
Now choose the output format for playback on your iPad Mini. You can get optimized video for iPad under iPad> iPad Mini HD Video (*.mp4). And choose the destination folder to save the converted videos.


Tips: you can click “Settings” to tweak the detailed video and audio encoding settings. Remember the file size is based more on bitrate than resolution which means that bitrate higher results in big file size, and lower visible quality loss.

ipad mini 2 video settings

Step 3: Start VC-1 Blu-ray to iPad Mini 2 ripping

After all the above settings, simply click “Convert” button to start converting VC-1 Blu-ray to iPad Mini 2 videos. Just wait for the converting process to be done. After that, find the converted videos in your output folder and transfer them to your iTunes library and sync your iPad Mini. 

1. Launch the iTunes and connect iPad Mini 2 to PC.
2. Choose “File – > Add File to Library…”
3. Drag the .mp4 file you want to the iPad icon.

So there you have it. Now you are free to watch Blu-ray movies on new iPad Mini 2 with subtitles anytime and anywhere as you like. Enjoy.
  
Related Articles:

Thursday, November 21, 2013

Tips for Converting DVD movies to Surface 2 and Surface Pro 2 playable video format - MP4 format

As one of the most popular Windows 8 tablet, Surface 2 or Surface Pro 2 is not equipped with DVD drive or support to DVD ISO image file. So "How do I play DVD movies on Surface 2 and Surface Pro 2 without DVD drive?" This guide will show you the easiest way to rip DVD protection and convert DVDs to Surface Pro 2/Surface 2 support format (MP4/HD MP4) for playback without DVD drive.


For watching DVD movies on Surface Pro 2 or Surface 2 without any problem, a good DVD to Surface Pro 2 converter will give you big help. Here we recommend you to take a free try on our DVD to Surface Pro 2 Converter, this is top DVD Ripper for Surface Pro 2/Surface 2 tablet, which can rip latest DVD discs/floder/ISO/IFO image files to any formats you need, such as MP4, MOV, AVI, WMV, FLV, MPG, etc. when you converted DVD to compatible formats, you can transfer DVD movies to Surface Pro 2/Surface 2 tablet, Android/Apple/Windows 8 tablet or smartphone, or other playable devices for freely viewing.
  
Note: If you are Mac users, view Pavtube DVDAid for Mac; well support Mac OS X 10.9 Mavericks!

Steps: How to convert DVD disc/ folder/ISO/IFO to Surface 2 & Surface Pro 2 playable MP4 format? 


Step 1. Run DVD to Windows 8 Converter; load DVD disc/ISO/IFO/folder.

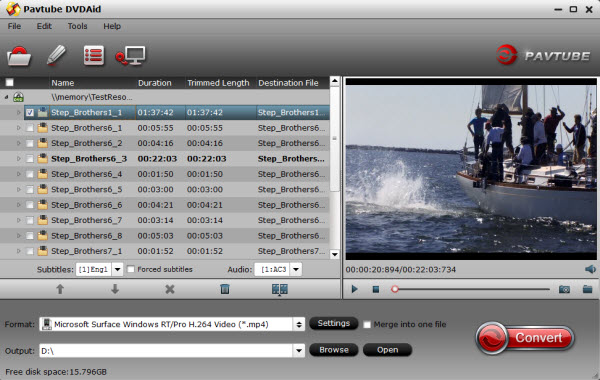
Click the disc button to browse and import DVD disc from ROM, or load the ISO/IFO file that you want to convert for viewing on Windows 8 Surface Pro 2.


Pavtube DVD Ripper will detect and list the main title (the full length of this movie) and check it by default. So just keep it untouched and let’s move on to Step 2.

Step 2. Choose format.

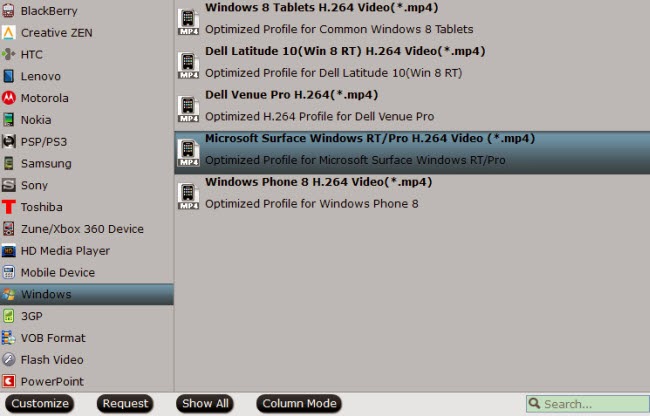
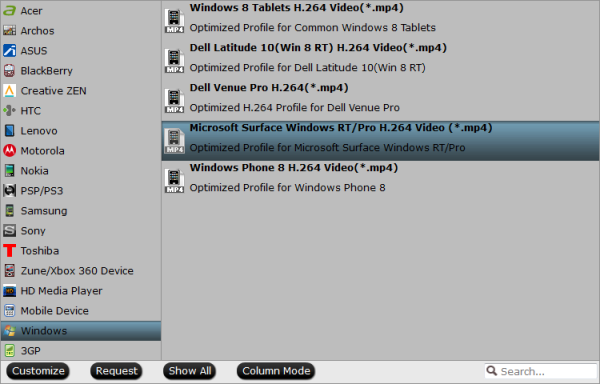
Highlight the movie title you want to rip, and then you can click the dropdown menu below “Subtitles” and “Audio” respectively, you will see many presets for difference devices and programs. In this case, you are suggested to select “Microsoft Surface Windows RT/Pro H.264 Video (*.mp4)” as the best MP4 preset for Surface 2 and Surface Pro 2. Or you can also "Format -> HD Videos -> H.264 MP4" as output video format.

surface 2 best video format

If you prefer a much better video quality and don’t mind the output file size, you can rise the video bit rate higher than 1500. Generally speaking, the higher video bit rate will result in the larger output file size, and vice versa.

Step 4. Start conversion.

Now hit the big red “Convert” to start converting DVD movies to Surface 2/Surface Pro 2 MP4 with best video quality for playback.
  
After the conversion, you can get the converted DVD rips in .mp4 format by clicking the “Open” or “Open output folder” icon and transfer the result videos to your Surface Pro 2 via USB cable.

This DVD to Surface Pro 2 Ripper also equipped with NVIDIA CUDA and AMD APP acceleration technology, so it can rip DVDs at a fast speed, it will save you much time. Now please take a try, hope it can help you.

And now you can transfer DVD movies to Surface Pro 2 at your leisure time freely. Enjoy.

Tips: If you have other media files like Blu-ray movies, Blu-ray ISO image files, MKV, AVI, MTS, MPG, VOB, TiVo, FLV, F4V, MOV, etc. HD videos, and want convert and watch them on your Surface Pro 2 or other devices(Surface 2, Surface RT, Surface Pro, iPhone 5S, iPhone 5C, iPad Air, iPad Mini 2, Kindle Fire HDX, Moto X, Motorola Droid Mini, Galaxy Note 3, Galaxy Tab 3, Nexus 7 (2), Xperia Z1, LG G-Pad, Xperia Z Ultra, Acer Liquid E2/S2, Fonepad 7, MeMO Pad Smart 10, MeMO Pad HD 7, MeMO Pad ME172V, Motorola Droid Ultra, HTC One Mini, Galaxy Note 10.1 2014 Edition, SkyPad tablets,  Toshiba Encore , Toshiba Thrive 10.1, etc.), you can try the package tool Pavtube Video Converter Ultimate (Mac users: iMedia Converter for Mac) to achieve your goal. Both are 20% off on Thanksgiving Hot Deals 2013. 

Related Articles:


Wednesday, November 20, 2013

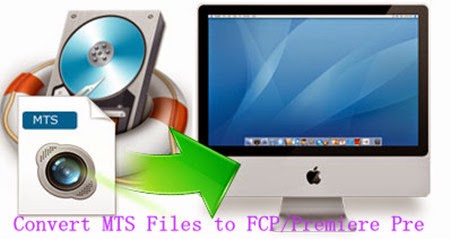
Import AVCHD MTS Files to FCP, Premiere Pro on Mac (Mavericks included)?

When you didn't get correct structure of your AVCHD footage, you will find FCP does not read your broken AVCHD structure properlythen how to open and edit your single .mts files in FCP and Premiere Pro without problems? Fortunately, there is an easy way to fix the issue. Let's find it out here. 


The reason that I can't sucessfully ingest the single .mts videos to your non-linear editing systems is simple. In fact, Final Cut Pro/Premiere Pro is very picky in importing videos. One can import AVCHD files on Mac directly from a memory card (with the original file structure in place), or from a camera archive, but can't import them by selecting the single .mts clips.

That's is to say, if your card structure is broken and whatever reason it doesn’t come across intact, you can't directly load your mts files onto your FCP and Premiere Pro. In case that FCP/Premiere needs a correct folder Structure so if you have to, transcoding the MTS to Prores with a 3rd party app is a feasible workaround. They you will have no requirement with ingest supported with additional software and no use camera archives method.

Hot Search: MTS to VLC | MTS to smart TVMTS to MP4

Here I would like to share this usefull MTS Converting program - Pavtube MTS/M2TS Converter for Mac is recommended for you, with this you can achieve the individual .mts to Prores conversion. No matter the AVCHD files are single .MTS files or directly from your camera, you can transfer it to FCP/Premiere compatible formats and directly import it to FCP for easy editing. 

Plus, this Mac AVCHD converter also supports converting AVCHD MTS footage to iMovie, Avid Media Composer, Final Cut Express and more to meet your needs. These output formats are specially presetted, so the conversion quality is guaranteed, you can get lossless video conversion with this tool. Now, download it and follow the step-by-step guide transcoding single .MTS/M2TS to Final Cut Pro/Premiere Pro. 

Step 1. Run the nice AVCHD MTS Converter on your Mac and load mpg clips to it by clicking "Add" button. There are two ways for you to import files: add video directly and add the entire folder. The software supports batch conversion, so you can import several videos to it one time.


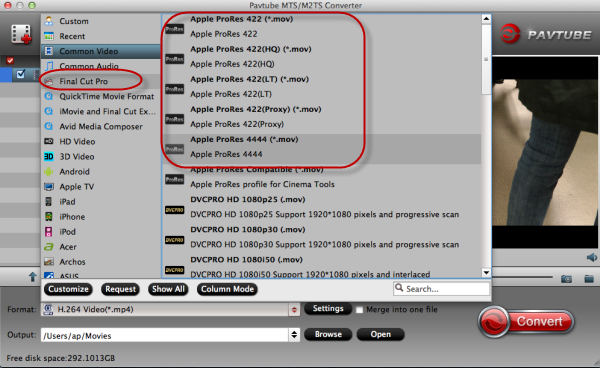
Step 2. Click "Format" bar and then move your pointer to "Final Cut Pro > Apple ProRes 422 (*.mov)" as the editable format for Final Cut Pro and Premiere Pro. 

  
Tips: 

Here listed the main difference of the five ProRes codecs. 

a. ProRes 422 (HQ): offers the utmost possible quality for 4:2:2 or 4:2:0 sources and provides target data rate of approximately 220 Mbps and higher quality than Apple ProRes 422; 

b. ProRes 422: provides target data rate of approximately 145 Mbps and higher quality than Apple ProRes 422 (LT); 

c. ProRes 422 (LT): provides roughly 70 percent of the data rate of Apple ProRes 422 (thus, smaller file sizes than Apple ProRes 422) and higher quality than ProRes 422 (Proxy); 

d. ProRes 422 (Proxy): provides roughly 30 percent of the data rate of Apple ProRes 422 and high-quality offline editing at the original frame size, frame rate, and aspect ratio; 

e. ProRes 4444: offers the utmost possible quality for 4:4:4 sources and roughly 50 percent higher than the data rate of Apple ProRes 422 (HQ). 

Step 4. You can click "settings" to customize the output parameters, adjust the resolution, bitrate as you want. 

Step 5. Click convert button to start converting AVCHD MTS to Prores MOV for Final Cut Pro and Premiere Pro editing. 

After the Mac MTS to Prores conversion, you can import the converted footages to FCP and Premiere Pro for editing smoothly on Mac. You're done! Now you may know how to ingest and edit single .MTS footage in Final Cut Pro and Premiere Pro. 

Read More:

How to Solve the freezes when importing MTS media to Premiere CC-2015.3?
How to Convert MTS/M2TS with Handbrake Easily?
Best Solution to Play Sony MTS/M2TS Files on MacBook Pro
Play MTS on Smart TV (Windows and Mac Solutions)
Top 5 MTS/M2TS Video Editors for Mac
Top 5 MTS/M2TS Video Editors for Windows (10, 8.1, 8, 7, XP, etc)
Fix Choppy Issues When Importing AVCHD Files to FCP
Join and Convert MTS/M2TS Files for playing with VLC Player
How to Convert 3D AVCHD MTS to 3D Tablet for Watching?

Tuesday, November 19, 2013

Transfer Blu-ray to Surface Pro 2, Put Blu-ray Folder/ISO to Surface Pro 2 for playback

To view Blu-ray movies on your new Surface Pro 2 tablet, the best way to rip Blu-ray disc/folder/ISO files to Surface Pro 2 support video format so that you can playback Blu-ray on Surface Pro 2 smoothly.
“For software that has to be loaded from a Blu-ray movie, how will I get my software on the Surface Pro 2? Will I have to use an external blu-ray drive whenever I want to watch Blu-ray movie on Surface Pro 2? Or is some other method involved??”
Surface Pro 2 is just a laptop without a keyboard. You can plug in a disk drive or any of the other peripherals that can be connected to any Windows computer. You could connect an external Blu-ray drive to play a blu-ray disc; but you don’t have to so this every time when you want to play (3D) Blu-ray movie on Surface Pro 2 as it’s inconvenient. In my way, I’d prefer to rip Blu-ray disc to MP4 format that works perfect on Surface Pro 2 for playback.

play blu-ray movies on surface pro 2

If you want to transfer Blu-ray movies to Surface Pro 2, a professional powerful ripping program will help you a lot.Pavtube Blu-ray to Surface Pro 2 Converter is such a tool with the easiest workflow to help you rip off Blu-ray disc/ISO/folder protection, then convert the decrypted movie to MP4 format with best video settings for Surface Pro 2. Get Blu-ray to Surface Pro 2 Converter for Mac here; well support Mac Mavericks!

Tutorials: How to transfer Blu-ray to Surface Pro 2? 

Step 1. Run Blu-ray to Surface Pro 2 Converter; load Blu-ray.

This converter does not only support Blu-ray disc/folder/ISO, but also able to convert DVD disc/folder/ISO/IFO files. Your ISO image file would be recognized automatically so there’s no need to run virtual drive to mount it any more.


Step 2. Choose format.

Click the drop-down list besides “Format” list, you can find many presets and columns for different devices and programs. Let’s switch to “Windows” column and select “Microsoft Surface Windows RT/Pro H.264 Video (*.mp4)” as the best preset for Surface Pro 2. (For Surface 2 users, refer the guide: How to copy Blu-ray movies to Surface 2 for playback easily)

Or you can enter “Surface” in the small search box at bottom right corner.


Step 3. Adjust specs or edit video before conversion (Optional).

If you want to customize output video size, bitrate, frame rate and others, just click “Settings” to enter profiles settings window.

And you can click the pencil-like icon on the top to crop, trim, edit audio/subtitles/ or add watermarks before conversion.

Step 4. Start conversion.

Now hit the big red “Convert” to start converting Blu-ray movies to Surface Pro 2 MP4 with best settings for playback.

After the conversion, you can get the converted Blu-ray rips in .mp4 format by tapping the Open button.

How to transfer media files to Surface Pro 2?

To see how much storage space you have:
  1. Open the Settings charm, tap or click Change PC settings.
  2. Tap or click General.

Scroll down to Available storage, to see how much storage space you have.
Or don’t move files to Surface. Store them in the cloud instead using your files on SkyDrive. This way you can access your files from other computers or your phone.

You can pick using one of the following methods to transfer video to Surface Pro 2
  • -Connect to a networked computer
  • Use a USB flash drive or a memory card -- microSD, microSDHC, or micro SDXC cards all work with Surface.
Connect to a network computer

Surface can access music, pictures, videos, and documents on computers that are part of your home network. To see the files and folders that have been shared on your network, go to the Start screen and open File Explorer. Shared items appear under HomeGroup or Network.

Use a USB flash drive or memory card
  
You can also move files to Surface, by copying them to a USB flash drive or memory card (microSD, microSDHC, or micro SDXC cards all work with Surface) and then adding the files to Surface. Here’s how:

1. Copy files onto a USB flash drive or memory card on your other computer.
2. Insert the USB flash drive or memory card into Surface.
3. Tap or click the notification that appears in the upper-right corner of the screen.
4. Tap or click Open folder to view files.
File Explorer opens.
5. Select the files or folders you want to add to Surface, tap or click Home, and then tap or click Copy to.
6. Select a location. For example, choose Documents if the flash drive or memory card contains documents.

Related Articles:

Monday, November 18, 2013

Workflow of editing Panasonic HPX-171E P2 MXF footages in Sony Movie Studio Platinum 12

Description: With the P2 MXF to Sony Movie Studio converter you can easily find the best video and audio codec for converting Panasonic HPX-171E P2 MXF footages to edit in Sony Movie Studio Platinum 12.

Question:
“What’s the best video and audio codec for converting P2 MXF footages to edit in Movie Studio Platinum 12? Actually I am new one in this entire story about videos. My camera is 171e-Panasonic. My audio codec is pcm_s16le. I have a material and before I start to make editing in Movie Studio I would like to give the converted file to my friend for a first look on his computer or TV. What should I do?”
Solution:
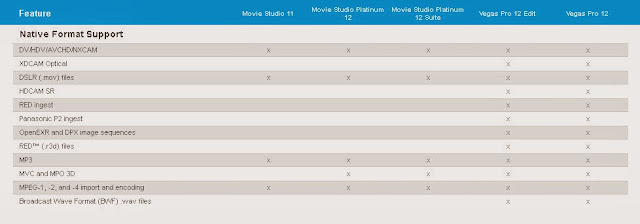
To edit Panasonic HPX-171E P2 MXF footages in Sony Movie Studio Platinum 12, you need to know which video and audio codec/formats this video editing tool supports. On Sony Movie Studio Platinum 12 official website, I find it works well with AAC, AA3, AIFF, AVI, BMP, CDA, FLAC, GIF, JPEG, MP3, MPEG-1, MPEG-2, MPEG-4, MVC, OGG, OMA, PCA, PNG, QuickTime®, RealMedia®, SND, SFA, W64, WAV, WDP, WMA, WM. Among them, I prefer MPEG-2 as video codec since they can be supported only by Sony Movie Studio as well as the computer and TV you request.


Here is a brief instruction about how to convert Panasonic P2 MXF files to MPEG-2/AC3 for Sony Movie Studio Platinum 12.
 
Setp 1. Free download the P2 MXF to MPEG-2 Converter. I used this app to successfully convert many MXF footages shot by my Canon XF100, so I guess it would also work well for your Panasonic P2 camcorder. 
 
Tip 1: If you are using a Mac OS X computer, Mac P2 MXF Converter is available as well.
 
Tip 2: When you import P2 MXF files from computer, don’t forget to copy the complete CONTENT folder from your camcorder to hard disk in advance.

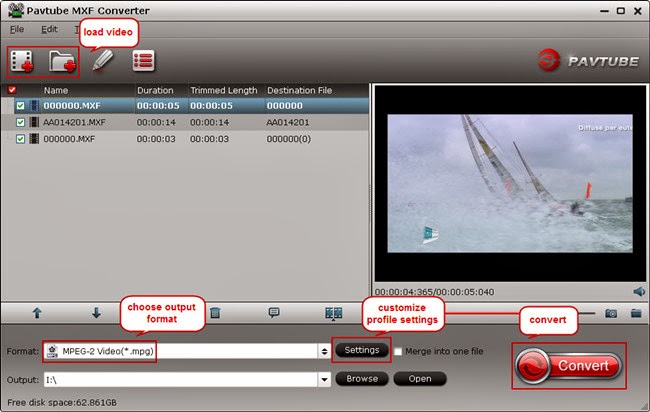
Step 2. Hit the “Add video” button, navigate to the source file location and import your P2 MXF file.


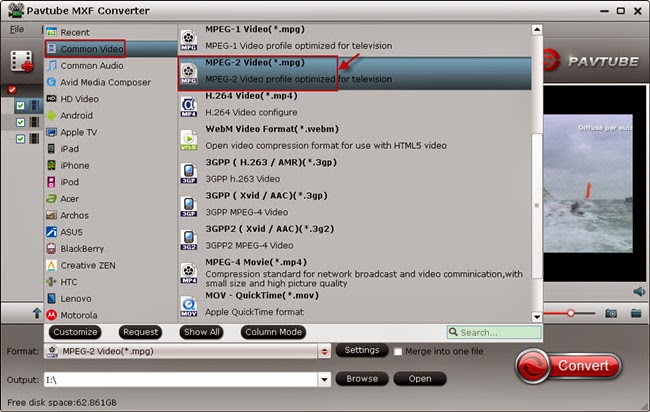
Step 3. Then follow the path “Common Video > MPEG-2 Video(*.mpg)” and choose MPEG-2 as output format. Of course you would find other MPEG-2 profile under the “Format” list, but I would recommend this one because it allows you to change audio codec.


Step 4. Enter the “Settings” tab, and you can freely set profile presets in your own way. BTW, all these parameters under Profile Settings, including video codec, display resolution, bitrate, frame rate, etc, can be customized as you like to get better video and audio quality. To get better audio quality, you are suggested to switch Audio Codec from MP2 to AC3.


Step 5. Return back to the P2 MXF to Sony Movie Studio converter main UI, hit the big “Convert” button and start converting your P2 MXF files for Sony Movie Studio Platinum 12. Once it finishes, open output folder to locate the created MPEG-2 file and transfer it to Sony Movie Studio Platinum 12 for video editing.
  

Thursday, November 14, 2013

Convert DVD ISO/IFO to Multi-track MP4 for watch on iPad Air

Description: This article tell you how to watch DVD ISO/IFO movies on iPad Air in multi-track MP4 format so you can switch to the desired language during playback.

If you own many DVD movies which have been backed up in ISO/IFO files on computer hard drive and would like to convert DVD ISO/IFO movies to multi-track MP4 so that you may watch movies on the new iPad Air with any language by switching to the desired one, the Pavtube DVD to iPad Air Converter is your great choice to rip DVD ISO/IFO and original DVD disc to iPad Air compatible MP4 format as well as multiple audio tracks saved for iPad Air playback.

How to Rip DVD ISO/IFO to Multi-track MP4 for watch on iPad Air? 


Part One. Rip/Convert DVD ISO/IFO to Multi-track MP4 for iPad Air


Step 1. Free download the Multi-track DVD Converter (Mac users can download here), install and launch it. Click the “Load ISO/IFO” button to import source DVD ISO/IFO files.

blu-ray-to-multi-track-mp4

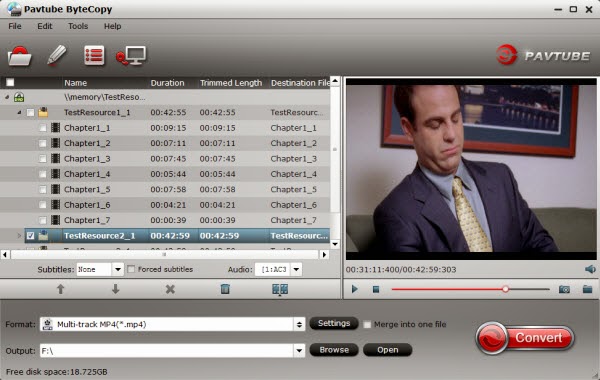
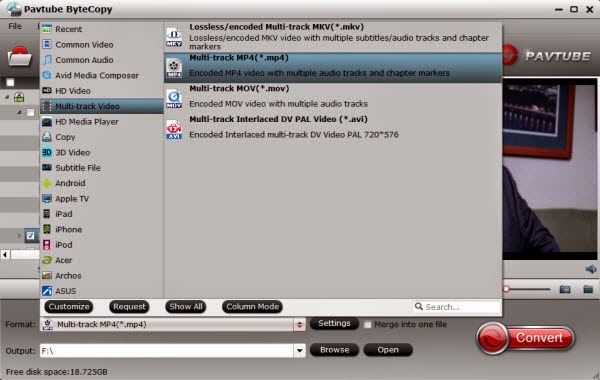
Step 2. Choose “Multi-track Video > Multi-track MP4 (*.mp4)” from the “Format” drop-down list as output format.

blu-ray-to-multi-track-mp4

Tip: This profile extracts more than one audio track from source DVD ISO/IFO movies in saved MP4 files. And you are allowed to remove unwanted audio track by unchecking the “Check” box in front of each audio source.

Step 3. Hit the “Convert” button on Pavtube ByteCopy main UI to start ripping DVD ISO/IFO to Multi-track MP4 for iPad Air. Once the conversion process finishes, open output folder and locate the created multi-track MP4 movie.

Part Two. Stream and watch Multi-track MP4 movies on iPad Air
 

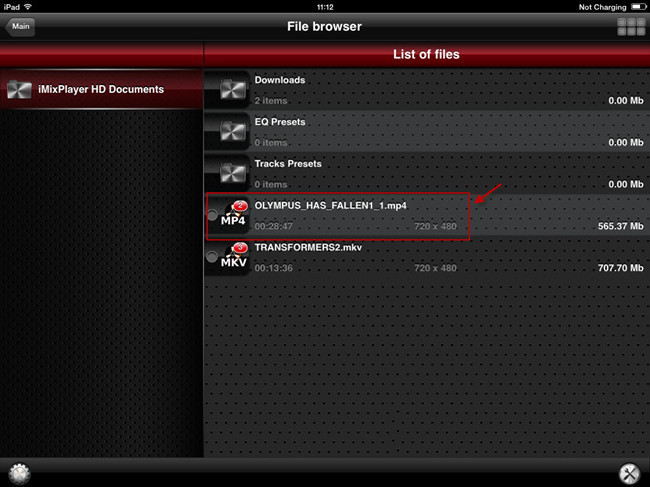
Step 1. Install multi-track player on iPad Air. When typing in the keyword “multitrack player” in Apple Store, many free or charged apps would show up, choose one and install on your iPad Air.

Step 2. Open iTunes, and add created multi-track MP4 movie to this multi-track player.

Step 3. Open this multi-track player, open the source multi-track MP4, and choose wanted language during movie playback.


iPad Air related articles:
Get more money-saving tip: