“One of my clients just bought a used Panasonic P2 camera, a HVX200, and wants to edit P2 MXF footages in FCP on OS 10.6, but he found FCP cannot recognize the P2 .mxf footages well. Any idea? ”

Panasonic P2 HD series: AJ-HPX3700, AJ-HPX2700, AJ-HPX3100, AJ-HPX2100, AJ-HPX2000, AG-3DP1, AG-HPX500 series, AG-HPX370 series, AG-HPX250, AG-HVX170.
In order to convert Panasonic DVCPRO HD P2 MXF files into best format for FCP on Mac, you may like to give a shpt to this powerful Pavtube MXF Converter for Mac. (iMixMXF to preserve the multi-track audios)With intuitive interface, you can easily and fast convert Panasonic DVCPRO HD P2 MXF to ProRes 422 HQ for FCP on Mac using this professional MXF to ProRes Converter. And the latest Mac OS X Yosemite is also supported. What’s more, we can transcode the P2 MXF to other suitable ones for editing in Avid MC or playback on TV, etc.
Notes: It can decode and encode the H.265/HEVC files after upgraded to the latest version 4.8.5.1. Do you wanna enjoy the higher definition?
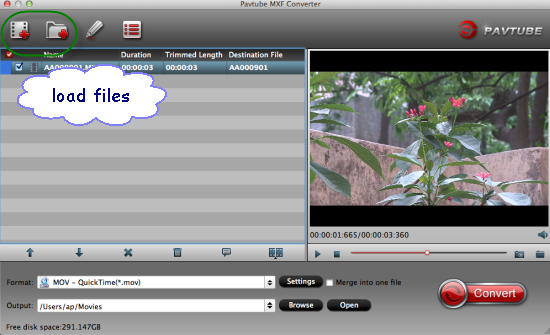
Step 1.Click the ‘Add Video’ button at the top right of the main interface. In the open window, select the MXF video file from Panasonic P2 card. You can also transfer P2 MXF files from your camcorder to Mac Hard Drive before import.
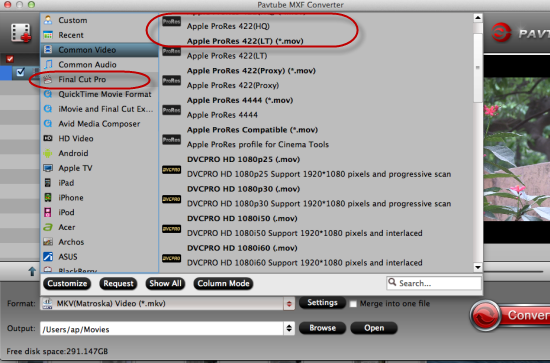
Step 2. Click on the ‘Format’ bar and get the dropdown menu, then move your pointer to choose ‘Final Cut Pro> Apple PreRes 422’ as the output format.
For advanced functions?
Click the “Effect” button to open the Video Edit window to achieve editing MP4 like trim, crop, image, watermark, effect, subtitles and rotate and etc in the corresponding editing pane.
Click the “Setting…” button to open the Advanced Settings window to adjust the output video codec, resolution, bitrates, frame rate, aspect ratio, audio codec, channel, volume and etc in the advanced tab.
Finally, go back to the main interface to tap the big button ‘Convert’ to start the conversion. Just follow this way and no needs to wait a long time, we are glad to import the DVCPRO P2 MXF files to FCP 7/X after transferring as usual.
Further Reading: