Making a travel video is an effective way to share your vacation experiences with your family and friends. Many people get video footage while traveling but they are unsure how to make a good travel video. Video production is a creative endeavour, and there are many approaches to creating a travel video.A few professional tips for Editing Your Travel Video in FCP will help you get started.Stay organizedOnce your photos and videos have made it onto your laptop or home computer, they can easily become cluttered or overwhelming. Take some time to sort through your photos and place them into folders. These can be as detailed as food, sunsets or landscapes, or as broad as the city you were staying in. If you have video files, you may consider putting them into folders that will help you when compiling your initial video: B-roll (all of your extra footage), wide shots, animals… whatever makes sense for the video you’re planning to create. Also feel free to make a “keepers” folder for the shots you know will definitely make it into your final piece. Just don’t delete anything at this step! You never know what you’ll end up using for your final video.Start with a slideshowIf you are not ready to dive into a full-blown video project, start by putting together a nice slideshow of pictures set to some of your favorite songs. Windows MovieMaker, iMovie and FCP for Apple are great starter programs that allow you to easily import photos and add transitions at set intervals. Here you can learn pacing and how to tell a story with pictures that you already have on your computer. Burn your slideshow to a DVD and show it on your TV to impress your friends.Trim the fatOnce you’ve gathered all of the best photos and videos you took on tour, start compiling a series of your favorite footage with FCP in the order you want your video to flow. Just like any good story, your video should have a beginning, middle and end. Make your video as concise as possible and if a particular shot does not fit in with the story you’re trying to tell, leave it out.Think of the dynamicsThe most interesting videos all have one thing in common: they have a variety of different angles and shots. Make sure to balance panoramic views and movement with static shots for effect when you are editing your video in FCP. Duration is also crucial. You will want shorter shots as well as longer ones. All of this variety will keep your audience engaged.Try adding transitionsGradual transitions, known as dissolves, can be very effective when it comes to a travel video. Standard cuts can become stale. When you add in dissolves in FCP, they help ease the transition between shots and make the video feel more professional. Anywhere from 5-10 second dissolves usually work the best.Don’t forget the musicPicking a great song or themed music can set the stage for your video and help the audience connect with what you are showing. It could be restaurant music that reminds you of Italy or even your favorite pop hit. Let the rhythm of the song help guide you with the cuts you make.(remove/ replace the themed music )As you have get the tips to for Editing Your Travel Video in FCP above, you should have faith on making your travel video that people actually want to watch. Now I like to let your editing work with the nice travel video in FCP more smoothly even if you are a FCP beginner. Some people feedback that they encounter such many problems when they edit video in FCP like no audios, no video images or can’t be imported issues. It mainly caused by the incompatible video format, for Final Cut Pro, the best compatible format or codec is Apple ProRes(Apple ProRes Codec Types). Final Cut Pro can not decode all of the video codec sometimes. Pavtube Video Converter for Mac(read the review) are high recommend here for you. It is a professional video tool can be convert all your travel video into FCP with the best compatible format or codec of Apple ProRes. With it you can merge several travel video clips into one bigger file and splitting one video file into several clips according to the clip quantity, duration time and file size. Meanwhile, it can handle multiple videos and realize batch conversion to save your time and energy. This program can be supported by latest Mac OS X El Capitan.
 How to Make Eidting Travel Videos More Smoothly?First free download and install Pavtube Video Converter on your Mac, and then launch it. Now just follow the step by step guide to make editing work more smoothly.Step 1: Install and launch this program. Just drag and drop video files to the main interface of the program to add videos. If you have several video files that you want to convert in batch, just drag the folder where the sources are to the software.
 Step 2: Click the “Format” drop-down menu to choose an output format that you prefer. Click “Format” bar, from its drop-down options, move your mouse to “Final Cut Pro > Apple ProRes 422 (*.mov)” to select it as the output file format.
 Step 3: Before converting, you can edit the Canon footage to achieve a better overall effect. Simply highlight a video clip and click the “Edit” button beside it to enter the Video Edit window. You can then crop, trim, rotate videos, adjust Canon recordings effects, add text/image watermarks, etc. as you like.
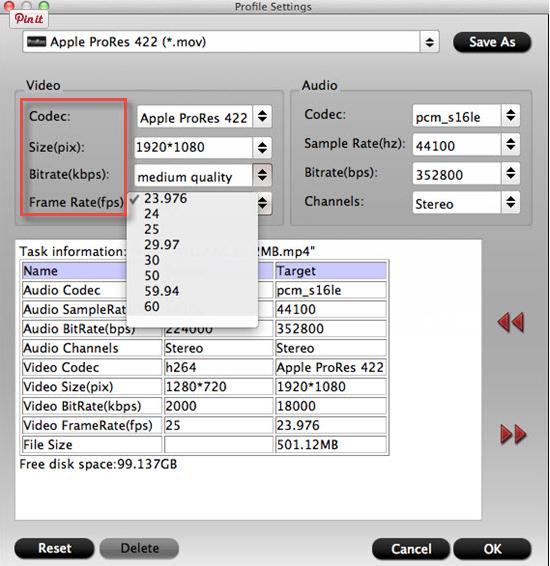 Step 4: Hit the convert button under the preview windows, the conversion will started immediately.When the conversion is completed, run the FCP and import the converted footage into it with more smoothly editing.Read More:
I am have bought a SONY HD-camcorder. It produced AVCHD video format MPEG-4 AVC/H.264 + Dolby Digital. The perfect solution for me would be just to copy my videos from the camera to the NAS and watch it on the TV. I downloaded an sample file *.MTS just to try on my Samsung LE46B650. The video was OK (even with FF, FEW functions), but without sound. I did not get any error message something like "not supported sound format".
Is somebody here has any experience with AVCHD *.MTS video from SONY? How do you see the videos on you Samsung? Do you convert them to another video format? Which? May be should buy not Sony cam?PS: Is there possible to watch the AVCHD video with my iPhone 6 on the go?  AVCHD video is always with the file extension of mts or m2ts. and widely used HD video format. However, it cannot be accepted by Apple products, such as iPad and iPhone, it is no secret that Apple iPhone only support a limit type of video formats: MOV, MP4 and M4V, so one cannot play AVCHD video by iPad iPhone on the go directly. The strand format for almost HD TV is MPEG-4(*.mp4), some series may be supported by AVI, so you cannot play your AVCHD videos on your Samsung LE46B650 directly. Luckily,Pavtube MTS/M2TS Converter / Mac Version(read the review), a professional video converter especially for iPad and iPhone and HD TV, is capable of converting AVCHD video to iPad iPhone supported MOV, MP4 and M4V, and provide the special profiles depend on the TV brands, you can choose the brand and converting to it’s best supported format.Hot Search: AVCHD to QuickTime | AVCHD to Apple ProRes | Play AVCHD on VLC
 Key Feature of Pavtube of MTS/M2TS Converter
- Professional video converter: This MTS/M2TS converter supports converting 150+ video formats. You can use it to convert M2TS/MTS to all the formats like MP4, MOV, M4V.
- High output video quality: The converted videos are in high quality. It will keep 100% orginal video quality.
- Fastest Conversion Speed: It can batch convert videos at 30X fastest speed than almost all the competitors.
- Great video editing tool: You can use it to enhance your video by adding effects, or edit your video by merging, rotating, trimming, etc.
How to Watch the Recorded AVCHD Videos on TV or On-the-goStep 1: Load Sony AVCHD video to the program.Launch the program on your computer, click "File" > "Add Video/Audio" to import AVCHD videos from the camcorder to the application.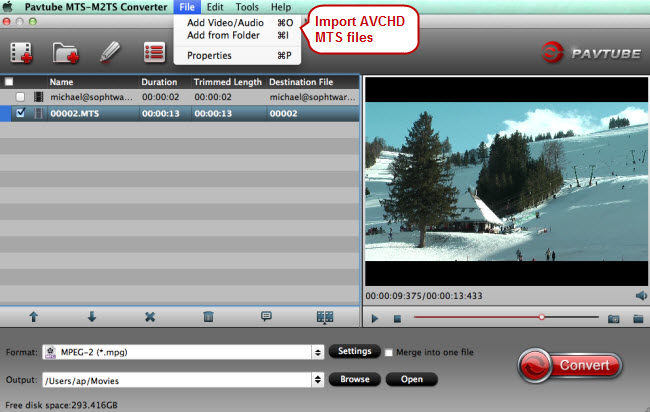 Step 2: Choose output file format.If you want watch the AVCHD on your iPhone or iPad on the go, click the format bar to follow "iPhone", such as you can choose "iPhone 6 Plus H.264 Full Screen/Full HD 1080p (*.mp4)" for iPhone 6 Plus or "iPhone 6 H.264 Full Screen 1334*750 (*.mp4)" for iPhone 6. It all depend on what Apple devices model.
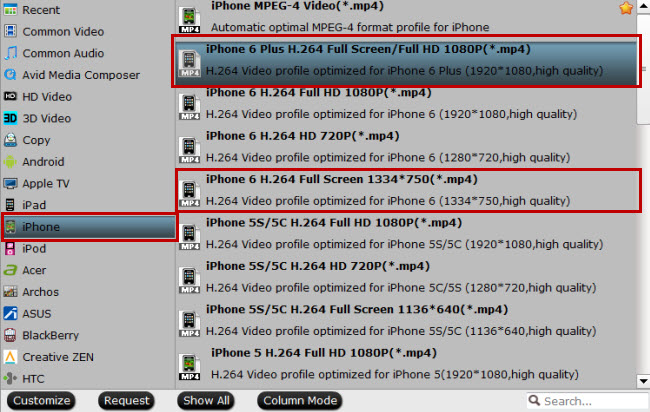 If you want to watch AVCHD on your big screen TV you can go to "Format" bar, from its drop-down select, select "TVs" > "LG TV(*mp4)" as your desired output file format.
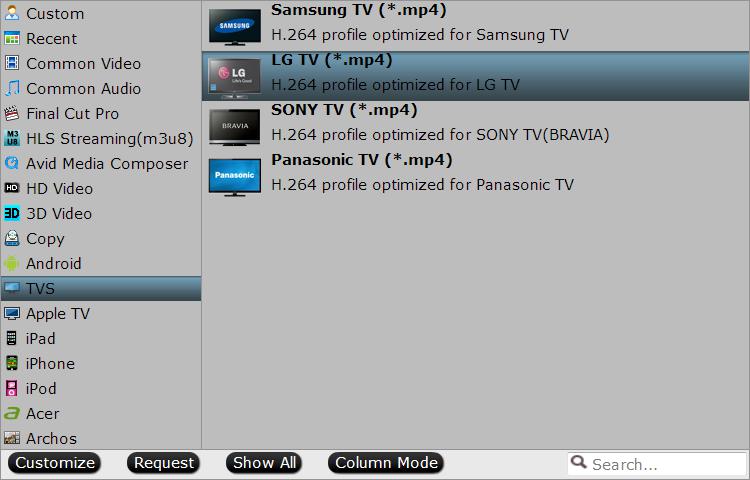 Step 3. Start AVCHD to TV or Apple devices conversionSet an output folder to store the converted files, then hit the "Convert" button to carry out the conversion.When the conversion is over, connect your computer to the TV via HDMI, them you will be able to view your camcorder AVCHD videos on your TV with or you can transfer the video to your Apple devices via iTunes.Read More:
I have some foreign language movies in .avi format. I downloaded the subtitles but when I play it, the timing of the subtitles are wrong. How can I integrate the subtitles to the movie file itself and adjust the timing again? Thanks.Subtitle files can be a challenge in case the text doesn't synchronize with your AVI video, this also holds true if you want to add personalized subtitles to your videos or recordings.Here I would recommended you a professional video toos--Pavtube Video Converter / Mac Version for you to add SRT(.srt) in your AVI movies or videos. The simple steps will be show below with just a few clicks. In addition, it can also support adding subtitles to many other video formats including MKV, AVI, MPG, WMV, MOV, 3GP, VOB, FLV, MXF, AVCHD, VOB and etc.Besides acting as the AVI Subtitle Adder, Pavtube Video Converter is a powerful video converter. It can convert more than 150 video and audio formats with superb quality. What is more, it is a good video editing tool that can trim videos, crop videos, add watermark to videos, merge or join videos together, split videos by chapters, adjust audio channels, and remove black bars and more.Hot Search: Add SRT/ASS/SSA Subtitles to MP4 | Add Subtitles to Blu-ray Movies | Add Subtitles to DVD Movies First free download and install Pavtube Video Converter on your Mac or Windows, and then launch it. Now just follow the step by step guide to to add .srt subtitles to AVI video.Step 1. Click the "Add File" button to load the MP4 files. You can also drag and drop AVI files to the interface of the software. Step 2. Add subtitles to AVI videosClick “Edit” or the pencil icon
  to switch to the editing interface, where you can find multiple editing functions and “Subtitle” is just one of them. Click the “Subtitle” tab and check the “Enable” box to allow you to add SRT/ASS/SSA subtitles to AVI videos. Then Click “Browse” to find and import the downloaded SRT/ASS/SSA subtitles.
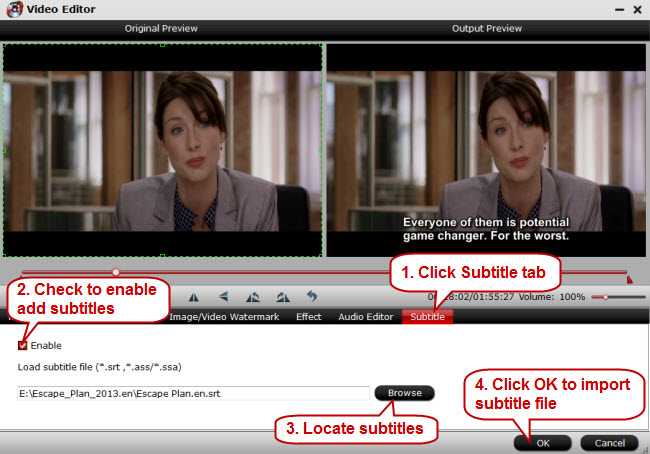 Kindly note: Pavtube Video Converter only supports SRT/ASS/SSA subtitles, and make sure that the subtitle file and your AVI video files are kept in the same folder sharing the same name.Step 3. Start inserting subtitles to AVI videoGo back to the main UI and click “Convert” to start inserting SRT/ASS/SSA subtitles to your AVI videos. If you don’t want to keep the original AVI format, just click the format bar to choose the output video format you want before conversion.Read More:
Summary: This article will show you the solution on how can I convert a movie file from FLV to MOV format so that QuickTime can read it.Sometimes when you download some FLV videos from video-sharing website like YouTube, Myspace, Google Video, Yahoo Video etc, you may want to play them on QuickTime offline, or edit them in iMovie, Final Cut Pro(different between iMovie and Final Cut Pro). However, the FLV Videos can not be recognized by the QuickTime player and the Mac editor tools. Because FLV (flash video) lacks compatibility with commonly used digital media players and editing programs, sometimes you might need to convert FLV file to a format to take with on an Apple product. If you want to play FLV videos with QickTime on Mac, you may find that these FLV videos are not supported by QuickTime Player. In that case, you can convert FLV to MOV for Mac.We'll look at a way to convert certain video files, such as .flv to .mov for Mac, with the software named Pavtube Video Converter for Mac. It is a digital file conversion application that lets you effortlessly convert videos to whatever type of video file you want for playback on portable digital devices such as iPhone, iPad, or copy into iTunes, iMovie, Final Cut Pro etc. It also includes a basic set of editing tool such as trimming, cropping, rotating, adjusting video effect and more. On the other hand, you may want to share a MOV video clip saved on your Mac desktop to YouTube or other video hosting sites, then you need to convert MOV to FLV format. If you need to convert between FLV and MOV format on Windows, please try Pavtube Video Converter.Hot Search: YouTube to MOV | H.265 to QuickTime MOV | AVCHD/MTS/M2TS/M2T/TS to QuickTime MOVKey Features of Pavtube Video Converter.
- Convert almost all HD/SD audio/video formats: All types of audios and videos (e.g. SD/HD/Tivo/DRV/Camcorder HD/AVCHD footages, etc) to almost any audio and video formats.
- hange default settings: You can change the parameters such as video size, bitrate, frame rate, and channels for your video file according to your need to get the best output effect.
- Batch conversion: Handle multiple videos and realize batch conversion to save your time and energy.
- Merging & splitting: Merge several video clips into one bigger file and splitting one video file into several clips according to the clip quantity, duration time and file size.
- Create new output format: Adjust profile parameters, rename and save it for future use.
- Supported OS: Mac OS X 10.11 El Capitan, Mac OS X 10.10 Yosemite, 10.9 Mavericks, 10.8 Mountain Lion, 10.7 Lion, 10.6 Snow Leopard, 10.5 Leopard
How to Convert FLV to MOVFirst free download and install Pavtube Video Converter on your Mac, and then launch it. Now just follow the step by step guide to make editing work more smoothly.Step 1: Run it and click “File” > “Add Video/Audio” or “Add from Folder” to import files. You can also directly drag and drop the files.Step 2: Just go to the format list by clicking the format bar and choose “Common Video” and pick “MOV - QuickTime (*.mov).”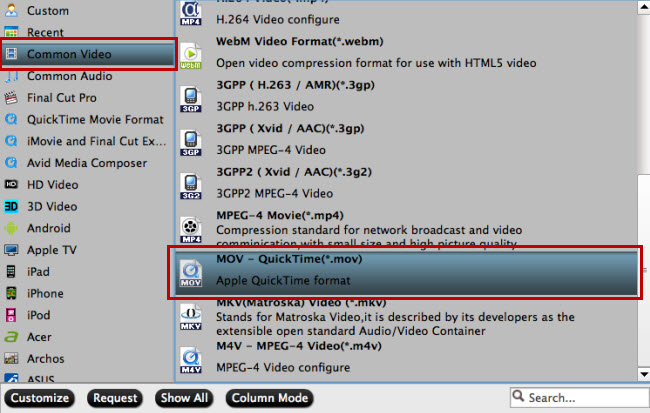 Step 3: Specify output folder on your computer to save the output files. Click the "Browse" button to choose the path where you want to save the output files in. Click the "Convert" button at the lower right corner of the interface to begin to convert FLV to MOV. After the conversion is finished, you can transfer the video to your desired output devices or editor for enjoyment.Read More:
Summary: Every body has a Smart Phone even if you are a teenage, besides makign calls, sending messages, listening to music, you can also viewing videos or movies on it as long as your Phone’s storage is large enough. This article will show you the solution on how to make all type of videos can be played on your Android Phones.Q: "I recently purchased an Android phone (Samsung Galaxy 6). I would like to add video to it so I can view it on my Android phone. But even after uploading in, the phone fails to play them. Anyone have any suggestions on how to put video to Android phone for playback?"Unfortunately, the graphic processors in most smartphones are not usually powerful enough to play back full size audio and video files, and those files take up too much space on the flash drive. In order to quickly turn videos on your computer into mobile videos that can be viewed on your phone and watch them wherever you want. You need to convert video to Android phone supported formats first, and then put video to Android phone to play.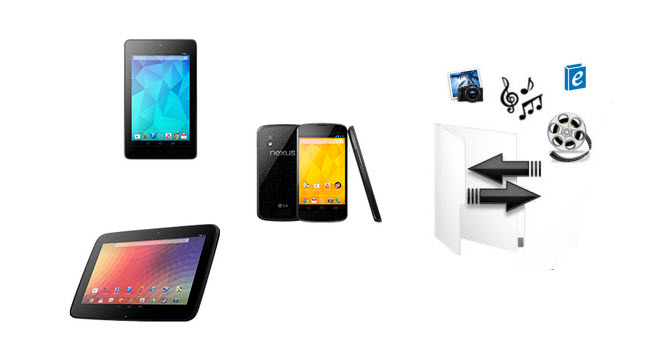 If fact, it is very easy to put video to Android phone so long as you own the professional video to Android converter. Let's take a look at the world-class Android video converter Pavtube Video Converter / Mac Version(read thereview) which is an easy-to-use software right away. Key Feature of Pavtube Video Converter:
- Convert almost all HD/SD audio/video formats: All types of audios and videos (e.g. SD/HD/Tivo/DRV/Camcorder HD footages, etc) to almost any audio and video formats.
- All popular Android devices: Android products (e.g. Google Nexus series, Samsung Galaxy series, Sony, HTC, etc).
- hange default settings: You can change the parameters such as video size, bitrate, frame rate, and channels for your video file according to your need to get the best output effect.
- Batch conversion: Handle multiple videos and realize batch conversion to save your time and energy.
- Merging & splitting: Merge several video clips into one bigger file and splitting one video file into several clips according to the clip quantity, duration time and file size.
- Create new output format: Adjust profile parameters, rename and save it for future use.
- Supported OS: Windows XP/2003/Vista/Windows 7/Windows 8/Windows 8.1/Windows 10
- Supported OS: Mac OS X 10.11 El Capitan, Mac OS X 10.10 Yosemite, 10.9 Mavericks, 10.8 Mountain Lion, 10.7 Lion, 10.6 Snow Leopard, 10.5 Leopard
How to Convert Video to Android Samsung Sony HTC PhoneThe simple instructions below show you how to convert video for Android phone in just a few easy steps. Just click the appropriate button to download the Windows or Mac version. Step 1: Install the ProgramDownload the Pavtube Video Converter. Run the downloaded file and install the program following the onscreen instructionsStep 2: Add Media Files for ConversionClick the Add Video button. In the Open File dialogue window, find the movies or clips you want to convert to watch on your phone, and click Open to add them to the programStep 3: Choose the Output PresetHere you can choose the target format you want. Click “Android” on the left column and find the target format with your phone brand, or you can just select "HD video" > "H.264 MP4" cause H.264 MP4 is the most compatible format of Android phones. Step 4: Start Converting Files for Android MobileThe final step is to click Convert on the right. Once the encoding process is complete, the output folder will open automatically.Step 5 (Optional): Transfer Output Video to Your Android Mobile PhoneIn the destination folder on your computer, select the files you want to store on your device, right-click them, and select Copy. Connect your device to your computer via USB cable and open the phone’s flash drive. Select the folder where you store your media files, right-click the empty space, and choose Paste to copy the files to your device. See more on transfer video to Android phones.Additional TipsAndroid tablets only recognize SD cards formatted in FAT 32, this limits a single file size less than 4GB. If you worry about getting a big video file larger than 4GB, you can use split feature in Pavtube software to split a large file into multiple chunks under 4GB. Learn to split a large video file into several small files under 4GB for Android device.Read More:
Summary: When you open an FLV file the player may give you a warning message saying that it doesn't recognize the file extension. This article will help you get out of that issue.As soon as one tries to play a FLV file with the help of Windows Media Player, a message will appear saying that the file can't be opened because the extension is invalid. Properly configured codecs needs to be installed to play FLV files using Windows Media Player. The formats supported by windows are .asf, .wmx, .au, .snd, .mov, .m4a, .dvr-ms, .asx, .m4v, .mp4, .wpl, .mpg, .miv, .mpa, .mp2, .mpeg, .3g2, .adts, .adt, .3gp2, .aiff, .wms, .3gp, .mp3, .m3u, .mid, .midi, .mpv2, .cda, .rmi, .wav, .wax, .aif, .wmv, .ivf, .3gpp, .wm, .mpc, .aifi, .aac, .wvx, .wma, .wm2, .m2ts, .mp4v, .avi and .wmd. Play FLV after Installing FLV codecs for Windows Media PlayerWMP uses codecs to play media files. Codecs of many formats are inbuilt in WMP to open files of that format. Yet the codec of FLV needs to be downloaded by the user to run FLV files on WMP. After successfully installing the codec, you will be able to run files with .flv extension in your WMP.If one is unable to view their files on Window Media Player because the file has .flv extension, then Pavtube Video Converter can be used to convert the videos in the format supported by the Window Media Player. In fact, this program can be used to complete conversion between various formats, including FLV, AVI, ASF, MOV, M4V, WMV, MKV, Xvid, MP4, and so on.
  Step-by-step guide to convert FLV to Windows Media Player supported formatsStep 1. Install iSkysoft Video Converter and put FLV files on the converterImport the FLV files to the video converter. You can do that in two ways:a) You can drag and drop the file directly in the application.b) You can click the "Add Files" button to browse, select and load the file in the application.windows media player flv codecStep 2. Choose the output formatVisit the bottom of the application and then select WMV as the output format. All the videos converted at the same time will be converted in the same output format.
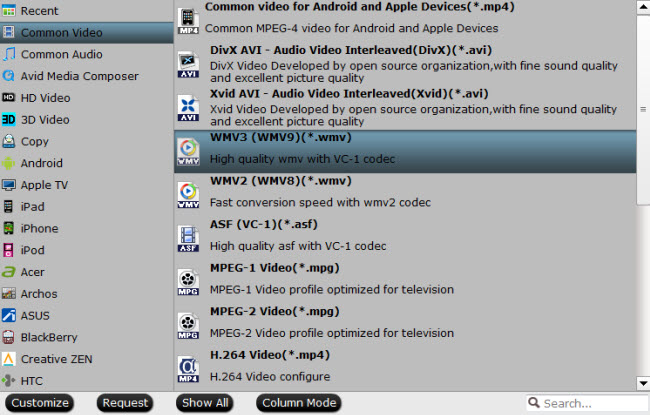 Step 3. Push convertYou just need to press the "Convert" button now. The video will be converted within seconds.Read More:
Summary: This article will show you easiest way to convert MKV on PS3 with it’s compatible formats, it aim to help you play all kinds of MKV on PS3.Can PS3 Play MKV Files Successfully?MKV is famous as an open standard free container format which can hold an unlimited number of video, audio, picture, or subtitle tracks in one file. It is intended to serve as a universal format for storing common multimedia content, like movies or TV shows. Although MKV is one of the most popular formats, it is still impossible to play MKV on PS3. To successfully play MKV on PS3, a widely used solution without limit is to convert MKV to PS3 compatible formats, no matter you are Windows user or Mac user.An MKV to PS3 Converter is needed to convert MKV to PS3 recognized formats. Here, I strongly recommend Pavtube Video Converter / Mac Version to you. Pavtube Video Converter is designed for PS3 owners. With it, playing MKV on PS3 just as easy as pie, even the source MKV file contains several video, audio or subtitle tracks.Besides acting as MKV to PS3 Converter, Pavtube Video Converter also supports to convert almost all video formats like MOV, 3GP, OGV, MXF, WebM, FLV, WTV, ASF, MP4, AVI, WMV, and DivX, etc to PS3 popular formats. In this way, you can play various of movie or video files on PS3 easily and fast.Furthermore, Pavtube Video Converter Converter has a powerful feature of transforming nearly all audio files like MP3, WAV, AC3, FLAC, AU, AIFF, CAF, 3GA, AAC, and DTS etc to play them on PS3. How to Convert MKV to PS3 for Playback?Here is the step by step guide to convert MKV to PS3 with Pavtube Video Converter.Step 1 Load MKV to Pavtube Video ConverterSimply drag and drop MKV to the main interface of Pavtube Video Converter and the file will show immediately.Step 2 Set PS3 supported formatsGo the format list to choose MP4 which is the most widely used format as the output by clicking the format bar to follow “HD Video” > “MPEG-4 HD Video (*.mp4).”
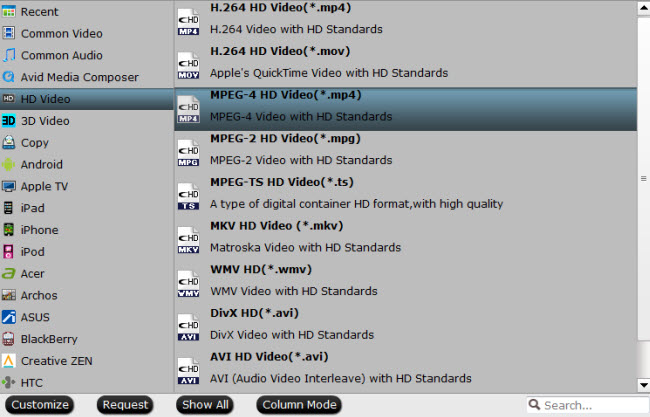 Step 3 Start converting MKV to PS3Click the big "Convert" button of Faasoft MKV to PS3 Converter to start MKV to PS3 conversion.Read More: