Summary: In this article I will show you the best way to fix the general error in final cut pro 7 when you import some Canon video clip for editing. If you in the same trouble, just follow the article and you will fix the problem in short time.Q:Everytime I try to work with .mov files from my Canon, final cut pro gives me a general error after I've added a couple of clips to the timeline, it used to be no problem but I don't know how to solve the general error... any help?I once edited a whole project in FCP 7 using the native Canon 5D files and while it started well enough, it got more instable as the timeline filled and renders got glitches between edits.Using files straight from camera is ideal and works very well with Adobe Premiere or Final Cut X, and I highly recommend switching to one of those. You have to know FCP 7 is 32 bits, doesn't support more than one CPU, and is no longer supported by Apple. Chances are, the latest version of FCP 7 is older than your camera and it will stay that way forever. And unless you are using a computer from 6 years ago, you are also waiting way longer than you have to for your renders.If you absolutely want to keep using FCP 7, you are going to have to convert your footage to good old proRes beforehand. You can use FCP's media manager or Apple Compressor for that. Alternatively, do yourself a favour and get a modern NLE like FCPX which handles and optimises files from almost all cameras automatically. As FCP 7 are not workable with Canon files natively, if you want to load Canon files to FCP (including FCP 7 and FCP X), first you need to convert Canon files to FCP 7 friendly codec like Apple Prores. of course, losslessly. To do so, you need a professional Video Converter to help.Hot Search: H.264 MP4 Footage into Final Cut Pro | AVCHD M2TS to FCP | XC 10 4K/1080p MXF to Premiere ProHere I'd like to recommend an excellent HD Video Converter for Mac from Pavtube. It can convert ALL(Canon videos included) videos to Apple ProRes codec which is intermediate format that features high performance and quality, being less processor-intensive to work with FCP 7.
 Other Download:- Pavtube old official address: http://www.pavtube.com/hd-video-converter-mac/- Amazon Store Download: http://www.amazon.com/Pavtube-Video-Converter-Mac-Download/dp/B00QI9GNZS- AppStore Download: https://itunes.apple.com/de/app/pavtube-hd-video-converter/id502792488?mt=12- Cnet Download: http://download.cnet.com/Pavtube-HD-Video-Converter/3000-2194_4-76177786.htmlHow to load All(Canon) videos to FCP 7?Step 1: click top left icons to load your sources. You can load individual videos from by clicking "add videos", or load the entire folder by clicking ‘add from folder'.
 Step 2: Choose Apple ProRes 422 codec for Final Cut Pro 7.Click the "Profile" option, and move mouse cursor to Final Cut Pro > Apple ProRes 422 HQ (*.mov) as output format.
 Tips:To keep original video quality for editing in FCP, select “Apple ProRes 422”;For SD levels – 480i/p and 576i/p and offline workflows, select “Apple ProRes 422 (Proxy)”;To edit and finish 4:4:4 material, choose “Apple ProRes 4444″.Learn more Apple ProRes, please refer to Types of Apple ProRes CodecsTo get 1080 videos, we need to click the "Settings" button and choose 1920*1080 as output video resolution.Step 3: Convert all video files for FCP 7.Click the read button Convert to start transcoding alll video files to MOV for FCP 7. When the conversion is completed, click "Open" button to locate the converted Apple ProRes 422 MOV files for editing with Final Cut Pro 7.Pavtube Video Converter for Mac: An all-in-one program integrating conversion and editing 4K videos, 1080p/720p MKV, MXF, M2TS, etc. on Mac OS X El Capitan.Pavtube iMedia Converter for Mac: An all-inclusive converter to complete 2D/3D Blu-ray, DVD, ISO, SD/HD/4K Video to m3u8, H.265 MP4, do H.265 to non-H.265 conversion on Mac OS X El Capitan.MP4 to FCP
 ǀ
AVCHD to FCP ǀ
MOV to FCP ǀ
H.265 to FCP
Summary: As for the professional NLEs, a few years ago the answer was simple FCP or Premiere. Over the past 2 years the industry has gone through some major changes. Here we talk about the different between the Final Cut Pro and Adobe Premiere and give the solution of how to import any video into them for editing natively.Apple abandoned FCP7 and launched an all new NLE called FCPX. It was a radical change and it broke many professional post houses workflows. This created a major backlash for Apple. FCPX has improved since launch and some Pros are using it.Adobe Premiere has gained enormous market share from FCP users. Many loyal FCP editors refer to Premiere Pro CS6 as the FCP8 they wanted but did not get. Premiere has become far more professional, stable and powerful over the past couple of years.Since the release of Final Cut Pro X, there have been a number of professional video editors moving to Adobe Premiere Pro and Avid Media Composer, due to Apple's seeming lack of interest in the professional market.I'm not to sure about the recent updates for FCP, but last I heard there were a great many features that were considered necessary tools for professional work that Apple had decided not to include.I've been cutting on Adobe Premiere Pro for years now, and I love everything about it. The Mercury Playback Engine makes rendering simple effects unnecessary, and the integration with the rest of the Adobe Creative Suite is simply phenomenal. Premiere Pro let's you edit most video formats natively (P2, Red, Arri, Canon XF, etc.) without having to transcode into an intermediate codec like Apple ProRes.In the rest of the article we talk about how to import any video into them for editing natively.As we all know that like all the = professional non-linear video editing program, Final Cut Pro and Adobe Premiere different also has its own native editing codec - MPEG-2 for Adobe Premiere and Apple ProRes for Final Cut Pro, which is specially designed for nonlinear editing and complex multi-generation composing in post production. To create Final Cut Pro and Adobe Premiere editing codec, you can download Pavtube HD Video Converter for Mac(read the review), a professional Mac video decoder to beneficially encode all kinds of videos to Final Cut Pro and Adobe Premiere optimized MPEG-2/Apple ProRes codec.Moreover, Pavtube HD Video Converter for Mac also allows you to customize profile settings to get a desired and better output. Movie creation with this program is no big deal. You can edit your video files by trimming, cropping, attaching external subtitles, adding watermarks, change video effect, etcBy the way, if your are a one hundred percent Windows user, please turn to Pavtube HD Video Converter. It has the same ability as Mac version. Other Download:
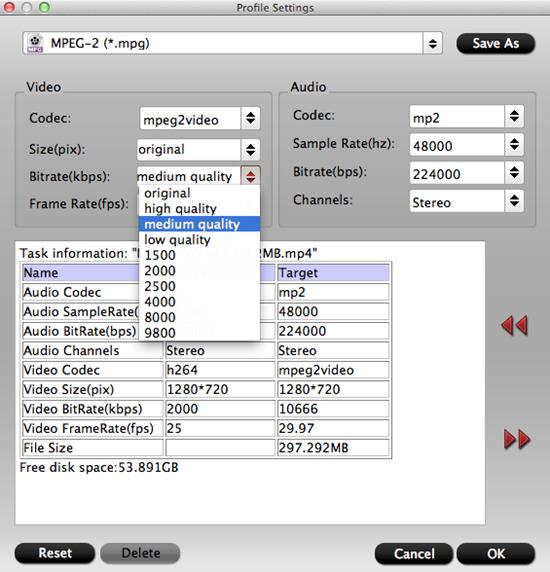
How to Convert any Video to Final Cut Pro and Adobe Premiere for Smoothly EditingStep 1: Input video files.Start the program on your computer, add video to the program by clicking the "Add Video" or "Add folder" button. Step 2: Choose format to output.For FCP users, from "Format" drop-down option, choose "Final Cut Pro"> "Apple Prores 422(*.mov)" as output format. To output higher quality video, it is ideal for you to output "Apple Prores 422(*.mov)" or "Apple Prores 422(HQ)(*.mov)" format. To output small size video, choose Apple Prores 422(LT)(*.mov) or Apple Prores 422(Proxy)(*.mov) format.For Premiere users, click "Format" bar, from its drop-down list, select "Adobe Premiere Pro/Son..." > "MPEG-2 (*.mpg)" to output for editing with Premiere Pro CC. Step 3: Customize output video and audio settings.Open "Profile Settings" window to adjust output video and audio parameter settings according to your own preference.
 Step 4: Start the conversion process.After all the setting is over, go back to the main interface and hit right-bottom "Convert" button to start the Apple Prores 422 or MPEG-2 conversion process.When the conversion is completed, launch FCP/Premiere and import the converted video to it and then you can be editing the converted video smoothly.Read More:
Summary: If you have a Roku 4, a Plex, and a 4K OLED TV. You will absolutely want to transfer the 4K video you just recorded on Christmas Party on Roku 4 via Plex.Roku has announced the latest version of their video streaming player. Roku 4 comes with a faster quad core processor, supports 4K UHD HEVC and 4K UHD VP9 video playback up to respectively 2160p60 and 2160p30, and includes a new version of Roku operating systems. Roku 4 has its own limited playable formats,only the Roku 4 supports video files with 4k resolution. They also must either be encoded with VP9 codec or H.265 codec. You can watch them on any TV hooked to the Roku 4. As 4K camcorder records video with 4k MXF , 4K MOV, 4K MP4, or 4K XAVC/XAVC-S,etc. So, we can not import all 4k videos to Roku 4 for playback.From roku.com we get the get the following media file formats are supported:
- Video — H.264/AVC (.MKV, .MP4, .MOV), on Roku 4 only: H.265/HEVC (.MKV, .MP4, .MOV); VP9 (.MKV)
- Audio – AAC (.MKV, .MP4, .MOV); MP3(.MP3, .MKV); WMA (.ASF, .WMA, .MKV), FLAC (.FLAC, .MKV), PCM (.WAV, .MKV, .MP4, .MOV), AC3/EAC3 (.MKV,.MP4. .MOV, .AC3), DTS (.MKV, .MP4, .MOV), ALAC (.MKV, .MP4, .MOV, .M4A)
- Image — JPG, PNG, GIF (non-animated)
Only supported file types are shown in the Roku Media Player channel. The channel hides unsupported file types.Multichannel AAC is not supported on all Roku models. Roku TV’s and Roku 4 set-top-boxes do support multichannel decode to PCM stereo.DTS is only supported via pass through on both Roku set-top-boxes and Roku TV’s. You must connect your Roku player via HDMI or S/PDIF to a TV or receiver capable of decoding Dolby Digital or DTS in order to hear videos with audio tracks in those formats.Some media server software may convert files into Roku compatible formats.DRM-protected content is not supported.Hot Search: Blu-ray to H.265 | Encode Any Videos to H.265 | YouTube Videos on RokuTherefore, if you want to stream some 4K videos such as 4k MXF , 4K MOV, 4K MP4, or 4K XAVC/XAVC-S files to Roku 4 or Apple TV 4 for playback, an 4K to converter is needed. Among many apps on the market, Pavtube HD Video Converter for Mac(read the review) is the top-ranked one. It can transcode any 4K UHD videos to Roku 4 in H.265 MP4, with excellent video quality. In settings window, you can freely adjust the video and audio size, codec, nitrate, frame rate, etc to get more compatible video with Roku 4. If you are a Windows user, please turn to Pavtube HD Video Converter, the same ability as Mac version. Other Download:
How to Convert 4K Video to H.265 for Roku 4Step 1. Import 4K video to HD converterDownload and launch this Mac HD video converter, and click “File” and “Add Video/Audio” to add source videos.Step 2: Select output file format.Click "Format" bar, you can choose "H.265 Video(*.mp4)" as the output format from the format list.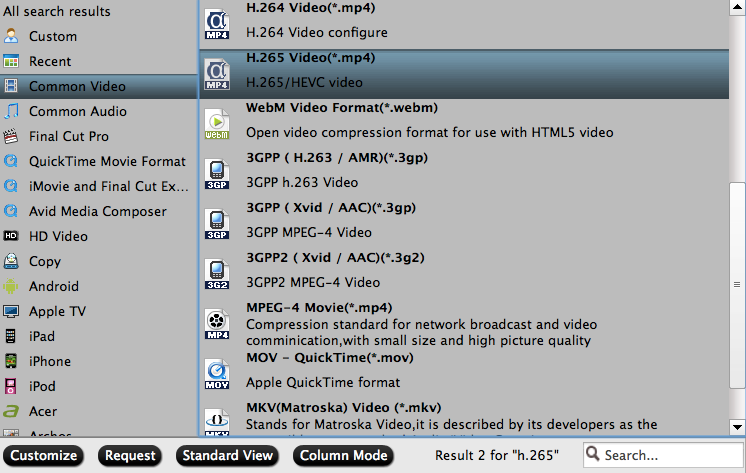 Step 3. Compress 4K videos (Optional)Hit "Settings" on the main interface, you will open the "Parameters" window, here, you can set the output video codec, size, frame rate, bit rate, audio codec, bit rate, sample rate and channels to improve output video quality.Step 4. Convert 4K video to Roku 4 or Apple TV 4Once everything is settled for conversion, click “Convert” on main interface to make your source videos converted. After conversion, you’ll get the expected and desired video format well accepted by Roku 4.Step 5. Import converted videos to Roku 4. You can find the generated files by clicking "Open output folder" when the conversion is completed. Transfer them to an external USB hard drive and plug the drive into your Roku 4, you will have no difficulty to watch 4K videos on your large screen HDTV via Roku 4.Read More:
Summary: Can Windows Media Player play DJI Phantom 4K mp4 files? Why my Windows Media Player won’t play DJI Phantom 4k MOV files ? What should I do in order to open and play DJI 4k mov files in Windows Media Player? In this article, we will teach you how to convert DJI Phantom 3 4K MOV footage to Windows Movie Maker for smooth editing.The DJI Inspire 3 is a well-built, ready-to-fly quadcopter that captures excellent 4K-resolution video. you're shooting 4K videos and capturing 12 megapixel photos that look crisper and cleaner. However, things would be a little more complicated when you work with the DJI Phantom 3 4K in Windows Movie Maker.Windows Movie Maker does not recognize MOV files from DJI Phantom. The file type is a compressed output format; not ideal for editing in NLE system. Something else, Windows Movie Maker lacks support for 4K video. To solve those problems, the quick workaround is to transcode Phantom 3 4K MOV files to Windows Movie Maker natively supported formats (WMV/AVI are highly recommended) in proper settings.That's where Pavtube Video Converter comes in: It supports converting DJI Inspire 3 4k MOV files to Windows Movie Maker highly compatible WMV or AVI without quality loss. Besides, it also supports the decent outputs for Avid MC, Adobe Premier Pro, Sony Vegas, Pinnacle Studio and more to meet different of needs. Just download it and follow the step-by-step guide to transcode DJI Inspire 4k MOV files for editing in Window Movie Maker smoothly.
 Other Download:- Pavtube old official address: http://www.pavtube.com/video_converter/- Amazon Download: http://download.cnet.com/Pavtube-Video-Converter/3000-2194_4-75734821.html- Cnet Download: http://download.cnet.com/Pavtube-Video-Converter/3000-2194_4-75734821.htmlGuide on Downscaling DJI 4K to 1080p for editingStep 1. Load the 4K files of DJI.Click "Add Video" button to load your DJI Phantom 3 4K files as soon as you get into the main interface. Or you can drag & drop the files to the software directly.
 Step 2. Choose the output formatClick the "Profile" drop down list to select a proper video foramt as you want. Here you just need to hit the "Profile" box and select "HD Video" > "WMV HD" on the dropdown menu as output format.
  Step 3. Set Video Resolution at 1080p.Click "Settings" button; you can adjust video and audio settings, including codec, aspect ratio, bit rate, frame rate, sample rate, and audio channel. To down-convert ultra HD 4K to 1080p, do remember adjusting video size to 1920*1080. That is the exact 108p.
 Step 3. Start transcoding DJI 4K to 1080p on MacWhen everything is OK, hit "Convert" button at the bottom of the main interface to let the 4K to 1080p conversion begin.When the conversion finished, check the generated 1080p video, you will certainly be satisfied with its final video quality. It would be easier for you to playback and edit your DJI Phantom 3 4K clips. Enjoy.Read More:
Summary: If you used to edit video in ScreenFlow, and you know litter about other editor, however, you have problem of importing the MOV into ScreenFlow, what should you do? Take it easy, this article will show you the unimport reason and give tutorial to get it work.In my experience with ScreenFlow, if QuickTime can open the movie, ScreenFlow can edit it. If QuickTime can't open the file, you might consider to convert unsupported MOV videos into QuickTime compatible format for importing into ScreenFlow, since the mov video may be codec in other QuickTime incompatible codec.Has mentioned above if you want to play and edit MOV videos on ScreenFlow, just convert MOV to QuickTime MOV. There are many kinds of MOV converter software in the market. The output video quality and the converting speed must be the key factors that you should be looking out for. Pavtube HD Video Converter for Mac(read the review) provides Mac users the easiest and smartest way to convert incompatible MOV to QuickTime MOV on Mac (El Capitan). Equipped with high quality engine and hyper threading technology, even support Multi-core CPU and hardware encoding technology, this HD video converter for Mac can convert incompatible MOV to QuickTime MOV format without suffering any quality loss, up to 5X faster than other converters in the market. Other Download:
How to Convert Incompatible MOV to QuickTime Player .MOV for Editing on ScreenFlow?Step 1: Add incompatible MOV files.Launch the program on your computer, add incompatible MOV files to the program by clicking the "Add Video" or "Add folder" button.Step 2: Choose output file format.From "Format" drop-down option, choose QuickTime natively supported format by following "Common Video" > "MOV - QuickTime (*.mov)". Step 3: Customize output video and audio settings.Open "Profile Settings" window to adjust output video and audio parameter settings such as video codec, size, bit rate, frame rate, audio codec, bit rate, frame rate, channels, etc according to your own preference.Step 4: Start the conversion process.After all the setting is over, go back to the main interface and hit right-bottom "Convert" button to start incompatible MOV video to QuickTime mov conversion process.When the conversion is completed, you will have no limitation to importing converted incompatible MOV video footage on ScreenFlow.Related program: Pavtube Media Magician / Mac Version: A nice camcorder assistant manager, lossless camcorder video joiner, MTS/ M2TS/ MXF/ MOV/ MKV/ TiVo/ WMV/ AVI/ MPG converter and editor. Meamwhile it supported upload edited video to YouTube directly.Read More:
Summary: Roku 4 and Apple TV 4 are the best TV streaming devices. No matter which one you get, here you will have no issue of play 4k video on them.Choosing a streaming device can be a daunting prospect if you're new to the cord cutter lifestyle. There are many great options, but the best strongly depends on what kind of features you need. The Roku 4 or Apple TV 4 is still the best option overall if you want a quality, affordable device with access to Amazon Prime and basic remote voice command features that make your streaming experience more enjoyable. Roku has announced the latest version of their video streaming player. Roku 4 comes with a faster quad core processor, supports 4K UHD HEVC and 4K UHD VP9 video playback up to respectively 2160p60 and 2160p30, and includes a new version of Roku operating systems. Roku 4 has its own limited playable formats, so, we can not import all 4k videos to Roku 4 for playback. But the new Apple TV is missing the thing important about the future of TV. Unlike other streaming boxes, from competitors like Amazon, Roku, and Nvidia, the new Apple TV, it can’t stream “House of Cards” in Ultra HD 4K. For House of Cards fan who have Apple TV 4, it is really a sad news.Therefore, if you want to stream some 4K videos such as 4k MXF , 4K MOV, 4K MP4, or 4K XAVC/XAVC-S files to Roku 4 or Apple TV 4 for playback, an 4K to converter is needed.Hot Search: movies on Roku 3 | YouTube Videos on Roku | M3U8 to Apple TVIf course, this must be under the help of 4K Converter. Among many apps on the market, Pavtube HD Video Converter for Mac(read the review) is the top-ranked one. It can transcode any 4K UHD videos to Roku 4 or Apple TV 4 in MP4, with excellent video quality. In settings window, you can freely adjust the video and audio size, codec, nitrate, frame rate, etc to get more compatible video with Roku 4 or Apple TV 4. Other Download:
How can we deal with 4K files for Playback with Roku 4 or Apple TV 4?Step 1. Import 4K video to HD converterDownload and launch this Mac HD video converter, and click “File” and “Add Video/Audio” to add source videos.Step 2. Choose Roku 4 or Apple TV 4 supported video formatChoose Roku 4 or Apple TV 4 playable "HD Video" > "H.264 HD Video" from "Format" bar drop-down selections. Step 3. Compress 4K videos (Optional)Hit the button “Settings” near the format bar, and you’ll brought to the “Profile Settings” interface where you can compress source videos by choosing a smaller video size from the “Size” dropdown list.
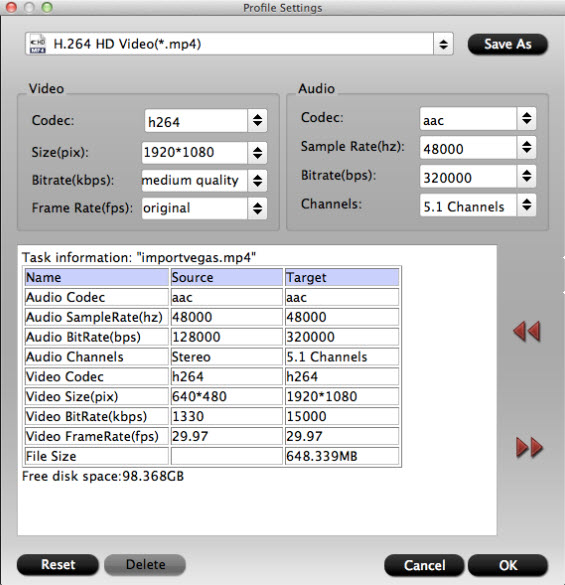 Step 4. Convert 4K video to Roku 4 or Apple TV 4Once everything is settled for conversion, click “Convert” on main interface to make your source videos converted. After conversion, you’ll get the expected and desired video format well accepted by Roku 4 or Apple TV 4.Step 5. Import converted videos to Roku 4 or Apple TV 4. You can find the generated files by clicking "Open output folder" when the conversion is completed. Transfer them to an external USB hard drive and plug the drive into your Roku 4 or Apple TV 4, you will have no difficulty to watch 4K videos on your large screen HDTV via Roku 4 or Apple TV 4.Read More:
Summary: What is the best solution for editing AVCHD and AVCHD Lite MTS/M2TS footage in Final Cut Pro? This is a frequently asked question by FCP users. This article give you the best solution of importing AVCHD/MTS video into FCP for smoothly editing.
AVCHD is an HD video format jointly developed by Sony and Panasonic that uses Advanced Video Coding (AVC) compression (also known as MPEG-4 part 10 or H.264) to achieve high-quality images and low data rates. Generally speaking, AVCHD footage is usually saved in MTS or M2TS container format, which are widely used by Sony, Panasonic, JVC, Canon camcorders.
However, AVCHD files are not natively supported by Final Cut Pro and must be transcoded to FCP friendly codecs such as QuickTime movie and Apple Intermediate Codec before importing to FCP.
First method you could try
Thankfully, FCPX can import AVCHD footage from a hard drive, but you need to make sure you preserve the original file structure. Copy the whole card just as it is, onto your drive. Then from within the FCPX import window, navigate to the folder, and voila, you’ll see the video clips and be able to import then as normal (They’ll be converted to H.264 .MOV files and copied to the “Original Media” folder.) You’ll notice that you won’t have the option to uncheck “Copy Media to Events Folder.” That’s because FCPX reads the archive as if it were a card. That means in essence you will be duplicating your footage.
The second best method
To lower the quality loss during transcoding, Apple introduced in 2008 the Apple ProRes family to help Final Cut Pro works more efficiently with HD contents. By transcoding/converting AVCHD to Apple ProRes codec, the possible best quality is retained in post-production workflow and you can then edit the resulting media files just as you would edit in QuickTime Movie format. Besides, the rendering time is saved as Apple ProRes codecs are natively supported by FCP.
Hot Search: 4K AVCHD to iMovie/FCE/FCP | Play AVCHD on VLC Player | Import Media Files to Final Cut Pro
Pavtube HD Video Converter for Mac(read the review) will be the best choice for you. This is an AVCHD/AVCHD Lite transcoding tool for Mac. It can deals with AVCHD footage straightly from Sony, Panasonic, JVC and various other camcorders and exports HD contents encoded in various codecs for editing and playing back. The FCP friendly codecs includes Apple ProRes family (ProRes 422, ProRes 422 LT, ProRes 422 HQ, ProRes 422 Proxy, ProRes 4444), DVCPRO, HDV, Apple Intermediate codec, etc.
Meanwhile, this software can help you convert any HD video to Apple ProRes 422 for Final Cut Pro editing on Mac, or to Apple InterMediate Codec for FCE, iMovie. You can also convert videos between so many video formats.
If you are windows user, please turn to Pavtube HD Video Converter. It has the same features as Mac version.
Other Download:
Encode AVCHD to ProRes 422 for FCP
Step 1. Download Pavtube HD Video Converter for Mac.
This professional HD Video Converter can help you convert AVCHD files to ProRes 422 MOV format for Final Cut Pro, more output formats are also supported.
Install and launch this AVCHD Converter. Import AVCHD footage to the converter by clicking "File">"Add Video/Audio".
 Step2. Click format bar to choose the output format.
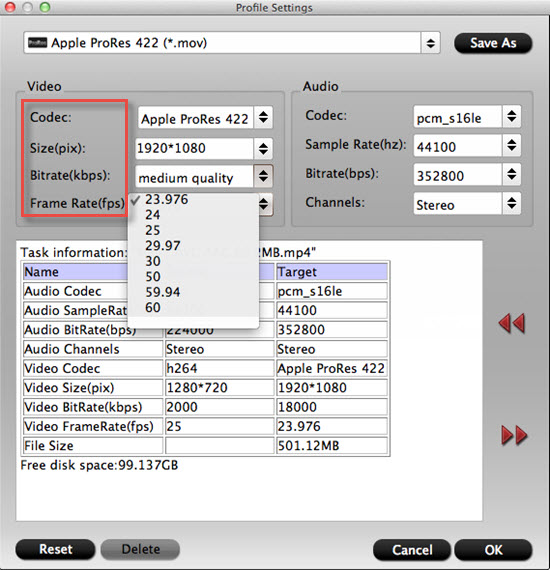
Click and choose "Final Cut Pro">"Apple ProRes 422 (*.mov)". If you don't care about the generated file size while just pursuit the video quality, then you can totally go for "Apple ProRes 422 HQ (*.mov)". (Differences among Apple ProRes codecs)
Step2. Click format bar to choose the output format.
Click and choose "Final Cut Pro">"Apple ProRes 422 (*.mov)". If you don't care about the generated file size while just pursuit the video quality, then you can totally go for "Apple ProRes 422 HQ (*.mov)". (Differences among Apple ProRes codecs)
 Step 3. You can click "settings" to customize the output parameters, adjust the resolution, bitrate as you want.
If you just want to keep the original video quality, you can choose "original ", or if there is no proper parameters for you to choose, you can just type them by yourself.
Step 3. You can click "settings" to customize the output parameters, adjust the resolution, bitrate as you want.
If you just want to keep the original video quality, you can choose "original ", or if there is no proper parameters for you to choose, you can just type them by yourself.
 Step 4. Click convert button to start.
After you deinterlace AVCHD/MTS to FCP ProRes 422 codec, you can import the converted footages to Final Cut Pro, iMovie/Final Cut Express for editing without rendering, now please take a try.
Userful tips:
-"Interlaced" to "Progressive"
If you want to change the "interlaced' into "Progressive"mode, then you can go to this "Edit" UI.
Step 4. Click convert button to start.
After you deinterlace AVCHD/MTS to FCP ProRes 422 codec, you can import the converted footages to Final Cut Pro, iMovie/Final Cut Express for editing without rendering, now please take a try.
Userful tips:
-"Interlaced" to "Progressive"
If you want to change the "interlaced' into "Progressive"mode, then you can go to this "Edit" UI.
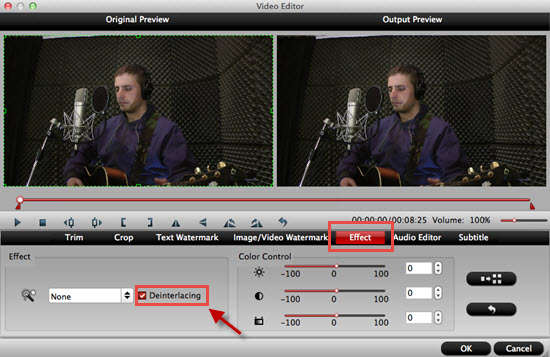 By this function, you can have the "Progressive" mode to get a better quality of your videos.
-Transfer files into FCP X
For many new users of Final Cut Pro, how to load files into Final Cut Pro smoothly without unknown problems may be very needed for them.
Read More:
By this function, you can have the "Progressive" mode to get a better quality of your videos.
-Transfer files into FCP X
For many new users of Final Cut Pro, how to load files into Final Cut Pro smoothly without unknown problems may be very needed for them.
Read More: