Summary: Applying the best GoPro Hero 4K Video Converter, you can convert 4K video from GoPro Hero for importing to Vimeo with easy uploading.
 Hot search: AVCHD to Vimeo | MXF to Vimeo | OBS FLV to Vimeo | GoPro Hero 4K video to DropBox | GoPro Hero 4K video to Sony Movie StudioGoPro video cameras HD Hero 3, GoPro Hero3+, Hero 4, etc are familiar with everyone whoever has passion for outdoor activities. GoPro cameras are used in a plethora of conditions, like cycling down a rocky ravine, skiing off-piste, skateboarding on a public road, or windsurfing in choppy waters, to capture amazing action scenes and record incredible vantage points. GoPro’s new Hero 4 black edition camera has the sharpest footage and is the most user-friendly version. When you got some 4K clips from GoPro Hero, you would probably upload them to Vimeo for sharing with your friends and family members.Vimeo is quickly becoming both a popular video share website and a social networking site. It’s a common place for budding videographers to showcase their short films and original videos to other filmmaking enthusiasts. The site is also popular with a few professionals as a place to store and showcase their work.The Vimeo site can accept a wide range of file formats for upload, so you do not have to worry about compatibility issue. Vimeo supports the following file formats: AVI, WMV, MP4, MPEG, MPG, MOV, M4V, DV, ASF, Divx, QT, 3G2, 3GP, 3iVX, 3VX, DVX, ASX. Currently, most 4K movies are recorded in MXF/RAW/XAVC/XAVC-S format. If you want to upload GoPro Hero 4K video to Vimeo, Vimeo won’t recognize your files due to incompatibility issues. At this time, you’ll need a conversion tool since Vimeo has no support for GoPro Hero 4K contents. Pavtube Video Converter (Mac version), the best solution to upload GoPro Hero 4K video to Vimeo by converting 4K video to multiple Vimeo supported formats such as AVI, WMV, MP4, MPEG, MPG, MOV, DV, QT, 3GP, 3G2, etc. Besides converting files to Vimeo, the program also help you edit 4K videos in a number of ways so that you can get the exact piece of video you want.
 Other Download:- Pavtube old official address: http://www.pavtube.com/video_converter/- Amazon Download: http://download.cnet.com/Pavtube-Video-Converter/3000-2194_4-75734821.html- Cnet Download: http://download.cnet.com/Pavtube-Video-Converter/3000-2194_4-75734821.htmlA detailed guide on how to upload GoPro Hero 4K video to Vimeo for sharing:Step 1: Download and install the corresponding program. Click “Add video” on the main interface to load your GoPro Hero 4K videos to the program. You can also drag the files to the program’s window list directly. This program can also support the batch video clips.
 Step 2: Select the right formats for uploading to Vimeo. Here we suggest you to go to the “HD Video” list, you will get the “H.264 HD Video (*.mp4)” as the best output.
 Step 3: Click “Settings” button to customize the output video and audio settings by yourself. But if you are not good at it, you’d better use the default parameters, they will ensure you a good balance between file size and image quality basically. You can change the resolution, bit rate, frame rate as you need.Step 4: After all the settings, you can preview the final result of movie. If you are happy with the effect, you can then press the big “Convert” button on the lower right to launch the conversion.Conclusion: Wait a moment, and then the conversion will be done flawlessly. After conversion, click “Open Folder” button to locate the converted video files. You can upload GoPro Hero 4K video to Vimeo seamlessly.Note: How to upload GoPro Hero 4K video to Vimeo?Visit vimeo.com, click the “Upload a video” button to go to the upload page. Hit the “Choose a Video to Upload” button, select the file you want to upload from your computer, and hit “Select” (or “Choose”). Your video will automatically start uploading to Vimeo and you’ll see a progress bar telling you how long it will take. When the uploading is finished, the program will go through a conversion process with a progress bar. Vimeo will send you an email when it’s finished.Further Reading:
Summary: Do you want to know Nabi Square HD 4K video to FCP workflow? Based on our testing, to make Nabi Square HD 4K video works well with FCP, the easy option is to convert 4K video to ProRes, a native format for FCP.
 Today, Nabi has announced a new 4K action camera called the Nabi Square HD. This is a rugged action camera that’s designed especially for kids with a rugged case to protect the camera from broken, dust or water. The Nabi Square HD can record full HD 1080p video at 60 fps, 2.7K video at 30 fps, 4K video at 15 fps and also support for slow motion with 120 fps at 720p video.
Since Nabi Square HD can record 4K videos, if you’ve got some 4K footages from Nabi Square HD, you may be curious how to edit those impressed 4K videos in FCP without hassles. As a matter of fact, FCP won’t deal with 4K videos instantly- have to wait for rendering or even some raw footage like 4K MP4 can’t be recognized. Currently, most 4K movies are recorded in MXF/RAW/XAVC/XAVC-S format, while FCP supports ProRes best.
Before editing Nabi Square HD 4K video in FCP smoothly, you’d better convert 4K video to ProRes with the assistance of third-party software. Pavtube HD Video Converter for Mac is what most guys recommend. Overall, this 4K video converter provides the most reliable and professional 4K solutions to all format issues including 4K XAVC/XAVC S, 4K MTS, 4K MP4, 4K MOV, 4K MXF and more. With it, you can convert 4K to FCP without any quality loss. It comes with hundreds of output format presets for 4K videos, such as Apple ProRes for Final Cut Pro, DNxHD for Avid, Apple InterMediate Codec for iMovie, MPEG-2 for Adobe Premiere. Besides, this 4K converter is also available to customize the output resolutions to any size like 1080p, 2K, 4K as users want.
Today, Nabi has announced a new 4K action camera called the Nabi Square HD. This is a rugged action camera that’s designed especially for kids with a rugged case to protect the camera from broken, dust or water. The Nabi Square HD can record full HD 1080p video at 60 fps, 2.7K video at 30 fps, 4K video at 15 fps and also support for slow motion with 120 fps at 720p video.
Since Nabi Square HD can record 4K videos, if you’ve got some 4K footages from Nabi Square HD, you may be curious how to edit those impressed 4K videos in FCP without hassles. As a matter of fact, FCP won’t deal with 4K videos instantly- have to wait for rendering or even some raw footage like 4K MP4 can’t be recognized. Currently, most 4K movies are recorded in MXF/RAW/XAVC/XAVC-S format, while FCP supports ProRes best.
Before editing Nabi Square HD 4K video in FCP smoothly, you’d better convert 4K video to ProRes with the assistance of third-party software. Pavtube HD Video Converter for Mac is what most guys recommend. Overall, this 4K video converter provides the most reliable and professional 4K solutions to all format issues including 4K XAVC/XAVC S, 4K MTS, 4K MP4, 4K MOV, 4K MXF and more. With it, you can convert 4K to FCP without any quality loss. It comes with hundreds of output format presets for 4K videos, such as Apple ProRes for Final Cut Pro, DNxHD for Avid, Apple InterMediate Codec for iMovie, MPEG-2 for Adobe Premiere. Besides, this 4K converter is also available to customize the output resolutions to any size like 1080p, 2K, 4K as users want.

 Other Download:
- Pavtube old official address: http://www.pavtube.com/hd-video-converter-mac/
- Amazon Store Download: http://www.amazon.com/Pavtube-Video-Converter-Mac-Download/dp/B00QI9GNZS
- AppStore Download: https://itunes.apple.com/de/app/pavtube-hd-video-converter/id502792488?mt=12
- Cnet Download: http://download.cnet.com/Pavtube-HD-Video-Converter/3000-2194_4-76177786.html
How to convert Nabi Square HD 4K video to FCP for editing?
Step 1: Download and have a quick installation. The trial version will have a watermark on your converted files. Except for that, there are no time limitation, no virus, and no unnecessary bundle apps while downloading. After that, click “Add Video” button to load your Nabi Square HD 4K video files. You can load several files at once thanks to “Add from folder” button.
Other Download:
- Pavtube old official address: http://www.pavtube.com/hd-video-converter-mac/
- Amazon Store Download: http://www.amazon.com/Pavtube-Video-Converter-Mac-Download/dp/B00QI9GNZS
- AppStore Download: https://itunes.apple.com/de/app/pavtube-hd-video-converter/id502792488?mt=12
- Cnet Download: http://download.cnet.com/Pavtube-HD-Video-Converter/3000-2194_4-76177786.html
How to convert Nabi Square HD 4K video to FCP for editing?
Step 1: Download and have a quick installation. The trial version will have a watermark on your converted files. Except for that, there are no time limitation, no virus, and no unnecessary bundle apps while downloading. After that, click “Add Video” button to load your Nabi Square HD 4K video files. You can load several files at once thanks to “Add from folder” button.
 Step 2: Click the “Format” bar to get the drop-down menu and you can get “Final Cut Pro”. Choose “Apple ProRes 422 (*.mov)” as output format.
 Step 3: Click “Settings” button to customize the output video and audio settings by yourself. But if you are not good at it, you’d better use the default parameters, they will ensure you a good balance between file size and image quality basically. You can change the resolution, bit rate, frame rate as you need.
Step 4: Click “Convert” button on the bottom of the screen to start 4K video to ProRes 422 MOV conversion process. The amount of time it takes will vary based on your system’s hardware and the quality settings you selected.
Conclusion: When the conversion is done, you can click “Open” button to get the generated video files. Now, you can edit Nabi Square HD 4K video in FCP freely.
Further Reading:
Step 3: Click “Settings” button to customize the output video and audio settings by yourself. But if you are not good at it, you’d better use the default parameters, they will ensure you a good balance between file size and image quality basically. You can change the resolution, bit rate, frame rate as you need.
Step 4: Click “Convert” button on the bottom of the screen to start 4K video to ProRes 422 MOV conversion process. The amount of time it takes will vary based on your system’s hardware and the quality settings you selected.
Conclusion: When the conversion is done, you can click “Open” button to get the generated video files. Now, you can edit Nabi Square HD 4K video in FCP freely.
Further Reading:
Summary: As a Mac user, you might have come across some down situation: Sony camera videos are unplayable on QuickTime, the native media player on Mac. So what’s next step? Convert Sony camera video to QuickTime compatible formats. Read on.
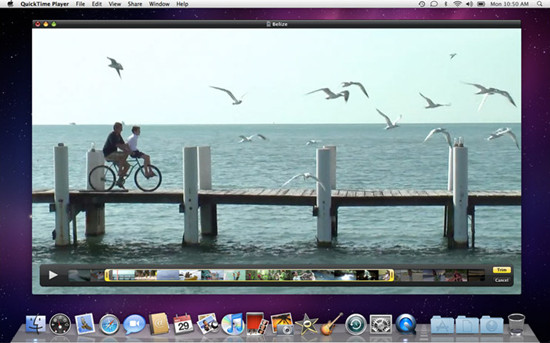 Sony Handycam camcorders provide us great ways to record our most unforgettable moments, but for many Sony Handycam owners, most of them have a headache of playing incompatible Sony camera video with QuickTime. Apple QuickTime movie is stored in the format of Apple QuickTime (.mov, .qt) which is a file format for storing and playing back movies with sound. Though developed and supported primarily by Apple Computer, the format of Apple QuickTime isn't limited to Macintosh operating systems.To avoid importing issues, you’d better check out QuickTime best supported formats first. And then convert incompatible ones to QuickTime friendly format for playback:
 Here Pavtube Video Converter for Mac offers an easy way to convert Sony camera video to QuickTime accepted format for playback on Mac. With it, you will be able to import Sony camera videos to your QuickTime for playback with best quality, fastest converting speed, excellent A/V sync and so on. Besides, by converting Sony camera videos to MOV, you can transfer the generated files to your iPhone, iPad, Apple TV 3, etc to play with ease. Other Download:- Pavtube old official address: http://www.pavtube.com/video-converter-mac/- Amazon Store Download: http://www.amazon.com/Pavtube-Video-Converter-Mac-Download/dp/B00QIBK0TQ- Cnet Download: http://download.cnet.com/Pavtube-Video-Converter/3000-2194_4-76179460.htmlHow to convert Sony camera video to QuickTime for playback?Step 1: Download and have a quick installation. The trial version will have a watermark on your converted files. Except for that, there are no time limitation, no virus, and no unnecessary bundle apps while downloading. After that, click “Add Video” button to load your Sony camera videos. You can load several files at once thanks to “Add from folder” button.
 Step 2: Click the “Format” bar to get the drop-down menu and you can get “Common Video”. Choose “MOV- QuickTime (*.mov)” as output format.
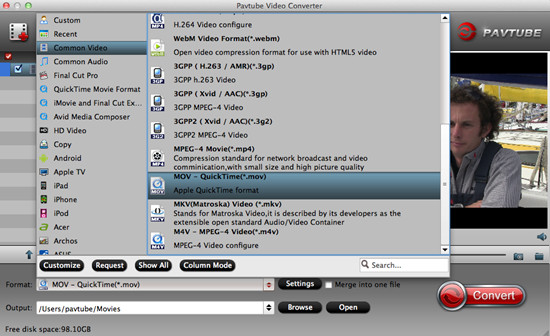 Step 3: Click “Settings” button to customize the output video and audio settings by yourself. But if you are not good at it, you’d better use the default parameters, they will ensure you a good balance between file size and image quality basically. You can change the resolution, bit rate, frame rate as you need.Step 4: Click “Convert” button on the bottom of the screen to start Sony camera videos to QuickTime MOV conversion process. The amount of time it takes will vary based on your system’s hardware and the quality settings you selected.Conclusion: Once the conversion is finished, click “Open” to quickly find the converted files. Then, QuickTime will recognize, catalog, play and stream them just fine. There is no need to worry about how to play Sony camera videos on QuickTime.Further Reading:
Summary: These days I’ve been trying to figure out how to get VLC to recognize Canon/Panasonic/Sony MXF recordings, how to play MXF on VLC player, but there is no-go. Can anyone kindly shed some light on this issue?
 Material Exchange Format (MXF) is an open-standard container or a wrapper format for digital audio and video media. There are many camcorders use MXF format, like Sony XDCAM series, Panasonic P2 series and Canon XF series. Unfortunately MXF is not an easy format to handle both on Windows and Mac.
VLC media player is the most successful free open source cross-platform multimedia player in Windows, Linux, Mac OS X and framework that plays most multimedia files as well as DVD, Audio CD, VCD, and various streaming protocols. There are still many people encountered problems when playing MXF with VLC.
“I am using VLC to play some MXF files on Mac. The files play fine but it seems I cannot seek. Whenever I try to click to a position on the scrollbar the video will freeze and jump to the beginning. I am wondering is this a known issue?”
If you tried to play MXF with VLC on Mac, you may probably run into the same situations as mentioned above because MXF is incompatible with VLC. To be able to make MXF files viewable on a Mac through VLC, you are suggested to transcode MXF to a format that is suitable for your VLC media player:
Container formats: 3GP, ASF, AVI, DVR-MS, FLV, Matroska, MIDI, QuickTime File Format, MP4, Ogg, OGM, WAV, MPEG-2 (ES, PS, TS, PVA, MP3), AIFF, Raw audio, Raw DV, MXF, VOB, RM, DVD-Video, VCD, SVCD, CD Audio, DVB
Video formats: Cinepak, Dirac, DV, H.263, H.264/MPEG-4 AVC, H.265/MPEG HEVC, HuffYUV, Indeo 3, MJPEG, MPEG-1, MPEG-2, MPEG-4 Part 2, RealVideo 3&4, Sorenson, Theora, VC-1, VP5, VP6, VP8, VP9, DNxHD, ProRes and some WMV.
Audio formats: AAC, AC3, ALAC, AMR, DTS, DV Audio, XM, FLAC, It, MACE, Mod, Monkey's Audio, MP3, Opus, PLS, QCP, QDM2/QDMC, RealAudio, Speex, Screamtracker 3/S3M, TTA, Vorbis, WavPack, WMA (WMA 1/2, WMA 3 partially).
As shown above, you can convert MXF to H.264 MP4 for VLC smoothly playing. This requires third party software like Pavtube MXF Converter for Mac (review). With it, you can do the conversion work with fast speed and high quality preserved. If you are running on Windows operating system, you can refer to the equivalent version- Pavtube MXF Converter.
Other downloads:
AppStore Download: https://itunes.apple.com/us/app/pavtube-mxf-converter/id502807634?mt=12
Amazon Download: http://www.amazon.com/Pavtube-MXF-Converter-Mac-Download/dp/B00QID8K28
Cnet Download: http://download.cnet.com/Pavtube-MXF-Converter/3000-2194_4-76177789.html
Below is the simple guide about how to play Canon/Panasonic/Sony MXF on VLC Player:
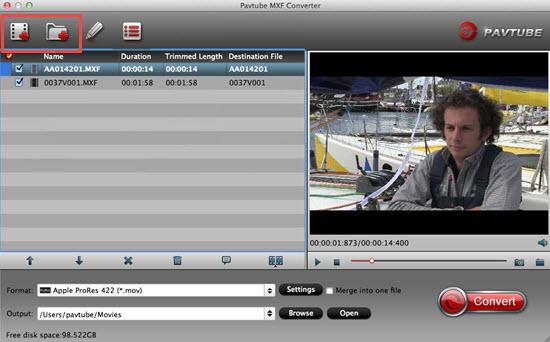
Step 1: Backup your MXF files to hard drive. Install and launch the corresponding program. Drag and drop MXF files to the software. You can import multiple files at once thanks to “Add from folder” button.
Material Exchange Format (MXF) is an open-standard container or a wrapper format for digital audio and video media. There are many camcorders use MXF format, like Sony XDCAM series, Panasonic P2 series and Canon XF series. Unfortunately MXF is not an easy format to handle both on Windows and Mac.
VLC media player is the most successful free open source cross-platform multimedia player in Windows, Linux, Mac OS X and framework that plays most multimedia files as well as DVD, Audio CD, VCD, and various streaming protocols. There are still many people encountered problems when playing MXF with VLC.
“I am using VLC to play some MXF files on Mac. The files play fine but it seems I cannot seek. Whenever I try to click to a position on the scrollbar the video will freeze and jump to the beginning. I am wondering is this a known issue?”
If you tried to play MXF with VLC on Mac, you may probably run into the same situations as mentioned above because MXF is incompatible with VLC. To be able to make MXF files viewable on a Mac through VLC, you are suggested to transcode MXF to a format that is suitable for your VLC media player:
Container formats: 3GP, ASF, AVI, DVR-MS, FLV, Matroska, MIDI, QuickTime File Format, MP4, Ogg, OGM, WAV, MPEG-2 (ES, PS, TS, PVA, MP3), AIFF, Raw audio, Raw DV, MXF, VOB, RM, DVD-Video, VCD, SVCD, CD Audio, DVB
Video formats: Cinepak, Dirac, DV, H.263, H.264/MPEG-4 AVC, H.265/MPEG HEVC, HuffYUV, Indeo 3, MJPEG, MPEG-1, MPEG-2, MPEG-4 Part 2, RealVideo 3&4, Sorenson, Theora, VC-1, VP5, VP6, VP8, VP9, DNxHD, ProRes and some WMV.
Audio formats: AAC, AC3, ALAC, AMR, DTS, DV Audio, XM, FLAC, It, MACE, Mod, Monkey's Audio, MP3, Opus, PLS, QCP, QDM2/QDMC, RealAudio, Speex, Screamtracker 3/S3M, TTA, Vorbis, WavPack, WMA (WMA 1/2, WMA 3 partially).
As shown above, you can convert MXF to H.264 MP4 for VLC smoothly playing. This requires third party software like Pavtube MXF Converter for Mac (review). With it, you can do the conversion work with fast speed and high quality preserved. If you are running on Windows operating system, you can refer to the equivalent version- Pavtube MXF Converter.
Other downloads:
AppStore Download: https://itunes.apple.com/us/app/pavtube-mxf-converter/id502807634?mt=12
Amazon Download: http://www.amazon.com/Pavtube-MXF-Converter-Mac-Download/dp/B00QID8K28
Cnet Download: http://download.cnet.com/Pavtube-MXF-Converter/3000-2194_4-76177789.html
Below is the simple guide about how to play Canon/Panasonic/Sony MXF on VLC Player:
Step 1: Backup your MXF files to hard drive. Install and launch the corresponding program. Drag and drop MXF files to the software. You can import multiple files at once thanks to “Add from folder” button.
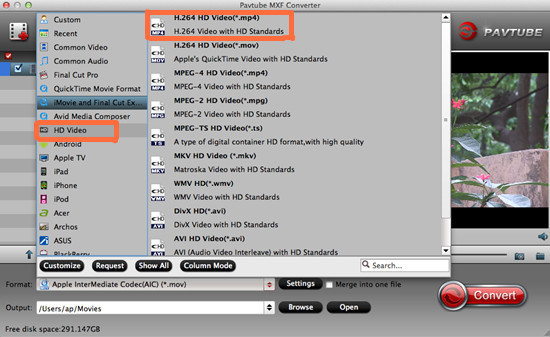
 Step 2: Click the drop-down list in the format line to get the format box. Then choose “HD Video>>H.264 HD Video (*.mp4)” as output format.
 Step 3: You can adjust the parameters by clicking “Settings” button, choose the resolution, bitrate, frame rate and etc. as you want.
Step 4: You can preview to check the final result. Once you are satisfied with it, click the “Convert” button to start converting Canon/Panasonic/Sony MXF files to H.264 HD Video MP4 for playing on VLC player flawlessly. It will take you a little while.
Conclusion: Once the conversion process shows in 100%, click “Open” to get the output videos. Now, you can smoothly play Canon/Panasonic/Sony MXF on VLC player without any issues.
Further Reading:
Step 3: You can adjust the parameters by clicking “Settings” button, choose the resolution, bitrate, frame rate and etc. as you want.
Step 4: You can preview to check the final result. Once you are satisfied with it, click the “Convert” button to start converting Canon/Panasonic/Sony MXF files to H.264 HD Video MP4 for playing on VLC player flawlessly. It will take you a little while.
Conclusion: Once the conversion process shows in 100%, click “Open” to get the output videos. Now, you can smoothly play Canon/Panasonic/Sony MXF on VLC player without any issues.
Further Reading:
Summary: It’s a wonderful idea to play videos on PS4 via USB driver. However, some common high definition video formats such as MP4, MKV, AVI, M4V, VOB, Tivo, WMV, MPG, FLV, WebM and M2TS etc. are not supported by PS4.
 Sony PS4 is a home video game console which is the successor to the PlayStation 3. Although PS4 has more powerful features like SharePlay which is a great way to experience video games, the PS3 is a little better in terms of the media machine than the PS4. Although it claims to support many files formats, but we still run into incompatible issues as we mentioned at the very beginning.Q: No way to watch videos on PS4 via a USB drive?“Can I play movies from USB Drive on Sony PlayStation 4? I have got the Sony PS4 video game console a week ago, now I want to watch movies on my HDTV via PS4, I have collected some movies on my computer, they are MP4 formats, are they supported by Sony PS4 from USB Drive?”According to PlayStation support website, PS4 has strict requirements of MP4 files, only supports playing MP4 files encoded with H.264/MPEG-4 AVC High Profile (AAC LC):Video in MPEG-4 SP (Simple Profile) and audio in AAC LC (Low Complexity) format.Video in H.264/AVC HP (High Profile) and audio in AAC LC (Low Complexity) format.MPEG-2 TS format with video in H.264/AVC and audio in AAC LC (Low Complexity) format.While MP4 is a container video format which may contain various video or audio codec. If the MP4 video is not encoded with PS4 compatible codec, we will fail to stream MP4 to PS4 or cannot play MP4 on PS4 even if successfully transferred MP4 to PS4. In order to successfully play various MP4 files or other format files on PS4, a widely used solution is to convert videos to PS4 recognized formats. Here, we strongly recommend Pavtube Video Converter (Mac version) to help you convert videos to PS4 to solve “PS4 won’t play MP4” issue. More details are allowed here for you to take the advice:Step 1: Download and install the program. Click “Add video” on the main interface to load video files to the program. You can also drag the files to the program’s window list directly. This program can also support the batch video clips.Step 2: Select the right formats for playing on PS4. Here we suggest you to go to the “PSP/PS3” list, you will get the “PS3 Video (1080P) MPEG-4 (*.mp4)”as the best output.
 Step 3: In the “Settings” button, you can adjust video and audio settings, including codec, bit rate, frame rate, sample rate, and audio channel.Step 4: With all the preparations work done? Why not go back to the main interface to click the “Convert” button to get the work started?Conclusion: Once the conversion is finished, click “Open” to quickly find the converted files. Then, PS4 will recognize, catalog, play and stream them just fine. Insert USB Drive into USB port, turn PS4 on and then go to the main menu, select “Video” and find your USB Drive, select “Display All” to see the video files that exists on your PS4, please choose the file that you want to transfer and press the triangle button, choose “Copy” and confirm the transferring, the movies are transferred to your PS4 hard drive, and then you can play MP4 movies on PS4 from USB Drive.Further Reading:
Summary: In order to save your local space and enjoy your videos whenever and wherever you want, stream your files to NAS is a good choice. If you have a NAS device, you probably would like to stream TiVo to NAS via Xbox.
 TiVos are great for time-shifting TV shows, but can place-shift them as well! Sometimes you may want to transfer the TiVo recordings to computer, send them to your iPod, iPad, PSP or archive them to DVD, build up your video library.As we know, TiVo is a popular home setup box for recording favorite TV drama programs and movies for later playback. And you can transfer the TV recordings to your personal computer by using the TiVo Desktop Software application. The only problem with the TiVo files is that they are not always compatible with other multi-media programs and editing software you may want to use.As soon as we are talking about the Xbox, most people may think of the exciting video games, right? Frankly speaking, except for playing and enjoying games, Xbox has another function of streaming TiVo to NAS for playback. To stream videos like TiVo to NAS, you should first check whether your media files are supported by Xbox. Even though it is said that Microsoft are working on increasing the number of supported formats, some formats still cannot be recognized.Part 1: How to stream the supported video formats for Xbox?It’s rather simple to stream Xbox supported video formats. All you have to do is some settings to get the job done. Make sure your Xbox and computer are in the same network. Then access the “Setting” menu on your Xbox. From there, find the “Preferences” option and make sure “Play To” is enabled. These steps will allow your console to have multimedia pushed from any PC.
 Part 2. Stream videos to Xbox with Plex Media Server.With the lasted update to Xbox, you can now use a new app called Media Player to work with your Plex Media Server perfectly and stream all the video you have set up with it. To do it: Open Apps and Games from your Start screen. Then from the Apps menu, open Media Player.
 After a few seconds, your Plex Media Server will show up. Then select on your server and find the video you want to play. You should now be streaming your video from Mac to your Xbox.Tips: How to Store and Stream Movies with Plex for Beginners?Part 3. How to stream incompatible video formats like TiVo to Xbox for playback on NAS?From guide showed above, it is easy for us to stream the Xbox supported videos, but how could we deal with those unsupported ones? To solve the issues well, we here introduce the Pavtube Video Converter for you, which we all look it as the professional TiVo to Xbox converter to convert all different videos to supported formats. What’s more, the new H.265/HEVC codec is also available. If you are Mac users, Pavtube Video Converter for Mac is also available. Brief conversion guide is allowed below:Step 1: Download and install the corresponding program. Press “Options” button. Switch to “TiVo” tab in Option window and enter TiVo Media Access Key.
 Tips: How to find your Media Access Key on TiVo? Go to “TiVo Central”> “Messages and Set Up” “Account and System Information”, and your Media Access Key would be there.Step 2: Click “Add video” button to load TiVo files to the program. You can load several files at once thanks to “Add from folder” button. Or you can drag and drop TiVo files to the main interface directly.Step 3: Click “Format” bar and select “HD Video>>H.264 HD Video (*.mp4)” as best output format.
 Step 4: Press “Convert” button to convert TiVo to Xbox for playback on NAS.Conclusion: No matter for supported or unsupported video formats, if you have the idea to stream videos to NAS for playback via Xbox, this guide indeed can help you a lot. What are you waiting for?Further Reading:
Summary: Usually, iPad does import and play MP4 files. However, sometimes you will fail to transfer MP4 to iPad let alone to play MP4 on iPad, iPad2, iPad3, iPad4, iPad Mini, and iPad Air.
 First glance at Apple's new iPad Air:
The new iPad Air is unbelievably thin and light. And yet it’s so much more powerful and capable. With the A7 chip, advanced wireless, and great apps for productivity and creativity—all beautifully integrated with iOS 7—iPad Air lets you do more than you ever imagined. In more places than you ever imagined.
Why fail to put MP4 to iPad Air?
Now that the fifth-generation iPad offers us such an amazing visual feast, to have all your MP4 files played on iPad Air becomes necessary. However, you may fail to import MP4 to iPad Air sometimes. According to the iPad Air Tech Specs on Apple official website, The TV&Video supported video formats are H.264, MPEG-4 or Motion JPEG video format with the following specifications:
H.264 video up to 1080p, 60 frames per second, High Profile level 4.2 with AAC-LC audio up to 160 Kbps, 48kHz, stereo audio in .m4v, .mp4, and .mov file formats;
MPEG-4 video up to 2.5 Mbps, 640 by 480 pixels, 30 frames per second, Simple Profile with AAC-LC audio up to 160 Kbps per channel, 48kHz, stereo audio in .m4v, .mp4, and .mov file formats;
Motion JPEG (M-JPEG) up to 35 Mbps, 1280 by 720 pixels, 30 frames per second, audio in ulaw, PCM stereo audio in .avi file format.
If your MP4 videos are not meet the above technical specification, you will fail to transfer MP4 to iPad Air to play MP4 on iPad Air. That's why sometimes you play MP4 on iPad effortlessly, but sometimes can't.
How to play MP4 on iPad Air?
To play MP4 on iPad Air without any limitation, we highly recommend you to convert MP4 to iPad more popular formats with the powerful tool- Pavtube Video Converter (Mac version). To get the job done, this program is the ideal solution that provides an extremely easy but efficient MP4 to iPad Air conversion on Windows/Mac with super fast speed and zero quality loss. With the optimized preset for any generation of iPad, you can easily convert MP4 to iPad Air, as well as other generations of iPad, be it iPad Mini 2, iPad Mini, iPad 4, iPad 3 or iPad 2, in a fraction of seconds.
Other Download:
- Pavtube old official address: http://www.pavtube.com/video_converter/
- Amazon Download: http://download.cnet.com/Pavtube-Video-Converter/3000-2194_4-75734821.html
- Cnet Download: http://download.cnet.com/Pavtube-Video-Converter/3000-2194_4-75734821.html
A detailed guide is offered here for your information:
Step 1: Download and install the program. Click “Add video” on the main interface to load your MP4 files to the program. You can also drag the files to the program’s window list directly. This program can also support the batch video clips.
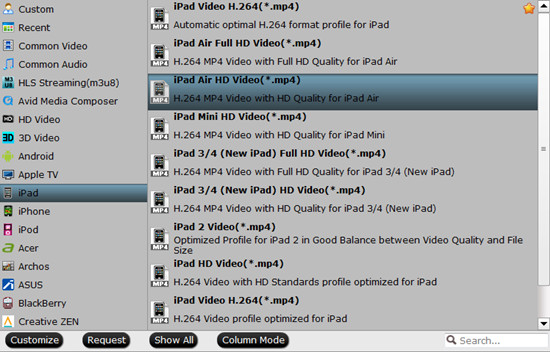
Step 2: Click the “Format” bar to get the drop-down menu and you can get “iPad”. Choose “iPad Air HD Video (*.mp4)” as best output format.
 Step 3: Click “Settings” button to customize the output video and audio settings by yourself. But if you are not good at it, you’d better use the default parameters, they will ensure you a good balance between file size and image quality basically. You can change the resolution, bit rate, frame rate as you need.
Step 4: Specify output folder on your computer to save the output files. Click the “Browse” button to choose the path where you want to save the output files in. Click “Convert” button to finish converting MP4 to iPad compatible format.
Conclusion: Connect iPad to computer, start iTunes, and then import the converted MP4 file to iTunes for sync and transfer MP4 to iPad. Wait no more, just get this powerful iPad Video Converter now!
Further Reading:
Step 3: Click “Settings” button to customize the output video and audio settings by yourself. But if you are not good at it, you’d better use the default parameters, they will ensure you a good balance between file size and image quality basically. You can change the resolution, bit rate, frame rate as you need.
Step 4: Specify output folder on your computer to save the output files. Click the “Browse” button to choose the path where you want to save the output files in. Click “Convert” button to finish converting MP4 to iPad compatible format.
Conclusion: Connect iPad to computer, start iTunes, and then import the converted MP4 file to iTunes for sync and transfer MP4 to iPad. Wait no more, just get this powerful iPad Video Converter now!
Further Reading: