Friday, July 11, 2014

Carry Around Your Entire DVD Movie Collection In Your Pocket with Wi-Drive 64GB/32GB

If you’re like me and have trunk filled with DVDs, you should consider ripping them for storage on Wi-Drive. Not only does this create DVD backups just in case the discs become damaged, but you can also move them onto your favorite devices iPad, iPhone with ease.

For example, lately I’ve been feeling very nostalgic for older episodes of The Simpsons. Over the weekend I set out to pack my Kingston Wi-Drive with Simpsons episodes of my DVD discs so that I could stream them to iPad for watching on vacation without sacrificing my internal storage.
ipad on vacation

Wi-Drive 32GB or 64GB is the best ultra-portable hard drive where you can store all your movies, then stream them to your iPhone or iPad using a simple Wi-Fi network the drive creates.

Why choose Wi-Drive?

First, They're easy to set-up, and all you need on your device is an app to access all your content.

Plus, most of these drives are small enough to fit in your pocket.

Also, with most of these Wi-Fi hard drives, a few people can watch movies streaming from them simultaneously. This means that you can have three kids in the backseat, each with an iPhone, watching the same movie on different screens (if you're so lucky).

Lastly, these gadgets have built in rechargeable batteries so even if you don't have a power outlet nearby, you'll have enough juice for a plane ride or car trip.

Have a ton of DVD movies? Here's how to bring them with you on Wi-Drive.
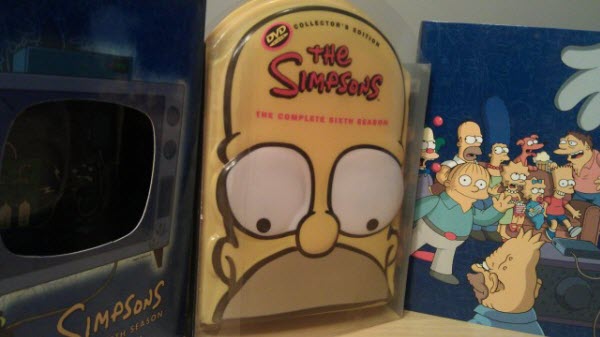
simpsons

To bring your DVDs on the go, you'll need a piece of free software called Pavtube Free DVDAid to iPad/iPhone/Wi-Drive supported mov format.

Here's how to use the super simple freeware.
Which Is the Best Free DVD Ripper for Mac to rip DVD movies free

Once you've converted your movies to about 1-2 GB per movie, you can either import them into iTunes and sync them to your device, or drag them onto a Wi-Fi hard drive like the ones we mentioned.

Depending on how many movies you have and whether you're using an iPhone (small screen) or iPad (large screen), you can alter compression settings in Handbrake to fit your needs and how many movies you want to bring around.

For example, if you plan to only watch on an iPhone, the quality of a movie compressed to 500 MB could be quite good, but it might look pixelated on an iPad.
In that case, carrying a whole stack of DVDs with Wi-Drive on vacation is as easy as a pie, and it's pretty nice to lug your entire collection with your iPad on the road.  

Note: If you want to transfer your DVD videos to other portable devices and media players for freely watching, you'd better get the updated DVDAid to rip DVD into MP4 format.

How to Use AirVideo to stream movies to your iPhone or iPad
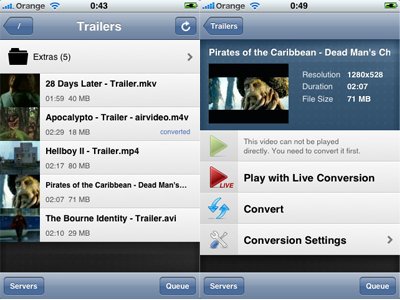
use airvideo to stream movies 

Use AirVideo for iPhone and iPad to stream movies from your home computer over Wi-Fi or over your cell network.

AirVideo won't play videos you've purchased on iTunes, but it will play everything else (it converts incompatible videos on the fly).

Price: $2.99

The comparison of Wi-Drive and its alternatives

1. The AirStash is wallet-friendly and fully featured
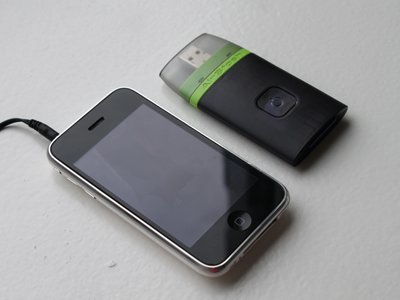
the airstash

The AirStash is ultra-light, only has one button, and lets you decide how much you want to spend on memory.

Th AirStash lets you slip in SD cards up to 32GB in size, which is killer, because you can pick how much memory you want to spend money on. If you have a bunch of SD cards lying around, you can bring tons of media with you.

AirStash has a companion app for accessing your media from an iPhone or iPad, and has great battery life too. Up to 8 people can view documents at the same time using the AirStash, and fewer for movies or music.

Also, since the AirStash has a SD card slot, traveling photographers can pop in their SD cards and view all their photos on the go.

Price: $99.99 (SD card not included)

2. The SeaGate GoFlex Satellite has the most storage, but isn't tiny

the seagate goflex satellite

Seagate

The GoFlex Satellite isn't small, but it holds tons more storage than some of the other portable solutions.

At 500GB, you can bring along hundreds of movies, but you'll sacrifice size and portability. The GoFlex Satellite has a good 5 hours of battery life, but apparently the software to use the device isn't as good.

Even if the software isn't great and directories are hard to navigate, the GoFlex uses the super fast USB 3.0 to transfer movies and other media.

Unlike the Wi-Drive, the GoFlex doesn't allow you to browse the internet over Wi-Fi while you're connect to the device.

Price: $199.99 (500GB)

3. The Kingston Wi-Drive is as big as an iPhone, but thinner.
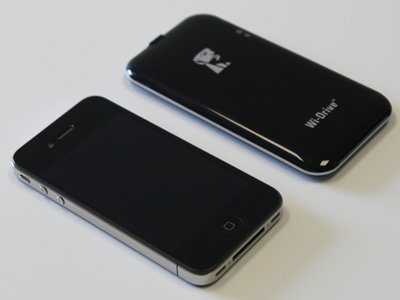
the kingston

The Kingston Wi-Drive is another flash drive to hold all your media. It comes in 16GB and 32GB varieties, with no expandable memory slots.

The Wi-Drive isn't as small as the AirStash, and you have to charge it with a bundled in USB cable (which means you're bringing one more thing around). Up to three people can use the Wi-Drive simultaneously.

Kingston built a decent app for the Wi-Drive which lets you access all your media, and one killer feature is that you can connect to the Wi-Drive via Wi-Fi, but also use the internet via Wi-Fi simultaneously because it has a pass-through data feature.

Price: 16GB ($149.99), 32GB ($199.99)

4. The Panasonic DY-PS10 has superb battery life
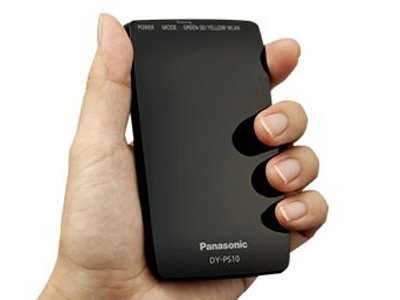
the panasonic dy ps10


The Panasonic Pocket Server is kind of like the AirStash, because it reads SD cards, and is kind of like the Wi-Drive, because it's palm-sized.

The device takes SD cards up to 64GB (the AirStash's max is 32GB) and has about 10 hours of battery life, but we don't know much more than that since it was just announced today.

Price: $191.00 (launching in Japan September 15th)

You'll also need...


adapter

Never have to worry about battery life again using a cigarette lighter adapter that will let you charge your Wi-Drive, AirStash, or GoFlex Satellite on the go.

Get an adapter with extra ports or a USB port (like this one) to also conserve battery life on your iPhone or iPad.

Price: $19.99
Thursday, July 10, 2014

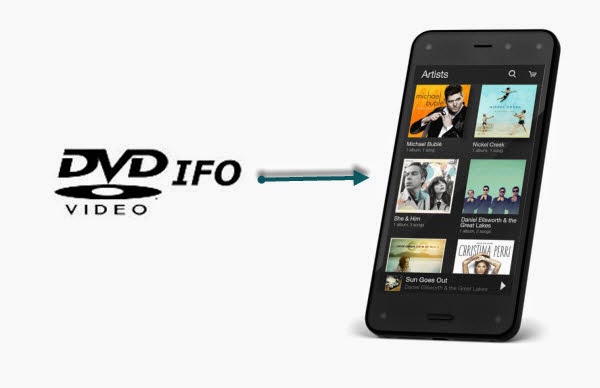
DVD IFO to Fire Phone Converter - Convert/Rip/Play DVD IFO to Amazon Fire Phone

I backed some of my DVD collections to local computer in IFO images already. And I want to move DVD IFO images from my computer to Amazon Fire Phone, which I plan to put into my shopping list. How to get it done?

Well, this article will share you the solution to convert/rip and play DVD IFO to Amazon Fire Phone.

Amazon doesn't just sell smartphones anymore — it makes one. In news that should surprise exactly no one, Jeff Bezos has officially unveiled Amazon's first cellphone, the Fire Phone. It'll be available July 25th with a 4.7-inch, 720p display, aluminum buttons, a Qualcomm processor, Adreno 330 graphics, and 2GB of RAM.

rip dvd ifo to fire phone

Well, here let's have a quick glance of Amazon Fire Phone video format list:

Amazon Fire Phone supported video format:

H.264/MPEG4/AVC, H.263, MPEG4, MPEG4 SP, HDCP2.x, AVI, VP8, PlayReady DRM

As above, I got know Amazon Fire Phone can fully support MP4 video, but not the DVD IFO files. In other words, if I want to play DVD IFO on Amazon Fire Phone, I need to convert them in advance. Now, I’ve a big success converting DVD IFO movies to Amazon Fire Phone optimized MP4 format by using Pavtube DVD to Amazon Fire Phone Converter.

This program is good at dealing with all kinds of DVD movies, like DVD discs, DVD ISO or IFO images files, etc to any common video format like MP4, AVI, WMV, FLV, MKV, VOB, MOV and more as you need. So, with this DVD Convert tool, it will be easy to rip DVD IFO to Amazon Fire Phone compatible formats, and then you can watch DVD IFO movies on Fire Phone as ease.

Easy Steps to rip DVD IFO to Amazon Fire Phone for watching

Free download DVDAid, or DVDAid for Mac

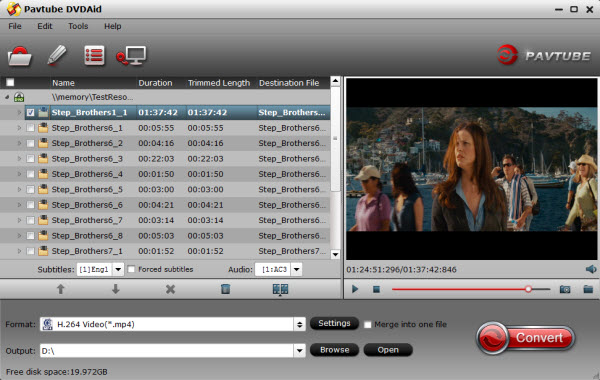
Step 1. Install this DVD IFO converter for Fire Phone on your computer. Run it and load your DVD IFO image file into it.

Rip DVD IFO to Amazon Fire Phone

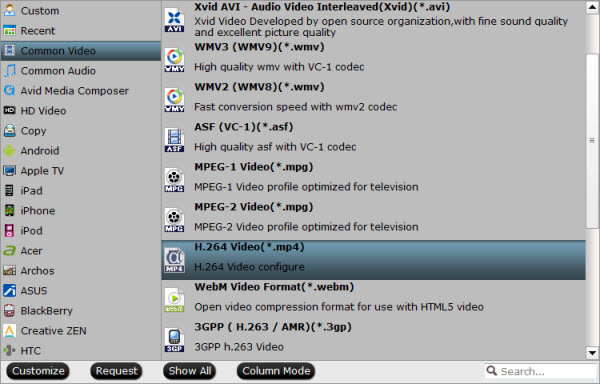
Step 2. Choose output profile for Amazon Fire Phone. Here I recommend you “Common Video > H.264 Video (*.mp4)” which works for playing on Amazon Fire Phone.

Amazon Fire Phone Format

Tips:

1. You may set subtitles and audio language for DVD IFO movies as well.

Select subtitle

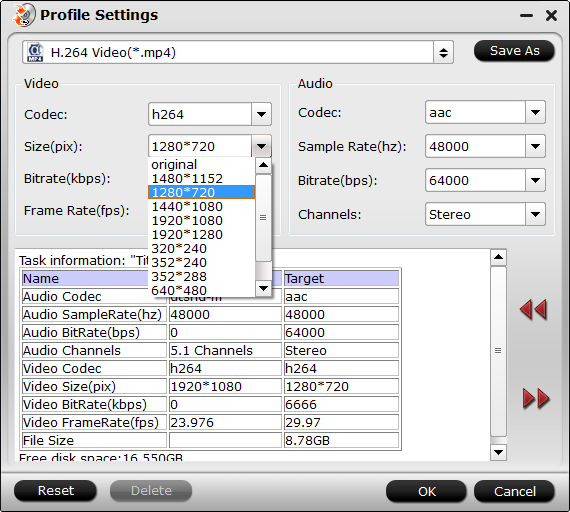
2. Click on Settings you could easily set bitrate, frame rate, codec, channels, sample rate, etc to adjust parameters that affect video quality and file size for the video you prefer. According to the resolution of Amazon Fire Phone, you can set size to 1280 *720.

fire phone format settings

Step 3. Hit Convert button to run this DVD IFO to Amazon Fire Phone conversion.

After transferring converted video file to Fire Phone, you can play DVD IFO on Amazon Fire Phone anywhere.

Thursday, July 3, 2014

Get 30% OFF BDMagic at 2014 Summer Holiday Biggest Promotion

Woo-hoo, after a long-term study, 2014 Summer Vacation begins! Havn't got any plans? If you are a frequent traveler or ready to prepare a travel this summer holiday by hiking, fishing, camping, or going to seaside with your kids, chances are they'll be clamoring to see some favorite movies when they aren't off at camp or jumping in the pool.


Now with 30% OFF Pavtube BDMagic, you can watch new released Blu-ray/DVD movie like Captain America: The Winter Soldier, Rio 2, The Amazing Spider-Man 2, etc. on your mobile devices on the go, wonderful experience!

Follow this link to enjoy 49% off and more FREE products~

https://www.facebook.com/pavtubefans/app_186981981345123

Expire on Jul. 15th.

It's never to later to make your choice!

More details here:

http://www.multipelife.com/summer-2014-deals

How to Get Freemake Subtitles Pack Key Serial License Code Free


Is it possible to get a Freemake Subtitles Pack serial key without paying? Want to activate Freemake Subtitles Pack? Now you can download the Freemake Alternative with powerful subtitles features.


What is Freemake Subtitles Pack?
 
Subtitles Pack is a set of advanced features for Freemake Video Converter to work with video subtitles. With it, you can freely have access to editing subtitle size, altering subtitle font, watching foreign movies with special symbols, Unicode and UTF subtitles and enjoying movies with subtitles to your movie and watch it on PC, TV, or any portable device: iPhone, iPad, Android, Xbox, PSP, cell phone.

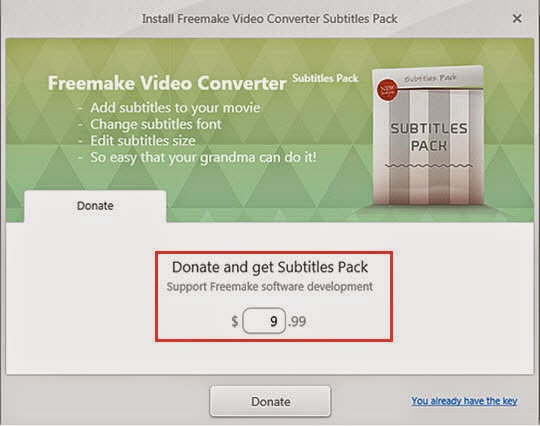
Get your Subtitles Pack right now! Edit subtitles for your movie easily. Watch movies with subtitles with pleasure! However, after I downloaded, it asked me to donate if I need to activate the Subtitles Pack function. Then how can I get a Freemake Subtitles Pack serial key free?

How to get Freemake Subtitles Pack? 

1. Download Freemake Video Converter here and run it. Then go to “Help” tab and click “Get Subtitles Pack” link. Enter any amount of money you are ready to donate for Freemake Subtitles Pack and click “Donate”. You’ll be forwarded to PayPal where you can pay using Visa, MasterCard, Discover, American Express or PayPal account.


2. Then we will send you an automatic email with an activation key for Freemake Subtitles Pack to the email address you provided in the payment data.

3. Copy the key from the email. Make sure you copied only the key without additional spaces.

4. Open Freemake Video Converter.

5. Go to Help-> Get Subtitles Pack-> Click “I already have a key”->Insert your key in a field->Click "OK". See the message that you've activated Subtitles Pack. That’s it. You can enjoy Subtitles Pack features now. 

How to Activate Freemake Subtitles Pack without a Key?

Is it possible to get Freemake Subtitles Pack key free or activate the subtitles pack of Freemake Video Converter without a key? The answer, directly, is no. However, there are always ways to find and get keys to active some other Freemake Alternative with powerful subtitle features!

Here recommend you : Pavtube Video Converter Ultimate- The best  Freemake Alternative
  • Integrate with BDMagic, DVDAid, and Video Converter.
  • Convert Blu-ray/DVD 3D/2D movies in batch to MP4, M4V, MOV, AVI, MKV, WMV, MPG, VOB, DV files with 3D/2D effects.
  • Support all Video files (MTS, TS, M2TS, M2T, MKV, MXF, AVI, VOB, MPG, M4V, WMV, FLV, VRO, EVO, M2V, 3GP, MOV) to to any file formats for palying, editing and sharing
  • Add *.srt, *.ass, or *.ssa subtitle files to BD/DVD movie or videos.
  • Directly copy the latest releases of Blu-ray/DVD movies in fast speed.
  • Help enjoy BD/DVD movies & camcorder videos on iOS/Android/Windows Tablets & Phones, and HD Media Players.


Now go to download, install and run Pavtube Video Converter Ultimate, and you’re allowed trying the trial version to test the functions firstly.

How to convert video embedded with SRT/ASS/SSA subtitle you need?

Step 1. Import your source files.

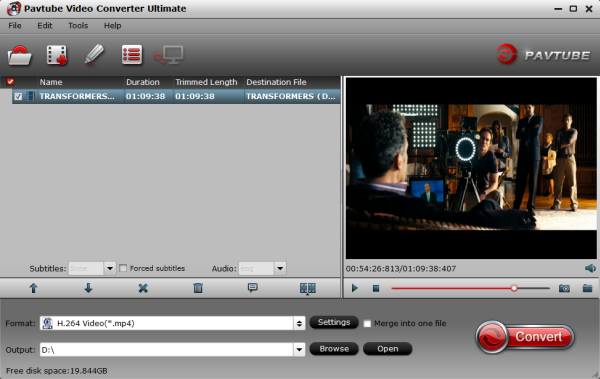
Click “Add Video” to load your videos files to Pavtube Video Converter Ultimate.


Step 2. Choose a suitable output format.

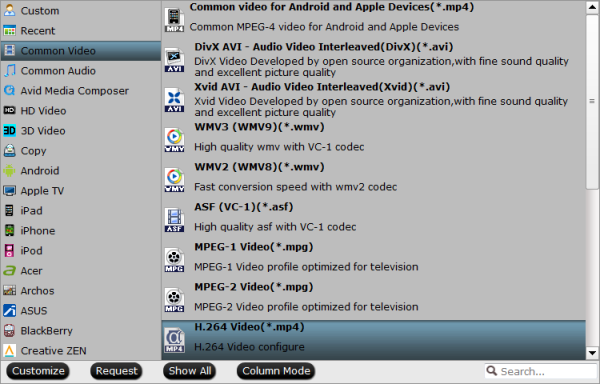
Choose a desired output format by clicking the “Format” option. Then, choose a video format (e.g. MP4 format) or device format (e.g. iPhone, iPod, iPad, Samsung, Asus, etc.) for playing.


Tip: To get your video with high quality and meet your own demand, you are allowed adjusting the video and audio parameters for output files including Codec, Bitrate, Size, Frame Rate and so on.

Step 3. Export video with subtitle you want.

Now, it’s time to save subtitle to converted video permanently.

First of all, you need to find your language subtitle from website. Though there is no 100% guarantees of availability, you still have great chances to get you desired language subtitle after an easy search on Google. Best subtitle file searching method: “movie title” + “your preferred language” + “subtitle” as the search strings. Here I share four free subtitle files download website:
More Subtitle Download Sites at here: Top 5 Subtitle Download Sites

Of course, you can also download the subtitle edit software, make a custom subtitle you need and different style through font, color, size, position, transparency, etc.

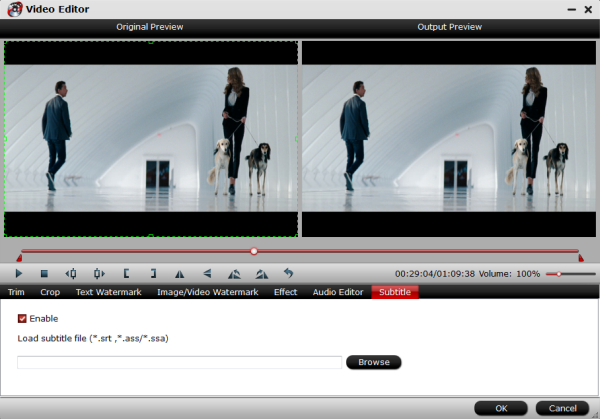
After getting subtitle files from internet, choose “Edit” button to launch the video editing window. Go to “Subtitle” tab, check “Enable”, then click “Browse” button to load an external subtitle files (.srt, .ssa or .ass). After the subtitle is loaded, click “OK” button to return to the primary window.


Tip: By click “Edit” button, you can also do some simple editor: Trim, Corp, Add Watemark, Add Special Effect, Deinterlacing, Audio Editor.

Step 4. Convert video embedded with subtitle you need.

Finally, click “Convert” button to start conversion. Then click “Open” button to find the generated MP4 files, the subtitle you need will be written permanently on the output video.

Tips: Acceleration will speed up the conversion and help to save time for you. You can find it under “Option”:


This Freemake alternative is an integrated software with easy-to-use interface. And it supports lots of input and output video formats, meanwhile, it is capable of ripping and converting DVD and Blu-ray disc embedded with srt/ass/ssa suntitle for playing. Let’s try this amazing software.

Read more:

MediaCoder Alternatives for Mac - Transcode any Video/Audio on Mac OS X
Why Is My MPEG Streamclip Not Working - Get Alternative MPEG Streamclip
No Found AnyDVD for Mac? Get a AnyDVD Mac replacement to Copy DVD on Mac
Rip HD/3D Blu-ray Movies with Forced Subtitles on Mac

Thursday, June 26, 2014

Copy Blu-ray disc to digital format and Burn to DVD for watching on Honda Pilot

This article mainly discusses about how to Copy Blu-ray to digital format for burning and watching on Honda Pilot. In this page, you will find the reason and tool you need to backup Blu-ray for burning, as well as how to do this.

With a new baby, the only time I can watch the movies is on my husband's Honda Pilot to work! The wonderful experience is that I would like rip the original Cars movie from Blu Ray to computer and burn them into DVD for playing. I'm looking for the way now.


Part I: Convert Blu-ray disc to digital format

In case Blu-ray discs get damaged or destroyed, it is a good choice to copy/rip Blu-ray in digital format. But how to convert Blu-ray to digital copy? To get the answer, just read on to learn how to make a digital copy of Blu-ray.

At first, Pavtube BDMagic is the tool you need  which can rip Blu-ray into a most common format which could be accepted by most of your devices with best quality. After many trials, I prefer to save them into MP4 format as it’s widely supported by my iPhone, iPad, Android tablet and Samsung Smart TV.  It is easy of use and after converting,you can freely enjoy your favourite Blu-rays without loading BD disc, isn’t it fantastic? Just have a try!

The Mac version is BDMagic for Mac.

How to convert Blu-ray to digital videos with Pavtube BDMagic

Step 1. Launch Pavtube BDMagic; import disc

Run the best Blu-ray Rippe and click this “Load Disc” icon to import your inserted Blu-ray Disc. Note that you shall keep Internet connected during this period.


Step 2. Choose format


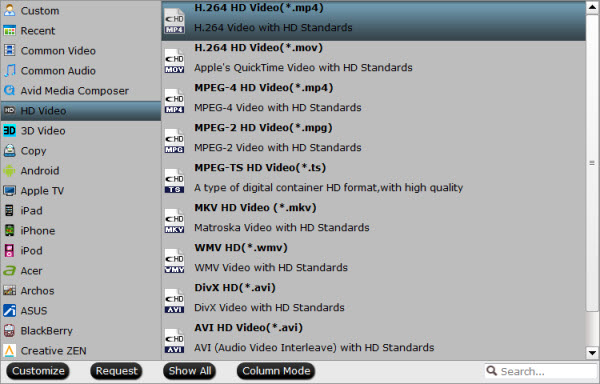
Hit “Format” drop-down list and choose “HD Video> H.264 HD Video(*.mp4)” as the most widely used format for playback on smartphones, tablets and HDTV, or choose the optimized preset for your device. If you want to play DVD with Windows Media Player, you can choose WMV as the output format.


Step 3. Adjust output settings (Optional)


You can click “Settings” (besides “Format”) to change target video size, bitrate, frame rate and other specs. Change the size to “Original” to get full size picture that can be playback on TV clearly. And the higher bitrate you choose, the better video quality will be.

Step 4. Star conversion

Back to the main interface and hit the “Convert” to start converting Blu-ray to HD MP4; this converter will start all the tasks in batch. Wait for a while till the conversion completed; click “Open output folder” to quick locate the converted files. Now start trasferring your Blu-ray movies for playback and sharing.

Part 2: Burn converted mp4 Videos to playable DVD video

Software Required:

Here I recommend using Pavtube DVD Creator which can help you to easily and fastly burn mp4 videos to DVD ISO/Disc for backup or DVD Player.

Breaking news: With Pavtube new site releasing, now we are offering some new money saving bundles. With either bundle package, not only can you save more money, you will get the most powerful combination from Pavtube to handle Blu-rays, DVDs, regular videos as well as DRM protected videos files at this Special Offer Page.

BDMagic($49) + DVD Creator($35) = Only $49.9, Save $28.1
BDMagic for Mac ($49) + DVD Creator for Mac ($35) = Only $49.9, Save $28.1

Now you can copy Blu-ray disc to digital format and burn to DVD for watching on Honda Pilot with this bundled software. Just try it!

Sunday, June 22, 2014

How to Play Blu-ray/DVD Movies on PS4

Have you ever wanted to watch a Blu-ray and DVD movie on PS4, but not want to lose any video quality? This article mainly tells you how.

Sony PS4 console a fantastic next-gen console with almost everything gamers are looking for: great graphical power, high storage capacity, high-resolution widescreen, HD and 4K support and more. Needless to say, it will be a great pleasant to enjoy videos/movies on this might-be-the-best game console. Spontaneously, users will have questions to ask, i.e, "Can I watch Blu-ray movies on PS4?" or "How to play a DVD on the PS4?".


As PlayStation 4 won't play Blu-rays or DVDs out of the box, customers have to install the software update when first getting it. If the PS4 is connected to the Internet, go to the function screen, select "Settings" -> "System Software Update", and update to the latest system software 1.50. In case the PS4 has no Internet connection for the time being, users can also use an external disc or USB storage to update the console system.

Until now, there are many issues of playing Blu-ray/DVD on PS4 from PlayStation4 Support. Maybe do some audio video setting could be on the cards to make BD/DVD playable on the Sony's new game console. But the complexity might be a lot more irritating.

So to play Blu-ray/DVD movies on PS4 with ease, what you need is a professional Blu-ray/DVD to PS4 Ripper- Pavtube BDMagic that can help you to remove the protection of Blu-ray/DVD and then convert to PS4 supported mp4 format with outstanding video quality. Moreover, you can choose the desired subtitle for output and select forced subtitles for some foreign languages. The mac version is BDMagic for Mac.

Read on the detailed guides below:

How to Play Blu-ray/DVD Movies on PS4

Note: Put Blu-ray onto Blu-ray drive before ripping Blu-rays.

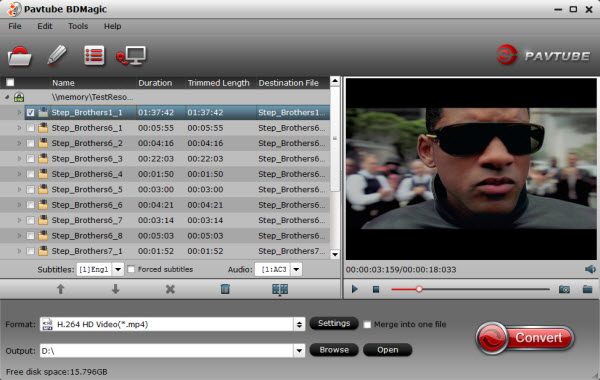
Step 1. Run the software and load Blu-ray.

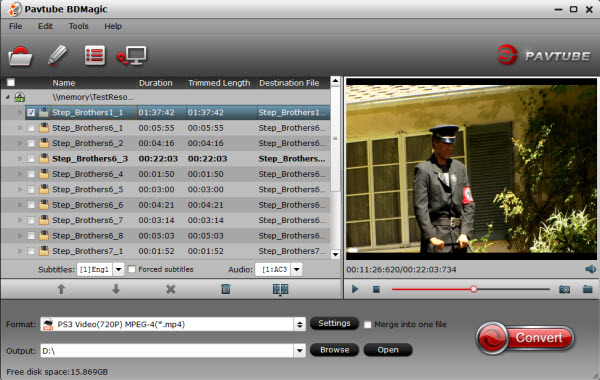
Click "Load file" button to import Blu-ray/DVD. The software will recognize the real main title of Blu-ray and pick it automatically. You do not need to look for the main title manually.

Click the selected main title you can preview the whole Blu-ray/DVD movies on the preview window on the right, which works like a media player.


Tips: You can check forced subtitles for output.

"Forced subtitle" is optional and uncheck by default. Go to check "Forced subtitles" for output.

Take note that it will output forced subtitles only if it is checked. And you can choose the desired subtitle and audio tracks in the "Subtitle" and "Audio" drop list.

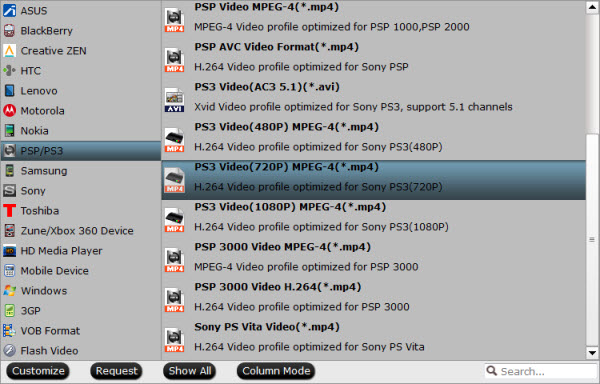
Step 2. Choose output format for PS4.

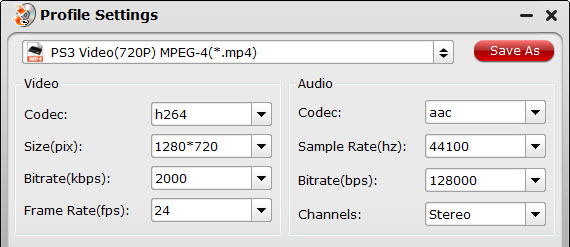
Choose PS4 supported formats in the "Format" dropdown list. You can go to "PSP/PS3" option to find what you like. Here "PS3 Video(720P) MPEG-4(*.mp4)" is better for wathing or streaming on PS4.


Tips: For some advances users, you can go to adjust video and audio parameters like bitrate, resolution, channels, etc. Click "Settings" button you can go to check and change them as you like.


Step 3. Convert Blu-ray to PS4

Before conversion you can go to "Browse" your computer to find the folder for output files. Then click "Convert" button to get conversion started. After a while, you can find the generated files quickly via "Open" button.

Now just copy and dump the converted video to PS4 via USB for convenient playback via PS4.

Tips:

If you simply want to back up Blu-ray to external hard drive, here are two solutions:

1. Click the "Copy the entire disc" icon on the top to output 1:1 Blu-ray/DVD file exactly the same as original.

2. Select "Copy>Directly Copy" in format list to output an intact m2ts file of the main title.

3. I used another Pavtube program called ByteCopy to backup my Blu-ray/DVD without quality loss. Meanwhile, several audio tracks and subtitles are preserved so I can switch language when watching movies.

Related Articles:


Tuesday, June 17, 2014

How-To: Rip DVD to Nexus 10 Tablet for Playback Smoothly via Pavtube DVDAid

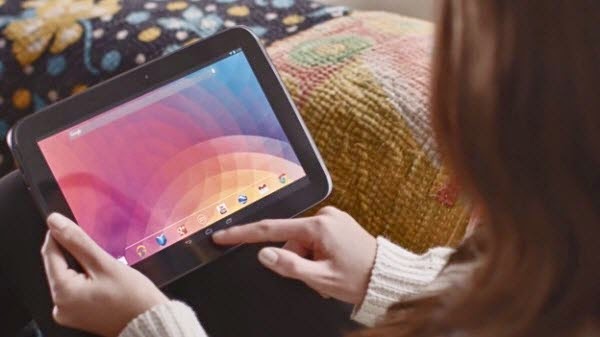
Simple guide for ripping and putting DVD movies (DVD ISO) onto Google Nexus 10 so that you can enjoy your favorite DVD movies on Nexus 10 anywhere. 


How to do the DVD to Nexus 10 ripping 

"Hello, I recently purchased a Nexus 10 and wanna back up my favorite DVD movies including some DVD ISO image files on it. It's really a nice tablet for video playback and I can find no guide to tell how to do the DVD to Nexus 10 ripping. What do you recommend if I'd love to put couple of DVD movies (DVD ISO) on my Nexus 10 tablet? Can anyone help?" 

Easier and more convenience than laptop or DVD player to be taken around, however, Nexus 10 is still not equipped with DVD drive while it has strict video formats limitations. Therefore, you may not be able to enjoy your favorite DVD movies (DVD ISO) on it. That seems a little pity. Here I will give you a relatively easy solution for ripping DVD (DVD ISO) to Nexus 10 tablet. 

Why You Need to Rip DVD Video to Nexus 10 

1. DVD Video is in VOB format and Nexus 10 cannot play it 
2. Many DVDs are protected 

That's why you need to pick up a DVD ripping software to assist you to remove DVD protections and put your precious DVD movies to Nexus 10 in case you have some long journeys and want to watch them in the airport waiting on your flight. 

Assistant for watching my DVD (DVD ISO) on Nexus 10 

The best program I can recommend for transferring DVD (DVD ISO) to Nexus 10 is Pavtube DVDAid which can be my assistant for watching my DVD (DVD ISO) on Nexus 10. I chose Pavtube because the interface was very clear and the whole process seemed very straight- forward. It does a great job in ripping my DVD movies no matter from DVD discs, DVD movie folders, or DVD IFO/ISO image files to a common video for my Nexus 10. Now just download it and follow the tutorial below to learn how to copy DVD movies (DVD ISO) to Nexus 10 with best video quality. 

To bring more convenience to all Nexus 10 users, I will make a brief share with all of you. 

Preparations for DVD to Nexus 10 Backup: 

1. DVD disc or DVD ISO files ready for backup
2. Pavtube DVDAid

How to Rip DVD (DVD ISO) for Nexus 10 

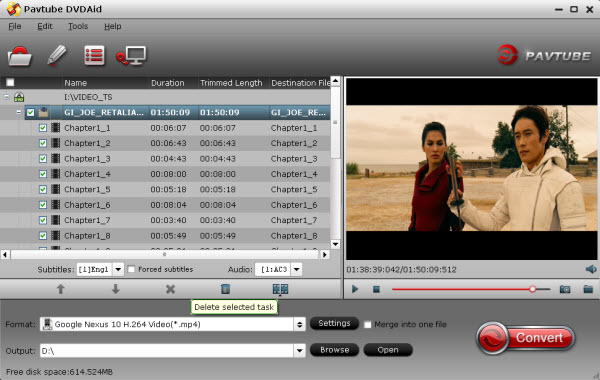
Step 1: Insert your DVD disc to computer's DVD-ROM and click Pavtube DVDAid to start to run the program. Import DVD movies. 


Note: ISO file and DVD folder can be added too. You can preview loaded movies on the right viewing window and take snapshots of your favorite scene

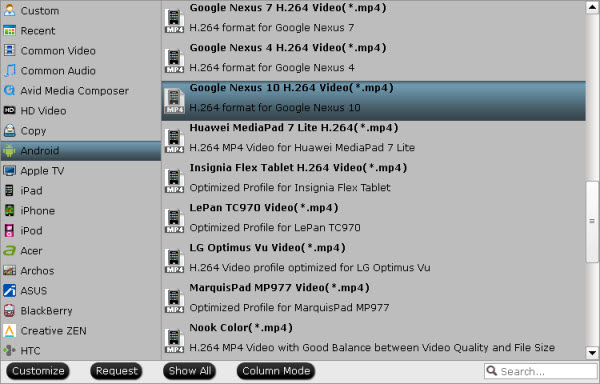
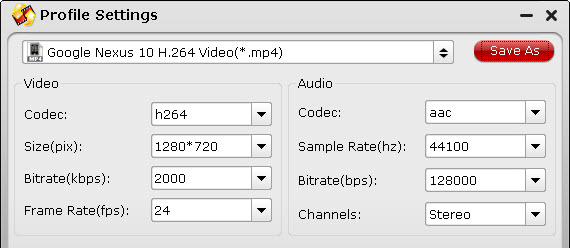
Step 2: Click the “Format” bar, and choose “Google Nexus 10 H.264 Video (*.mp4) under “Android” column to get compatible format for ripping DVD/DVD ISO to Google Nexus 10 acceptable videos.


Note: If you like, you can customize video and audio parameters to change aspect ratio, bit rate, frame rate, sample rate, and audio channel, etc. 


Step 3: Begin the DVD/DVD ISO to Nexus 10 ripping via pressing the button "Convert".

With step-by-step guide above, you can easily rip your DVD movies/DVD ISO to Nexus 10 with Pavtube DVDAid, which seems like a piece of cake even for fresh users. To get an excellent output quality at blazing speed with no difference compared to playing the discs themselves. 


In this way, you can successfully rip your favorite DVD (DVD ISO) to Nexus 10 for watching fast and easy. Enjoy!

(For Mac users, click to get Pavtube DVDAid for Mac)

Still have trouble about ripping DVD (DVD ISO) to Nexus 10? Please feel free to contact us now!
Read more: